ESP YAMAHA YZ85 2015 Owners Manual
[x] Cancel search | Manufacturer: YAMAHA, Model Year: 2015, Model line: YZ85, Model: YAMAHA YZ85 2015Pages: 88, PDF Size: 2.07 MB
Page 12 of 88
LOCATION OF IMPORTANT LABELS
1-2
1For Cana
da
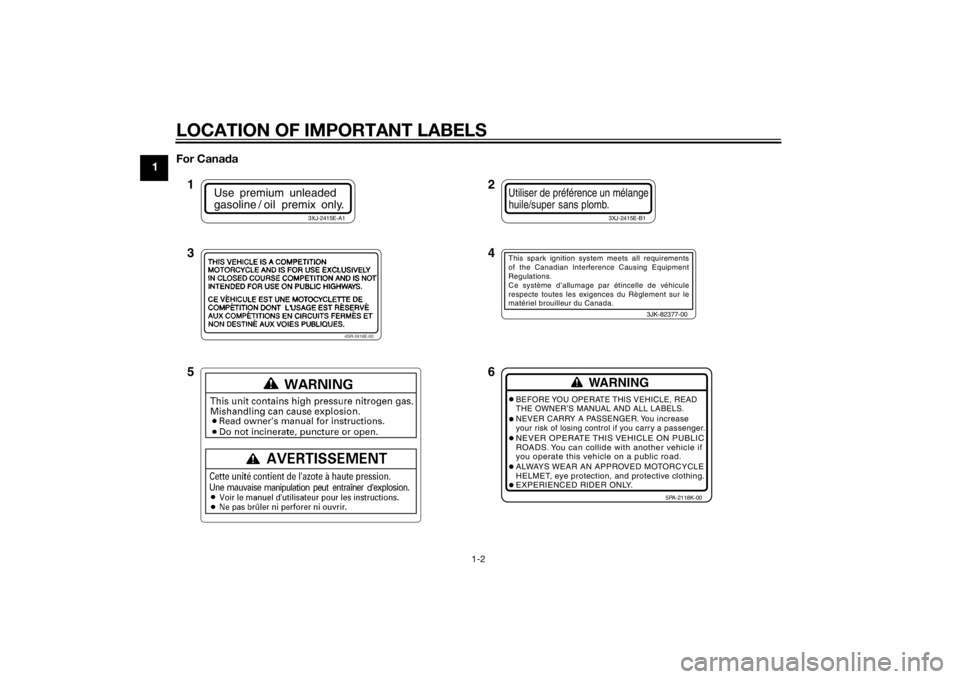
Use premium unleaded
gasoline / oil premix only.
3XJ-2415E-A1
Utiliser de préférence un mélangehuile/super sans plomb.
3XJ-2415E-B1
4SR-2416E-00
3JK-82377-00
This spark ignition system meets all requirements
of the Canadian Interference Causing Equipment
Regulations.
Ce système d’allumage par étincelle de véhicule
respecte toutes les exigences du Règlement sur le
matériel brouilleur du Canada.
WARNING
BEFORE YOU OPERATE THIS VEHICLE, READ
THE OWNER’S MANUAL AND ALL LABELS.
NEVER CARRY A PASSENGER. You increase
your risk of losing control if you carry a passenger.NEVER OPERATE THIS VEHICLE ON PUBLIC
ROADS. You can collide with another vehicle if
you operate this vehicle on a public road.ALWAYS WEAR AN APPROVED MOTORCYCLE
HELMET, eye protection, and protective clothing.
EXPERIENCED RIDER ONLY.
5PA-2118K-00
2
4
6
1
3
5
U1SN83E0.book Page 2 Monday, September 8, 2014 2:36 PM
Page 20 of 88

2-1
2
SAFETY INFORMATION
EAU41469
Be a Responsible Owner
As the vehicle’s owner, you are re-
sponsible for the safe and proper oper-
ation of your motorcycle.
Motorcycles are single-track vehicles.
Their safe use and operation are de-
pendent upon the use of proper riding
techniques as well as the expertise of
the operator. Every operator should
know the following requirements be-
fore riding this motorcycle.
He or she should: Obtain thorough instructions from
a competent source on all aspects
of motorcycle operation.
Observe the warnings and mainte-
nance requirements in this Own-
er’s Manual.
Obtain qualified training in safe
and proper riding techniques.
Obtain professional technical ser-
vice as indicated in this Owner’s
Manual and/or when made neces-
sary by mechanical conditions.
Never operate a motorcycle with-
out proper training or instruction.
Take a training course. Beginners
should receive training from a cer-
tified instructor. Contact an autho-
rized motorcycle dealer to find out
about the training courses nearest
you.
Safe Ri din g
Perform the pre-operation checks
each time you use the vehicle to make
sure it is in safe operating condition.
Failure to inspect or maintain the vehi-
cle properly increases the possibility of
an accident or equipment damage.
See page 5-1 for a list of pre-operation
checks. This motorcycle is designed for
off-road use only, therefore, it is il-
legal to operate it on public
streets, roads, or highways, even
a dirt or gravel one. Off-road use
on public lands may be illegal.
Please check local regulations be-
fore riding.
This motorcycle is designed to
carry the operator only. No pas-
sengers.
The failure of motorists to detect
and recognize motorcycles in traf-
fic is the predominating cause of
automobile/motorcycle accidents.
Many accidents have been
caused by an automobile driver
who did not see the motorcycle.
Making yourself conspicuous ap-
pears to be very effective in reduc-
ing the chance of this type of
accident.
Therefore:
• Wear a brightly colored jacket.
• Use extra caution when you are approaching and passing
through intersections, since in-
tersections are the most likely
places for motorcycle accidents
to occur.
• Ride where other motorists can see you. Avoid riding in another
motorist’s blind spot.
• Never maintain a motorcycle without proper knowledge.
Contact an authorized motorcy-
cle dealer to inform you on ba-
sic motorcycle maintenance.
Certain maintenance can only
be carried out by certified staff.U1SN83E0.book Page 1 Monday, September 8, 2014 2:36 PM
Page 22 of 88

SAFETY INFORMATION
2-3
2soning, leave the area immediately, get
fresh air, and SEEK MEDICAL TREAT-
MENT.
Do not run engine indoors. Even if
you try to ventilate engine exhaust
with fans or open windows and
doors, carbon monoxide can rap-
idly reach dangerous levels.
Do not run engine in poorly venti-
lated or partially enclosed areas
such as barns, garages, or car-
ports.
Do not run engine outdoors where
engine exhaust can be drawn into
a building through openings such
as windows and doors.
Genuine Yamaha Accessories
Choosing accessories for your vehicle
is an important decision. Genuine
Yamaha accessories, which are avail- able only from a Yamaha dealer, have
been designed, tested, and approved
by Yamaha for use on your vehicle.
Many companies with no connection
to Yamaha manufacture parts and ac-
cessories or offer other modifications
for Yamaha vehicles. Yamaha is not in
a position to test the products that these aftermarket companies produce.
Therefore, Yamaha can neither en-
dorse nor recommend the use of ac-
cessories not sold by Yamaha or
modifications not specifically recom-
mended by Yamaha, even if sold and
installed by a Yamaha dealer.
Aftermarket Parts, Accessories, an
d
Mo difications
While you may find aftermarket prod-
ucts similar in design and quality to
genuine Yamaha accessories, recog-
nize that some aftermarket accesso-
ries or modifications are not suitable
because of potential safety hazards to
you or others. Installing aftermarket
products or having other modifications
performed to your vehicle that change
any of the vehicle’s design or operation
characteristics can put you and others
at greater risk of serious injury or
death. You are responsible for injuries
related to changes in the vehicle.
Keep the following guidelines in mind,
as well as those provided under “Load-
ing” when mounting accessories.
Never install accessories that
would impair the performance of
your motorcycle. Carefully inspect
the accessory before using it to
make sure that it does not in any
way reduce ground clearance or
cornering clearance, limit suspen-
sion travel, steering travel or con-
trol operation.
• Accessories fitted to the han- dlebar or the front fork area can
create instability due to improp-
er weight distribution. If acces-
sories are added to the
handlebar or front fork area,
they must be as lightweight as
possible and should be kept to
a minimum.
• Bulky or large accessories may seriously affect the stability of
the motorcycle. Wind may at-
tempt to lift the motorcycle, or
the motorcycle may become
unstable in cross winds.
• Certain accessories can dis- place the operator from his or
her normal riding position. This
improper position limits the
freedom of movement of the
U1SN83E0.book Page 3 Monday, September 8, 2014 2:36 PM
Page 42 of 88
OPERATION AND IMPORTANT RIDING POINTS
6-1
6
EAU15952
Read the Owner’s Manual carefully to
become familiar with all controls. If
there is a control or function you do not
understand, ask your Yamaha dealer.
WARNING
EWA10272
Failure to familiarize yourself with
the controls can lead to loss of con-
trol, which coul d cause an acci dent
or injury.
EAU41308
Startin g an d warmin g up a
col d en gine1. Turn the fuel cock lever to “ON”.
2. Shift the transmission into the
neutral position.
3. Turn the starter (choke) on and completely close the throttle. (See
page 4-6.)
4. Start the engine by pushing the kickstarter lever down.
5. When the engine is warm, turn the starter (choke) off.TIPThe engine is warm when it responds
quickly to the throttle with the starter
(choke) turned off.NOTICE
ECA11043
For maximum en gine life, never ac-
celerate har d when the en gine is
col d!
EAU16661
Startin g a warm en gineFollow the same procedure as for
starting a cold engine with the excep-
tion that the starter (choke) is not re-
quired when the engine is warm.
Instead, start the engine with the throt-
tle slightly open.TIPIf the engine does not start after sever-
al kicks, try again with the throttle 1/4
to 1/2 open.
U1SN83E0.book Page 1 Monday, September 8, 2014 2:36 PM
Page 44 of 88
OPERATION AND IMPORTANT RIDING POINTS
6-3
6
EAU41505
Engine break-in
WARNING
EWA10322
Failure to properly maintain the vehi-
cle or performin g maintenance ac-
tivities incorrectly may increase
your risk of injury or death durin g
service or while usin g the vehicle. If
you are not familiar with vehicle ser-
vice, have a Yamaha d ealer perform
service.1. Before starting the engine, fill the fuel tank with a break-in oil-fuel
mixture as follows.
2. Start and warm up the engine. Check the operation of the con-
trols and the engine stop switch.
(See page 4-1.)
3. Operate the motorcycle in the lower gears at moderate throttle
openings for five to eight minutes.
Stop the engine and check the spark plug condition (see page
7-8); it will show a rich condition
during break-in.
4. Allow the engine to cool. Restart the engine and operate the motor-
cycle as in the step above for five
minutes. Then, very briefly shift to
the higher gears and check the
full-throttle response. Stop the en-
gine and check the spark plug.
5. After again allowing the engine to cool, restart and run the motorcy-
cle for five more minutes. Full
throttle and the higher gears may
be used, but sustained full-throttle
operation should be avoided.
Stop the engine and check the
spark plug again.
6. Allow the engine to cool, remove the cylinder head and cylinder,
and inspect the piston and cylin-
der. Remove any high spots on
the piston with #600-grit wet
sandpaper. Clean all components
and carefully reassemble the cyl-
inder head and cylinder.
7. Drain the break-in oil-fuel mixture from the fuel tank and refill with
the specified mix. (See page 4-3.) 8. Start the engine and check the op-
eration of the motorcycle through-
out its entire operating range.
Stop the engine and check the
spark plug condition. Restart the
motorcycle and ride it for about 10
to 15 more minutes. The motorcy-
cle will now be ready to ride nor-
mally.
After the engine break-in period, thor-
oughly check the motorcycle for loose
parts, oil leakage and any other prob-
lems. Be sure to inspect and make ad-
justments thoroughly, especially cable
and drive chain slack and loose
spokes. In addition, check all fittings
and fasteners for looseness, and tight-
en if necessary.
NOTICE
ECA15561
When any of the followin g parts
have been replaced , they must
b e broken in.
Cylin der or crankshaft:
A bout one hour of b reak-in op-
eration is necessary.
Piston, rin gs or transmission
g ears:
Recommen ded 2-stroke en gine oil:
See page 9-1.
Mixin g ratio ( gasoline to oil):
15:1
U1SN83E0.book Page 3 Monday, September 8, 2014 2:36 PM
Page 68 of 88
PERIODIC MAINTENANCE AND ADJUSTMENT
7-23
7loa
d the en gine as well as other
vital parts of the motorcycle an d
can lead to chain slippa ge or
b reakag e. To prevent this from
occurrin g, keep the drive chain
slack within the specifie d limits.
[ECA10572]
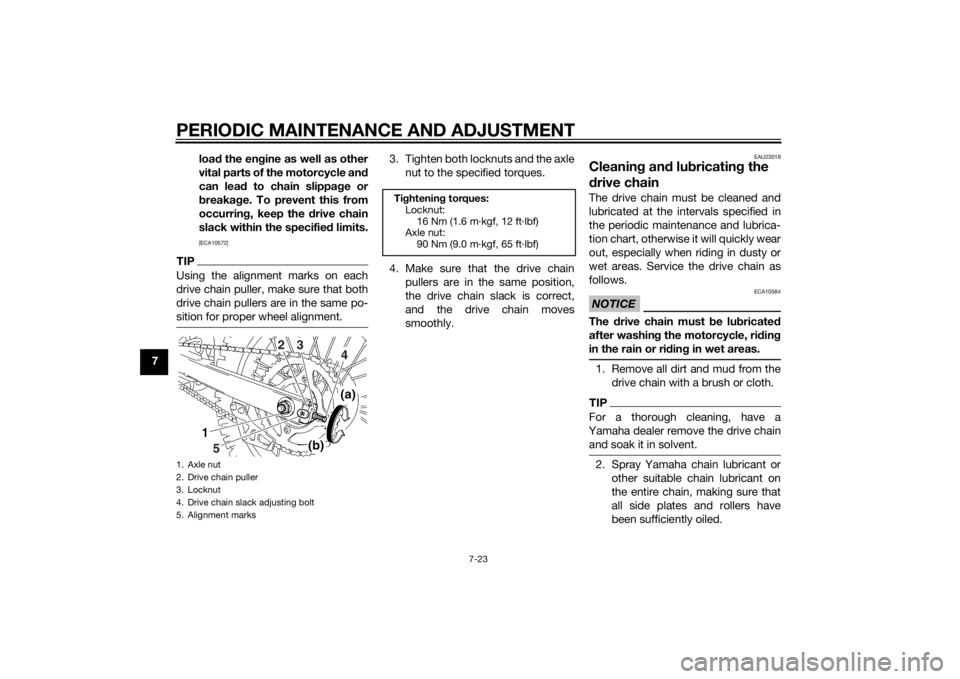
TIPUsing the alignment marks on each
drive chain puller, make sure that both
drive chain pullers are in the same po-
sition for proper wheel alignment.
3. Tighten both locknuts and the axle
nut to the specified torques.
4. Make sure that the drive chain pullers are in the same position,
the drive chain slack is correct,
and the drive chain moves
smoothly.
EAU23018
Cleanin g an d lu bricatin g the
d rive chainThe drive chain must be cleaned and
lubricated at the intervals specified in
the periodic maintenance and lubrica-
tion chart, otherwise it will quickly wear
out, especially when riding in dusty or
wet areas. Service the drive chain as
follows.NOTICE
ECA10584
The drive chain must be lu bricated
after washin g the motorcycle, ri din g
in the rain or ri din g in wet areas.1. Remove all dirt and mud from the
drive chain with a brush or cloth.TIPFor a thorough cleaning, have a
Yamaha dealer remove the drive chain and soak it in solvent.2. Spray Yamaha chain lubricant or other suitable chain lubricant on
the entire chain, making sure that
all side plates and rollers have
been sufficiently oiled.
1. Axle nut
2. Drive chain puller
3. Locknut
4. Drive chain slack adjusting bolt
5. Alignment marks
5 4
32
Ti
ghtenin g torques:
Locknut: 16 Nm (1.6 m·kgf, 12 ft·lbf)
Axle nut:
90 Nm (9.0 m·kgf, 65 ft·lbf)
U1SN83E0.book Page 23 Monday, September 8, 2014 2:36 PM
Page 79 of 88
MOTORCYCLE CARE AND STORAGE8-1
8
EAU37834
Matte color cautionNOTICE
ECA15193
Some models are equipped with
matte colored finished parts. Be
sure to consult a Yamaha dealer for
a d vice on what prod ucts to use be-
fore cleanin g the vehicle. Usin g a
b rush, harsh chemical pro ducts or
cleanin g compoun ds when cleanin g
these parts will scratch or damag e
their surface. Wax also shoul d not
b e applie d to any matte colored fin-
ishe d parts.
EAU41359
CareWhile the open design of a motorcycle
reveals the attractiveness of the tech-
nology, it also makes it more vulnera-
ble. Rust and corrosion can develop
even if high-quality components are
used. A rusty exhaust pipe may go un-
noticed on a car, however, it detracts
from the overall appearance of a mo-
torcycle. Frequent and proper care
does not only comply with the terms of
the warranty, but it will also keep your
motorcycle looking good, extend its
life and optimize its performance.
Before cleanin g
1. Cover the muffler outlet with a plastic bag after the engine has
cooled down.
2. Make sure that all caps and cov- ers as well as all electrical cou-
plers and connectors, including
the spark plug cap, are tightly in-
stalled.
3. Remove extremely stubborn dirt, like oil burnt onto the crankcase,
with a degreasing agent and a
brush, but never apply such prod- ucts onto seals, gaskets, sprock-
ets, the drive chain and wheel
axles. Always rinse the dirt and
degreaser off with water.
Cleanin g
NOTICE
ECA17692
Avoi d usin g stron g aci dic wheel
cleaners, especially on spoked
wheels. If such pro ducts are
use d on har d-to-remove dirt, do
not leave the cleaner on the af-
fected area any lon ger than in-
structed . Also, thorou ghly rinse
the area off with water, immed i-
ately dry it, an d then apply a cor-
rosion protection spray.
Improper cleanin g can d amage
plastic parts (such as cowlin gs,
panels, etc.) an d the mufflers.
Use only a soft, clean cloth or
spon ge with water to clean
plastic. However, if the plastic
parts cannot be thorou ghly
cleaned with water, dilute d mil d
d eter gent with water may be
use d. Be sure to rinse off any
U1SN83E0.book Page 1 Monday, September 8, 2014 2:36 PM