engine YAMAHA YZ85 2022 Owner's Manual
[x] Cancel search | Manufacturer: YAMAHA, Model Year: 2022, Model line: YZ85, Model: YAMAHA YZ85 2022Pages: 90, PDF Size: 2.63 MB
Page 60 of 90
Periodic maintenance an d a djustment
7-11
7 4. After the coolant is completely
drained, thoroughly flush the cool-
ing system with clean tap water.
5. Install the coolant drain bolt and its new gasket, and then tighten
the bolt to the specified torque.
6. Pour the recommended coolant into the radiator until it is full.
7. Install the radiator cap, start the engine, let it idle for several min-
utes, and then turn it off.
8. Remove the radiator cap to check the coolant level in the radiator. If
necessary, add sufficient coolant until it reaches the bottom of the
radiator filler neck, and then install
the radiator cap.
9. Start the engine, and then check the vehicle for coolant leakage. If
coolant is leaking, have a Yamaha
dealer check the cooling system.
EAU48394
Cleanin g the air filter elementThe air filter element should be cleaned
or replaced at the intervals specified in
the periodic maintenance and lubrica-
tion chart. Clean or, if necessary, re-
place the air filter element more
frequently if you are riding in unusually
wet or dusty areas.
1. Remove the seat. (See page 4-7.)
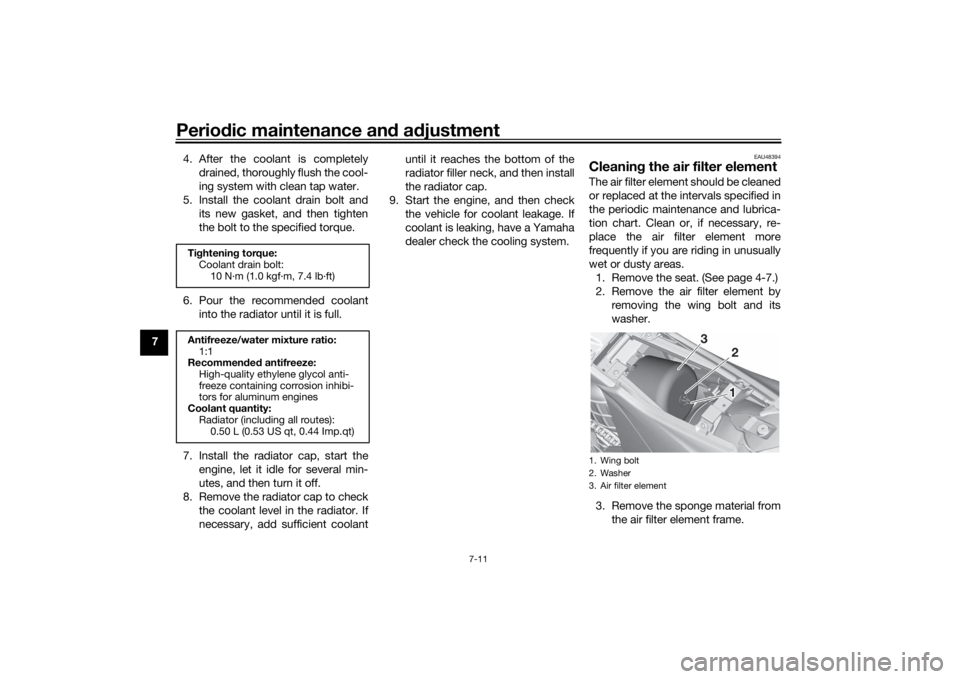
2. Remove the air filter element by removing the wing bolt and its
washer.
3. Remove the sponge material from the air filter element frame.
Tightenin g torque:
Coolant drain bolt: 10 N·m (1.0 kgf·m, 7.4 lb·ft)
Antifreeze/water mixture ratio: 1:1
Recommen ded antifreeze:
High-quality ethylene glycol anti-
freeze containing corrosion inhibi-
tors for aluminum engines
Coolant quantity: Radiator (including all routes):0.50 L (0.53 US qt, 0.44 Imp.qt)
1. Wing bolt
2. Washer
3. Air filter element
1 1
3 32
UB4B83E0.book Page 11 Thursday, September 9, 2021 8:47 AM
Page 62 of 90
Periodic maintenance an d a djustment
7-13
7
EAU42111
A djustin g the car buretorThe carburetor is an important part of
the engine and requires very sophisti-
cated adjustment. Therefore, most
carburetor adjustments should be left
to a Yamaha dealer, who has the nec-
essary professional knowledge and ex-
perience. The adjustment described in
the following section, however, may be
serviced by the owner as part of rou-
tine maintenance.NOTICE
ECA10551
The car buretor has been set an d ex-
tensively teste d at the Yamaha fac-
tory. Chang ing these settin gs
without sufficient technical knowl-
e dge may result in poor perfor-
mance of or d amage to the en gine.
EAU44391
A djustin g the eng ine idlin g
spee dThe engine idling speed must be ad-
justed when necessary.
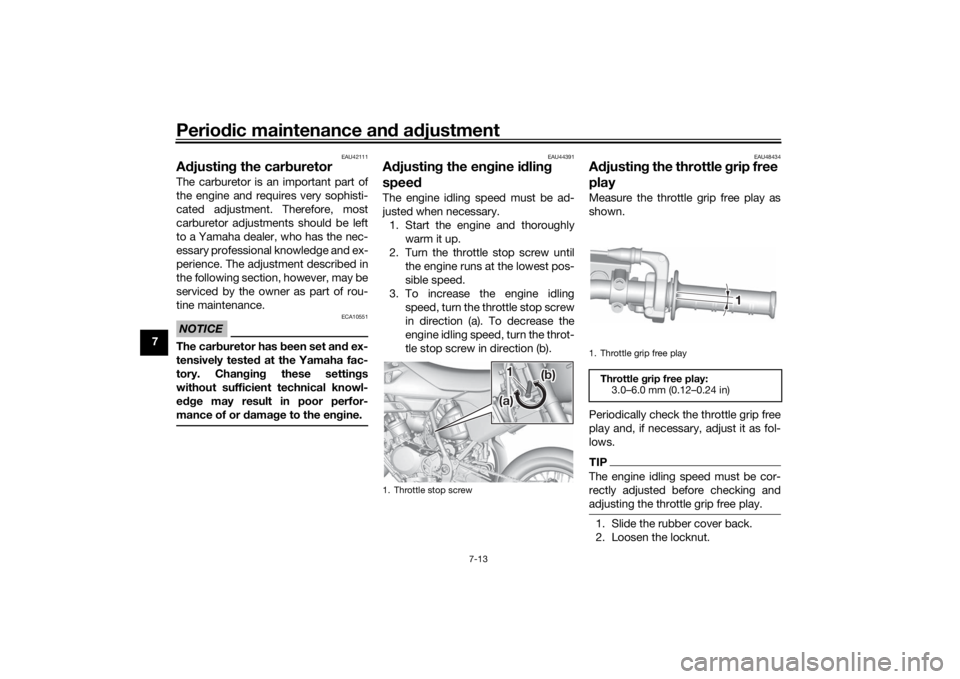
1. Start the engine and thoroughly warm it up.
2. Turn the throttle stop screw until the engine runs at the lowest pos-
sible speed.
3. To increase the engine idling speed, turn the throttle stop screw
in direction (a). To decrease the
engine idling speed, turn the throt-
tle stop screw in direction (b).
EAU48434
Adjustin g the throttle grip free
playMeasure the throttle grip free play as
shown.
Periodically check the throttle grip free
play and, if necessary, adjust it as fol-
lows.TIPThe engine idling speed must be cor-
rectly adjusted before checking and
adjusting the throttle grip free play.1. Slide the rubber cover back.
2. Loosen the locknut.
1. Throttle stop screw
11
(a)(a)
(b)(b)
(a) (b)
1. Throttle grip free playThrottle
grip free play:
3.0–6.0 mm (0.12–0.24 in)
11
UB4B83E0.book Page 13 Thursday, September 9, 2021 8:47 AM
Page 79 of 90
Periodic maintenance an d a djustment
7-30
7
EAU86370
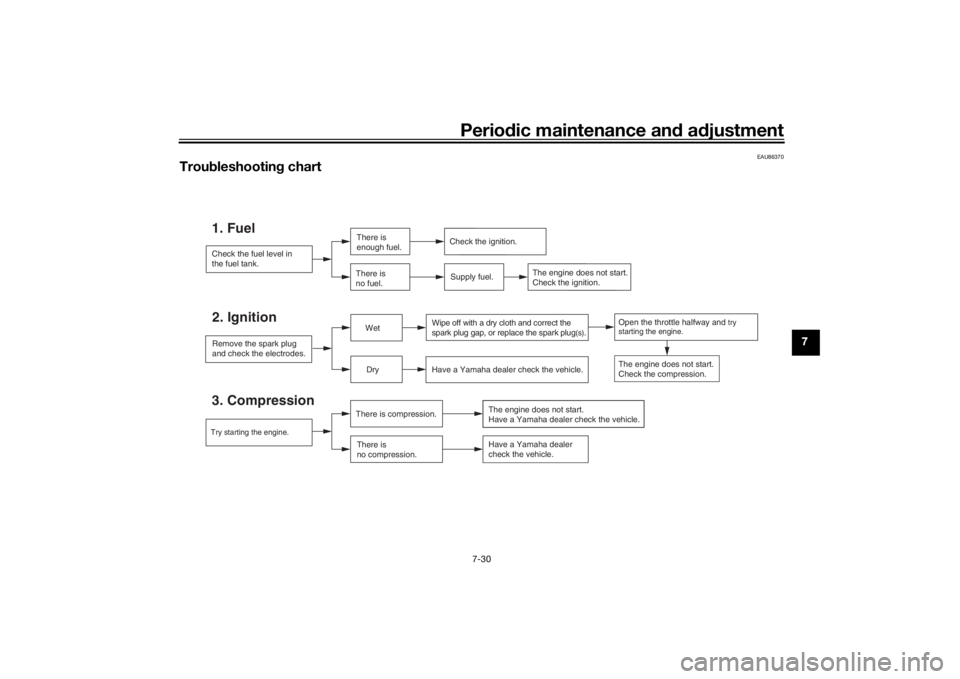
Trou bleshootin g chart
Check the fuel level in
the fuel tank.1. Fuel
There is
enough fuel.
There is
no fuel.
Supply fuel.Check the ignition.
The engine does not start.
Check the ignition.
Try starting the engine.3. Compression
There is compression.There is
no compression. The engine does not start.
Have a Yamaha dealer check the vehicle.
Have a Yamaha dealer
check the vehicle.
Remove the spark plug
and check the electrodes.2. Ignition
Wet
Dry Wipe off with a dry cloth and correct the
spark plug gap, or replace the spark plug
(s).
Have a Yamaha dealer check the vehicle. The engine does not start.
Check the compression.
Open the throttle halfway and
try
starting the engine.
UB4B83E0.book Page 30 Thursday, September 9, 2021 8:47 AM
Page 80 of 90
Periodic maintenance an d a djustment
7-31
7
EAU86420
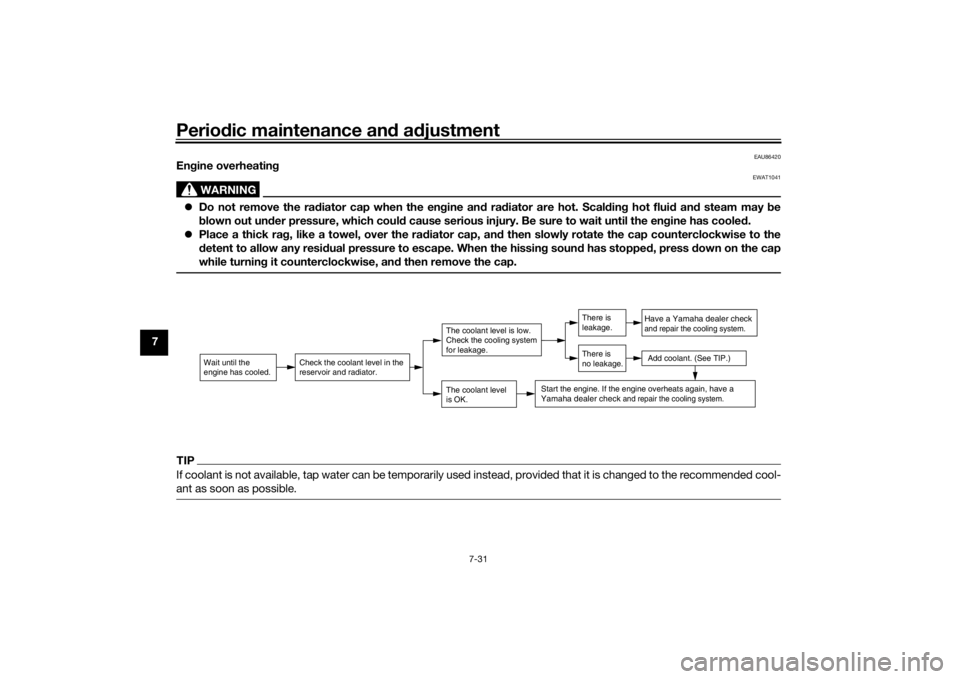
En gine overheatin g
WARNING
EWAT1041
Do not remove the ra diator cap when the en gine an d ra diator are hot. Scal din g hot flui d an d steam may be
b lown out un der pressure, which coul d cause serious injury. Be sure to wait until the en gine has coole d.
Place a thick ra g, like a towel, over the ra diator cap, an d then slowly rotate the cap counterclockwise to the
d etent to allow any resi dual pressure to escape. When the hissin g soun d has stoppe d, press d own on the cap
while turnin g it counterclockwise, an d then remove the cap.TIPIf coolant is not available, tap water can be temporarily used instead, provided that it is changed to the recommended cool-
ant as soon as possible.
Wait until the
engine has cooled.
Check the coolant level in the
reservoir and radiator.
The coolant level
is OK.The coolant level is low.
Check the cooling system
for leakage.
Have a Yamaha dealer checkand repair the cooling system.Add coolant. (See TIP.)
Start the engine. If the engine overheats again,
have a
Yamaha dealer check
and repair the cooling system.
There is
leakage.
There is
no leakage.
UB4B83E0.book Page 31 Thursday, September 9, 2021 8:47 AM
Page 83 of 90
![YAMAHA YZ85 2022 Owners Manual Motorcycle care and stora ge
8-3
8
will
become slippery, which
coul d cause loss of control.
Thorou ghly clean the surfaces
of these parts before operatin g
the vehicle.
[EWA20650]
5. Treat rubber, YAMAHA YZ85 2022 Owners Manual Motorcycle care and stora ge
8-3
8
will
become slippery, which
coul d cause loss of control.
Thorou ghly clean the surfaces
of these parts before operatin g
the vehicle.
[EWA20650]
5. Treat rubber,](/img/51/54017/w960_54017-82.png)
Motorcycle care and stora ge
8-3
8
will
become slippery, which
coul d cause loss of control.
Thorou ghly clean the surfaces
of these parts before operatin g
the vehicle.
[EWA20650]
5. Treat rubber, vinyl, and unpainted plastic parts with a suitable care
product.
6. Touch up minor paint damage caused by stones, etc.
7. Wax all painted surfaces using a non-abrasive wax or use a detail
spray for motorcycles.
8. When finished cleaning, start the engine and let it idle for several
minutes to help dry any remaining
moisture.
9. If the headlight lens has fogged up, start the engine and turn on
the headlight to help remove the
moisture.
10. Let the vehicle dry completely be- fore storing or covering it.NOTICE
ECA26320
Do not apply wax to ru bber or
unpainte d plastic parts.
Do not use a brasive polishin g
compoun ds as they will wear
away the paint.
Apply sprays an d wax sparin gly.
Wipe off excess afterwar ds.
WARNING
EWA20660
Contaminants left on the brakes or
tires can cause loss of control. Make sure there is no lu bricant
or wax on the brakes or tires.
If necessary, wash the tires with
warm water an d a mil d d eter-
g ent.
If necessary, clean the b rake
d iscs an d pad s with b rake
cleaner or acetone.
Before ri din g at hi gher spee ds,
test the vehicle’s brakin g per-
formance an d cornerin g b ehav-
ior.
EAU86460
Stora geAlways store the vehicle in a cool, dry
place. If necessary, protect it against
dust with a porous cover. Be sure the
engine and the exhaust system are
cool before covering the vehicle. If the
vehicle often sits for weeks at a time
between uses, the use of a quality fuel
stabilizer is recommended after each
fill-up.NOTICE
ECA21170
Storin g the vehicle in a poorly
ventilate d room or coverin g it
with a tarp, while it is still wet,
will allow water an d humi dity to
seep in an d cause rust.
To prevent corrosion, avoi d
d amp cellars, stab les (because
of the presence of ammonia)
an d areas where stron g chemi-
cals are stored .Long term stora ge
Before storing the vehicle long term (60
days or more):
UB4B83E0.book Page 3 Thursday, September 9, 2021 8:47 AM
Page 84 of 90

Motorcycle care and stora ge
8-4
8 1. Make all necessary repairs and
perform any outstanding mainte-
nance.
2. Follow all instructions in the Care Section of this chapter.
3. Fill up the fuel tank and add fuel stabilizer according to product in-
structions.
4. Run the engine for 5 minutes to distribute treated fuel through the
fuel system.
5. For vehicles with a fuel cock: Turn the fuel cock lever to the off posi-
tion.
6. For vehicles with a carburetor: To prevent fuel deposits from build-
ing up, drain the fuel in the carbu-
retor float chamber into a clean
container. Retighten the drain bolt
and pour the fuel back into the fuel
tank.
7. Use a quality engine fogging oil according to product instructions.
If engine fogging oil is not avail-
able, perform the following steps
for each cylinder:a. Remove the spark plug cap and spark plug. b. Pour a teaspoonful of engine
oil into the spark plug bore.
c. Install the spark plug cap onto the spark plug, and then place
the spark plug on the cylinder
head so that the electrodes are
grounded. (This will limit spark-
ing during the next step.)
d. Turn the engine over several times with the starter or kick-
starter. (This will coat the cylin-
der wall with oil.) WARNING!
To prevent d amage or injury
from sparkin g, make sure to
g roun d the spark plu g elec-
tro des while turning the en-
g ine over.
[EWA10952]
e. Remove the spark plug cap
from the spark plug, and then
install the spark plug and the
spark plug cap.
8. Lubricate all control cables, piv- ots, levers and pedals, as well as
the sidestand and centerstand (if
equipped).
9. Check and correct the tire air pressure, and then lift the vehicle
so that all wheels are off the
ground. If maintenance stands are not available, turn the wheels a lit-
tle once a month in order to pre-
vent the tires from becoming
degraded in one spot.
10. Cover the muffler outlet with a plastic bag to prevent moisture
from entering it.
11. For vehicles with a battery: Re- move and fully charge it, or attach
a maintenance charger. NOTICE:
Confirm that the battery an d its
char ger are compati ble. Do not
char ge a VRLA b attery with a
conventional char ger.
[ECA26330]
UB4B83E0.book Page 4 Thursday, September 9, 2021 8:47 AM
Page 85 of 90
Specifications
9-1
9
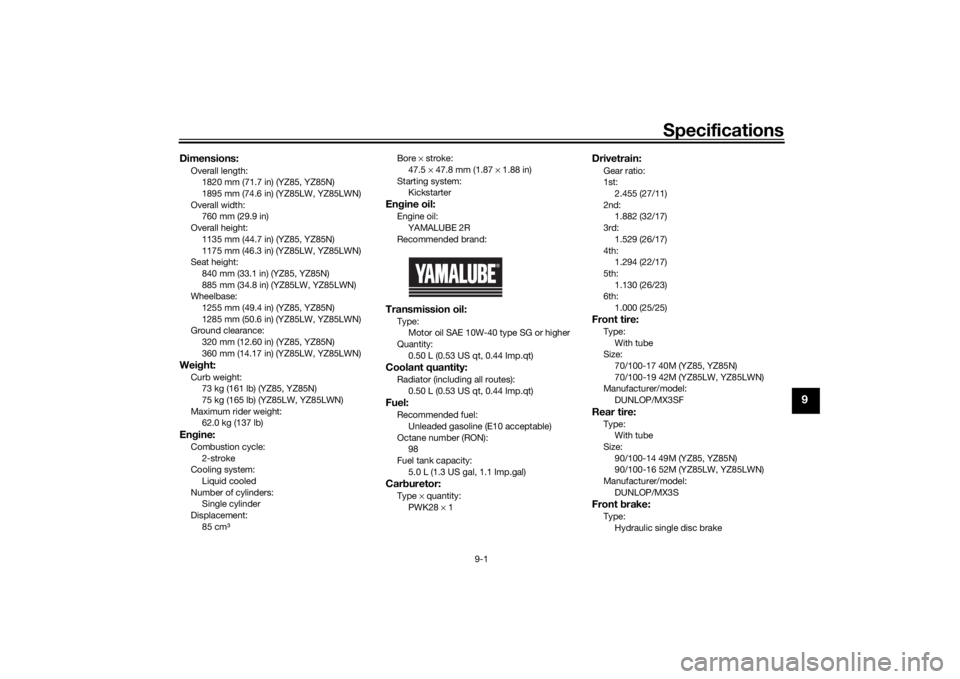
Dimensions:Overall length:1820 mm (71.7 in) (YZ85, YZ85N)
1895 mm (74.6 in) (YZ85LW, YZ85LWN)
Overall width: 760 mm (29.9 in)
Overall height:
1135 mm (44.7 in) (YZ85, YZ85N)
1175 mm (46.3 in) (YZ85LW, YZ85LWN)
Seat height:
840 mm (33.1 in) (YZ85, YZ85N)
885 mm (34.8 in) (YZ85LW, YZ85LWN)
Wheelbase:
1255 mm (49.4 in) (YZ85, YZ85N)
1285 mm (50.6 in) (YZ85LW, YZ85LWN)
Ground clearance:
320 mm (12.60 in) (YZ85, YZ85N)
360 mm (14.17 in) (YZ85LW, YZ85LWN)Wei ght:Curb weight:
73 kg (161 lb) (YZ85, YZ85N)
75 kg (165 lb) (YZ85LW, YZ85LWN)
Maximum rider weight: 62.0 kg (137 lb)Engine:Combustion cycle:
2-stroke
Cooling system: Liquid cooled
Number of cylinders: Single cylinder
Displacement:
85 cm³ Bore
× stroke:
47.5 × 47.8 mm (1.87 × 1.88 in)
Starting system: Kickstarter
Engine oil:Engine oil:
YAMALUBE 2R
Recommended brand:Transmission oil:Type: Motor oil SAE 10W-40 type SG or higher
Quantity:
0.50 L (0.53 US qt, 0.44 Imp.qt)Coolant quantity:Radiator (including all routes):0.50 L (0.53 US qt, 0.44 Imp.qt)Fuel:Recommended fuel:Unleaded gasoline (E10 acceptable)
Octane number (RON): 98
Fuel tank capacity:
5.0 L (1.3 US gal, 1.1 Imp.gal)Car buretor:Type × quantity:
PWK28 × 1
Drivetrain:Gear ratio:
1st:
2.455 (27/11)
2nd: 1.882 (32/17)
3rd:
1.529 (26/17)
4th: 1.294 (22/17)
5th: 1.130 (26/23)
6th:
1.000 (25/25)Front tire:Type:With tube
Size:
70/100-17 40M (YZ85, YZ85N)
70/100-19 42M (YZ85LW, YZ85LWN)
Manufacturer/model:
DUNLOP/MX3SFRear tire:Type: With tube
Size:
90/100-14 49M (YZ85, YZ85N)
90/100-16 52M (YZ85LW, YZ85LWN)
Manufacturer/model:
DUNLOP/MX3SFront brake:Type:
Hydraulic single disc brake
UB4B83E0.book Page 1 Thursday, September 9, 2021 8:47 AM
Page 87 of 90
Consumer information
10-1
10
EAU26366
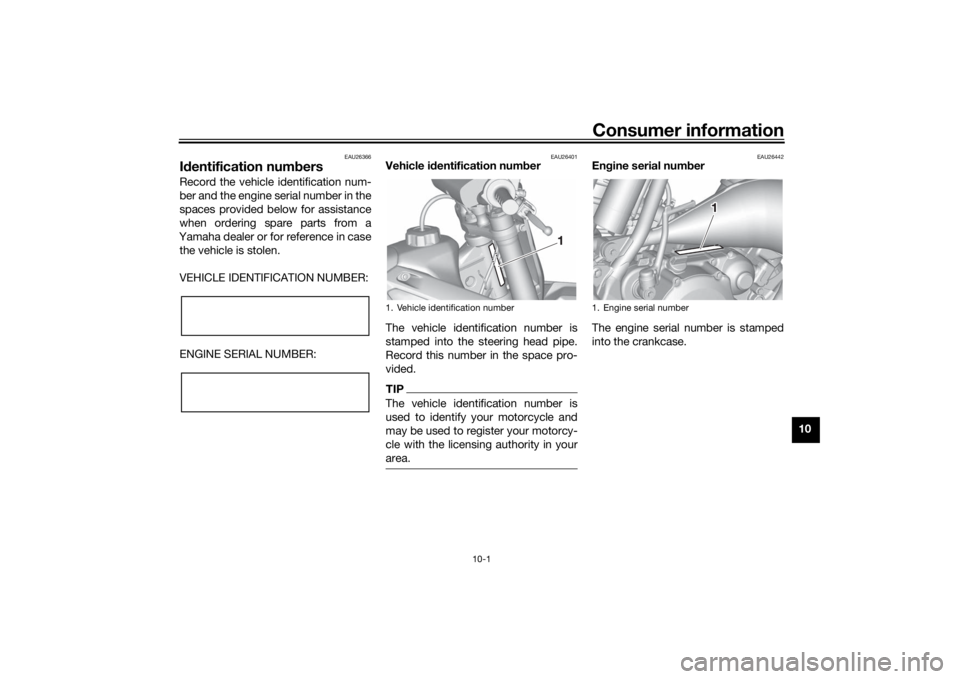
Id entification num bersRecord the vehicle identification num-
ber and the engine serial number in the
spaces provided below for assistance
when ordering spare parts from a
Yamaha dealer or for reference in case the vehicle is stolen.
VEHICLE IDENTIFICATION NUMBER:
ENGINE SERIAL NUMBER:
EAU26401
Vehicle i dentification num ber
The vehicle identification number is
stamped into the steering head pipe.
Record this number in the space pro-
vided.TIPThe vehicle identification number is
used to identify your motorcycle and
may be used to register your motorcy-
cle with the licensing authority in your
area.
EAU26442
En gine serial num ber
The engine serial number is stamped
into the crankcase.
1. Vehicle identification number
1
1. Engine serial number
1 1
UB4B83E0.book Page 1 Thursday, September 9, 2021 8:47 AM
Page 89 of 90

11-1
11
Index
AAir filter element, cleaning .................... 7-11BBrake and clutch levers, checking
and lubricating ................................... 7-23
Brake fluid, changing............................ 7-20
Brake fluid level, checking.................... 7-19
Brake lever.............................................. 4-2
Brake lever free play, checking ............ 7-17
Brake pedal ............................................ 4-3
Brake pedal, checking and lubricating........................................... 7-24CCables, checking and lubricating ......... 7-22
Carburetor, adjusting............................ 7-13
Care ........................................................ 8-1
Clutch lever............................................. 4-1
Clutch lever free play, adjusting ........... 7-16
Coolant ................................................... 7-9DDrive chain, cleaning and lubricating ... 7-22
Drive chain slack .................................. 7-20EEngine break-in ...................................... 6-1
Engine idling speed .............................. 7-13
Engine overheating ............................... 7-31
Engine serial number ............................ 10-1
Engine, starting a warm.......................... 6-3
Engine stop switch ................................. 4-1FFront and rear brake pads, checking ... 7-18
Front fork, adjusting ............................... 4-8
Front fork, bleeding .............................. 4-10
Front fork, checking ............................. 7-25 Fuel ........................................................ 4-3
Fuel cock................................................ 4-6
Fuel tank breather hose ......................... 4-6
Fuel tank cap.......................................... 4-3
HHandlebar switch ................................... 4-1IIdentification numbers ......................... 10-1KKickstarter .............................................. 4-7LLabels, location ...................................... 1-1MMatte color, caution ............................... 8-1PParking ................................................... 6-4
Part locations ......................................... 3-1
Periodic maintenance and lubrication
chart ..................................................... 7-2RRear suspension, lubricating................ 7-24SSafety defects, reporting (For CANADA customers) ......................... 10-2
Safety information .................................. 2-1
Seat ........................................................ 4-7
Shifting ................................................... 6-3
Shift pedal .............................................. 4-2
Shift pedal, checking ........................... 7-18
Shock absorber assembly, adjusting ... 4-11
Sidestand ............................................. 4-14
Spark plug, checking ............................. 7-7
Specifications......................................... 9-1
Starter (choke) knob............................... 4-7 Starting and warming up a cold
engine ................................................... 6-2
Steering, checking ................................ 7-25
Storage ................................................... 8-3
Supporting the motorcycle ................... 7-26
Swingarm pivots, lubricating ................ 7-24
TThrottle grip and cable, checking and lubricating ........................................... 7-23
Throttle grip free play, adjusting ........... 7-13
Tires ...................................................... 7-14
Transmission oil ...................................... 7-8
Troubleshooting .................................... 7-29
Troubleshooting chart........................... 7-30VVehicle identification number ............... 10-1WWheel bearings, checking .................... 7-26
Wheel (front).......................................... 7-26
Wheel (rear)........................................... 7-27
Wheels .................................................. 7-16YYPVS system ........................................ 4-14
UB4B83E0.book Page 1 Thursday, September 9, 2021 8:47 AM