brake fluid YAMAHA YZF-R1 2001 Owners Manual
[x] Cancel search | Manufacturer: YAMAHA, Model Year: 2001, Model line: YZF-R1, Model: YAMAHA YZF-R1 2001Pages: 116, PDF Size: 12.72 MB
Page 13 of 116
DESCRIPTION
2-2
2
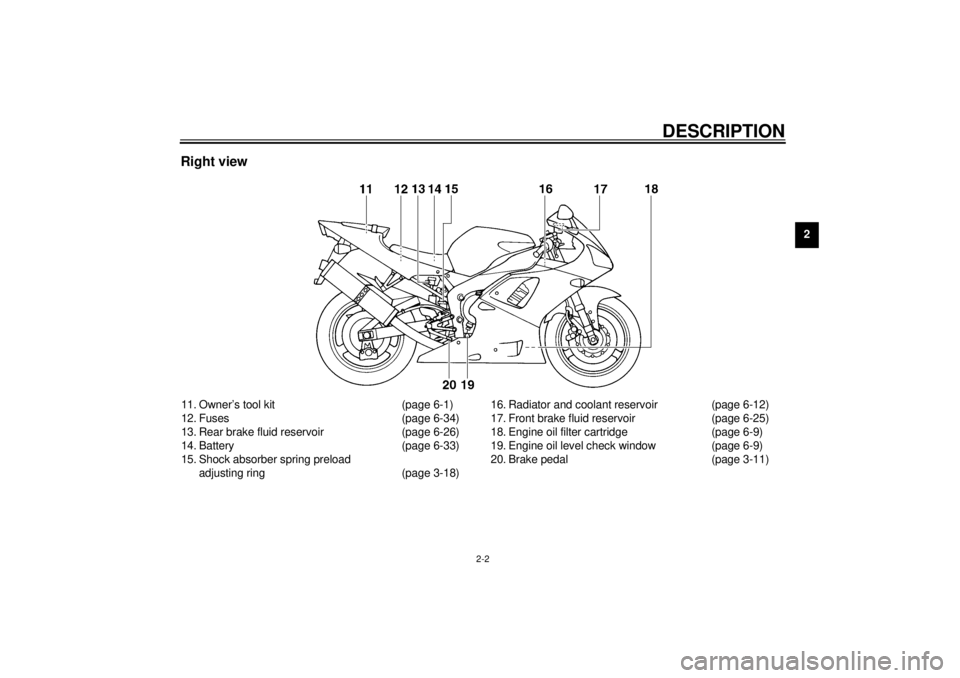
Right view11. Owner’s tool kit (page 6-1)
12. Fuses (page 6-34)
13. Rear brake fluid reservoir (page 6-26)
14. Battery (page 6-33)
15. Shock absorber spring preload
adjusting ring (page 3-18)16. Radiator and coolant reservoir (page 6-12)
17. Front brake fluid reservoir (page 6-25)
18. Engine oil filter cartridge (page 6-9)
19. Engine oil level check window (page 6-9)
20. Brake pedal (page 3-11)
E_5jj.book Page 2 Friday, September 8, 2000 3:33 PM
Page 42 of 116
4-1
4
EAU01114
4-PRE-OPERATION CHECKSThe condition of a vehicle is the owner’s responsibility. Vital components can start to deteriorate quickly and unexpectedly,
even if the vehicle remains unused (for example, as a result of exposure to the elements). Any damage, fluid leakage or loss
of tire air pressure could have serious consequences. Therefore, it is very important, in addition to a thorough visual inspec-
tion, to check the following points before each ride.
EAU03439
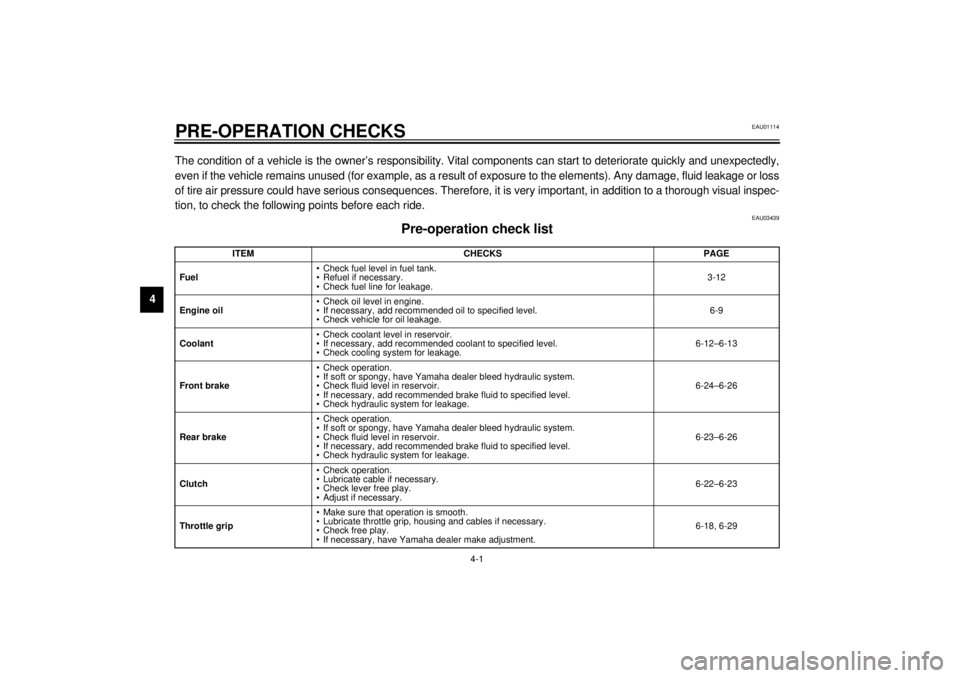
Pre-operation check list
ITEM CHECKS PAGE
Fuel• Check fuel level in fuel tank.
• Refuel if necessary.
• Check fuel line for leakage.3-12
Engine oil• Check oil level in engine.
• If necessary, add recommended oil to specified level.
• Check vehicle for oil leakage.6-9
Coolant• Check coolant level in reservoir.
• If necessary, add recommended coolant to specified level.
• Check cooling system for leakage.6-12–6-13
Front brake• Check operation.
• If soft or spongy, have Yamaha dealer bleed hydraulic system.
• Check fluid level in reservoir.
• If necessary, add recommended brake fluid to specified level.
• Check hydraulic system for leakage.6-24–6-26
Rear brake• Check operation.
• If soft or spongy, have Yamaha dealer bleed hydraulic system.
• Check fluid level in reservoir.
• If necessary, add recommended brake fluid to specified level.
• Check hydraulic system for leakage.6-23–6-26
Clutch• Check operation.
• Lubricate cable if necessary.
• Check lever free play.
• Adjust if necessary.6-22–6-23
Throttle grip• Make sure that operation is smooth.
• Lubricate throttle grip, housing and cables if necessary.
• Check free play.
• If necessary, have Yamaha dealer make adjustment.6-18, 6-29
E_5jj.book Page 1 Friday, September 8, 2000 3:33 PM
Page 51 of 116
6
PERIODIC MAINTENANCE AND MINOR REPAIR
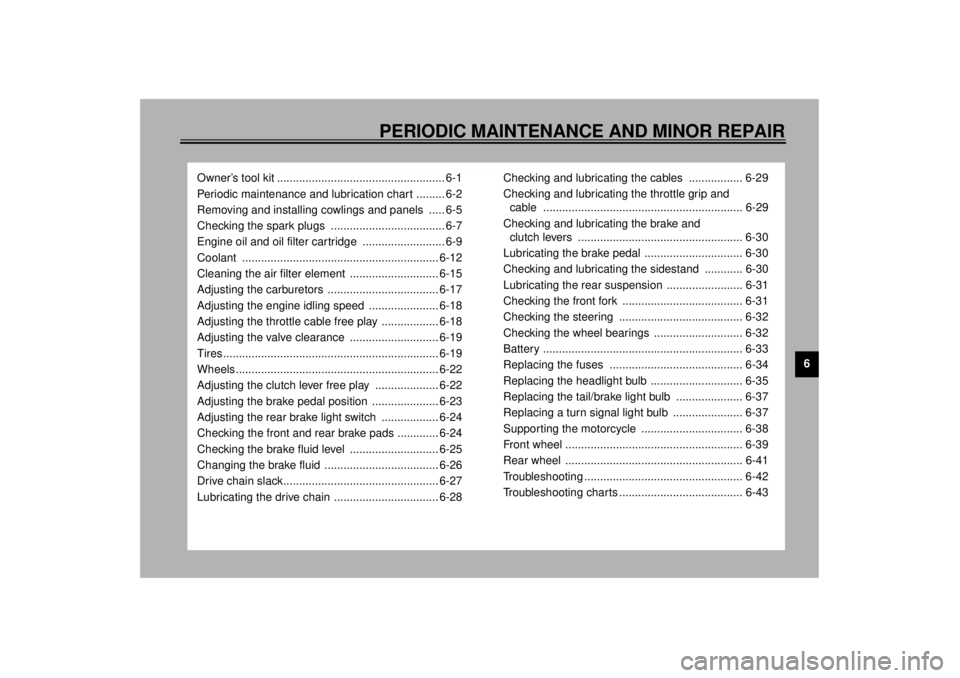
Owner’s tool kit ..................................................... 6-1
Periodic maintenance and lubrication chart ......... 6-2
Removing and installing cowlings and panels ..... 6-5
Checking the spark plugs .................................... 6-7
Engine oil and oil filter cartridge .......................... 6-9
Coolant .............................................................. 6-12
Cleaning the air filter element ............................ 6-15
Adjusting the carburetors ................................... 6-17
Adjusting the engine idling speed ...................... 6-18
Adjusting the throttle cable free play .................. 6-18
Adjusting the valve clearance ............................ 6-19
Tires .................................................................... 6-19
Wheels ................................................................ 6-22
Adjusting the clutch lever free play .................... 6-22
Adjusting the brake pedal position ..................... 6-23
Adjusting the rear brake light switch .................. 6-24
Checking the front and rear brake pads ............. 6-24
Checking the brake fluid level ............................ 6-25
Changing the brake fluid .................................... 6-26
Drive chain slack................................................. 6-27
Lubricating the drive chain ................................. 6-28Checking and lubricating the cables ................. 6-29
Checking and lubricating the throttle grip and
cable ............................................................... 6-29
Checking and lubricating the brake and
clutch levers .................................................... 6-30
Lubricating the brake pedal ............................... 6-30
Checking and lubricating the sidestand ............ 6-30
Lubricating the rear suspension ........................ 6-31
Checking the front fork ...................................... 6-31
Checking the steering ....................................... 6-32
Checking the wheel bearings ............................ 6-32
Battery ............................................................... 6-33
Replacing the fuses .......................................... 6-34
Replacing the headlight bulb ............................. 6-35
Replacing the tail/brake light bulb ..................... 6-37
Replacing a turn signal light bulb ...................... 6-37
Supporting the motorcycle ................................ 6-38
Front wheel ........................................................ 6-39
Rear wheel ........................................................ 6-41
Troubleshooting .................................................. 6-42
Troubleshooting charts ....................................... 6-43
E_5jj.book Page 1 Friday, September 8, 2000 3:33 PM
Page 53 of 116
PERIODIC MAINTENANCE AND MINOR REPAIR
6-2
6
EAU03540
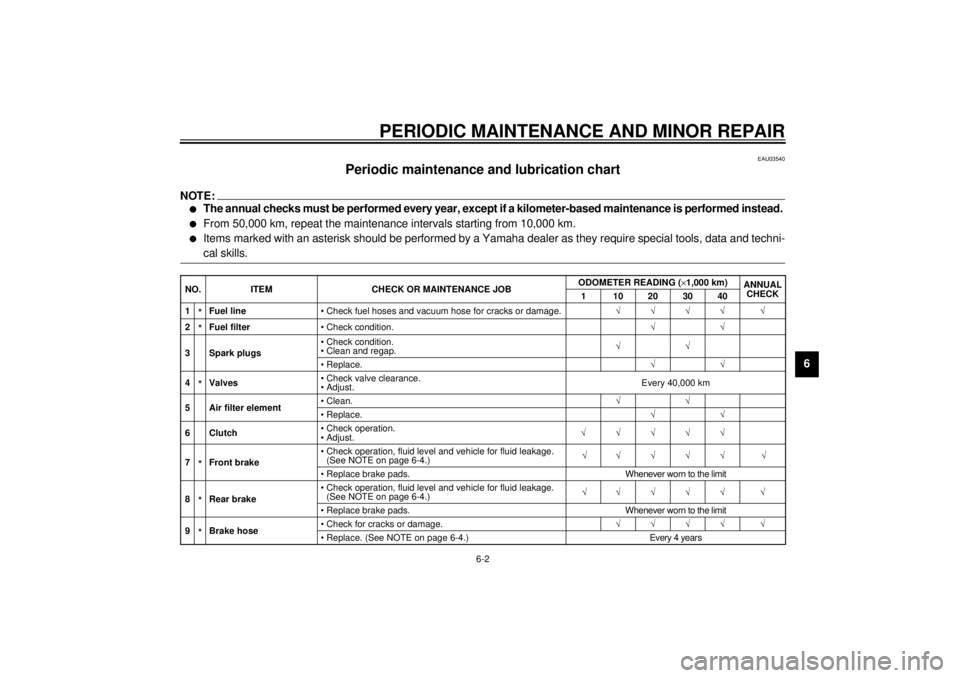
Periodic maintenance and lubrication chart
NOTE:@ l
The annual checks must be performed every year, except if a kilometer-based maintenance is performed instead.
l
From 50,000 km, repeat the maintenance intervals starting from 10,000 km.
l
Items marked with an asterisk should be performed by a Yamaha dealer as they require special tools, data and techni-
cal skills.
@CP-03ENO. ITEM CHECK OR MAINTENANCE JOBODOMETER READING (´1,000 km)
ANNUAL
CHECK
1 10203040
1
*Fuel line• Check fuel hoses and vacuum hose for cracks or damage.ÖÖÖÖ Ö
2*Fuel filter• Check condition.ÖÖ
3 Spark plugs• Check condition.
• Clean and regap.ÖÖ
• Replace.ÖÖ
4*Valves• Check valve clearance.
•Adjust.Every 40,000 km
5 Air filter element•Clean.ÖÖ
• Replace.ÖÖ
6Clutch• Check operation.
•Adjust.ÖÖÖÖÖ
7*Front brake• Check operation, fluid level and vehicle for fluid leakage.
(See NOTE on page 6-4.)ÖÖÖÖÖ Ö
• Replace brake pads. Whenever worn to the limit
8*Rear brake• Check operation, fluid level and vehicle for fluid leakage.
(See NOTE on page 6-4.)ÖÖÖÖÖ Ö
• Replace brake pads. Whenever worn to the limit
9*Brake hose• Check for cracks or damage.ÖÖÖÖ Ö
• Replace. (See NOTE on page 6-4.) Every 4 years
E_5jj.book Page 2 Friday, September 8, 2000 3:33 PM
Page 55 of 116
PERIODIC MAINTENANCE AND MINOR REPAIR
6-4
6
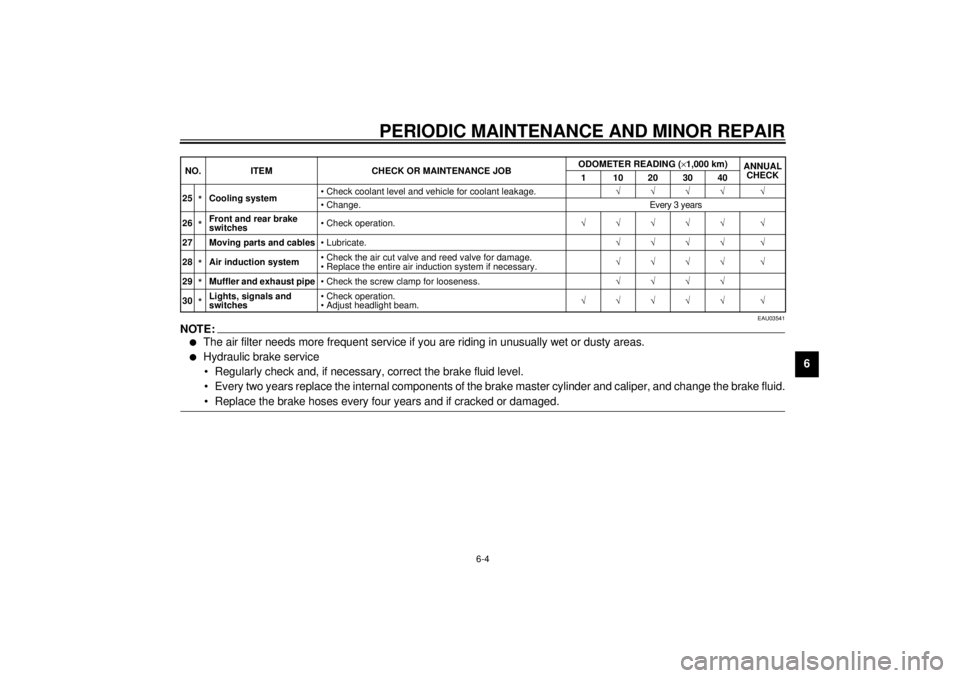
EAU03541
NOTE:@l
The air filter needs more frequent service if you are riding in unusually wet or dusty areas.
l
Hydraulic brake service
• Regularly check and, if necessary, correct the brake fluid level.
• Every two years replace the internal components of the brake master cylinder and caliper, and change the brake fluid.
• Replace the brake hoses every four years and if cracked or damaged.
@25
*Cooling system• Check coolant level and vehicle for coolant leakage.ÖÖÖÖ Ö
• Change. Every 3 years
26*Front and rear brake
switches• Check operation.ÖÖÖÖÖ Ö
27 Moving parts and cables• Lubricate.ÖÖÖÖ Ö
28*Air induction system• Check the air cut valve and reed valve for damage.
• Replace the entire air induction system if necessary.ÖÖÖÖ Ö
29*Muffler and exhaust pipe• Check the screw clamp for looseness.ÖÖÖÖ
30*Lights, signals and
switches• Check operation.
• Adjust headlight beam.ÖÖÖÖÖ Ö NO. ITEM CHECK OR MAINTENANCE JOBODOMETER READING (´1,000 km)
ANNUAL
CHECK
1 10203040
E_5jj.book Page 4 Friday, September 8, 2000 3:33 PM
Page 76 of 116
PERIODIC MAINTENANCE AND MINOR REPAIR
6-25
6
EAU01248
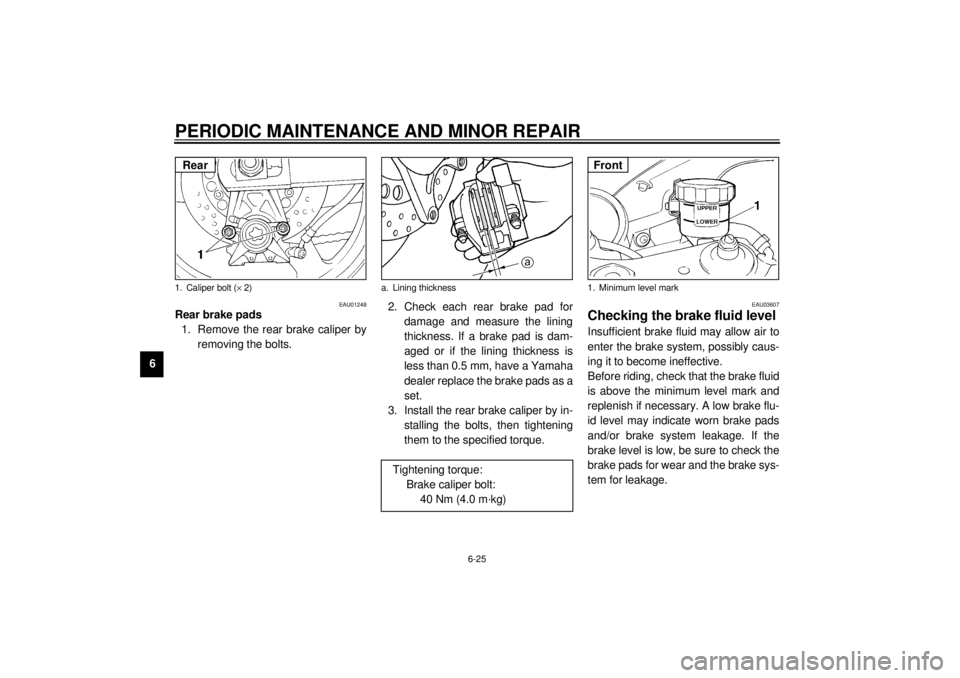
Rear brake pads
1. Remove the rear brake caliper by
removing the bolts.2. Check each rear brake pad for
damage and measure the lining
thickness. If a brake pad is dam-
aged or if the lining thickness is
less than 0.5 mm, have a Yamaha
dealer replace the brake pads as a
set.
3. Install the rear brake caliper by in-
stalling the bolts, then tightening
them to the specified torque.
EAU03607
Checking the brake fluid level Insufficient brake fluid may allow air to
enter the brake system, possibly caus-
ing it to become ineffective.
Before riding, check that the brake fluid
is above the minimum level mark and
replenish if necessary. A low brake flu-
id level may indicate worn brake pads
and/or brake system leakage. If the
brake level is low, be sure to check the
brake pads for wear and the brake sys-
tem for leakage.
1. Caliper bolt (´ 2)Rear
a. Lining thickness
Tightening torque:
Brake caliper bolt:
40 Nm (4.0 m·kg)
1. Minimum level markFront
E_5jj.book Page 25 Friday, September 8, 2000 3:33 PM
Page 77 of 116
PERIODIC MAINTENANCE AND MINOR REPAIR
6-26
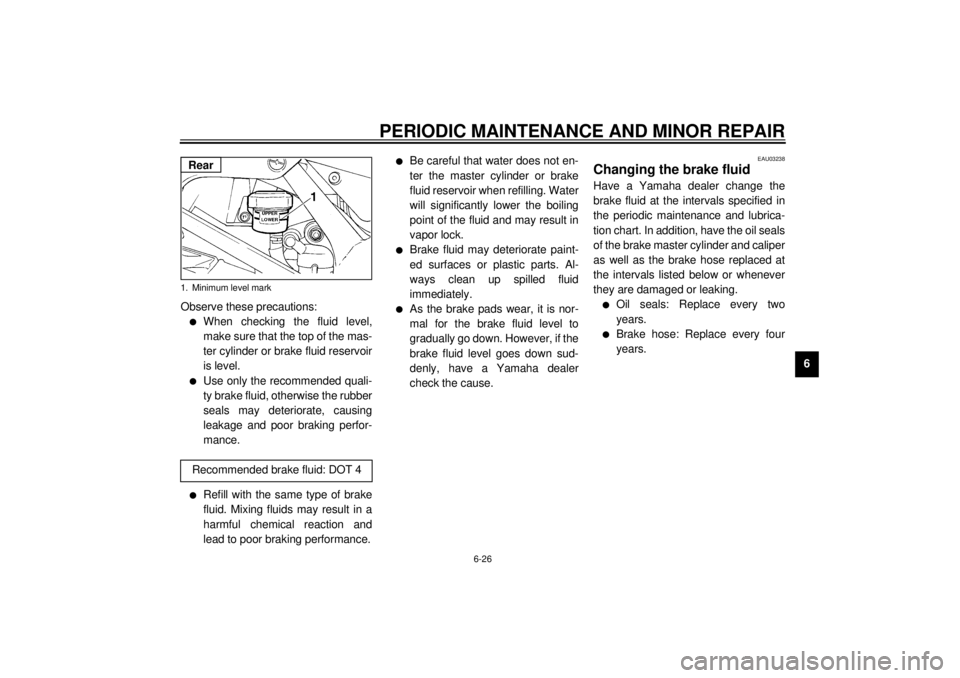
6 Observe these precautions:
l
When checking the fluid level,
make sure that the top of the mas-
ter cylinder or brake fluid reservoir
is level.
l
Use only the recommended quali-
ty brake fluid, otherwise the rubber
seals may deteriorate, causing
leakage and poor braking perfor-
mance.
l
Refill with the same type of brake
fluid. Mixing fluids may result in a
harmful chemical reaction and
lead to poor braking performance.
l
Be careful that water does not en-
ter the master cylinder or brake
fluid reservoir when refilling. Water
will significantly lower the boiling
point of the fluid and may result in
vapor lock.
l
Brake fluid may deteriorate paint-
ed surfaces or plastic parts. Al-
ways clean up spilled fluid
immediately.
l
As the brake pads wear, it is nor-
mal for the brake fluid level to
gradually go down. However, if the
brake fluid level goes down sud-
denly, have a Yamaha dealer
check the cause.
EAU03238
Changing the brake fluid Have a Yamaha dealer change the
brake fluid at the intervals specified in
the periodic maintenance and lubrica-
tion chart. In addition, have the oil seals
of the brake master cylinder and caliper
as well as the brake hose replaced at
the intervals listed below or whenever
they are damaged or leaking.l
Oil seals: Replace every two
years.
l
Brake hose: Replace every four
years.
1. Minimum level mark
Recommended brake fluid: DOT 4RearRear
E_5jj.book Page 26 Friday, September 8, 2000 3:33 PM
Page 99 of 116
MOTORCYCLE CARE AND STORAGE
7-2
7
l
Do not use any harsh chemical
products on plastic parts or the
muffler. Be sure to avoid using
cloths or sponges which have
been in contact with strong or
abrasive cleaning products, sol-
vent or thinner, fuel (gasoline),
rust removers or inhibitors,
brake fluid, antifreeze or
electrolyte.
l
Do not use high-pressure wash-
ers or steam-jet cleaners since
they cause water seepage and
deterioration in the following ar-
eas: seals (of wheel and swing-
arm bearings, fork and brakes),
storage compartments, electric
components (couplers, connec-
tors, instruments, switches and
lights), breather hoses and
vents.
l
For motorcycles equipped with
a windshield: Do not use strong
cleaners or hard sponges as
they will cause dulling or
scratching. Some cleaning
compounds for plastic may
leave scratches on the wind-
shield. Test the product on a
small hidden part of the wind-
shield to make sure that it does
not leave any marks. If the wind-
shield is scratched, use a quali-
ty plastic polishing compound
after washing.
@After normal useRemove dirt with warm water, a mild
detergent, and a soft, clean sponge,
and then rinse thoroughly with clean
water. Use a toothbrush or bottlebrush
for hard-to-reach areas. Stubborn dirt
and insects will come off more easily if
the area is covered with a wet cloth for
a few minutes before cleaning.After riding in the rain, near the sea or
on salt-sprayed roadsSince sea salt or salt sprayed on roads
during winter are extremely corrosive in
combination with water, carry out the
following steps after each ride in the
rain, near the sea or on salt-sprayed
roads.NOTE:@ Salt sprayed on roads in the winter may
remain well into spring. @1. Clean the motorcycle with cold
water and a mild detergent, after
the engine has cooled down.
ECA00012
CAUTION:@ Do not use warm water since it in-
creases the corrosive action of the
salt. @2. After drying the motorcycle, apply
a corrosion protection spray on all
metal, including chrome- and nick-
el-plated, surfaces (except the tita-
nium muffler) to prevent corrosion.
E_5jj.book Page 2 Friday, September 8, 2000 3:33 PM
Page 106 of 116
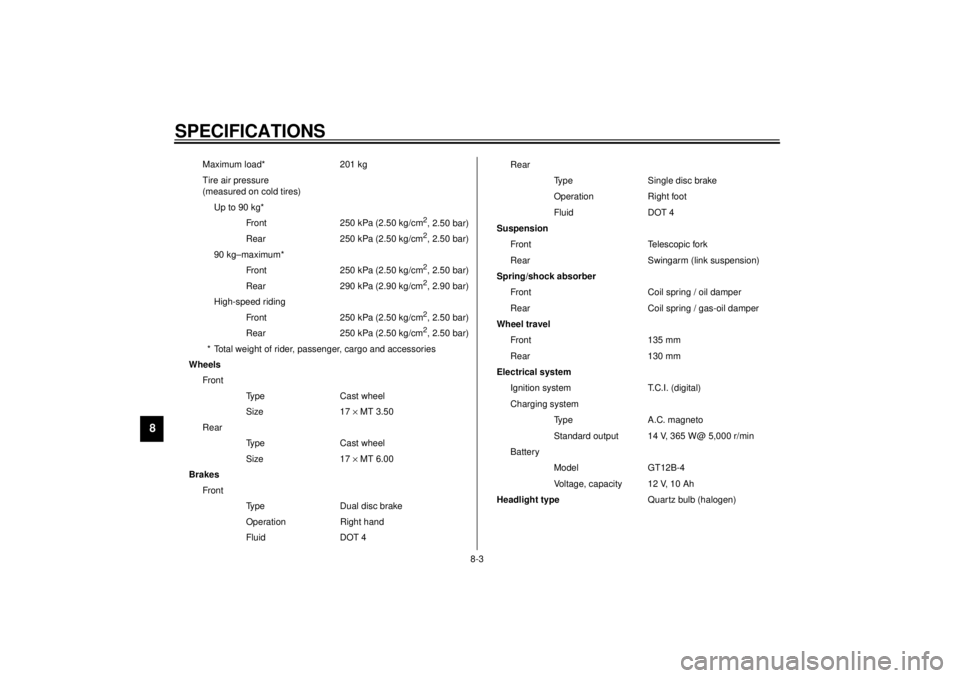
SPECIFICATIONS
8-3
8
Maximum load* 201 kg
Tire air pressure
(measured on cold tires)
Up to 90 kg*
Front 250 kPa (2.50 kg/cm
2, 2.50 bar)
Rear 250 kPa (2.50 kg/cm2, 2.50 bar)
90 kg–maximum*
Front 250 kPa (2.50 kg/cm2, 2.50 bar)
Rear 290 kPa (2.90 kg/cm2, 2.90 bar)
High-speed riding
Front 250 kPa (2.50 kg/cm2, 2.50 bar)
Rear 250 kPa (2.50 kg/cm2, 2.50 bar)
* Total weight of rider, passenger, cargo and accessories
Wheels
Front
Type Cast wheel
Size 17 ´ MT 3.50
Rear
Type Cast wheel
Size 17 ´ MT 6.00
Brakes
Front
Type Dual disc brake
Operation Right hand
Fluid DOT 4Rear
Type Single disc brake
Operation Right foot
Fluid DOT 4
Suspension
Front Telescopic fork
Rear Swingarm (link suspension)
Spring/shock absorber
Front Coil spring / oil damper
Rear Coil spring / gas-oil damper
Wheel travel
Front 135 mm
Rear 130 mm
Electrical system
Ignition system T.C.I. (digital)
Charging system
Type A.C. magneto
Standard output 14 V, 365 W@ 5,000 r/min
Battery
Model GT12B-4
Voltage, capacity 12 V, 10 Ah
Headlight typeQuartz bulb (halogen)
E_5jj.book Page 3 Friday, September 8, 2000 3:33 PM
Page 112 of 116
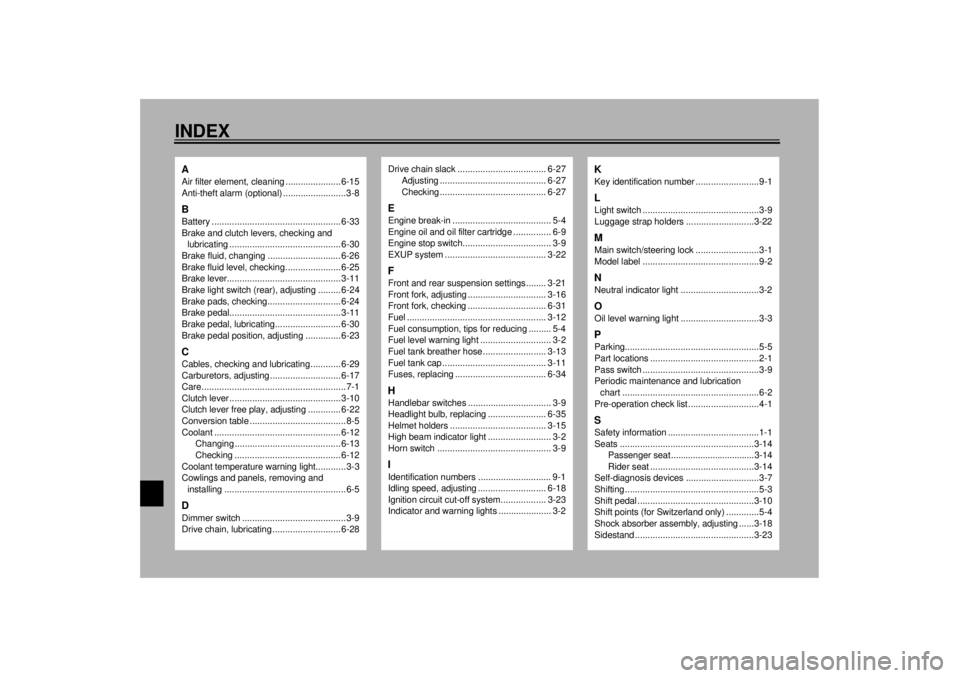
INDEXAAir filter element, cleaning ...................... 6-15
Anti-theft alarm (optional) .........................3-8BBattery ................................................... 6-33
Brake and clutch levers, checking and
lubricating ............................................ 6-30
Brake fluid, changing ............................. 6-26
Brake fluid level, checking...................... 6-25
Brake lever............................................. 3-11
Brake light switch (rear), adjusting ......... 6-24
Brake pads, checking............................. 6-24
Brake pedal............................................ 3-11
Brake pedal, lubricating.......................... 6-30
Brake pedal position, adjusting .............. 6-23CCables, checking and lubricating............ 6-29
Carburetors, adjusting............................ 6-17
Care.........................................................7-1
Clutch lever ............................................ 3-10
Clutch lever free play, adjusting ............. 6-22
Conversion table ......................................8-5
Coolant .................................................. 6-12
Changing .......................................... 6-13
Checking .......................................... 6-12
Coolant temperature warning light............3-3
Cowlings and panels, removing and
installing ................................................6-5DDimmer switch .........................................3-9
Drive chain, lubricating ........................... 6-28
Drive chain slack ................................... 6-27
Adjusting .......................................... 6-27
Checking .......................................... 6-27EEngine break-in ....................................... 5-4
Engine oil and oil filter cartridge ............... 6-9
Engine stop switch................................... 3-9
EXUP system ........................................ 3-22FFront and rear suspension settings ........ 3-21
Front fork, adjusting ............................... 3-16
Front fork, checking ............................... 6-31
Fuel ....................................................... 3-12
Fuel consumption, tips for reducing ......... 5-4
Fuel level warning light ............................ 3-2
Fuel tank breather hose ......................... 3-13
Fuel tank cap ......................................... 3-11
Fuses, replacing .................................... 6-34HHandlebar switches ................................. 3-9
Headlight bulb, replacing ....................... 6-35
Helmet holders ...................................... 3-15
High beam indicator light ......................... 3-2
Horn switch ............................................. 3-9IIdentification numbers ............................. 9-1
Idling speed, adjusting ........................... 6-18
Ignition circuit cut-off system.................. 3-23
Indicator and warning lights ..................... 3-2
KKey identification number .........................9-1LLight switch ..............................................3-9
Luggage strap holders ...........................3-22MMain switch/steering lock .........................3-1
Model label ..............................................9-2NNeutral indicator light ...............................3-2OOil level warning light ...............................3-3PParking.....................................................5-5
Part locations ...........................................2-1
Pass switch ..............................................3-9
Periodic maintenance and lubrication
chart ......................................................6-2
Pre-operation check list ............................4-1SSafety information ....................................1-1
Seats .....................................................3-14
Passenger seat .................................. 3-14
Rider seat .........................................3-14
Self-diagnosis devices .............................3-7
Shifting .....................................................5-3
Shift pedal ..............................................3-10
Shift points (for Switzerland only) .............5-4
Shock absorber assembly, adjusting ......3-18
Sidestand ...............................................3-23
E_5jj.book Page 1 Friday, September 8, 2000 3:33 PM