engine coolant YAMAHA YZF-R1 2001 Owners Manual
[x] Cancel search | Manufacturer: YAMAHA, Model Year: 2001, Model line: YZF-R1, Model: YAMAHA YZF-R1 2001Pages: 116, PDF Size: 12.72 MB
Page 13 of 116
DESCRIPTION
2-2
2
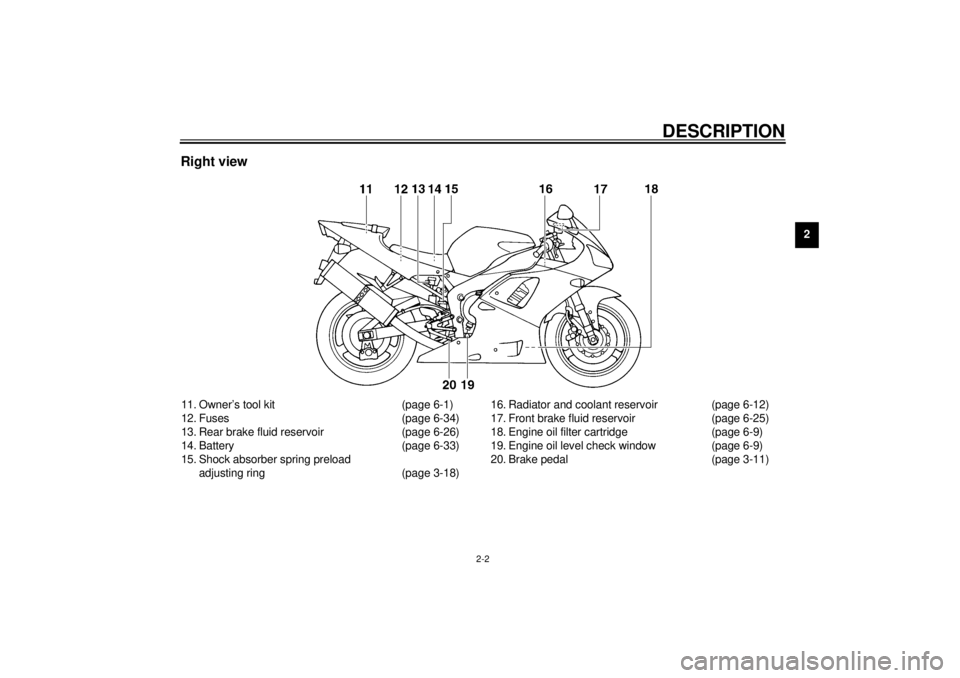
Right view11. Owner’s tool kit (page 6-1)
12. Fuses (page 6-34)
13. Rear brake fluid reservoir (page 6-26)
14. Battery (page 6-33)
15. Shock absorber spring preload
adjusting ring (page 3-18)16. Radiator and coolant reservoir (page 6-12)
17. Front brake fluid reservoir (page 6-25)
18. Engine oil filter cartridge (page 6-9)
19. Engine oil level check window (page 6-9)
20. Brake pedal (page 3-11)
E_5jj.book Page 2 Friday, September 8, 2000 3:33 PM
Page 18 of 116
INSTRUMENT AND CONTROL FUNCTIONS
3-3
3
EAU03285
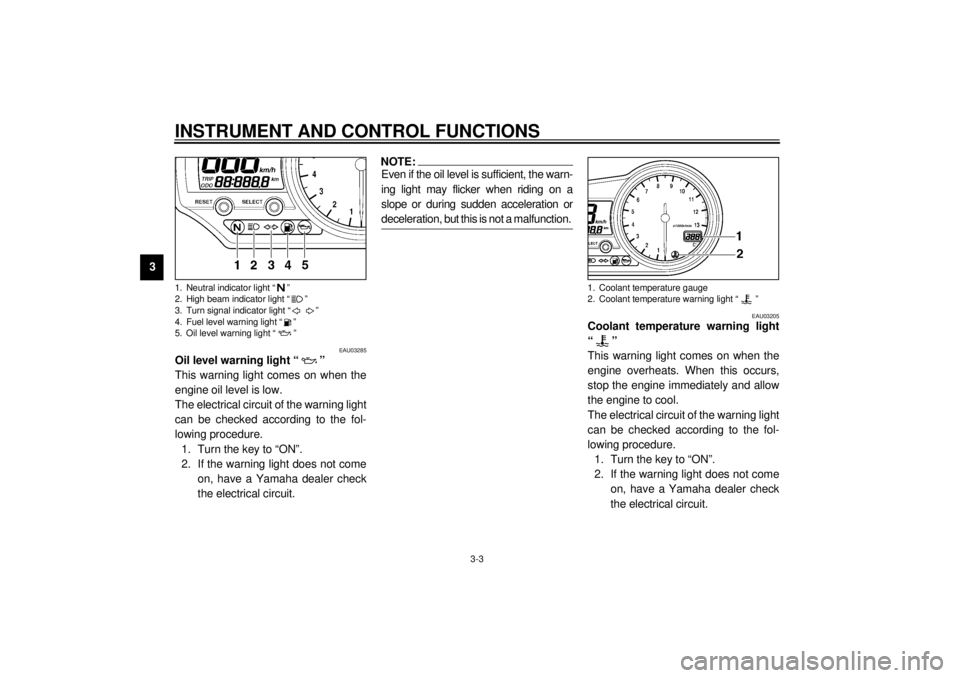
Oil level warning light “ ”
This warning light comes on when the
engine oil level is low.
The electrical circuit of the warning light
can be checked according to the fol-
lowing procedure.
1. Turn the key to “ON”.
2. If the warning light does not come
on, have a Yamaha dealer check
the electrical circuit.
NOTE:@ Even if the oil level is sufficient, the warn-
ing light may flicker when riding on a
slope or during sudden acceleration or
deceleration, but this is not a malfunction. @
EAU03205
Coolant temperature warning light
“”
This warning light comes on when the
engine overheats. When this occurs,
stop the engine immediately and allow
the engine to cool.
The electrical circuit of the warning light
can be checked according to the fol-
lowing procedure.
1. Turn the key to “ON”.
2. If the warning light does not come
on, have a Yamaha dealer check
the electrical circuit.
1. Neutral indicator light “ ”
2. High beam indicator light “ ”
3. Turn signal indicator light “ ”
4. Fuel level warning light “ ”
5. Oil level warning light “ ”
1. Coolant temperature gauge
2. Coolant temperature warning light “ ”
E_5jj.book Page 3 Friday, September 8, 2000 3:33 PM
Page 20 of 116
INSTRUMENT AND CONTROL FUNCTIONS
3-5
3
CB-25E
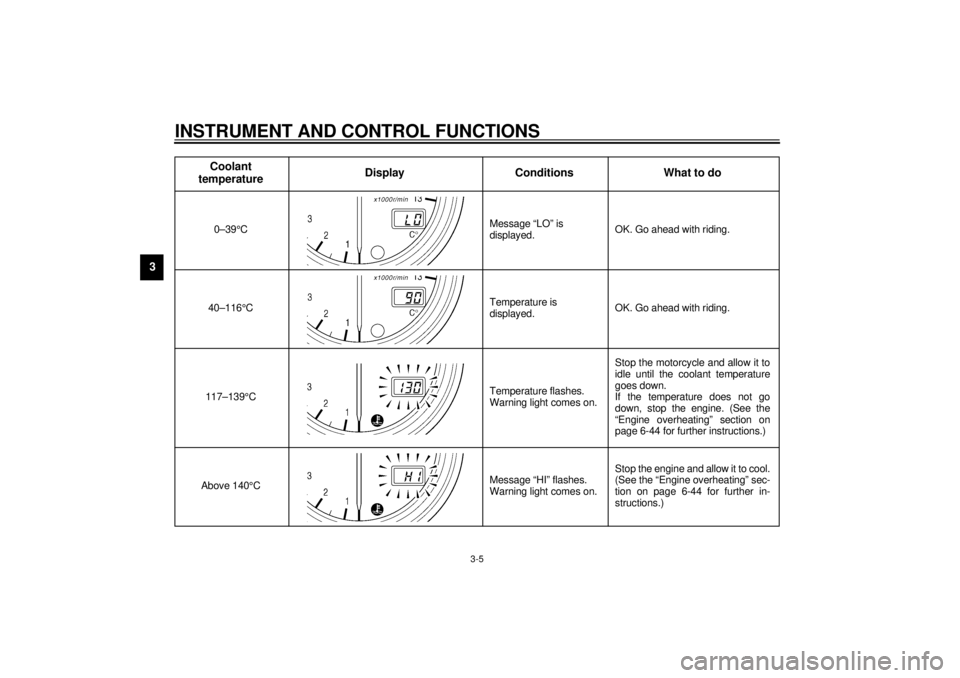
Coolant
temperatureDisplay Conditions What to do0–39°C Message “LO” is
displayed.OK. Go ahead with riding.
40–116°CTemperature is
displayed.OK. Go ahead with riding.
117–139°CTemperature flashes.
Warning light comes on.Stop the motorcycle and allow it to
idle until the coolant temperature
goes down.
If the temperature does not go
down, stop the engine. (See the
“Engine overheating” section on
page 6-44 for further instructions.)
Above 140°CMessage “HI” flashes.
Warning light comes on.Stop the engine and allow it to cool.
(See the “Engine overheating” sec-
tion on page 6-44 for further in-
structions.)
E_5jj.book Page 5 Friday, September 8, 2000 3:33 PM
Page 42 of 116

4-1
4
EAU01114
4-PRE-OPERATION CHECKSThe condition of a vehicle is the owner’s responsibility. Vital components can start to deteriorate quickly and unexpectedly,
even if the vehicle remains unused (for example, as a result of exposure to the elements). Any damage, fluid leakage or loss
of tire air pressure could have serious consequences. Therefore, it is very important, in addition to a thorough visual inspec-
tion, to check the following points before each ride.
EAU03439
Pre-operation check list
ITEM CHECKS PAGE
Fuel• Check fuel level in fuel tank.
• Refuel if necessary.
• Check fuel line for leakage.3-12
Engine oil• Check oil level in engine.
• If necessary, add recommended oil to specified level.
• Check vehicle for oil leakage.6-9
Coolant• Check coolant level in reservoir.
• If necessary, add recommended coolant to specified level.
• Check cooling system for leakage.6-12–6-13
Front brake• Check operation.
• If soft or spongy, have Yamaha dealer bleed hydraulic system.
• Check fluid level in reservoir.
• If necessary, add recommended brake fluid to specified level.
• Check hydraulic system for leakage.6-24–6-26
Rear brake• Check operation.
• If soft or spongy, have Yamaha dealer bleed hydraulic system.
• Check fluid level in reservoir.
• If necessary, add recommended brake fluid to specified level.
• Check hydraulic system for leakage.6-23–6-26
Clutch• Check operation.
• Lubricate cable if necessary.
• Check lever free play.
• Adjust if necessary.6-22–6-23
Throttle grip• Make sure that operation is smooth.
• Lubricate throttle grip, housing and cables if necessary.
• Check free play.
• If necessary, have Yamaha dealer make adjustment.6-18, 6-29
E_5jj.book Page 1 Friday, September 8, 2000 3:33 PM
Page 47 of 116
OPERATION AND IMPORTANT RIDING POINTS
5-2
5
NOTE:@ If the engine fails to start, release the
start switch, wait a few seconds, and
then try again. Each starting attempt
should be as short as possible to pre-
serve the battery. Do not crank the en-
gine more than 10 seconds on any one
attempt. @
EC000038
CAUTION:@ l
The oil level warning light and
fuel level warning light should
come on when the start switch
is pushed, and they should go
off when the start switch is
released.
l
If the oil level warning light flick-
ers or remains on after starting,
immediately stop the engine,
and then check the engine oil
level and the vehicle for oil leak-
age. If necessary, add engine
oil, and then check the warning
light again. If the warning light
does not come on when push-
ing the start switch, or if it doesnot go off after starting with suf-
ficient engine oil, have a
Yamaha dealer check the elec-
trical circuit.
l
If the fuel level warning light re-
mains on after starting, stop the
engine, and then check the fuel
level. If necessary, refuel as
soon as possible, and then
check the warning light again. If
the warning light does not come
on when pushing the start
switch, or if it does not go off af-
ter starting with sufficient fuel,
have a Yamaha dealer check the
electrical circuit.
@5. After starting the engine, move the
starter (choke) lever back halfway.
ECA00045
CAUTION:@ For maximum engine life, never ac-
celerate hard when the engine is
cold! @
6. When the engine is warm, turn the
starter (choke) off.NOTE:@ l
The engine is warm when it re-
sponds normally to the throttle
with the starter (choke) turned off.
l
When the engine is idling with the
starter (choke) turned on, the radi-
ator fan will automatically be
switched on and off regardless of
the coolant temperature. As a re-
sult, the engine idling speed will
vary, but this does not indicate a
malfunction.
@
E_5jj.book Page 2 Friday, September 8, 2000 3:33 PM
Page 51 of 116
6
PERIODIC MAINTENANCE AND MINOR REPAIR
Owner’s tool kit ..................................................... 6-1
Periodic maintenance and lubrication chart ......... 6-2
Removing and installing cowlings and panels ..... 6-5
Checking the spark plugs .................................... 6-7
Engine oil and oil filter cartridge .......................... 6-9
Coolant .............................................................. 6-12
Cleaning the air filter element ............................ 6-15
Adjusting the carburetors ................................... 6-17
Adjusting the engine idling speed ...................... 6-18
Adjusting the throttle cable free play .................. 6-18
Adjusting the valve clearance ............................ 6-19
Tires .................................................................... 6-19
Wheels ................................................................ 6-22
Adjusting the clutch lever free play .................... 6-22
Adjusting the brake pedal position ..................... 6-23
Adjusting the rear brake light switch .................. 6-24
Checking the front and rear brake pads ............. 6-24
Checking the brake fluid level ............................ 6-25
Changing the brake fluid .................................... 6-26
Drive chain slack................................................. 6-27
Lubricating the drive chain ................................. 6-28Checking and lubricating the cables ................. 6-29
Checking and lubricating the throttle grip and
cable ............................................................... 6-29
Checking and lubricating the brake and
clutch levers .................................................... 6-30
Lubricating the brake pedal ............................... 6-30
Checking and lubricating the sidestand ............ 6-30
Lubricating the rear suspension ........................ 6-31
Checking the front fork ...................................... 6-31
Checking the steering ....................................... 6-32
Checking the wheel bearings ............................ 6-32
Battery ............................................................... 6-33
Replacing the fuses .......................................... 6-34
Replacing the headlight bulb ............................. 6-35
Replacing the tail/brake light bulb ..................... 6-37
Replacing a turn signal light bulb ...................... 6-37
Supporting the motorcycle ................................ 6-38
Front wheel ........................................................ 6-39
Rear wheel ........................................................ 6-41
Troubleshooting .................................................. 6-42
Troubleshooting charts ....................................... 6-43
E_5jj.book Page 1 Friday, September 8, 2000 3:33 PM
Page 63 of 116
PERIODIC MAINTENANCE AND MINOR REPAIR
6-12
6
EAU03161
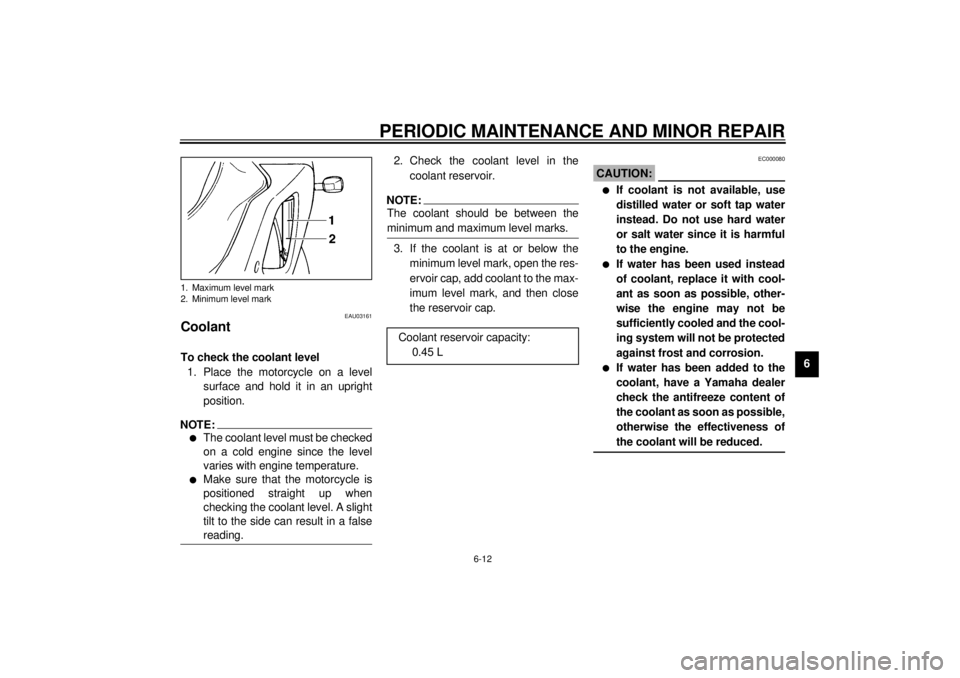
Coolant To check the coolant level
1. Place the motorcycle on a level
surface and hold it in an upright
position.NOTE:@ l
The coolant level must be checked
on a cold engine since the level
varies with engine temperature.
l
Make sure that the motorcycle is
positioned straight up when
checking the coolant level. A slight
tilt to the side can result in a false
reading.
@
2. Check the coolant level in the
coolant reservoir.NOTE:@ The coolant should be between the
minimum and maximum level marks. @3. If the coolant is at or below the
minimum level mark, open the res-
ervoir cap, add coolant to the max-
imum level mark, and then close
the reservoir cap.
EC000080
CAUTION:@ l
If coolant is not available, use
distilled water or soft tap water
instead. Do not use hard water
or salt water since it is harmful
to the engine.
l
If water has been used instead
of coolant, replace it with cool-
ant as soon as possible, other-
wise the engine may not be
sufficiently cooled and the cool-
ing system will not be protected
against frost and corrosion.
l
If water has been added to the
coolant, have a Yamaha dealer
check the antifreeze content of
the coolant as soon as possible,
otherwise the effectiveness of
the coolant will be reduced.
@
1. Maximum level mark
2. Minimum level mark
Coolant reservoir capacity:
0.45 L
E_5jj.book Page 12 Friday, September 8, 2000 3:33 PM
Page 64 of 116
PERIODIC MAINTENANCE AND MINOR REPAIR
6-13
6
NOTE:@ l
The radiator fan is automatically
switched on or off according to the
coolant temperature in the
radiator.
l
When the engine is idling with the
starter (choke) turned on, the radi-
ator fan will automatically be
switched on and off regardless of
the coolant temperature, but this
does not indicate a malfunction.
l
If the engine overheats, see page
6-44 for further instructions.
@
EAU01577
To change the coolant
1. Place the motorcycle on a level
surface and let the engine cool if
necessary.
2. Remove cowlings A and B, and
panel A. (See pages 6-5 and 6-6
for cowling and panel removal and
installation procedures.)
3. Place a container under the en-
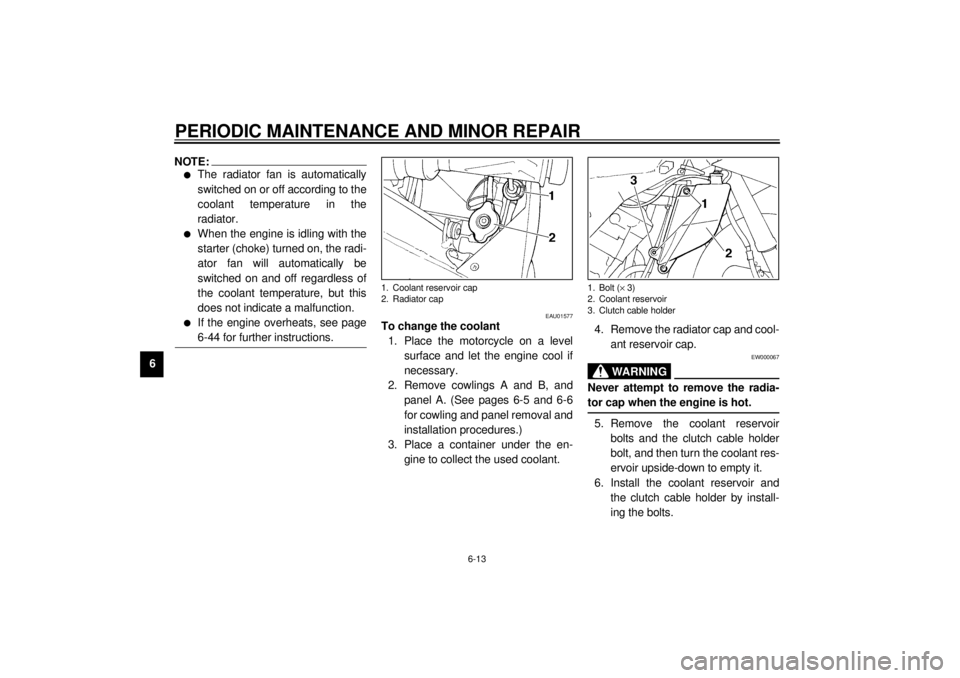
gine to collect the used coolant.4. Remove the radiator cap and cool-
ant reservoir cap.
EW000067
WARNING
@ Never attempt to remove the radia-
tor cap when the engine is hot. @5. Remove the coolant reservoir
bolts and the clutch cable holder
bolt, and then turn the coolant res-
ervoir upside-down to empty it.
6. Install the coolant reservoir and
the clutch cable holder by install-
ing the bolts.
1. Coolant reservoir cap
2. Radiator cap
1. Bolt (´ 3)
2. Coolant reservoir
3. Clutch cable holder
E_5jj.book Page 13 Friday, September 8, 2000 3:33 PM
Page 65 of 116
PERIODIC MAINTENANCE AND MINOR REPAIR
6-14
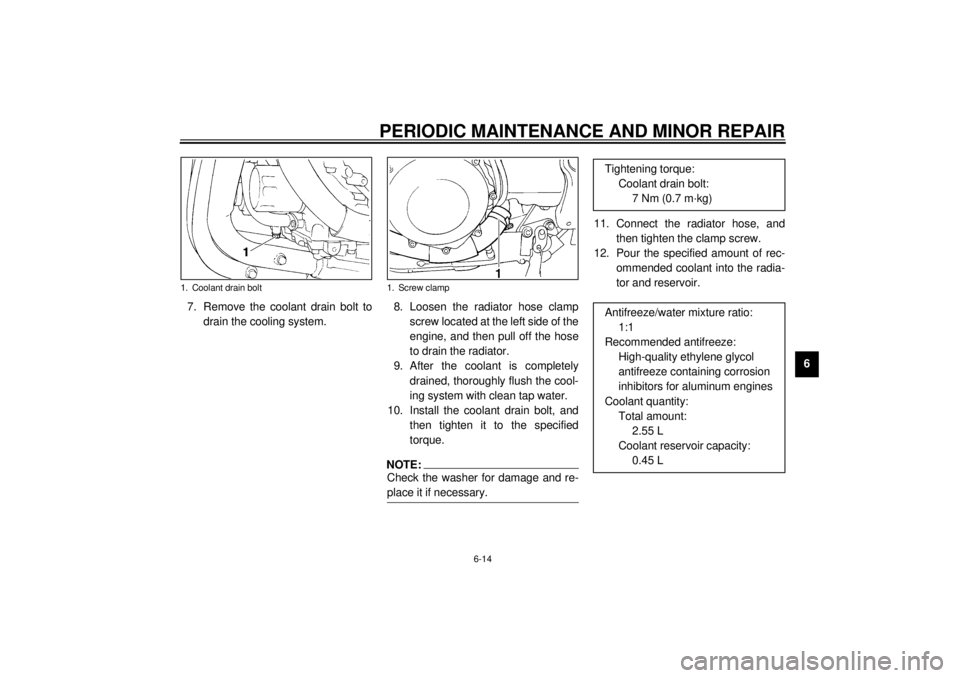
6 7. Remove the coolant drain bolt to
drain the cooling system.8. Loosen the radiator hose clamp
screw located at the left side of the
engine, and then pull off the hose
to drain the radiator.
9. After the coolant is completely
drained, thoroughly flush the cool-
ing system with clean tap water.
10. Install the coolant drain bolt, and
then tighten it to the specified
torque.
NOTE:@ Check the washer for damage and re-
place it if necessary. @
11. Connect the radiator hose, and
then tighten the clamp screw.
12. Pour the specified amount of rec-
ommended coolant into the radia-
tor and reservoir.
1. Coolant drain bolt
1. Screw clamp
Tightening torque:
Coolant drain bolt:
7 Nm (0.7 m·kg)
Antifreeze/water mixture ratio:
1:1
Recommended antifreeze:
High-quality ethylene glycol
antifreeze containing corrosion
inhibitors for aluminum engines
Coolant quantity:
Total amount:
2.55 L
Coolant reservoir capacity:
0.45 L
E_5jj.book Page 14 Friday, September 8, 2000 3:33 PM
Page 66 of 116
PERIODIC MAINTENANCE AND MINOR REPAIR
6-15
6
EC000080
CAUTION:@ l
If coolant is not available, use
distilled water or soft tap water
instead. Do not use hard water
or salt water since it is harmful
to the engine.
l
If water has been used instead
of coolant, replace it with cool-
ant as soon as possible, other-
wise the engine may not be
sufficiently cooled and the cool-
ing system will not be protected
against frost and corrosion.
l
If water has been added to the
coolant, have a Yamaha dealer
check the antifreeze content of
the coolant as soon as possible,
otherwise the effectiveness of
the coolant will be reduced.
@13. Install the radiator cap, start the
engine, let it idle for several min-
utes, and then turn it off.14. Remove the radiator cap to check
the coolant level in the radiator. If
necessary, add sufficient coolant
until it reaches the top of the radia-
tor, and then install the radiator
cap.
15. Check the coolant level in the res-
ervoir. If necessary, remove the
coolant reservoir cap, add coolant
to the maximum level mark, and
then install the cap.
16. Start the engine, and then check
the vehicle for coolant leakage. If
coolant is leaking, have a Yamaha
dealer check the cooling system.
17. Install the cowlings and the panel.
EAU03162
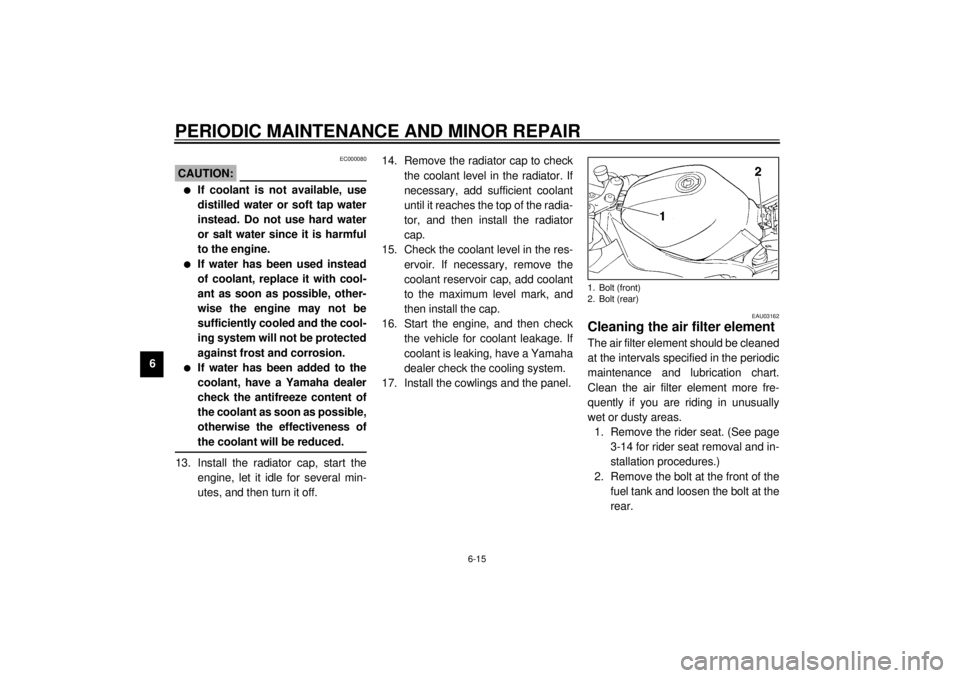
Cleaning the air filter element The air filter element should be cleaned
at the intervals specified in the periodic
maintenance and lubrication chart.
Clean the air filter element more fre-
quently if you are riding in unusually
wet or dusty areas.
1. Remove the rider seat. (See page
3-14 for rider seat removal and in-
stallation procedures.)
2. Remove the bolt at the front of the
fuel tank and loosen the bolt at the
rear.1. Bolt (front)
2. Bolt (rear)
E_5jj.book Page 15 Friday, September 8, 2000 3:33 PM