fuel YAMAHA YZF-R1 2001 Owners Manual
[x] Cancel search | Manufacturer: YAMAHA, Model Year: 2001, Model line: YZF-R1, Model: YAMAHA YZF-R1 2001Pages: 116, PDF Size: 12.72 MB
Page 15 of 116
3
INSTRUMENT AND CONTROL FUNCTIONS
Main switch/steering lock ...................................... 3-1
Indicator and warning lights ................................ 3-2
Speedometer unit ................................................ 3-6
Tachometer ........................................................... 3-7
Self-diagnosis devices ......................................... 3-7
Anti-theft alarm (optional) ..................................... 3-8
Handlebar switches .............................................. 3-9
Clutch lever ......................................................... 3-10
Shift pedal ........................................................... 3-10
Brake lever .......................................................... 3-11
Brake pedal......................................................... 3-11
Fuel tank cap ..................................................... 3-11
Fuel..................................................................... 3-12Fuel tank breather hose ..................................... 3-13
Starter (choke) lever........................................... 3-13
Seats .................................................................. 3-14
Helmet holders .................................................. 3-15
Storage compartment ........................................ 3-16
Adjusting the front fork ...................................... 3-16
Adjusting the shock absorber assembly ............ 3-18
Matching the front and rear suspension
settings ............................................................ 3-21
Luggage strap holders ...................................... 3-22
EXUP system ..................................................... 3-22
Sidestand ........................................................... 3-23
Ignition circuit cut-off system.............................. 3-23
E_5jj.book Page 1 Friday, September 8, 2000 3:33 PM
Page 17 of 116
INSTRUMENT AND CONTROL FUNCTIONS
3-2
3
EAU01574
(Parking)
The steering is locked, and the taillights
and auxiliary lights are on, but all other
electrical systems are off. The key can
be removed.
The steering must be locked before the
key can be turned to “ ”.
ECA00043
CAUTION:@ Do not use the parking position for
an extended length of time, other-
wise the battery may discharge. @
EAU03034
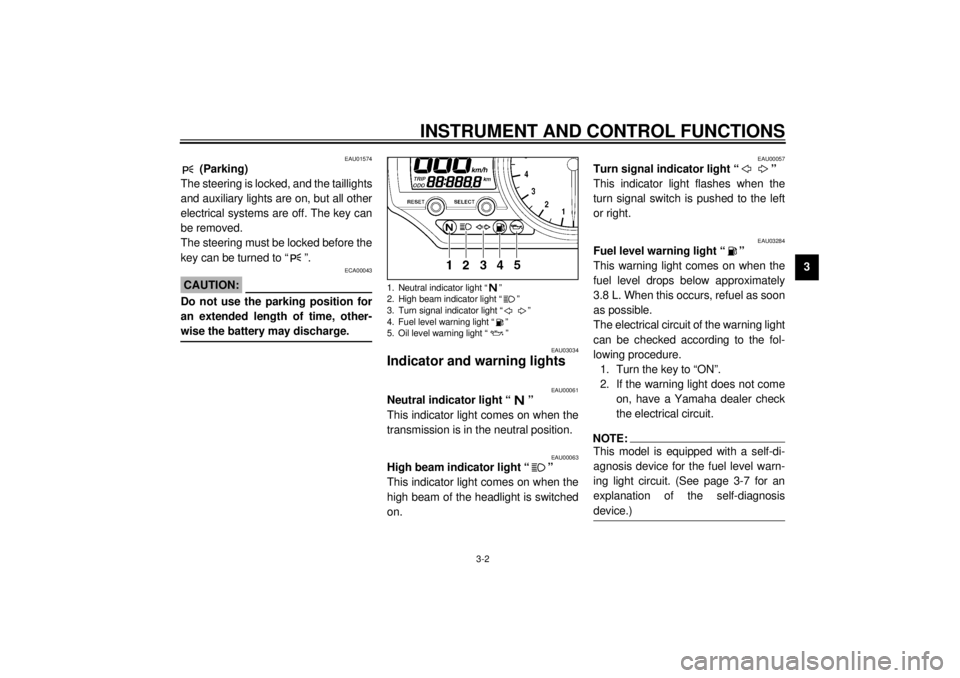
Indicator and warning lights
EAU00061
Neutral indicator light “ ”
This indicator light comes on when the
transmission is in the neutral position.
EAU00063
High beam indicator light “ ”
This indicator light comes on when the
high beam of the headlight is switched
on.
EAU00057
Turn signal indicator light “ ”
This indicator light flashes when the
turn signal switch is pushed to the left
or right.
EAU03284
Fuel level warning light “ ”
This warning light comes on when the
fuel level drops below approximately
3.8 L. When this occurs, refuel as soon
as possible.
The electrical circuit of the warning light
can be checked according to the fol-
lowing procedure.
1. Turn the key to “ON”.
2. If the warning light does not come
on, have a Yamaha dealer check
the electrical circuit.NOTE:@ This model is equipped with a self-di-
agnosis device for the fuel level warn-
ing light circuit. (See page 3-7 for an
explanation of the self-diagnosis
device.) @
1. Neutral indicator light “ ”
2. High beam indicator light “ ”
3. Turn signal indicator light “ ”
4. Fuel level warning light “ ”
5. Oil level warning light “ ”
E_5jj.book Page 2 Friday, September 8, 2000 3:33 PM
Page 18 of 116
INSTRUMENT AND CONTROL FUNCTIONS
3-3
3
EAU03285
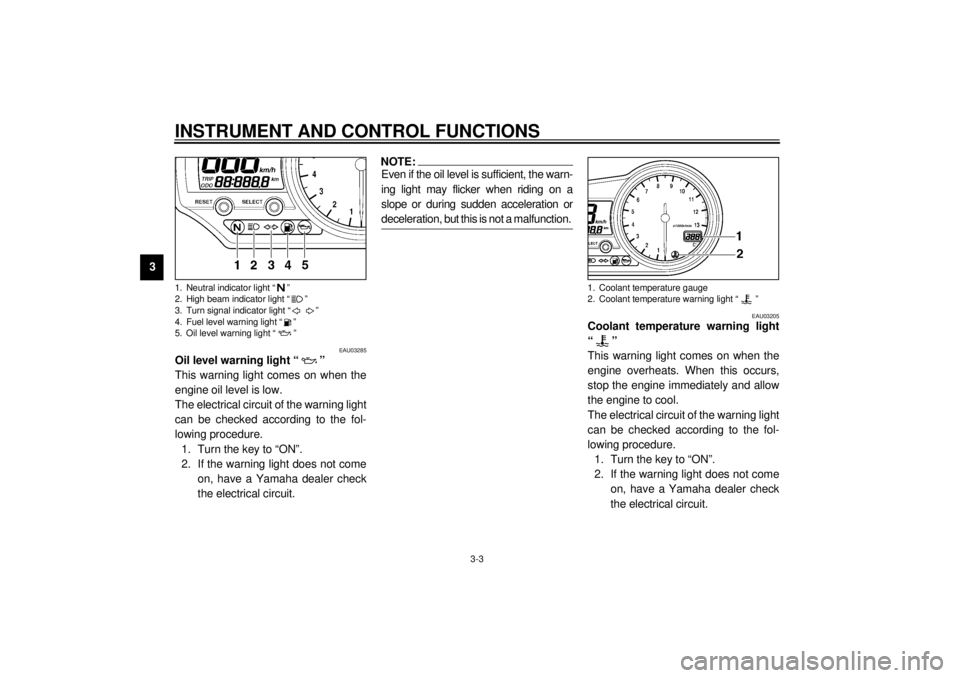
Oil level warning light “ ”
This warning light comes on when the
engine oil level is low.
The electrical circuit of the warning light
can be checked according to the fol-
lowing procedure.
1. Turn the key to “ON”.
2. If the warning light does not come
on, have a Yamaha dealer check
the electrical circuit.
NOTE:@ Even if the oil level is sufficient, the warn-
ing light may flicker when riding on a
slope or during sudden acceleration or
deceleration, but this is not a malfunction. @
EAU03205
Coolant temperature warning light
“”
This warning light comes on when the
engine overheats. When this occurs,
stop the engine immediately and allow
the engine to cool.
The electrical circuit of the warning light
can be checked according to the fol-
lowing procedure.
1. Turn the key to “ON”.
2. If the warning light does not come
on, have a Yamaha dealer check
the electrical circuit.
1. Neutral indicator light “ ”
2. High beam indicator light “ ”
3. Turn signal indicator light “ ”
4. Fuel level warning light “ ”
5. Oil level warning light “ ”
1. Coolant temperature gauge
2. Coolant temperature warning light “ ”
E_5jj.book Page 3 Friday, September 8, 2000 3:33 PM
Page 21 of 116
INSTRUMENT AND CONTROL FUNCTIONS
3-6
3
EAU03244
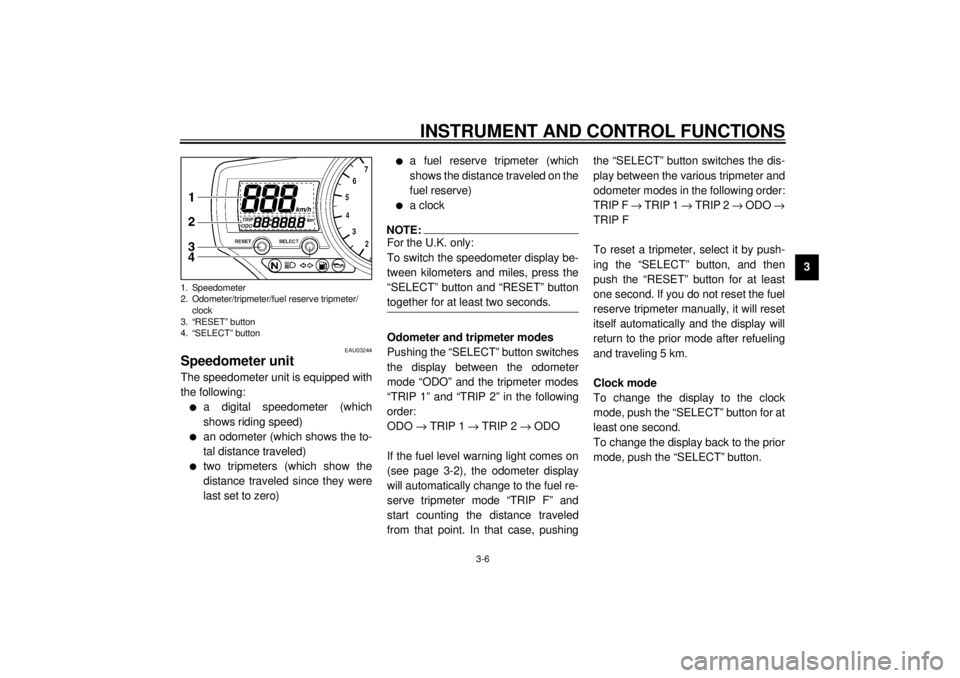
Speedometer unit The speedometer unit is equipped with
the following:l
a digital speedometer (which
shows riding speed)
l
an odometer (which shows the to-
tal distance traveled)
l
two tripmeters (which show the
distance traveled since they were
last set to zero)
l
a fuel reserve tripmeter (which
shows the distance traveled on the
fuel reserve)
l
a clock
NOTE:@ For the U.K. only:
To switch the speedometer display be-
tween kilometers and miles, press the
“SELECT” button and “RESET” button
together for at least two seconds. @Odometer and tripmeter modes
Pushing the “SELECT” button switches
the display between the odometer
mode “ODO” and the tripmeter modes
“TRIP 1” and “TRIP 2” in the following
order:
ODO
® TRIP 1
® TRIP 2
® ODO
If the fuel level warning light comes on
(see page 3-2), the odometer display
will automatically change to the fuel re-
serve tripmeter mode “TRIP F” and
start counting the distance traveled
from that point. In that case, pushingthe “SELECT” button switches the dis-
play between the various tripmeter and
odometer modes in the following order:
TRIP F
® TRIP 1
® TRIP 2
® ODO
®
TRIP F
To reset a tripmeter, select it by push-
ing the “SELECT” button, and then
push the “RESET” button for at least
one second. If you do not reset the fuel
reserve tripmeter manually, it will reset
itself automatically and the display will
return to the prior mode after refueling
and traveling 5 km.
Clock mode
To change the display to the clock
mode, push the “SELECT” button for at
least one second.
To change the display back to the prior
mode, push the “SELECT” button.
1. Speedometer
2. Odometer/tripmeter/fuel reserve tripmeter/
clock
3. “RESET” button
4. “SELECT” button
E_5jj.book Page 6 Friday, September 8, 2000 3:33 PM
Page 23 of 116
INSTRUMENT AND CONTROL FUNCTIONS
3-8
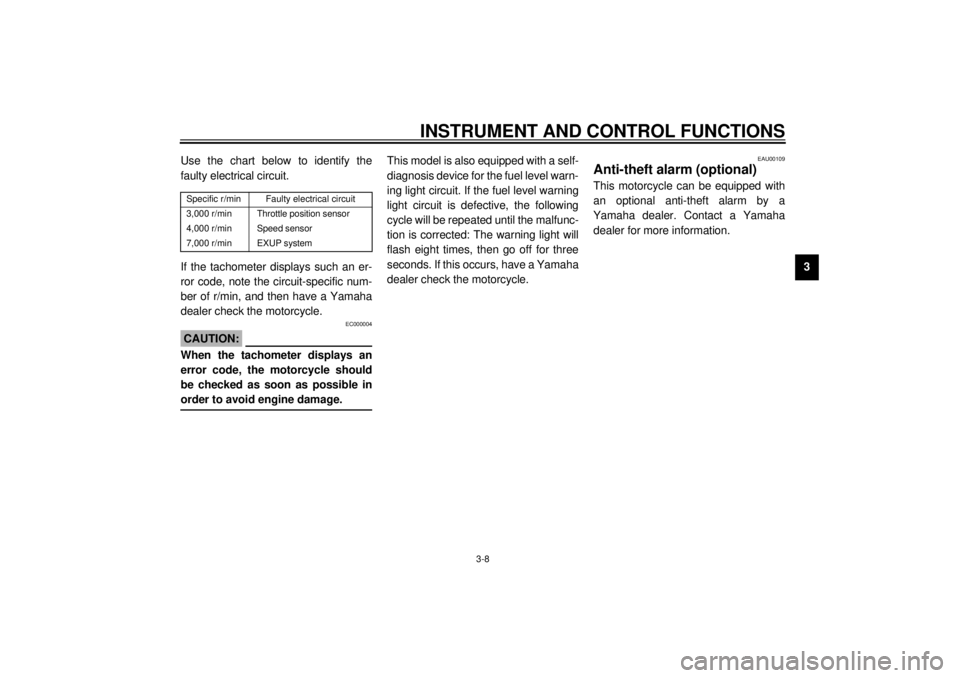
3 Use the chart below to identify the
faulty electrical circuit.
CB-26EIf the tachometer displays such an er-
ror code, note the circuit-specific num-
ber of r/min, and then have a Yamaha
dealer check the motorcycle.
EC000004
CAUTION:@ When the tachometer displays an
error code, the motorcycle should
be checked as soon as possible in
order to avoid engine damage. @
This model is also equipped with a self-
diagnosis device for the fuel level warn-
ing light circuit. If the fuel level warning
light circuit is defective, the following
cycle will be repeated until the malfunc-
tion is corrected: The warning light will
flash eight times, then go off for three
seconds. If this occurs, have a Yamaha
dealer check the motorcycle.
EAU00109
Anti-theft alarm (optional)This motorcycle can be equipped with
an optional anti-theft alarm by a
Yamaha dealer. Contact a Yamaha
dealer for more information.
Specific r/min
Faulty electrical circuit
3,000 r/min
Throttle position sensor
4,000 r/min
Speed sensor
7,000 r/min
EXUP system
E_5jj.book Page 8 Friday, September 8, 2000 3:33 PM
Page 26 of 116

INSTRUMENT AND CONTROL FUNCTIONS
3-11
3
EAU00161
Brake leverThe brake lever is located at the right
handlebar grip. To apply the front
brake, pull the lever toward the handle-
bar grip.
The brake lever is equipped with a po-
sition adjusting dial. To adjust the dis-
tance between the brake lever and the
handlebar grip, turn the adjusting dial
while holding the lever pushed away
from the handlebar grip. Make sure that
the appropriate setting on the adjusting
dial is aligned with the arrow mark on
the brake lever.
EAU00162
Brake pedalThe brake pedal is on the right side of
the motorcycle. To apply the rear
brake, press down on the brake pedal.
EAU02935
Fuel tank cap To open the fuel tank cap
Open the fuel tank cap lock cover, in-
sert the key into the lock, and then turn
it 1/4 turn clockwise. The lock will be re-
leased and the fuel tank cap can be
opened.
To close the fuel tank cap
1. Push the fuel tank cap into posi-
tion with the key inserted in the
lock.
1. Brake lever
2. Brake lever position adjusting dial
3. Arrow mark
a. Distance between brake lever and handlebar
grip
1. Brake pedal
1. Fuel tank cap lock cover
2. Unlock.
E_5jj.book Page 11 Friday, September 8, 2000 3:33 PM
Page 27 of 116

INSTRUMENT AND CONTROL FUNCTIONS
3-12
3 2. Turn the key counterclockwise to
the original position, remove it,
and then close the lock cover.
NOTE:@ The fuel tank cap cannot be closed un-
less the key is in the lock. In addition,
the key cannot be removed if the cap is
not properly closed and locked. @
EWA00025
WARNING
@ Make sure that the fuel tank cap is
properly closed before riding.@
EAU01183
FuelMake sure that there is sufficient fuel in
the tank. Fill the fuel tank to the bottom
of the filler tube as shown in the
illustration.
EW000130
WARNING
@ l
Do not overfill the fuel tank, oth-
erwise it may overflow when the
fuel warms up and expands.
l
Avoid spilling fuel on the hot
engine.
@
EAU00185
CAUTION:@ Immediately wipe off spilled fuel
with a clean, dry, soft cloth, since
fuel may deteriorate painted surfac-
es or plastic parts. @
EAU00191
NOTE:@ If knocking (or pinging) occurs, use
gasoline of a different brand or with a
higher octane grade. @
1. Fuel tank filler tube
2. Fuel level
Recommended fuel:
Regular unleaded gasoline with a
research octane number of 91 or
higher
Fuel tank capacity:
Total amount:
18 L
Reserve amount:
3.8 L
E_5jj.book Page 12 Friday, September 8, 2000 3:33 PM
Page 28 of 116
INSTRUMENT AND CONTROL FUNCTIONS
3-13
3
EAU02955
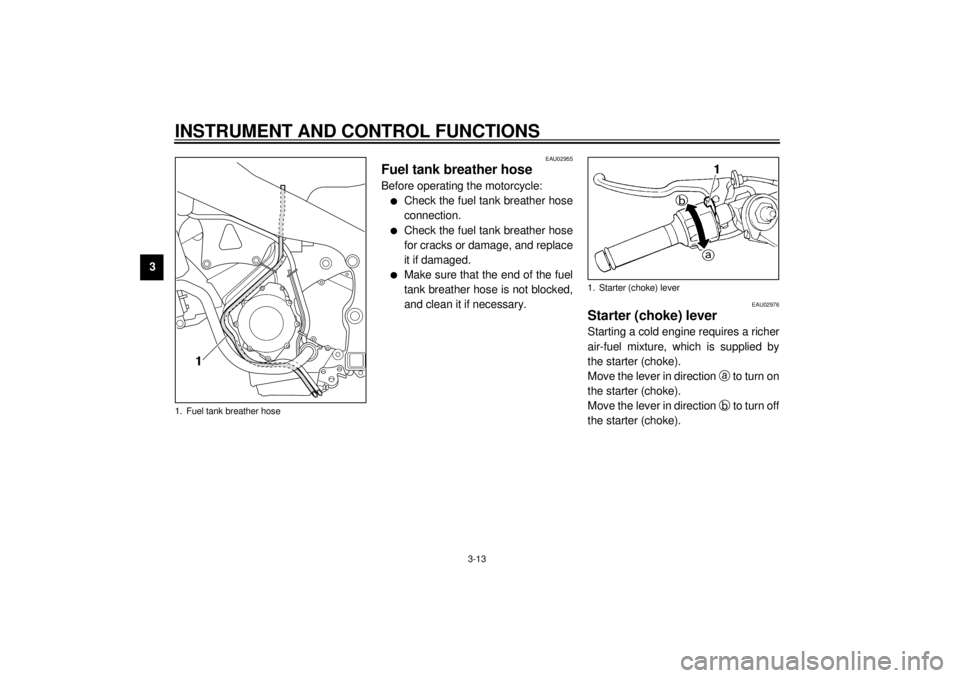
Fuel tank breather hoseBefore operating the motorcycle:l
Check the fuel tank breather hose
connection.
l
Check the fuel tank breather hose
for cracks or damage, and replace
it if damaged.
l
Make sure that the end of the fuel
tank breather hose is not blocked,
and clean it if necessary.
EAU02976
Starter (choke) leverStarting a cold engine requires a richer
air-fuel mixture, which is supplied by
the starter (choke).
Move the lever in direction
a to turn on
the starter (choke).
Move the lever in direction
b to turn off
the starter (choke).
1. Fuel tank breather hose
1. Starter (choke) lever
E_5jj.book Page 13 Friday, September 8, 2000 3:33 PM
Page 42 of 116

4-1
4
EAU01114
4-PRE-OPERATION CHECKSThe condition of a vehicle is the owner’s responsibility. Vital components can start to deteriorate quickly and unexpectedly,
even if the vehicle remains unused (for example, as a result of exposure to the elements). Any damage, fluid leakage or loss
of tire air pressure could have serious consequences. Therefore, it is very important, in addition to a thorough visual inspec-
tion, to check the following points before each ride.
EAU03439
Pre-operation check list
ITEM CHECKS PAGE
Fuel• Check fuel level in fuel tank.
• Refuel if necessary.
• Check fuel line for leakage.3-12
Engine oil• Check oil level in engine.
• If necessary, add recommended oil to specified level.
• Check vehicle for oil leakage.6-9
Coolant• Check coolant level in reservoir.
• If necessary, add recommended coolant to specified level.
• Check cooling system for leakage.6-12–6-13
Front brake• Check operation.
• If soft or spongy, have Yamaha dealer bleed hydraulic system.
• Check fluid level in reservoir.
• If necessary, add recommended brake fluid to specified level.
• Check hydraulic system for leakage.6-24–6-26
Rear brake• Check operation.
• If soft or spongy, have Yamaha dealer bleed hydraulic system.
• Check fluid level in reservoir.
• If necessary, add recommended brake fluid to specified level.
• Check hydraulic system for leakage.6-23–6-26
Clutch• Check operation.
• Lubricate cable if necessary.
• Check lever free play.
• Adjust if necessary.6-22–6-23
Throttle grip• Make sure that operation is smooth.
• Lubricate throttle grip, housing and cables if necessary.
• Check free play.
• If necessary, have Yamaha dealer make adjustment.6-18, 6-29
E_5jj.book Page 1 Friday, September 8, 2000 3:33 PM
Page 45 of 116
OPERATION AND IMPORTANT RIDING POINTS
5
Starting a cold engine ....................................................................... 5-1
Starting a warm engine ..................................................................... 5-3
Shifting ............................................................................................... 5-3
Recommended shift points (for Switzerland only) .............................. 5-4
Tips for reducing fuel consumption ................................................... 5-4
Engine break-in .................................................................................. 5-4
Parking ............................................................................................... 5-5
E_5jj.book Page 1 Friday, September 8, 2000 3:33 PM