lights YAMAHA YZF-R1 2017 User Guide
[x] Cancel search | Manufacturer: YAMAHA, Model Year: 2017, Model line: YZF-R1, Model: YAMAHA YZF-R1 2017Pages: 130, PDF Size: 9.99 MB
Page 75 of 130

Operation and important riding points
6-3
1
2
3
4
567
8
9
10
11
12
the neutral position, do not
coast for long periods of time
with the engine off, and do not
tow the motorcycle for long dis-
tances. The transmission is
properly lubricated only when
the engine is running. Inade-
quate lubrication may damage
the transmission.
Except when upshifting with the
QSS turned on, always use the
clutch while changing gears to
avoid damaging the engine,
transmission, and drive train,
which are not designed to with-
stand the shock of forced shift-ing.
EAU16811
Tips for reducing fuel
consumptionFuel consumption depends largely on
your riding style. Consider the following
tips to reduce fuel consumption:
Shift up swiftly, and avoid high en-
gine speeds during acceleration.
Do not rev the engine while shifting
down, and avoid high engine
speeds with no load on the engine.
Turn the engine off instead of let-
ting it idle for an extended length of
time (e.g., in traffic jams, at traffic
lights or at railroad crossings).
EAU16842
Engine break-inThere is never a more important period
in the life of your engine than the period
between 0 and 1600 km (1000 mi). For
this reason, you should read the follow-
ing material carefully.
Since the engine is brand new, do not
put an excessive load on it for the first
1600 km (1000 mi). The various parts in
the engine wear and polish themselves
to the correct operating clearances.
During this period, prolonged full-throt-
tle operation or any condition that might
result in engine overheating must be
avoided.
EAU17085
0–1000 km (0–600 mi)
Avoid prolonged operation above 7000
r/min.
NOTICE: After 1000 km (600
mi) of operation, the engine oil must
be changed and the oil filter car-
tridge or element replaced.
[ECA10303]
1000–1600 km (600–1000 mi)
Avoid prolonged operation above 8400
BX4-9-E0.book 3 ページ 2016年12月1日 木曜日 午後8時7分
Page 83 of 130

Periodic maintenance and adjustment
7-7
1
2
3
4
5
678
9
10
11
12
24 *Rear suspension
relay arm and
connecting arm
pivoting points Check operation.
25 Engine oil Change (warm engine before
draining).
Check oil level and vehicle for oil leakage.
26 Engine oil filter
cartridge Replace.
27 *Cooling system Check coolant level and vehicle
for coolant leakage.
Change. Every 3 years
28 *EXUP system Check operation, cable free play
and pulley position.
29 *Front and rear brake
switches Check operation.
30 *Moving parts and
cables Lubricate.
31 *Throttle grip
housing and cable Check operation and free play.
Adjust the throttle cable free play
if necessary.
Lubricate the throttle grip housing and cable.
32 *Lights, signals and
switches Check operation.
Adjust headlight beam.
NO. ITEM CHECK OR MAINTENANCE JOB
ODOMETER READING
ANNUAL
CHECK
1000 km
(600 mi) 10000 km
(6000 mi) 20000 km
(12000 mi) 30000 km
(18000 mi) 40000 km
(24000 mi)
BX4-9-E0.book 7 ページ 2016年12月1日 木曜日 午後8時7分
Page 112 of 130

Periodic maintenance and adjustment
7-36
1
2
3
4
5
67
8
9
10
11
12 3. Turn the key to “ON” and turn on
the electrical circuit in question to check if the device operates.
4. If the fuse immediately blows again, have a Yamaha dealer
check the electrical system.
EAU67121
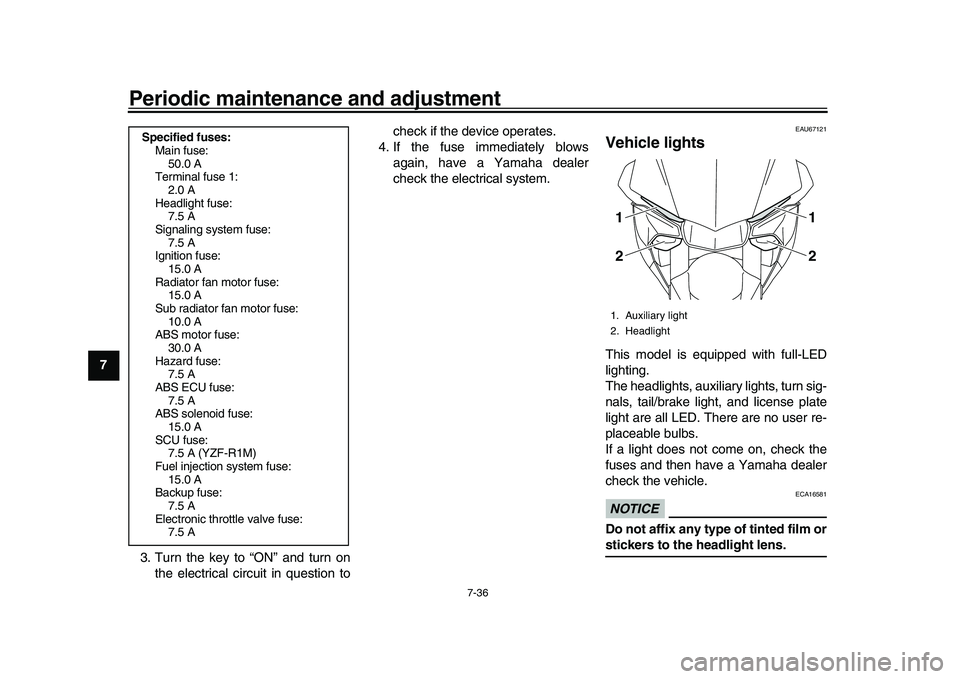
Vehicle lightsThis model is equipped with full-LED
lighting.
The headlights, auxiliary lights, turn sig-
nals, tail/brake light, and license plate
light are all LED. There are no user re-
placeable bulbs.
If a light does not come on, check the
fuses and then have a Yamaha dealer
check the vehicle.NOTICE
ECA16581
Do not affix any type of tinted film orstickers to the headlight lens.
Specified fuses:Main fuse:50.0 A
Terminal fuse 1:
2.0 A
Headlight fuse: 7.5 A
Signaling system fuse: 7.5 A
Ignition fuse:
15.0 A
Radiator fan motor fuse: 15.0 A
Sub radiator fan motor fuse: 10.0 A
ABS motor fuse:
30.0 A
Hazard fuse: 7.5 A
ABS ECU fuse: 7.5 A
ABS solenoid fuse:
15.0 A
SCU fuse: 7.5 A (YZF-R1M)
Fuel injection system fuse: 15.0 A
Backup fuse: 7.5 A
Electronic thrott le valve fuse:
7.5 A
1. Auxiliary light
2. Headlight
12
1
2
BX4-9-E0.book 36 ページ 2016年12月1日 木曜日 午後8時7分
Page 113 of 130

Periodic maintenance and adjustment7-37
1
2
3
4
5
678
9
10
11
12
TIP
The right headlight comes on
when Pass/LAP switch “ /LAP”
is pushed or the dimmer switch is
set to “ ” (high beam).
The auxiliary lights were designed
to fade out as your R1 goes tosleep.
EAU67131
Supporting the motorcycleSince this model is not equipped with a
centerstand, use maintenance stands
when removing the front or rear wheel
or when performing other maintenance
that requires the motorcycle to stand up
right.
Check that the motorcycle is in a stable
and level position before starting any
maintenance.
EAU25872
TroubleshootingAlthough Yamaha motorcycles receive
a thorough inspection before shipment
from the factory, trouble may occur dur-
ing operation. Any problem in the fuel,
compression, or ignition systems, for
example, can cause poor starting and
loss of power.
The following troubleshooting charts
represent quick and easy procedures
for checking these vital systems your-
self. However, should your motorcycle
require any repair, take it to a Yamaha
dealer, whose skilled technicians have
the necessary tools, experience, and
know-how to service the motorcycle
properly.
Use only genuine Yamaha replace-
ment parts. Imitation parts may look like
Yamaha parts, but they are often inferi-
or, have a shorter service life and can
lead to expensive repair bills.
WARNING
EWA15142
When checking the fuel system, do
not smoke, and make sure there are
no open flames or sparks in the ar-
ea, including pilot lights from water
1. Maintenance stand (example)
1
BX4-9-E0.book 37 ページ 2016年12月1日 木曜日 午後8時7分
Page 118 of 130

Motorcycle care and storage
8-2
1
2
3
4
5
6
78
9
10
11
12 water and diluted mild detergent
may be used. Be sure to rinse
off any detergent residue using
plenty of water, as it is harmful
to plastic parts.
Do not use any harsh chemical
products on plastic parts or the
muffler. Be sure to avoid using
cloths or sponges which have
been in contact with strong or
abrasive cleaning products, sol-
vent or thinner, fuel (gasoline),
rust removers or inhibitors,
brake fluid, antifreeze or electro-
lyte.
Do not use high-pressure wash-
ers or steam-jet cleaners since
they cause water seepage and
deterioration in the following ar-
eas: seals (of wheel and swing-
arm bearings, fork and brakes),
storage compartments, electric
components (couplers, connec-
tors, instruments, switches and
lights), breather hoses andvents.
After normal use
Remove dirt with warm water, a mild
detergent, and a soft, clean sponge,
and then rinse thoroughly with clean
water. Use a toothbrush or bottlebrush
for hard-to-reach areas. Stubborn dirt
and insects will come off more easily if
the area is covered with a wet cloth for
a few minutes before cleaning.
After riding in the rain, near the sea oron salt-sprayed roadsSince sea salt or salt sprayed on roads
during winter are extremely corrosive in
combination with water, carry out the
following steps after each ride in the
rain, near the sea or on salt-sprayed
roads.TIPSalt sprayed on roads in the winter mayremain well into spring.
1. Clean the motorcycle with cold wa- ter and a mild detergent, after the
engine has cooled down.
NOTICE: Do not use warm water
since it increases the corrosive
action of the salt.
[ECA10792]
2. After drying the motorcycle, apply a corrosion protection spray on all
metal, including chrome- and nick-
el-plated, surfaces (except the tita-
nium muffler) to prevent corrosion.
Cleaning the windshield
Avoid using any alkaline or strong acid
cleaner, gasoline, brake fluid, or any
other solvent. Clean the windshield with
a cloth or sponge dampened with a
neutral detergent, and after cleaning,
thoroughly wash it off with water. For
additional cleaning, use Yamaha Wind-
shield Cleaner or other quality cleaner.
Some cleaning compounds for plastics
may leave scratches on surfaces of the
windshield. Before using them, make a
test by polishing an area which does
not affect your visibility.
Cleaning the titanium mufflerThis model is equipped with a titanium
muffler, which requires the following
special care.
Use only a soft, clean cloth or
sponge with mild detergent and
water to clean the titanium muffler.
However, if the muffler cannot be
thoroughly cleaned with mild de-
BX4-9-E0.book 2 ページ 2016年12月1日 木曜日 午後8時7分
Page 126 of 130

11-1
1
2
3
4
5
6
7
8
9
1011
12
IndexAABS warning light.................................... 4-6
Air filter element .................................... 7-18
Auxiliary DC connector ......................... 4-46BBattery................................................... 7-33
Brake and clutch levers, checking and lubricating ........................................... 7-30
Brake and shift pedals, checking and lubricating ........................................... 7-29
Brake fluid, changing ............................ 7-26
Brake fluid level, checking .................... 7-25
Brake lever ............................................ 4-31
Brake lever free play, checking ............. 7-24
Brake light switches .............................. 7-24
Brake pedal ........................................... 4-31
Brake system ........................................ 4-32CCables, checking and lubricating .......... 7-29
Canister................................................. 7-13
Care ........................................................ 8-1
Catalytic converter ................................ 4-36
CCU ...................................................... 4-38
Clutch lever ........................................... 4-30
Clutch lever free play, adjusting ............ 7-23
Coolant.................................................. 7-16
Cowlings and panels, removing and installing................................................ 7-9DData recording, vehicle ......................... 10-2
Diagnostic connector ............................ 10-2
Dimmer switch ........................................ 4-4
Display, main screen............................... 4-9
Display, menu screen ........................... 4-15 Document storage ................................ 4-39
Drive chain, cleaning and lubricating .... 7-28
Drive chain slack .................................. 7-27
EEngine break-in ...................................... 6-3
Engine idling speed, checking .............. 7-19
Engine oil and oil fi
lter cartridge ........... 7-13
Engine serial number............................ 10-1
Engine trouble warning light ................... 4-6
EXUP system ....................................... 4-46FFront and rear brake pads, checking .... 7-25
Front fork, adjusting .............................. 4-40
Front fork, checking .............................. 7-31
Fuel....................................................... 4-34
Fuel consumption, tips for reducing........ 6-3
Fuel level warning light ........................... 4-6
Fuel tank breather hose and overflow hose ................................................... 4-36
Fuel tank cap ........................................ 4-33
Fuses, replacing ................................... 7-34GGlossary ................................................. 3-3HHandlebar switches ................................ 4-3
Hazard switch ......................................... 4-4
High beam indicator light ........................ 4-6
Horn switch ............................................. 4-4IIdentification numbers .......................... 10-1
Ignition circuit cut-off system ................ 4-47
Immobilizer system ................................. 4-1
Immobilizer system indicator light........... 4-7
Indicator lights and warning lights .......... 4-6
MMain switch/steering lock ........................ 4-2
Maintenance and lubrication, periodic..... 7-5
Maintenance, emission control system ... 7-3
Matte color, caution ................................. 8-1
Model label ............................................ 10-2NNeutral indicator light .............................. 4-6OOil pressure and coolant temperature warning light.......................................... 4-8PParking .................................................... 6-4
Part locations .......................................... 2-1
Pass/LAP switch ..................................... 4-4RRear view mirrors .................................. 4-40SSafety information ................................... 1-1
Seats ..................................................... 4-37
Shifting .................................................... 6-2
Shift pedal ............................................. 4-30
Shift timing indicator light ........................ 4-7
Shock absorber assembly, adjusting .... 4-42
Sidestand .............................................. 4-47
Sidestand, checking an d lubricating...... 7-31
Spark plugs, checking ........................... 7-12
Special features ...................................... 3-1
Specifications .......................................... 9-1
Stability control indicator light.................. 4-7
Starting the engine .................................. 6-1
Steering, checking................................. 7-32
Steering damper and suspension
warning light.......................................... 4-8
BX4-9-E0.book 1 ページ 2016年12月1日 木曜日 午後8時7分
Page 127 of 130

Index
11-2
1
2
3
4
5
6
7
8
9
101112
Stop/Run/Start switch ............................. 4-4
Storage ................................................... 8-4
Supporting the motorcycle .................... 7-37
Swingarm pivots, lubricating ................. 7-31TThrottle grip and cable, checking and lubricating ........................................... 7-29
Throttle grip free play, checking ........... 7-19
Tires...................................................... 7-20
Tool kit .................................................... 7-2
Troubleshooting .................................... 7-37
Troubleshooting charts ......................... 7-39
Turn signal indicator light........................ 4-6
Turn signal switch ................................... 4-4VValve clearance .................................... 7-19
Vehicle identification number................ 10-1
Vehicle lights ........................................ 7-36WWheel bearings, c hecking .................... 7-32
Wheels.................................................. 7-22YYRC functions visual guide..................... 3-4
YRC settings......................................... 4-16
YRC (Yamaha Ride Control) .................. 3-1
BX4-9-E0.book 2 ページ 2016年12月1日 木曜日 午後8時7分