engine oil YAMAHA YZF-R1 2019 User Guide
[x] Cancel search | Manufacturer: YAMAHA, Model Year: 2019, Model line: YZF-R1, Model: YAMAHA YZF-R1 2019Pages: 124, PDF Size: 9.58 MB
Page 67 of 124

6-1
1
2
3
4
567
8
9
10
11
12
Operation and important riding points
EAU15952
Read the Owner’s Manual carefully to
become familiar with all controls. If
there is a control or function you do not
understand, ask your Yamaha dealer.
WARNING
EWA10272
Failure to familiarize yourself with
the controls can lead to loss of con-
trol, which could cause an accidentor injury.
EAU73461
TIPThis model is equipped with:
an inertial measurement unit (IMU)
that will stop the engine in case of
turnover. In this case, turn the
main switch off (and then back on)
before attempting to restart the en-
gine. Failing to do so will prevent
the engine from starting even
though the engine will crank when
the start switch is pushed.
an engine auto-stop system. The
engine stops automatically if left
idling for 20 minutes. In this case,
simply push the start switch to re-start the engine.
EAU79303
Starting the engineIn order for the ignition circuit cut-off
system (page 4-42) to enable starting,
one of the following conditions must be
met:
The transmission is in the neutral
position.
The transmission is in gear with
the clutch lever pulled and the sid-
estand up.
To start the engine
1. Insert the key into the main switch.
2. Set the Stop/Run/Start switch to “”.
3. Turn the main switch (key) to “ON”.
4. Confirm the following warning lights and indicator lights perform a
self-check.
Engine trouble warning light
Oil pressure and coolant tem-
perature warning light
ABS warning light
Fuel level warning light
Auxiliary system warning light
Shift indicator light
Stability control indicator light
BX4-9-E2.book 1 ページ 2018年9月6日 木曜日 午後4時39分
Page 68 of 124
Operation and important riding points
6-2
1
2
3
4
56
7
8
9
10
11
12
Immobilizer system indicator
light
TIP
The oil pressure and coolant tem-
perature warning light will come
on, go off briefly, and then remain
on until the engine is started.
The ABS warning light will remainon until the vehicle starts moving.
NOTICE
ECA24110
If a warning or indicator light does
not work as described above, have aYamaha dealer check the vehicle.
5. Shift the transmission into the neu- tral position (or hold the clutch le-
ver pulled with the sidestand up).
6. Push the start switch, and release it when the engine starts.
If the engine does not start within 5
seconds of pressing the start
switch, wait 10 seconds before
pressing the switch again to allow
battery voltage to restore.
NOTICE
ECA11043
For maximum engine life, never ac-
celerate hard when the engine iscold!
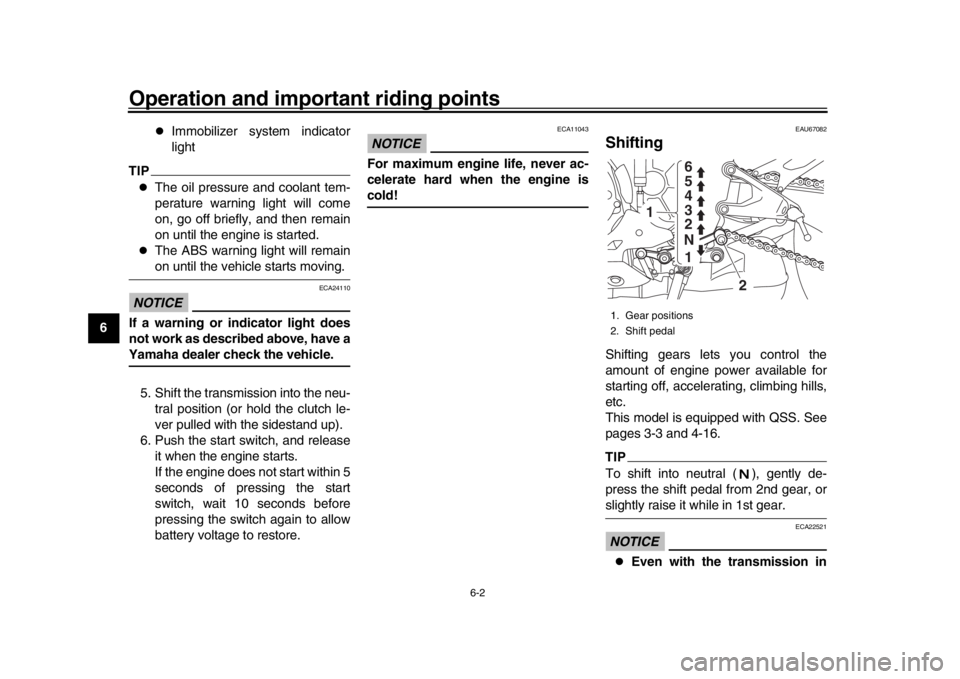
EAU67082
ShiftingShifting gears lets you control the
amount of engine power available for
starting off, accelerating, climbing hills,
etc.
This model is equipped with QSS. See
pages 3-3 and 4-16.TIPTo shift into neutral ( ), gently de-
press the shift pedal from 2nd gear, orslightly raise it while in 1st gear.NOTICE
ECA22521
Even with the transmission in
1. Gear positions
2. Shift pedal
1 2 3 4
5 6
N
1
2
BX4-9-E2.book 2 ページ 2018年9月6日 木曜日 午後4時39分
Page 69 of 124

Operation and important riding points
6-3
1
2
3
4
567
8
9
10
11
12
the neutral position, do not
coast for long periods of time
with the engine off, nor tow the
motorcycle for long distances.
The transmission is properly lu-
bricated only when the engine is
running. Inadequate lubrication
may damage the transmission.
Except when using the quick
shift system, always pull the
clutch lever when changing
gears to avoid damaging the en-
gine, transmission, and drive-train.
EAU16811
Tips for reducing fuel
consumptionFuel consumption depends largely on
your riding style. Consider the following
tips to reduce fuel consumption:
Shift up swiftly, and avoid high en-
gine speeds during acceleration.
Do not rev the engine while shifting
down, and avoid high engine
speeds with no load on the engine.
Turn the engine off instead of let-
ting it idle for an extended length of
time (e.g., in traffic jams, at traffic
lights or at railroad crossings).
EAU16842
Engine break-inThere is never a more important period
in the life of your engine than the period
between 0 and 1600 km (1000 mi). For
this reason, you should read the follow-
ing material carefully.
Since the engine is brand new, do not
put an excessive load on it for the first
1600 km (1000 mi). The various parts in
the engine wear and polish themselves
to the correct operating clearances.
During this period, prolonged full-throt-
tle operation or any condition that might
result in engine overheating must be
avoided.
EAU17085
0–1000 km (0–600 mi)
Avoid prolonged operation above 7000
r/min.
NOTICE: After 1000 km (600
mi) of operation, the engine oil must
be changed and the oil filter car-
tridge or element replaced.
[ECA10303]
1000–1600 km (600–1000 mi)
Avoid prolonged operation above 8400
BX4-9-E2.book 3 ページ 2018年9月6日 木曜日 午後4時39分
Page 77 of 124

Periodic maintenance and adjustment
7-7
1
2
3
4
5
678
9
10
11
12
24 *Rear suspension
relay arm and
connecting arm
pivoting points Check operation.
25 Engine oil Change (warm engine before
draining).
Check oil level and vehicle for oil leakage.
26 Engine oil filter
cartridge Replace.
27 *Cooling system Check coolant level and vehicle
for coolant leakage.
Change. Every 3 years
28 *EXUP system Check operation, cable free play
and pulley position.
29 *Front and rear brake
switches Check operation.
30 *Moving parts and
cables Lubricate.
31 *Throttle grip
housing and cable Check operation and free play.
Adjust the throttle cable free play
if necessary.
Lubricate the throttle grip housing and cable.
32 *Lights, signals and
switches Check operation.
Adjust headlight beam.
NO. ITEM CHECK OR MAINTENANCE JOB
ODOMETER READING
ANNUAL
CHECK
1000 km
(600 mi) 10000 km
(6000 mi) 20000 km
(12000 mi) 30000 km
(18000 mi) 40000 km
(24000 mi)
BX4-9-E2.book 7 ページ 2018年9月6日 木曜日 午後4時39分
Page 82 of 124

Periodic maintenance and adjustment
7-12
1
2
3
4
5
67
8
9
10
11
12
NOTICE
ECA10841
Do not use any tools to remove or in-
stall the spark plug cap, otherwise
the ignition coil coupler may get
damaged. The spark plug cap may
be difficult to remove because the
rubber seal on the end of the cap fits
tightly. To remove the spark plug
cap, simply twist it back and forth
while pulling it out; to install it, twistit back and forth while pushing it in.
EAU36112
CanisterThis model is equipped with a canister
to prevent the discharging of fuel vapor
into the atmosphere. Before operating
this vehicle, make sure to check the fol-
lowing:
Check each hose connection.
Check each hose and canister for
cracks or damage. Replace if dam-
aged.
Make sure that the canister breath-
er is not blocked, and if necessary,
clean it.
EAU66535
Engine oil and oil filter
cartridgeThe engine oil level should be checked
before each ride. In addition, the oil
must be changed and the oil filter car-
tridge replaced at the intervals speci-
fied in the periodic maintenance and
lubrication chart.
To check the engine oil level 1. Place the vehicle on a level sur- face and hold it in an upright posi-
tion. A slight tilt to the side can
result in a false reading.
2. Start the engine, warm it up for several minutes, and then turn it
off.
3. Wait a few minutes until the oil set- tles, and then check the oil level
through the check window located
at the bottom-left side of the crank-
case.TIPThe engine oil should be between theminimum and maximum level marks.
1. To fuel tank
2. To atmosphere
3. Throttle body
4. Charcoal canister
5. Canister breather
#4#3#2#1
1 2
3 4 5
BX4-9-E2.book 12 ページ 2018年9月6日 木曜日 午後4時39分
Page 83 of 124

Periodic maintenance and adjustment7-13
1
2
3
4
5
678
9
10
11
12
4. If the engine oil is at or below the
minimum level mark, add sufficient
oil of the recommended type to
raise it to the correct level.
TIPCheck the oil filler cap O-ring for dam-age, and replace it if necessary.
To change the engine oil (and oil fil-
ter cartridge)1. Remove cowling A and panel B. (See page 7-9.)
2. Start the engine, warm it up for several minutes, and then turn it off.
3. Place an oil pan under the engine to collect the used oil.
4. Remove the engine oil filler cap, the engine oil drain bolt and its
gasket to drain the oil from the
crankcase.
TIPSkip steps 5–7 if the oil filter cartridge isnot being replaced.
5. Remove the oil filter cartridge with an oil filter wrench.
1. Engine oil level check window
2. Maximum level mark
3. Minimum level mark
2
3
1
1. Engine oil filler cap
1
1. Engine oil drain bolt
2. Gasket
12
BX4-9-E2.book 13 ページ 2018年9月6日 木曜日 午後4時39分
Page 84 of 124

Periodic maintenance and adjustment
7-14
1
2
3
4
5
67
8
9
10
11
12
TIPAn oil filter wrench is available at aYamaha dealer.
6. Apply a thin coat of clean engine oil to the O-ring of the new oil filter
cartridge.
TIPMake sure that the O-ring is properlyseated.
7. Install the new oil filter cartridge with an oil filter wrench, and then
tighten it to the specified torque
with a torque wrench. 8. Install the engine oil drain bolt and
its new gasket, and then tighten
the bolt to the specified torque.
9. Refill with the specified amount of the recommended engine oil.
1. Oil filter cartridge
2. Oil filter wrench1
2
1. O-ring
1
1. Torque wrenchTightening torque:Oil filter cartridge:
17 N·m (1.7 kgf·m, 13 lb·ft)
Tightening torque: Engine oil drain bolt:23 N·m (2.3 kgf·m, 17 lb·ft)
1
BX4-9-E2.book 14 ページ 2018年9月6日 木曜日 午後4時39分
Page 85 of 124

Periodic maintenance and adjustment7-15
1
2
3
4
5
678
9
10
11
12
TIPBe sure to wipe off spilled oil on any
parts after the engine and exhaust sys-tem have cooled down.NOTICE
ECA11621
In order to prevent clutch slip-
page (since the engine oil also
lubricates the clutch), do not
mix any chemical additives. Do
not use oils with a diesel speci-
fication of “CD” or oils of a high-
er quality than specified. In
addition, do not use oils labeled
“ENERGY CONSERVING II” or
higher.
Make sure that no foreign mate-rial enters the crankcase. 10. Check the oil filler cap O-ring for
damage, and replace it if neces-
sary.
11. Install and tighten the oil filler cap.
12. Start the engine, and then let it idle for several minutes while checking
it for oil leakage. If oil is leaking, im-
mediately turn the engine off and
check for the cause.
TIPAfter the engine is started, the oil pres-
sure and coolant temperature warning
light should go off if the oil level is suffi-cient.
NOTICE
ECA22490
If the oil pressure and coolant tem-
perature warning light flickers or re-
mains on even if the oil level is
correct, immediately turn the engine
off and have a Yamaha dealer checkthe vehicle.
13. Turn the engine off, wait a few min- utes until the oil settles, and then
check the oil level and correct it if
necessary.
14. Install the cowling and panel.
Recommended engine oil: Full synthetic
10W-40, 15W-50
Oil quantity:
Oil change: 3.90 L (4.12 US qt, 3.43 Imp.qt)
With oil filter removal:
4.10 L (4.33 US qt, 3.61 Imp.qt)
1. Engine oil filler cap
2. O-ring
21
BX4-9-E2.book 15 ページ 2018年9月6日 木曜日 午後4時39分
Page 86 of 124

Periodic maintenance and adjustment
7-16
1
2
3
4
5
67
8
9
10
11
12
EAU85450
Why YamalubeYAMALUBE oil is a Genuine YAMAHA
Part born of the engineers’ passion and
belief that engine oil is an important liq-
uid engine component. We form teams
of specialists in the fields of mechanical
engineering, chemistry, electronics and
track testing, and have them develop
the engine together with the oil it will
use. Yamalube oils take full advantage
of the base oil’s qualities and blend in
the ideal balance of additives to make
sure the final oil clears our performance
standards. Thus, Yamalube mineral,
semisynthetic and synthetic oils have
their own distinct characters and value.
Yamaha’s experience gained over
many years of research and develop-
ment into oil since the 1960’s helps
make Yamalube the best choice for
your Yamaha engine.
EAUS1203
CoolantThe coolant level should be checked
regularly. In addition, the coolant must
be changed at the intervals specified in
the periodic maintenance chart.TIPIf genuine Yamaha coolant is not avail-
able, use an ethylene glycol antifreeze
containing corrosion inhibitors for alu-
minum engines and mix with distilledwater at a 1:1 ratio.
EAU66512
To check the coolant level
Since the coolant level varies with en-
gine temperature, check when the en-
gine is cold. 1. Park the vehicle on a level surface.
2. With the vehicle in an upright posi- tion, look at the coolant level in the reservoir.
3. If the coolant is at or below the minimum level mark, remove cowl-
ing B to access the coolant reser-
voir. (See page 7-9.)
4. Remove the coolant reservoir cap. WARNING! Remove only the
coolant reservoir cap. Never at-
tempt to remove the radiator
cap when the engine is
hot.
[EWA15162]
Recommended coolant:YAMALUBE coolant
Coolant quantity: Coolant reservoir (max level mark):0.25 L (0.26 US qt, 0.22 Imp.qt)
Radiator (including all routes): 2.25 L (2.38 US qt, 1.98 Imp.qt)
1. Maximum level mark
2. Minimum level mark1
2
BX4-9-E2.book 16 ページ 2018年9月6日 木曜日 午後4時39分
Page 97 of 124

Periodic maintenance and adjustment7-27
1
2
3
4
5
678
9
10
11
12
3. Tighten the axle nut, then the lock-
nuts to their specified torques.
4. Make sure that the drive chain pull- ers are in the same position, the
drive chain slack is correct, and
the drive chain moves smoothly.
EAU23026
Cleaning and l ubricating the
drive chainThe drive chain must be cleaned and
lubricated at the intervals specified in
the periodic maintenance and lubrica-
tion chart, otherwise it will quickly wear
out, especially when riding in dusty or
wet areas. Service the drive chain as
follows.NOTICE
ECA10584
The drive chain must be lubricated
after washing the motorcycle, ridingin the rain or riding in wet areas.
1. Clean the drive chain with kero- sene and a small soft brush.
NOTICE: To prevent damaging
the O-rings, do not clean the
drive chain with steam cleaners,
high-pressure washers or inap-
propriate solvents.
[ECA11122]
2. Wipe the drive chain dry.
3. Thoroughly lubricate the drive chain with a special O-ring chain
lubricant. NOTICE: Do not use
engine oil or any other lubri-
cants for the drive chain, as they may contain substances that
could damage the O-rings.
[ECA11112]
1. Axle nut
2. Drive chain puller
3. Drive chain slack adjusting bolt
4. Locknut
5. Alignment marksTightening torques:
Axle nut: 190 N·m (19 kgf·m, 140 lb·ft)
Locknut: 16 N·m (1.6 kgf·m, 12 lb·ft)
1
2 3
45
(a)
(b)
BX4-9-E2.book 27 ページ 2018年9月6日 木曜日 午後4時39分