high beam YAMAHA YZF-R1 2019 Owners Manual
[x] Cancel search | Manufacturer: YAMAHA, Model Year: 2019, Model line: YZF-R1, Model: YAMAHA YZF-R1 2019Pages: 124, PDF Size: 9.58 MB
Page 24 of 124

Instrument and control functions
4-4
1
2
34
5
6
7
8
9
10
11
12
EAU66091
Pass/LAP switch “ /LAP”
Press this switch to flash the headlights
and to mark the start of each lap when
using the lap timer.
EAU79872
Dimmer switch “ / ”
Set this switch to “ ” for the high
beam and to “ ” for the low beam.TIPWhen the switch is set to low beam,
only the left headlight comes on. When
the switch is set to high beam, bothheadlights come on.
EAU66040
Turn signal switch “ / ”
To signal a right-hand turn, push this
switch to “ ”. To signal a left-hand
turn, push this switch to “ ”. When re-
leased, the switch returns to the center
position. To cancel the turn signal
lights, push the switch in after it has re-
turned to the center position.
EAU66030
Horn switch “ ”
Press this switch to sound the horn.
EAU66060
Stop/Run/Start switch “ / / ”
To crank the engine with the starter, set
this switch to “ ”, and then push the
switch down towards “ ”. See page
6-1 for starting instructions prior to
starting the engine.
Set this switch to “ ” to stop the engine
in case of an emergency, such as when
the vehicle overturns or when the throt-
tle cable is stuck.
EAU66010
Hazard switch “ ”
With the key in the “ON” or “ ” posi-
tion, use this switch to turn on the haz-
ard lights (simultaneous flashing of all
turn signal lights).
The hazard lights are used in case of
an emergency or to warn other drivers
when your vehicle is stopped where it
might be a traffic hazard.NOTICE
ECA10062
Do not use the hazard lights for an
extended length of time with the en-
gine not running, otherwise the bat-tery may discharge.
EAU66111
Mode switch “MODE”
Use the mode switch to change YRC
modes or edit the PWR, TCS, and SCS
settings from the main screen. This
switch has three buttons.
Up button - push this button to change
the selected YRC setting upward.
Center button - push this button to
scroll left to right among the MODE,
PWR, TCS, and SCS items.
Down button - push this button to
change the selected YRC setting
downward.TIP
The center button is also used to
activate the launch control system.
When the LCS icon is grey, push
and hold the center button. The
LCS icon will flash and turn white
when the system has been activat-
ed.
The traction control system can
only be turned off from the main
screen. Select TCS with the center
button, then push and hold the up
button until TCS OFF is displayed.
To turn the traction control system
back on, use the down button.
BX4-9-E2.book 4 ページ 2018年9月6日 木曜日 午後4時39分
Page 25 of 124

Instrument and control functions
4-5
1
2
345
6
7
8
9
10
11
12
When TCS has been turned off,
the SCS, LCS, and LIF systems
are also turned off for all YRC
modes.
See “YRC Setting” on page 4-14
for more information on how to
customize YRC modes and adjustYRC item setting levels.
EAU66100
Wheel switch “ ”
When the main screen is set to
STREET MODE, use the wheel switch
to scroll and reset the information dis-
play items.
When the main screen is set to TRACK
MODE, use the wheel switch to scroll
and reset the information display items
and to activate the lap timer.
When the display has been changed to
the MENU screen, use the wheel
switch to navigate the setting modules
and make setting changes.
Operate the wheel switch as follows.
Rotate up - rotate the wheel upward to
scroll up/left or increase a setting value.
Rotate down - rotate the wheel down-
ward to scroll down/right or decrease a
setting value. Short push
- briefly press the switch in-
ward to make and confirm selections.
Long push - press the switch inward
for one second to reset an information
display item or to access and exit the
MENU screen.
TIP
See page 4-8 for more information
on the main screen and its func-
tions.
See page 4-13 for more informa-
tion on the MENU screen and howto make setting changes.
EAU4939G
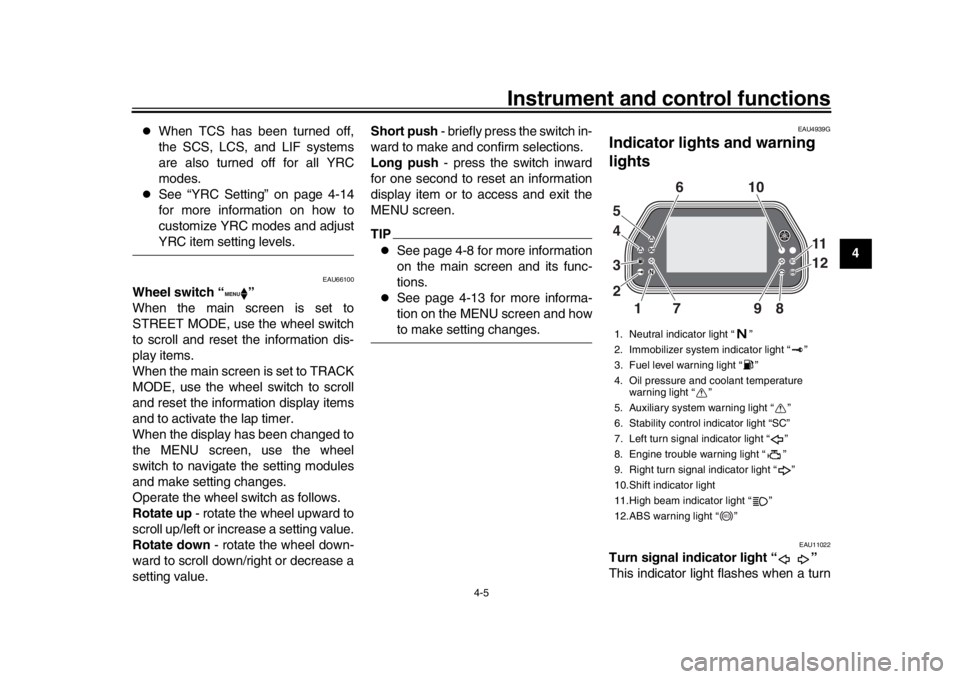
Indicator ligh ts and warning
lights
EAU11022
Turn signal indicator light “ ”
This indicator light flashes when a turn1. Neutral indicator light “ ”
2. Immobilizer system indicator light “ ”
3. Fuel level warning light “ ”
4. Oil pressure and coolant temperature warning light “ ”
5. Auxiliary system warning light “ ”
6. Stability control indicator light “SC”
7. Left turn signal indicator light “ ”
8. Engine trouble warning light “ ”
9. Right turn signal indicator light “ ”
10.Shift indicator light
11.High beam indicator light “ ”
12.ABS warning light “ ”
19 8
2 3 4 610
11
12
7
5
ABS
BX4-9-E2.book 5 ページ 2018年9月6日 木曜日 午後4時39分
Page 26 of 124

Instrument and control functions
4-6
1
2
34
5
6
7
8
9
10
11
12 signal light is flashing.
EAU11061
Neutral indicator light “ ”
This indicator light comes on when the
transmission is in the neutral position.
EAU11081
High beam indicator light “ ”
This indicator light comes on when the
high beam of the headlight is switched
on.
EAU66891
Fuel level warning light “ ”
This warning light comes on when the
fuel level drops below approximately
3.0 L (0.79 US gal, 0.66 Imp.gal). When
this occurs, refuel
as soon as possible.
The electrical circuit of the warning light
can be checked by turning the vehicle
on. The warning light should come on
for a few seconds, and then go off.TIPIf the warning light does not come on at
all, remains on after refueling, or if the
warning light flashes repeatedly, havea Yamaha dealer check the vehicle.
EAU79310
Engine trouble warning light “ ”
This warning light comes on if a prob-
lem is detected in the engine. If this oc-
curs, have a Yamaha dealer check the
on-board diagnostic system.
The electrical circuit of the warning light
can be checked by turning the vehicle
power on. The warning light should
come on for a few seconds, and then
go off.
If the warning light does not come on at
all, or if the warning light remains on,
have a Yamaha dealer check the vehi-
cle.
EAU66503
ABS warning light “ ”
In normal operation, the ABS warning
light comes on when the vehicle is
turned on, and goes off after traveling
at a speed of 10 km/h (6 mi/h) or higher.TIPIf the warning light does not work as de-
scribed above, or if the warning light
comes on while riding, the ABS and
UBS may not work correctly. Have a
Yamaha dealer check the vehicle as
soon as possible.
WARNING
EWA16041
If the ABS warning light does not go
off after traveling at a speed of 10
km/h (6 mi/h) or higher, or if the
warning light comes on or flashes
while riding, the brake system re-
verts to conventional braking. If ei-
ther of the above occurs, or if the
warning light does not come on at
all, use extra caution to avoid possi-
ble wheel lock during emergency
braking. Have a Yamaha dealer
check the brake system and electri-cal circuits as soon as possible.
EAU67432
Shift indicator light
This indicator light comes on when it is
time to shift to the next higher gear. The
engine speeds at which it comes on or
goes off can be adjusted. (See
page 4-20.)
As a self-check, the light will come on
briefly when the vehicle is first powered
on.
ABS
BX4-9-E2.book 6 ページ 2018年9月6日 木曜日 午後4時39分
Page 106 of 124

Periodic maintenance and adjustment
7-36
1
2
3
4
5
67
8
9
10
11
12
TIP
The right headlight comes on
when Pass/LAP switch “ /LAP”
is pushed or the dimmer switch is
set to “ ” (high beam).
The auxiliary lights were designed
to fade out as your R1 goes tosleep.
EAU67131
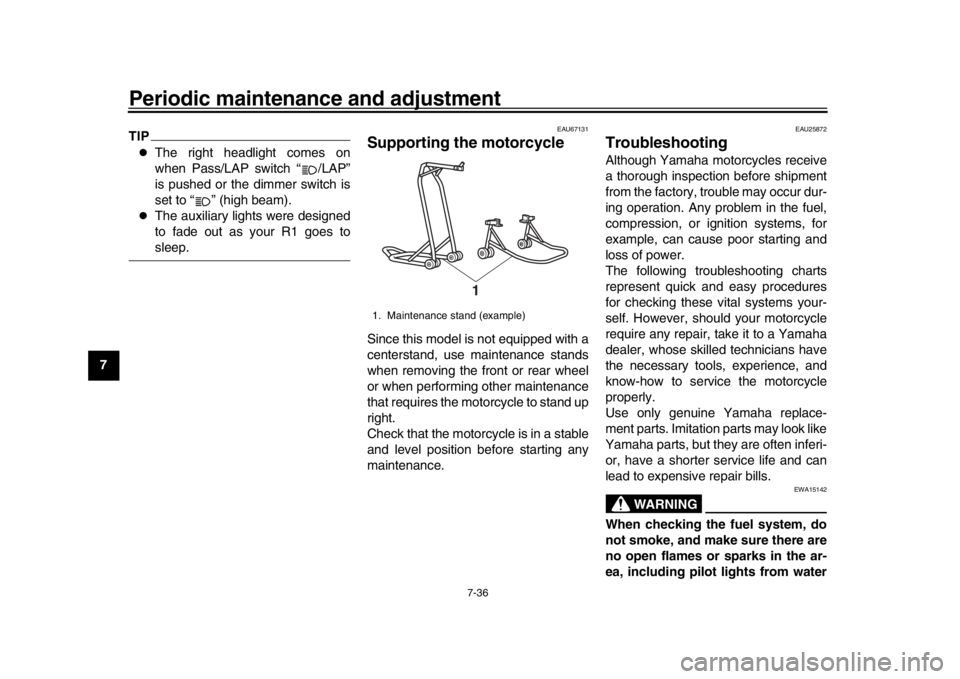
Supporting the motorcycleSince this model is not equipped with a
centerstand, use maintenance stands
when removing the front or rear wheel
or when performing other maintenance
that requires the motorcycle to stand up
right.
Check that the motorcycle is in a stable
and level position before starting any
maintenance.
EAU25872
TroubleshootingAlthough Yamaha motorcycles receive
a thorough inspection before shipment
from the factory, trouble may occur dur-
ing operation. Any problem in the fuel,
compression, or ignition systems, for
example, can cause poor starting and
loss of power.
The following troubleshooting charts
represent quick and easy procedures
for checking these vital systems your-
self. However, should your motorcycle
require any repair, take it to a Yamaha
dealer, whose skilled technicians have
the necessary tools, experience, and
know-how to service the motorcycle
properly.
Use only genuine Yamaha replace-
ment parts. Imitation parts may look like
Yamaha parts, but they are often inferi-
or, have a shorter service life and can
lead to expensive repair bills.
WARNING
EWA15142
When checking the fuel system, do
not smoke, and make sure there are
no open flames or sparks in the ar-
ea, including pilot lights from water
1. Maintenance stand (example)
1
BX4-9-E2.book 36 ページ 2018年9月6日 木曜日 午後4時39分
Page 120 of 124

11-1
1
2
3
4
5
6
7
8
9
1011
12
IndexAABS warning light.................................... 4-6
Air filter element .................................... 7-17
Auxiliary DC connector ......................... 4-41
Auxiliary system warning light ................. 4-8BBattery................................................... 7-32
Brake and clutch levers, checking and lubricating ........................................... 7-29
Brake and shift pedals, checking and
lubricating ........................................... 7-28
Brake fluid, changing ............................ 7-25
Brake fluid level, checking .................... 7-24
Brake lever ............................................ 4-27
Brake lever free play, checking ............. 7-23
Brake light switches .............................. 7-23
Brake pedal ........................................... 4-28
Brake system ........................................ 4-28CCables, checking and lubricating .......... 7-28
Canister................................................. 7-12
Care ........................................................ 8-1
Catalytic converter ................................ 4-33
Clutch lever ........................................... 4-26
Clutch lever free play, adjusting ............ 7-22
Coolant.................................................. 7-16
Cowlings and panels, removing and installing................................................ 7-9DData recording, vehicle ......................... 10-2
Diagnostic connector ............................ 10-2
Dimmer switch ........................................ 4-4
Display, main screen............................... 4-8
Display, menu screen ........................... 4-13 Document storage ................................ 4-35
Drive chain, cleaning and lubricating .... 7-27
Drive chain slack .................................. 7-26
EEngine break-in ...................................... 6-3
Engine idling speed, checking .............. 7-18
Engine oil and oil fi
lter cartridge ........... 7-12
Engine serial number............................ 10-1
Engine trouble warning light ................... 4-6
EXUP system ....................................... 4-40FFront and rear brake pads, checking .... 7-24
Front fork, adjusting .............................. 4-36
Front fork, checking .............................. 7-30
Fuel....................................................... 4-31
Fuel consumption, tips for reducing........ 6-3
Fuel level warning light ........................... 4-6
Fuel tank cap ........................................ 4-30
Fuel tank overflow hose........................ 4-32
Fuses, replacing ................................... 7-33GGlossary ................................................. 3-4HHandlebar switches ................................ 4-3
Hazard switch ......................................... 4-4
High beam indicator light ........................ 4-6
Horn switch ............................................. 4-4IIdentification numbers .......................... 10-1
Ignition circuit cut-off system ................ 4-42
Immobilizer system ................................. 4-1
Immobilizer system indicator light........... 4-7
Indicator lights and warning lights .......... 4-5
MMain switch/steering lock ........................ 4-2
Maintenance and lubrication, periodic..... 7-5
Maintenance, emission control system ... 7-3
Matte color, caution ................................. 8-1
Model label ............................................ 10-2NNeutral indicator light .............................. 4-6OOil pressure and coolant temperature
warning light.......................................... 4-7PParking .................................................... 6-4
Part locations .......................................... 2-1
Pass/LAP switch ..................................... 4-4RRear view mirrors .................................. 4-36SSafety information ................................... 1-1
Seats ..................................................... 4-34
Shift indicator light ................................... 4-6
Shifting .................................................... 6-2
Shift pedal ............................................. 4-27
Shock absorber assembly, adjusting .... 4-38
Sidestand .............................................. 4-41
Sidestand, checking an d lubricating...... 7-30
Spark plugs, checking ........................... 7-11
Special features ...................................... 3-1
Specifications .......................................... 9-1
Stability control indicator light.................. 4-7
Starting the engine .................................. 6-1
Steering, checking................................. 7-31
Stop/Run/Start switch.............................. 4-4
Storage.................................................... 8-4
BX4-9-E2.book 1 ページ 2018年9月6日 木曜日 午後4時39分