brake YAMAHA YZF-R125 2016 User Guide
[x] Cancel search | Manufacturer: YAMAHA, Model Year: 2016, Model line: YZF-R125, Model: YAMAHA YZF-R125 2016Pages: 98, PDF Size: 6.87 MB
Page 46 of 98
Periodic maintenance and adjustment
6-4
6
EAU69250
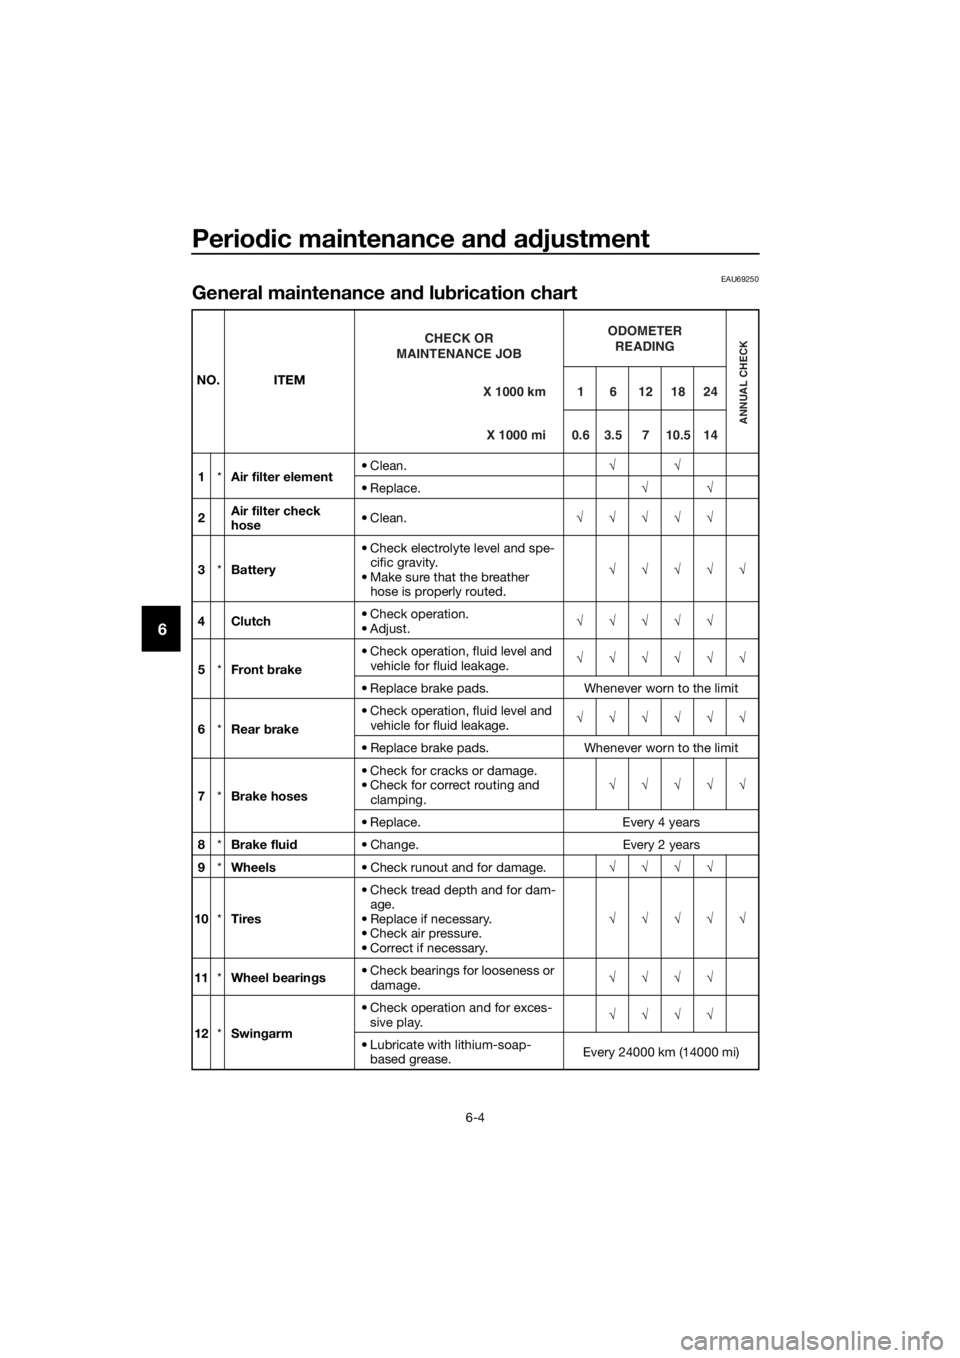
General maintenance and lubrication chart
NO. ITEM
1*Air filter element• Clean.√√
• Replace.√√
2Air filter check
hose• Clean.√√√√√
3*Battery• Check electrolyte level and spe-
cific gravity.
• Make sure that the breather
hose is properly routed.√√√√√
4Clutch• Check operation.
•Adjust.√√√√√
5*Front brake• Check operation, fluid level and
vehicle for fluid leakage.√√√√√√
• Replace brake pads. Whenever worn to the limit
6*Rear brake• Check operation, fluid level and
vehicle for fluid leakage.√√√√√√
• Replace brake pads. Whenever worn to the limit
7*Brake hoses• Check for cracks or damage.
• Check for correct routing and
clamping.√√√√√
• Replace. Every 4 years
8*Brake fluid• Change. Every 2 years
9*Wheels• Check runout and for damage.√√√√
10*Tires• Check tread depth and for dam-
age.
• Replace if necessary.
• Check air pressure.
• Correct if necessary.√√√√√
11*Wheel bearings• Check bearings for looseness or
damage.√√√√
12*Swingarm• Check operation and for exces-
sive play.√√√√
• Lubricate with lithium-soap-
based grease.Every 24000 km (14000 mi)X 1000 km CHECK OR
MAINTENANCE JOB
X 1000 miODOMETER
READINGANNUAL CHECK
1 6 12 18 24
0.6 3.5 7 10.5 14
U5D7E6E0.book Page 4 Wednesday, June 17, 2015 10:25 AM
Page 47 of 98
Periodic maintenance and adjustment
6-5
6
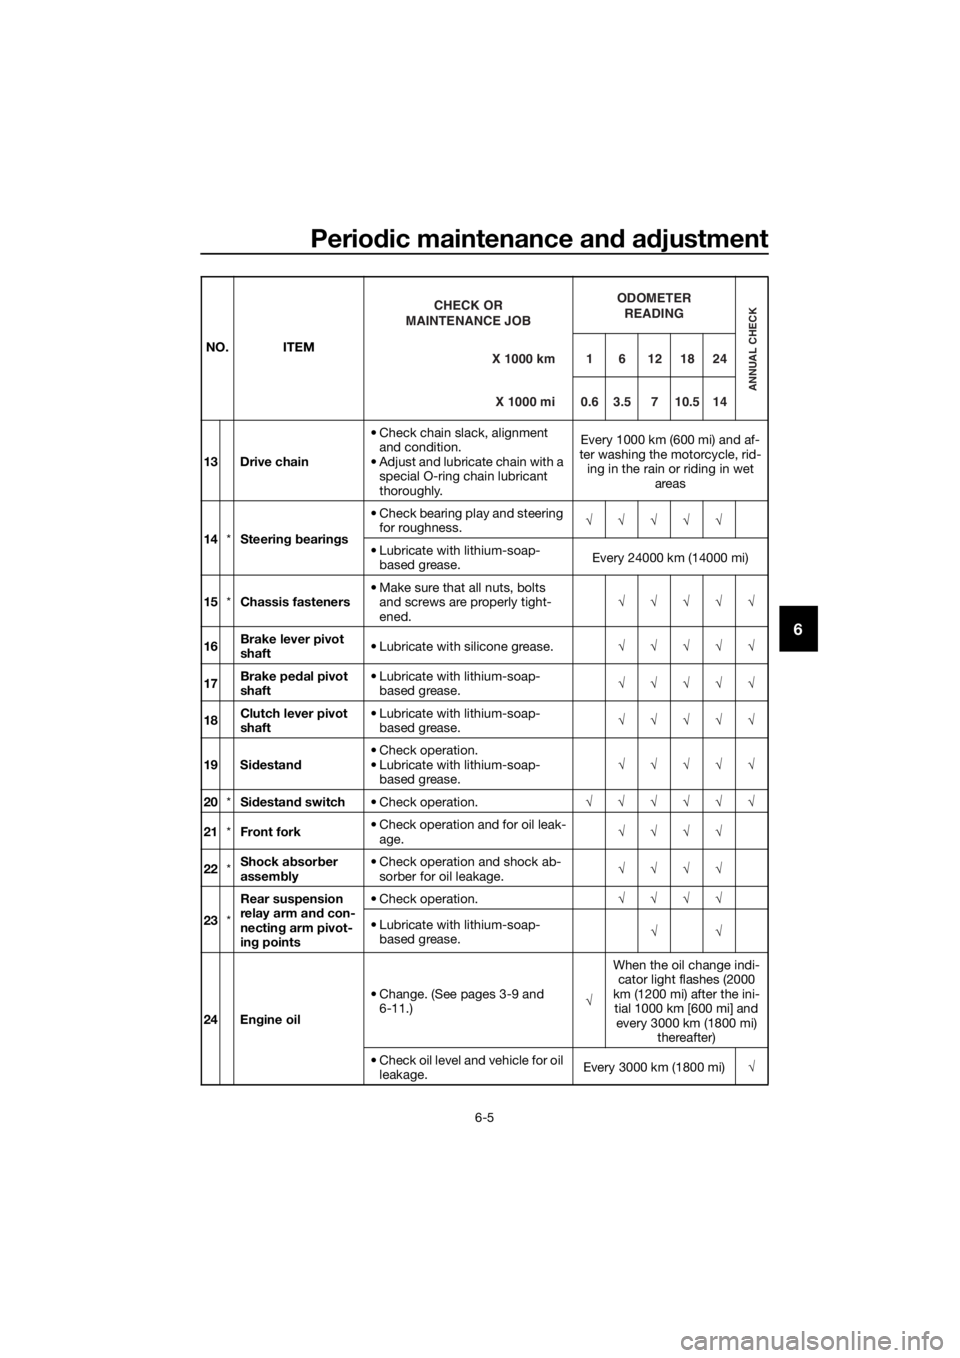
13 Drive chain• Check chain slack, alignment
and condition.
• Adjust and lubricate chain with a
special O-ring chain lubricant
thoroughly.Every 1000 km (600 mi) and af-
ter washing the motorcycle, rid-
ing in the rain or riding in wet
areas
14*Steering bearings• Check bearing play and steering
for roughness.√√√√√
• Lubricate with lithium-soap-
based grease.Every 24000 km (14000 mi)
15*Chassis fasteners• Make sure that all nuts, bolts
and screws are properly tight-
ened.√√√√√
16Brake lever pivot
shaft• Lubricate with silicone grease.√√√√√
17Brake pedal pivot
shaft• Lubricate with lithium-soap-
based grease.√√√√√
18Clutch lever pivot
shaft• Lubricate with lithium-soap-
based grease.√√√√√
19 Sidestand• Check operation.
• Lubricate with lithium-soap-
based grease.√√√√√
20*Sidestand switch• Check operation.√√√√√√
21*Front fork• Check operation and for oil leak-
age.√√√√
22*Shock absorber
assembly• Check operation and shock ab-
sorber for oil leakage.√√√√
23*Rear suspension
relay arm and con-
necting arm pivot-
ing points• Check operation.√√√√
• Lubricate with lithium-soap-
based grease.
√√
24 Engine oil• Change. (See pages 3-9 and
6-11.)√When the oil change indi-
cator light flashes (2000
km (1200 mi) after the ini-
tial 1000 km [600 mi] and
every 3000 km (1800 mi)
thereafter)
• Check oil level and vehicle for oil
leakage.Every 3000 km (1800 mi)√ NO. ITEM
X 1000 km CHECK OR
MAINTENANCE JOB
X 1000 mi
ODOMETER
READING
ANNUAL CHECK
16121824
0.63.5710.514
U5D7E6E0.book Page 5 Wednesday, June 17, 2015 10:25 AM
Page 48 of 98
Periodic maintenance and adjustment
6-6
6
EAUM2071
TIP
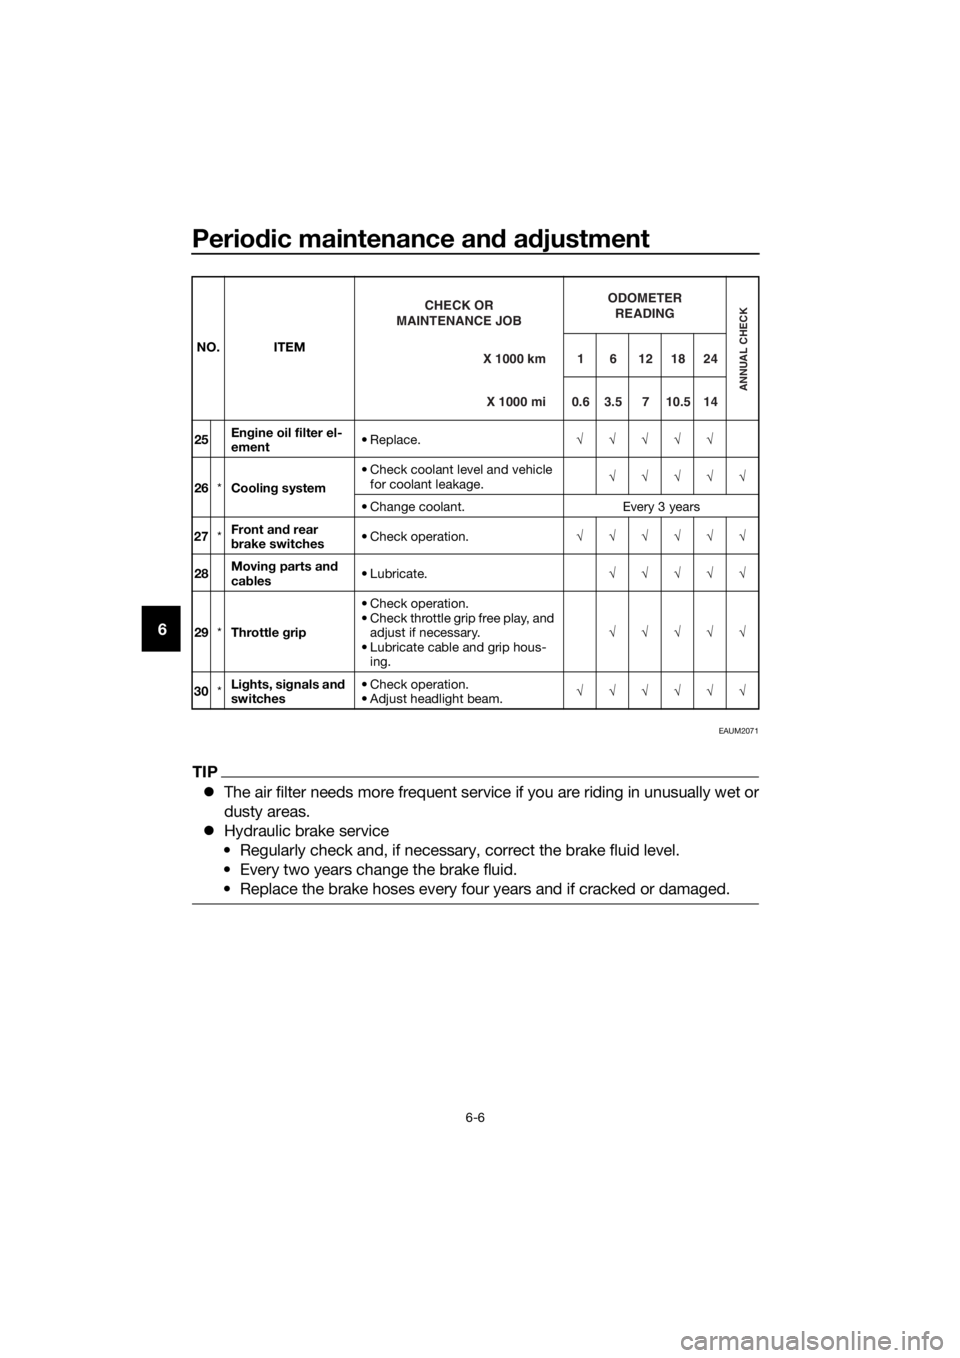
The air filter needs more frequent service if you are riding in unusually wet or
dusty areas.
Hydraulic brake service
• Regularly check and, if necessary, correct the brake fluid level.
• Every two years change the brake fluid.
• Replace the brake hoses every four years and if cracked or damaged.
25Engine oil filter el-
ement• Replace.√√√√√
26*Cooling system• Check coolant level and vehicle
for coolant leakage.√√√√√
• Change coolant. Every 3 years
27*Front and rear
brake switches• Check operation.√√√√√√
28Moving parts and
cables• Lubricate.√√√√√
29*Throttle grip• Check operation.
• Check throttle grip free play, and
adjust if necessary.
• Lubricate cable and grip hous-
ing.√√√√√
30*Lights, signals and
switches• Check operation.
• Adjust headlight beam.√√√√√√ NO. ITEM
X 1000 km CHECK OR
MAINTENANCE JOB
X 1000 miODOMETER
READING
ANNUAL CHECK
16121824
0.6 3.5 7 10.5 14
U5D7E6E0.book Page 6 Wednesday, June 17, 2015 10:25 AM
Page 61 of 98
Periodic maintenance and adjustment
6-19
6
TIP
The tire tread depth limits may differ
from country to country. Always com-
ply with the local regulations.
WARNING
EWA10472
Have a Yamaha dealer replace
excessively worn tires. Besides
being illegal, operating the vehi-
cle with excessively worn tires
decreases riding stability and
can lead to loss of control.
The replacement of all wheel
and brake-related parts, includ-
ing the tires, should be left to a
Yamaha dealer, who has the
necessary professional knowl-
edge and experience to do so.
Ride at moderate speeds after
changing a tire since the tire
surface must first be “broken
in” for it to develop its optimal
characteristics.
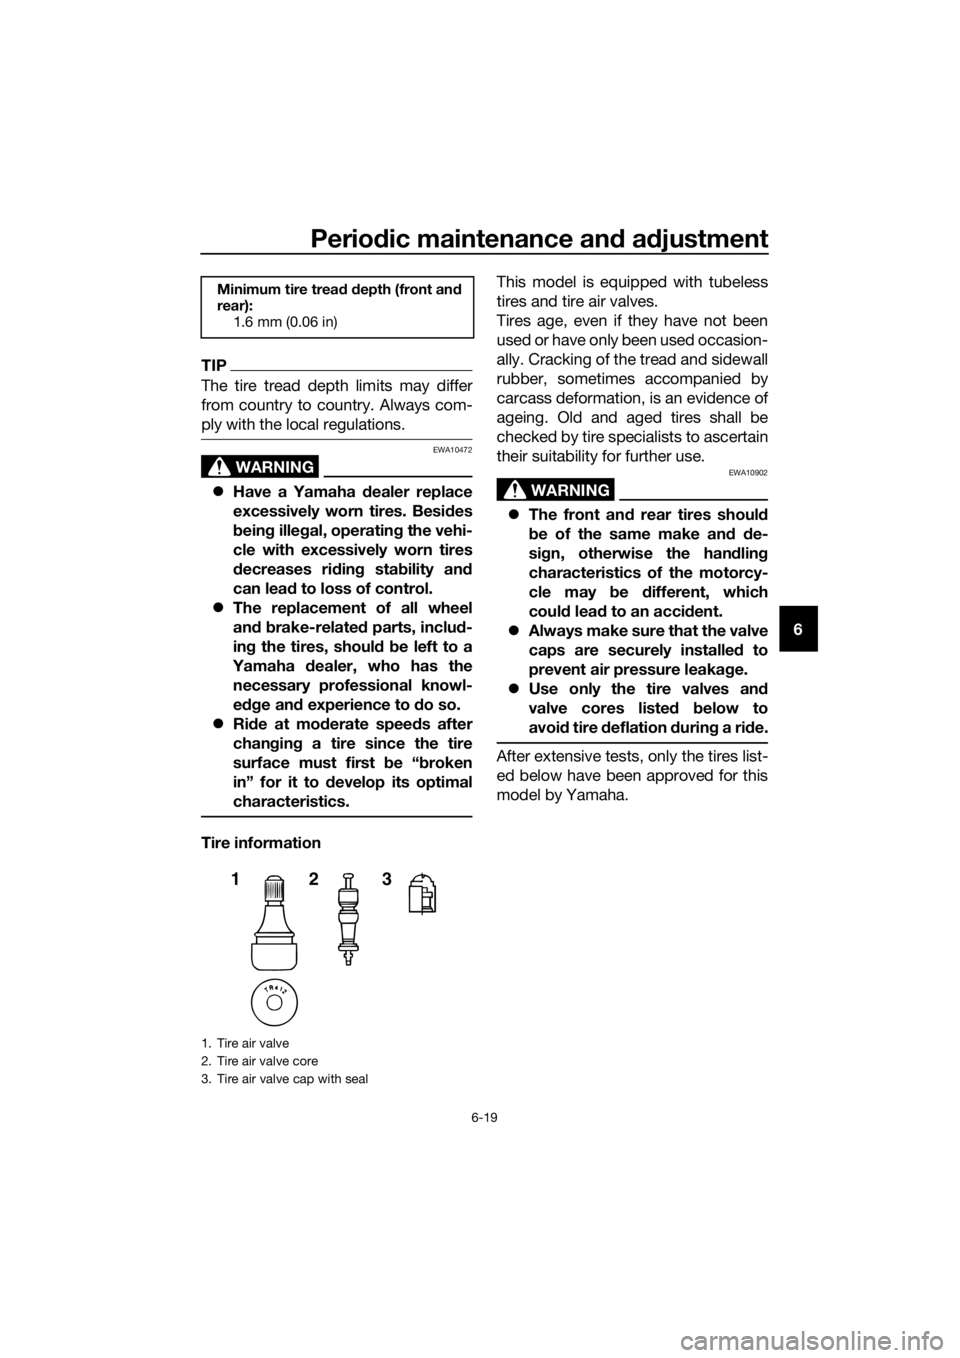
Tire informationThis model is equipped with tubeless
tires and tire air valves.
Tires age, even if they have not been
used or have only been used occasion-
ally. Cracking of the tread and sidewall
rubber, sometimes accompanied by
carcass deformation, is an evidence of
ageing. Old and aged tires shall be
checked by tire specialists to ascertain
their suitability for further use.
WARNING
EWA10902
The front and rear tires should
be of the same make and de-
sign, otherwise the handling
characteristics of the motorcy-
cle may be different, which
could lead to an accident.
Always make sure that the valve
caps are securely installed to
prevent air pressure leakage.
Use only the tire valves and
valve cores listed below to
avoid tire deflation during a ride.
After extensive tests, only the tires list-
ed below have been approved for this
model by Yamaha.
Minimum tire tread depth (front and
rear):
1.6 mm (0.06 in)
1. Tire air valve
2. Tire air valve core
3. Tire air valve cap with seal
123
U5D7E6E0.book Page 19 Wednesday, June 17, 2015 10:25 AM
Page 63 of 98
Periodic maintenance and adjustment
6-21
6
EAU22046
Adjusting the clutch lever free
play
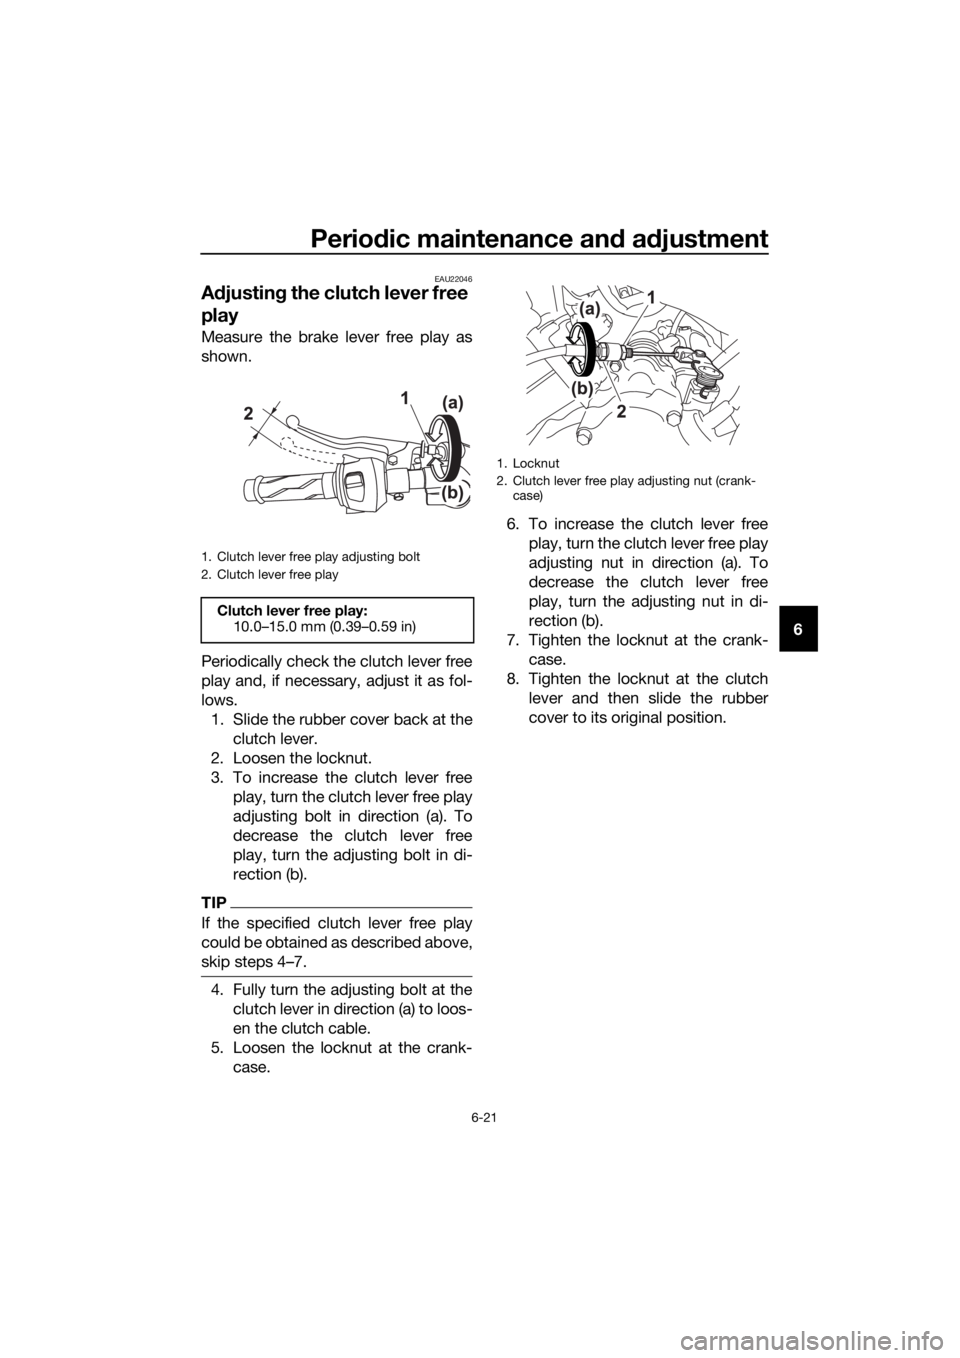
Measure the brake lever free play as
shown.
Periodically check the clutch lever free
play and, if necessary, adjust it as fol-
lows.
1. Slide the rubber cover back at the
clutch lever.
2. Loosen the locknut.
3. To increase the clutch lever free
play, turn the clutch lever free play
adjusting bolt in direction (a). To
decrease the clutch lever free
play, turn the adjusting bolt in di-
rection (b).
TIP
If the specified clutch lever free play
could be obtained as described above,
skip steps 4…7.
4. Fully turn the adjusting bolt at the
clutch lever in direction (a) to loos-
en the clutch cable.
5. Loosen the locknut at the crank-
case.6. To increase the clutch lever free
play, turn the clutch lever free play
adjusting nut in direction (a). To
decrease the clutch lever free
play, turn the adjusting nut in di-
rection (b).
7. Tighten the locknut at the crank-
case.
8. Tighten the locknut at the clutch
lever and then slide the rubber
cover to its original position.
1. Clutch lever free play adjusting bolt
2. Clutch lever free play
Clutch lever free play:
10.0–15.0 mm (0.39–0.59 in)
1. Locknut
2. Clutch lever free play adjusting nut (crank-
case)
U5D7E6E0.book Page 21 Wednesday, June 17, 2015 10:25 AM
Page 64 of 98

Periodic maintenance and adjustment
6-22
6
EAUT1223
Checking the front brake lever
free play
Measure the front brake lever free play
as shown.
Periodically check the brake lever free
play and, if necessary, have a Yamaha
dealer check the brake system.
WARNING
EWA10642
An incorrect brake lever free play in-
dicates a hazardous condition in the
brake system. Do not operate the
vehicle until the brake system has
been checked or repaired by a
Yamaha dealer.
EAUM1355
Adjusting the brake pedal free
play
Measure the brake pedal free play as
shown.
Periodically check the brake pedal free
play and, if necessary, have a Yamaha
dealer adjust it.
WARNING
EWAM1031
An incorrect brake pedal free play
indicates a hazardous condition in
the brake system. Do not operate
the motorcycle until the brake sys-
tem has been checked or repaired
by a Yamaha dealer.
1. Brake lever free play
Front brake lever free play:
2.0–5.0 mm (0.08–0.20 in)
ZAUM1179
INFOINFO
1. Brake pedal free play
Brake pedal free play:
3.5–4.5 mm (0.14–0.18 in)
U5D7E6E0.book Page 22 Wednesday, June 17, 2015 10:25 AM
Page 65 of 98
Periodic maintenance and adjustment
6-23
6
EAUM3541
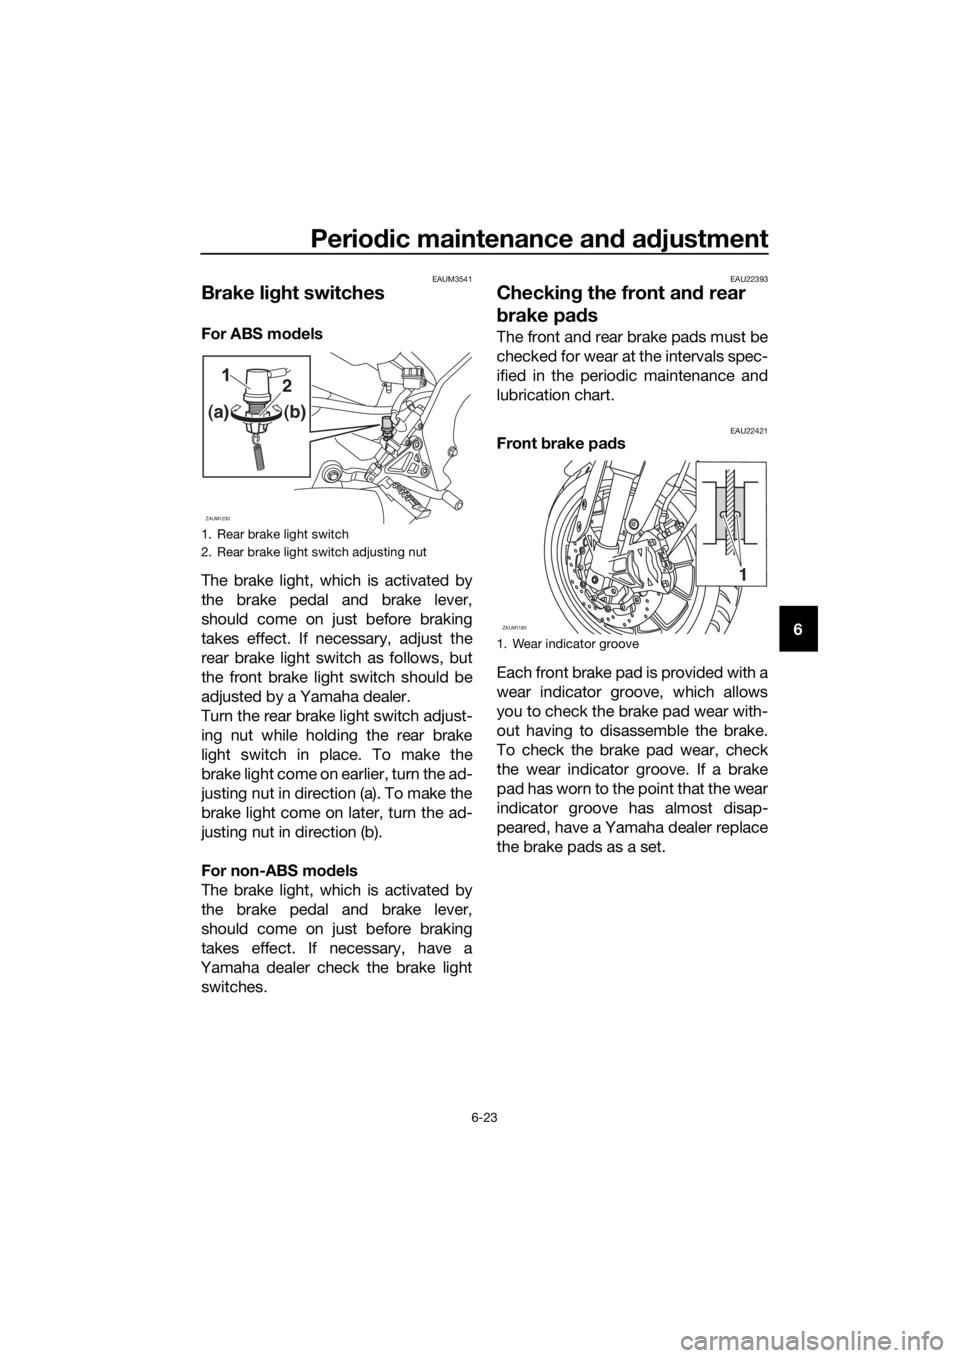
Brake light switches
For ABS models
The brake light, which is activated by
the brake pedal and brake lever,
should come on just before braking
takes effect. If necessary, adjust the
rear brake light switch as follows, but
the front brake light switch should be
adjusted by a Yamaha dealer.
Turn the rear brake light switch adjust-
ing nut while holding the rear brake
light switch in place. To make the
brake light come on earlier, turn the ad-
justing nut in direction (a). To make the
brake light come on later, turn the ad-
justing nut in direction (b).
For non-ABS models
The brake light, which is activated by
the brake pedal and brake lever,
should come on just before braking
takes effect. If necessary, have a
Yamaha dealer check the brake light
switches.
EAU22393
Checking the front and rear
brake pads
The front and rear brake pads must be
checked for wear at the intervals spec-
ified in the periodic maintenance and
lubrication chart.
EAU22421Front brake pads
Each front brake pad is provided with a
wear indicator groove, which allows
you to check the brake pad wear with-
out having to disassemble the brake.
To check the brake pad wear, check
the wear indicator groove. If a brake
pad has worn to the point that the wear
indicator groove has almost disap-
peared, have a Yamaha dealer replace
the brake pads as a set.
1. Rear brake light switch
2. Rear brake light switch adjusting nut
ZAUM1230
2
(a)(b)
1. Wear indicator groove
ZAUM1180
1
U5D7E6E0.book Page 23 Wednesday, June 17, 2015 10:25 AM
Page 66 of 98

Periodic maintenance and adjustment
6-24
6
EAU22501Rear brake pads
Check each rear brake pad for damage
and measure the lining thickness. If a
brake pad is damaged or if the lining
thickness is less than 1.5 mm (0.06 in),
have a Yamaha dealer replace the
brake pads as a set.EAU40262
Checking the brake fluid level
Before riding, check that the brake fluid
is above the minimum level mark.
Check the brake fluid level with the top
of the reservoir level. Replenish the
brake fluid if necessary.
Front brake
Rear brake
WARNING
EWA16011
Improper maintenance can result in
loss of braking ability. Observe
these precautions:
Insufficient brake fluid may al-
low air to enter the brake sys-
tem, reducing braking
performance.
1. Lining thickness
1. Minimum level mark
1. Minimum level mark
Specified brake fluid:
DOT 4
ZAUM1181
INFOINFO
U5D7E6E0.book Page 24 Wednesday, June 17, 2015 10:25 AM
Page 67 of 98
Periodic maintenance and adjustment
6-25
6 Clean the filler cap before re-
moving. Use only DOT 4 brake
fluid from a sealed container.
Use only the specified brake flu-
id; otherwise, the rubber seals
may deteriorate, causing leak-
age.
Refill with the same type of
brake fluid. Adding a brake fluid
other than DOT 4 may result in a
harmful chemical reaction.
Be careful that water or dust
does not enter the brake fluid
reservoir when refilling. Water
will significantly lower the boil-
ing point of the fluid and may re-
sult in vapor lock, and dirt may
clog the ABS hydraulic unit
valves.
NOTICE
ECA17641
Brake fluid may damage painted
surfaces or plastic parts. Always
clean up spilled fluid immediately.
As the brake pads wear, it is normal for
the brake fluid level to gradually go
down. A low brake fluid level may indi-
cate worn brake pads and/or brake
system leakage; therefore, be sure to
check the brake pads for wear and the
brake system for leakage. If the brake
fluid level goes down suddenly, have a
Yamaha dealer check the cause before
further riding.
EAU22733
Changing the brake fluid
Have a Yamaha dealer change the
brake fluid at the intervals specified in
the periodic maintenance and lubrica-
tion chart. In addition, have the oil seals
of the master cylinders and calipers as
well as the brake hoses replaced at the
intervals listed below or whenever they
are damaged or leaking.
Oil seals: Replace every two
years.
Brake hoses: Replace every four
years.
U5D7E6E0.book Page 25 Wednesday, June 17, 2015 10:25 AM
Page 71 of 98

Periodic maintenance and adjustment
6-29
6
EAU23144
Checking and lubricating the
brake and clutch levers
The operation of the brake and clutch
levers should be checked before each
ride, and the lever pivots should be lu-
bricated if necessary.
Brake lever
Clutch lever
EAU23185
Checking and lubricating the
brake pedal
The operation of the brake pedal
should be checked before each ride,
and the pedal pivot should be lubricat-
ed if necessary.
Recommended lubricants:
Brake lever:
Silicone grease
Clutch lever:
Lithium-soap-based grease
ZAUM1184
I
NFOINFO
Recommended lubricant:
Lithium-soap-based grease
ZAUM1234
U5D7E6E0.book Page 29 Wednesday, June 17, 2015 10:25 AM