engine oil YAMAHA YZF-R125 2019 Owners Manual
[x] Cancel search | Manufacturer: YAMAHA, Model Year: 2019, Model line: YZF-R125, Model: YAMAHA YZF-R125 2019Pages: 96, PDF Size: 5.65 MB
Page 5 of 96

Table of contents
Safety information............................1-1
Description........................................2-1
Left view ..........................................2-1
Right view........................................2-2
Controls and instruments ................2-3
Instrument and control functions....3-1
Main switch/steering lock ...............3-1
Indicator lights and warning
lights ............................................3-2
Multi-function meter unit .................3-4
Handlebar switches.......................3-12
Clutch lever ...................................3-13
Shift pedal .....................................3-13
Brake lever ....................................3-14
Brake pedal ...................................3-14
ABS ...............................................3-15
Fuel tank cap.................................3-16
Fuel................................................3-16
Fuel tank overflow hose ................3-18
Catalytic converter ........................3-18
Seats .............................................3-19
Sidestand ......................................3-20
Ignition circuit cut-off system........3-21
For your safety – pre-operation
checks...............................................4-1
Operation and important riding
points.................................................5-1
Starting the engine ..........................5-2
Shifting ............................................5-3
Tips for reducing fuel
consumption ................................5-4
Engine break-in ...............................5-4
Parking ............................................5-5
Periodic maintenance and
adjustment........................................6-1
Owner’s tool kit ...............................6-2
Periodic maintenance chart for the
emission control system ..............6-3
General maintenance and
lubrication chart ...........................6-4
Removing and installing cowlings ...6-7Checking the spark plug ................. 6-9
Engine oil and oil filter element ..... 6-10
Why Yamalube .............................. 6-12
Coolant ......................................... 6-13
Replacing the air filter element
and cleaning the check hose..... 6-14
Adjusting the engine idling
speed......................................... 6-15
Adjusting the throttle grip free
play ............................................ 6-15
Valve clearance ............................. 6-16
Tires .............................................. 6-17
Cast wheels .................................. 6-19
Adjusting the clutch lever free
play ............................................ 6-20
Checking the front brake lever
free play ..................................... 6-21
Adjusting the brake pedal free
play ............................................ 6-21
Brake light switches ...................... 6-22
Checking the front and rear brake
pads........................................... 6-22
Checking the brake fluid level....... 6-23
Changing the brake fluid............... 6-24
Drive chain slack ........................... 6-25
Cleaning and lubricating the drive
chain .......................................... 6-26
Checking and lubricating the
cables ........................................ 6-27
Checking and lubricating the
throttle grip and cable ............... 6-27
Checking and lubricating the
brake and shift pedals ............... 6-28
Checking and lubricating the
brake and clutch levers ............. 6-28
Checking and lubricating the
sidestand ................................... 6-29
Lubricating the swingarm pivots... 6-29
Checking the front fork ................. 6-30
Checking the steering ................... 6-30
Checking the wheel bearings ....... 6-31
Battery .......................................... 6-31
Replacing the fuses ...................... 6-33
Vehicle lights ................................. 6-34
Tail/brake light .............................. 6-34
UB5GE0E0.book Page 1 Thursday, August 23, 2018 10:05 AM
Page 13 of 96
Description
2-2
2
EAU63391
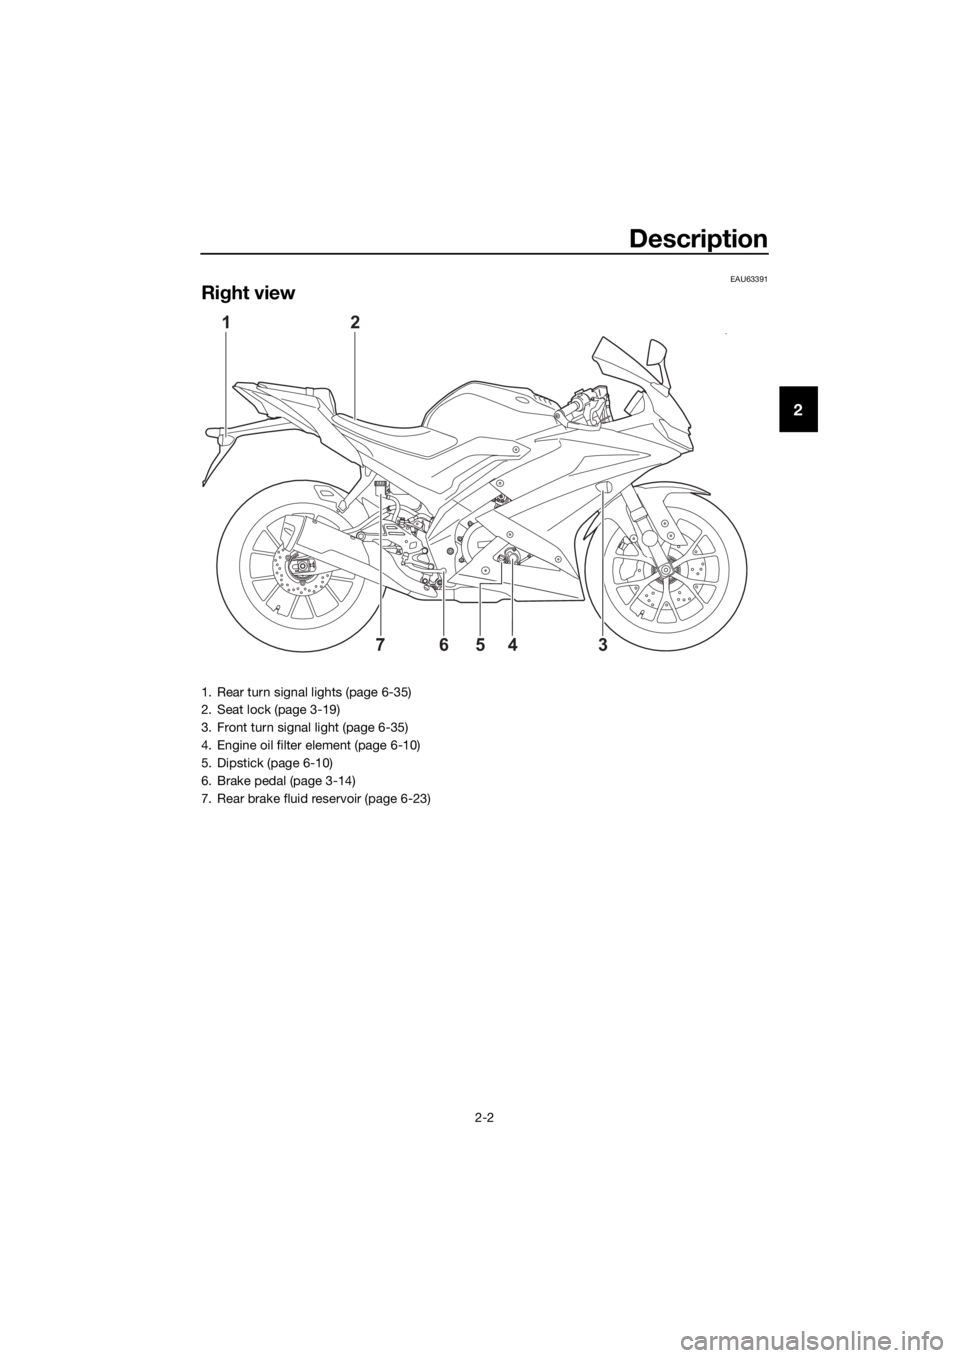
Right view
21
4 76
35
1. Rear turn signal lights (page 6-35)
2. Seat lock (page 3-19)
3. Front turn signal light (page 6-35)
4. Engine oil filter element (page 6-10)
5. Dipstick (page 6-10)
6. Brake pedal (page 3-14)
7. Rear brake fluid reservoir (page 6-23)
UB5GE0E0.book Page 2 Thursday, August 23, 2018 10:05 AM
Page 37 of 96
For your safety – pre-operation checks
4-1
4
EAU63441
Inspect your vehicle each time you use it to make sure the vehicle is in safe oper-
ating condition. Always follow the inspection and maintenance procedures and
schedules described in the Owner’s Manual.
WARNING
EWA11152
Failure to inspect or maintain the vehicle properly increases the possibility
of an accident or equipment damage. Do not operate the vehicle if you find
any problem. If a problem cannot be corrected by the procedures provided
in this manual, have the vehicle inspected by a Yamaha dealer.
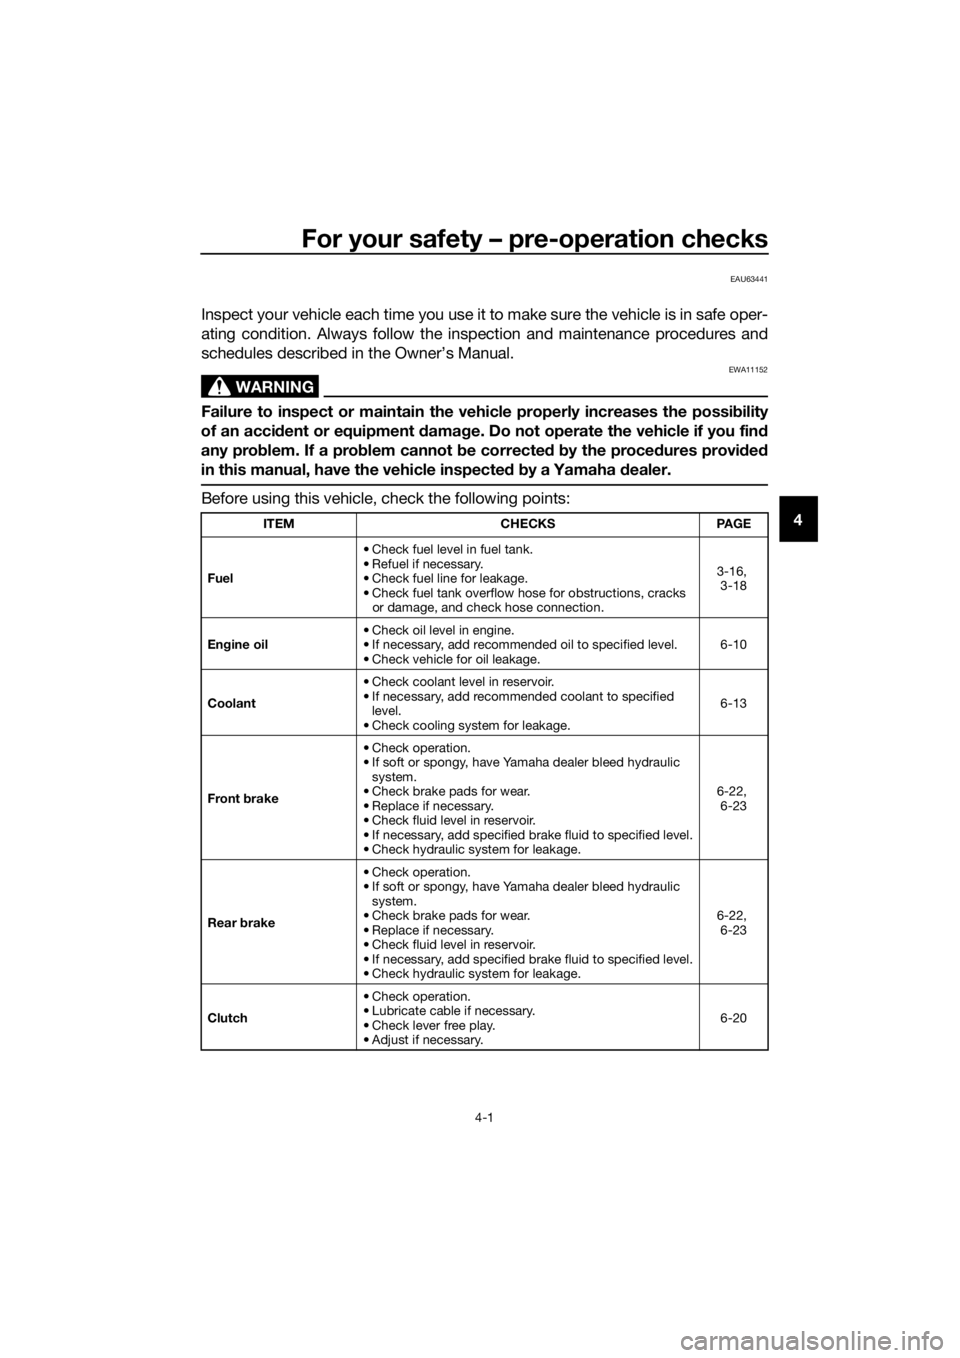
Before using this vehicle, check the following points:
ITEM CHECKS PAGE
Fuel• Check fuel level in fuel tank.
• Refuel if necessary.
• Check fuel line for leakage.
• Check fuel tank overflow hose for obstructions, cracks
or damage, and check hose connection.3-16,
3-18
Engine oil• Check oil level in engine.
• If necessary, add recommended oil to specified level.
• Check vehicle for oil leakage.6-10
Coolant• Check coolant level in reservoir.
• If necessary, add recommended coolant to specified
level.
• Check cooling system for leakage.6-13
Front brake• Check operation.
• If soft or spongy, have Yamaha dealer bleed hydraulic
system.
• Check brake pads for wear.
• Replace if necessary.
• Check fluid level in reservoir.
• If necessary, add specified brake fluid to specified level.
• Check hydraulic system for leakage.6-22,
6-23
Rear brake• Check operation.
• If soft or spongy, have Yamaha dealer bleed hydraulic
system.
• Check brake pads for wear.
• Replace if necessary.
• Check fluid level in reservoir.
• If necessary, add specified brake fluid to specified level.
• Check hydraulic system for leakage.6-22,
6-23
Clutch• Check operation.
• Lubricate cable if necessary.
• Check lever free play.
• Adjust if necessary.6-20
UB5GE0E0.book Page 1 Thursday, August 23, 2018 10:05 AM
Page 42 of 96

Operation and important riding points
5-4
5
EAU16811
Tips for reducing fuel con-
sumption
Fuel consumption depends largely on
your riding style. Consider the follow-
ing tips to reduce fuel consumption:
Shift up swiftly, and avoid high en-
gine speeds during acceleration.
Do not rev the engine while shift-
ing down, and avoid high engine
speeds with no load on the en-
gine.
Turn the engine off instead of let-
ting it idle for an extended length
of time (e.g., in traffic jams, at traf-
fic lights or at railroad crossings).
EAU16831
Engine break-in
There is never a more important period
in the life of your engine than the period
between 0 and 1000 km (600 mi). For
this reason, you should read the fol-
lowing material carefully.
Since the engine is brand new, do not
put an excessive load on it for the first
1000 km (600 mi). The various parts in
the engine wear and polish themselves
to the correct operating clearances.
During this period, prolonged full-throt-
tle operation or any condition that
might result in engine overheating
must be avoided.
EAU16983
0–500 km (0–300 mi)
Avoid prolonged operation above 5000
r/min.
After every hour of operation, stop the
engine, and then let it cool for five to
ten minutes.
Vary the engine speed from time to
time. Do not operate the engine at one
set throttle position.
500–1000 km (300–600 mi)
Avoid prolonged operation above 7500
r/min.
Rev the engine freely through the
gears, but do not use full throttle at any
time. NOTICE: After 1000 km (600 mi)
of operation, the engine oil must be
changed, the oil filter cartridge or el-
ement replaced, and the oil strainer
cleaned.
[ECA10322]
UB5GE0E0.book Page 4 Thursday, August 23, 2018 10:05 AM
Page 49 of 96
Periodic maintenance and adjustment
6-6
6
EAU72740
TIP
The air filter needs more frequent service if you are riding in unusually wet or
dusty areas.
Hydraulic brake service
• Regularly check and, if necessary, correct the brake fluid level.
• Every two years change the brake fluid.
• Replace the brake hoses every four years and if cracked or damaged.
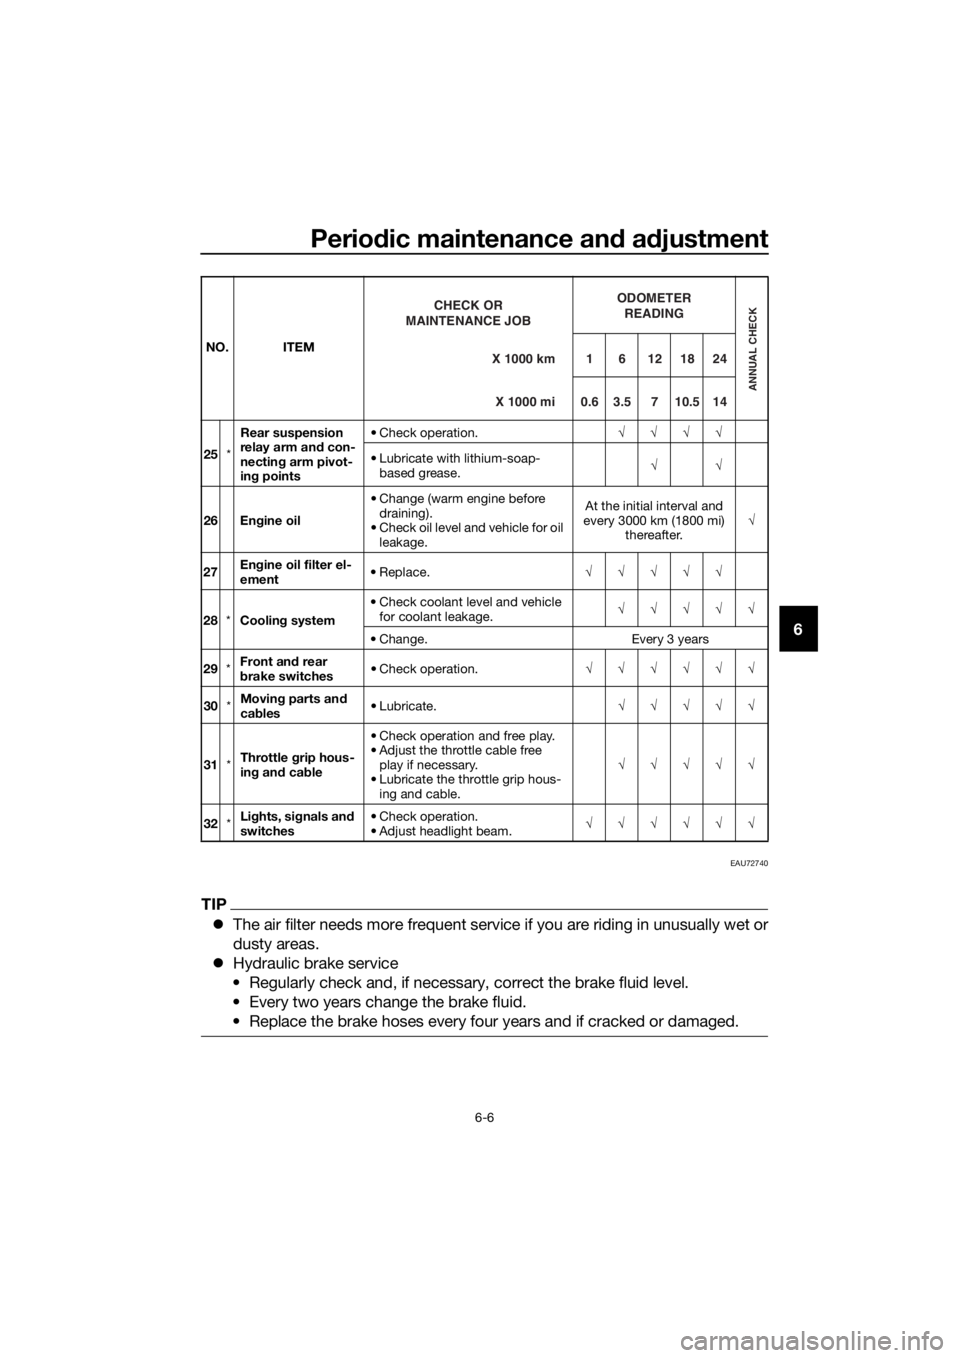
25*Rear suspension
relay arm and con-
necting arm pivot-
ing points• Check operation.√√√√
• Lubricate with lithium-soap-
based grease.√√
26 Engine oil• Change (warm engine before
draining).
• Check oil level and vehicle for oil
leakage.At the initial interval and
every 3000 km (1800 mi)
thereafter.√
27Engine oil filter el-
ement• Replace.√√√√√
28*Cooling system• Check coolant level and vehicle
for coolant leakage.√√√√√
• Change. Every 3 years
29*Front and rear
brake switches• Check operation.√√√√√√
30*Moving parts and
cables• Lubricate.√√√√√
31*Throttle grip hous-
ing and cable• Check operation and free play.
• Adjust the throttle cable free
play if necessary.
• Lubricate the throttle grip hous-
ing and cable.√√√√√
32*Lights, signals and
switches• Check operation.
• Adjust headlight beam.√√√√√√ NO. ITEM
X 1000 km CHECK OR
MAINTENANCE JOB
X 1000 mi
ODOMETER
READING
ANNUAL CHECK
16121824
0.63.5710.514
UB5GE0E0.book Page 6 Thursday, August 23, 2018 10:05 AM
Page 53 of 96
Periodic maintenance and adjustment
6-10
6
EAUM4051
Engine oil and oil filter ele-
ment
The engine oil level should be checked
before each ride. In addition, the oil
must be changed and the oil filter ele-
ment replaced at the intervals specified
in the periodic maintenance and lubri-
cation chart.
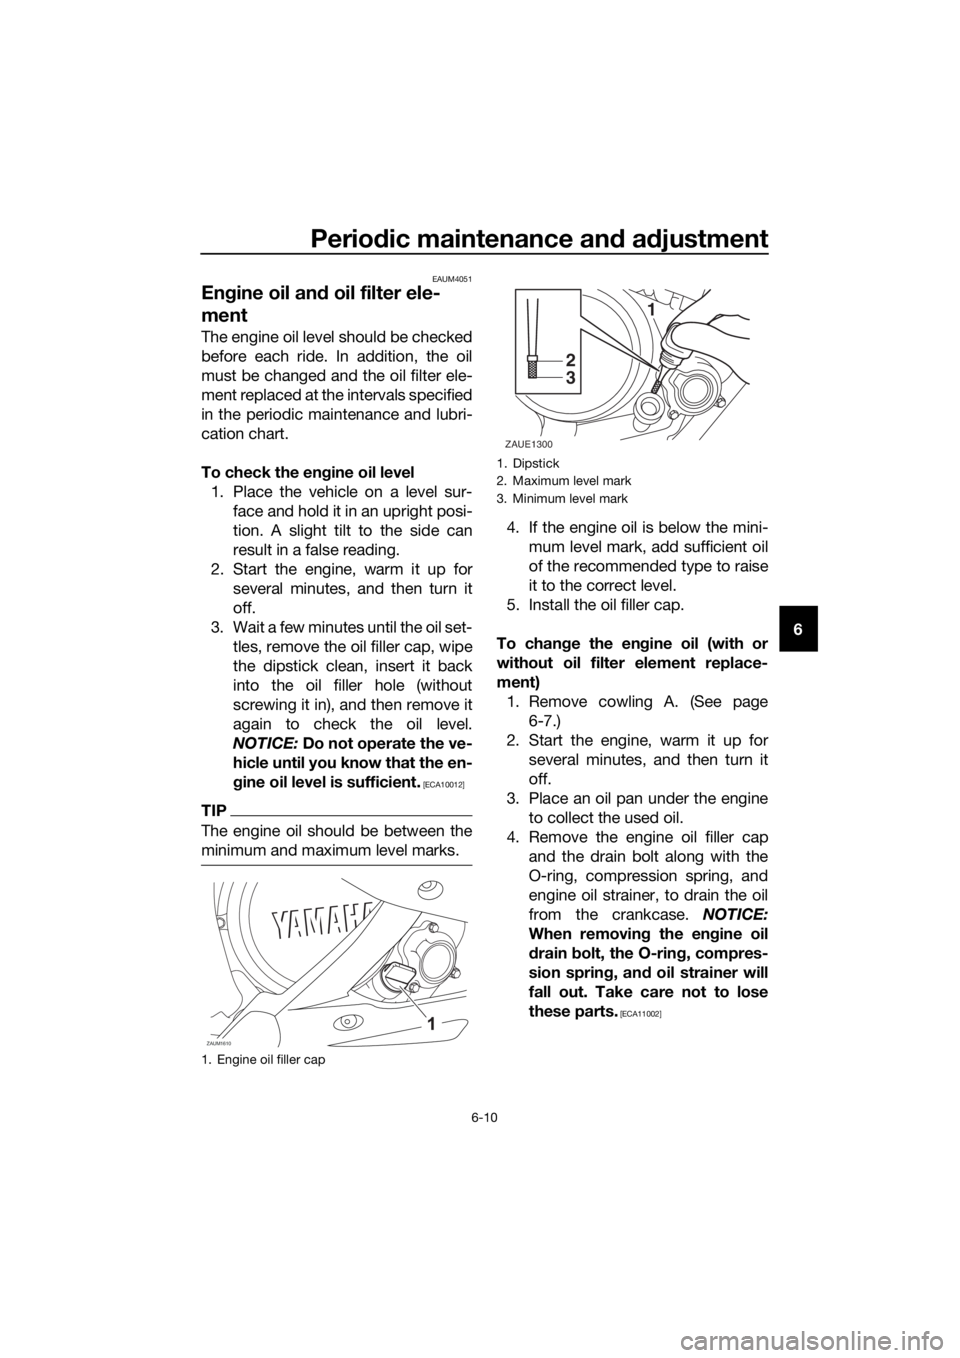
To check the engine oil level
1. Place the vehicle on a level sur-
face and hold it in an upright posi-
tion. A slight tilt to the side can
result in a false reading.
2. Start the engine, warm it up for
several minutes, and then turn it
off.
3. Wait a few minutes until the oil set-
tles, remove the oil filler cap, wipe
the dipstick clean, insert it back
into the oil filler hole (without
screwing it in), and then remove it
again to check the oil level.
NOTICE: Do not operate the ve-
hicle until you know that the en-
gine oil level is sufficient.
[ECA10012]
TIP
The engine oil should be between the
minimum and maximum level marks.
4. If the engine oil is below the mini-
mum level mark, add sufficient oil
of the recommended type to raise
it to the correct level.
5. Install the oil filler cap.
To change the engine oil (with or
without oil filter element replace-
ment)
1. Remove cowling A. (See page
6-7.)
2. Start the engine, warm it up for
several minutes, and then turn it
off.
3. Place an oil pan under the engine
to collect the used oil.
4. Remove the engine oil filler cap
and the drain bolt along with the
O-ring, compression spring, and
engine oil strainer, to drain the oil
from the crankcase. NOTICE:
When removing the engine oil
drain bolt, the O-ring, compres-
sion spring, and oil strainer will
fall out. Take care not to lose
these parts.
[ECA11002]
1. Engine oil filler cap
ZAUM1610
1. Dipstick
2. Maximum level mark
3. Minimum level mark
1
2
3
ZAUE1300
UB5GE0E0.book Page 10 Thursday, August 23, 2018 10:05 AM
Page 54 of 96
Periodic maintenance and adjustment
6-11
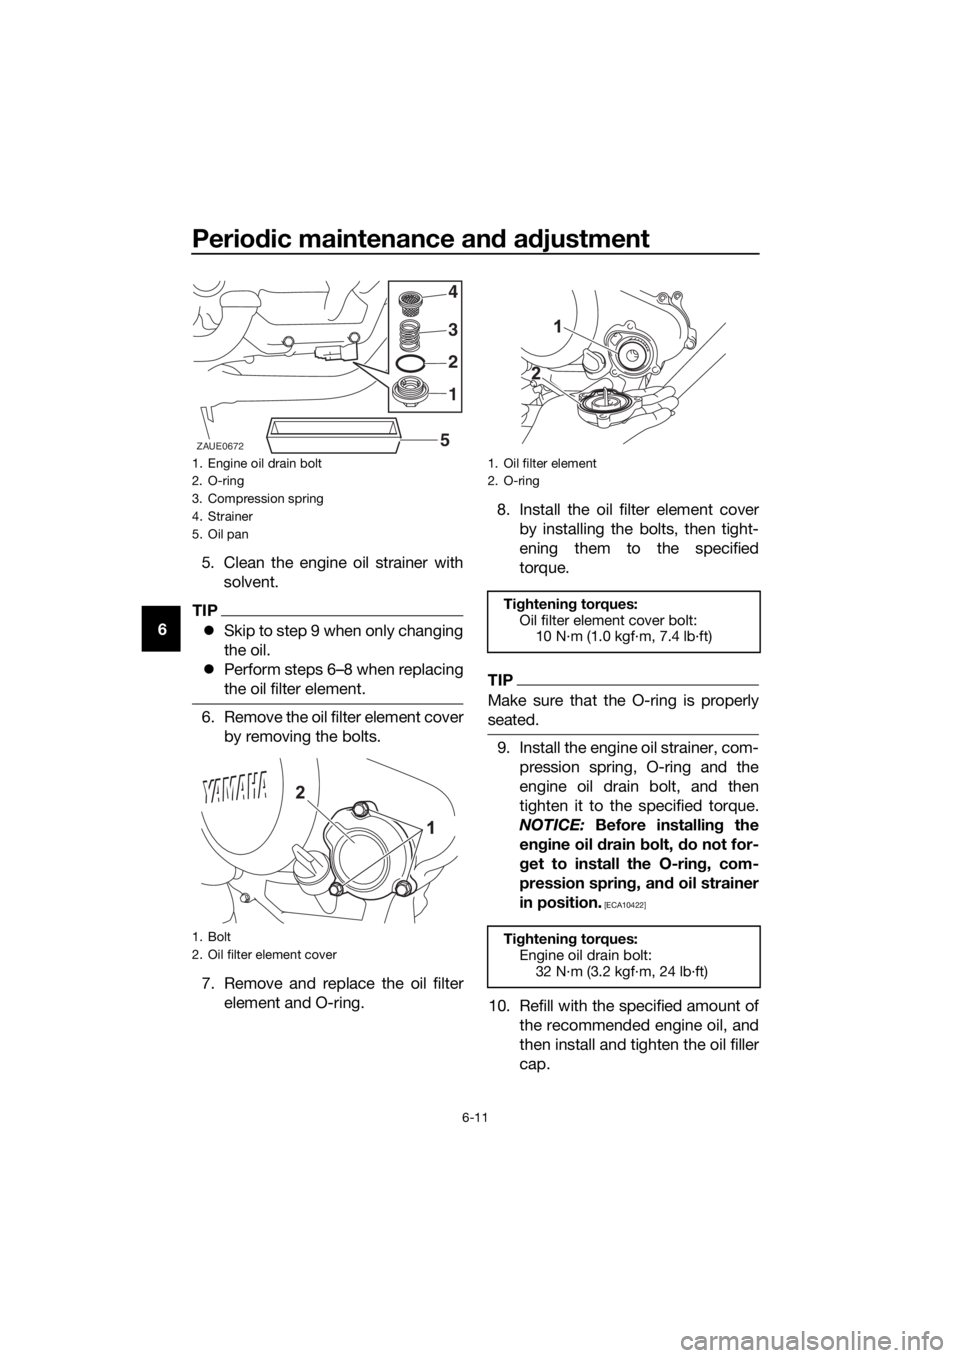
65. Clean the engine oil strainer with
solvent.
TIP
Skip to step 9 when only changing
the oil.
Perform steps 6–8 when replacing
the oil filter element.
6. Remove the oil filter element cover
by removing the bolts.
7. Remove and replace the oil filter
element and O-ring.8. Install the oil filter element cover
by installing the bolts, then tight-
ening them to the specified
torque.
TIP
Make sure that the O-ring is properly
seated.
9. Install the engine oil strainer, com-
pression spring, O-ring and the
engine oil drain bolt, and then
tighten it to the specified torque.
NOTICE: Before installing the
engine oil drain bolt, do not for-
get to install the O-ring, com-
pression spring, and oil strainer
in position.
[ECA10422]
10. Refill with the specified amount of
the recommended engine oil, and
then install and tighten the oil filler
cap.
1. Engine oil drain bolt
2. O-ring
3. Compression spring
4. Strainer
5. Oil pan
1. Bolt
2. Oil filter element cover
2 3 4
51
ZAUE0672
1. Oil filter element
2. O-ring
Tightening torques:
Oil filter element cover bolt:
10 N·m (1.0 kgf·m, 7.4 lb·ft)
Tightening torques:
Engine oil drain bolt:
32 N·m (3.2 kgf·m, 24 lb·ft)
UB5GE0E0.book Page 11 Thursday, August 23, 2018 10:05 AM
Page 55 of 96
Periodic maintenance and adjustment
6-12
6
NOTICE
ECA11621
In order to prevent clutch slip-
page (since the engine oil also
lubricates the clutch), do not
mix any chemical additives. Do
not use oils with a diesel speci-
fication of “CD” or oils of a high-
er quality than specified. In
addition, do not use oils labeled
“ENERGY CONSERVING II” or
higher.
Make sure that no foreign mate-
rial enters the crankcase.
11. Start the engine, and then let it idle
for several minutes while checking
it for oil leakage. If oil is leaking,
immediately turn the engine off
and check for the cause.
12. Turn the engine off, and then
check the oil level and correct it if
necessary.
EAU85450
Why Yamalube
YAMALUBE oil is a Genuine YAMAHA
Part born of the engineers’ passion
and belief that engine oil is an impor-
tant liquid engine component. We form
teams of specialists in the fields of me-
chanical engineering, chemistry, elec-
tronics and track testing, and have
them develop the engine together with
the oil it will use. Yamalube oils take full
advantage of the base oil’s qualities
and blend in the ideal balance of addi-
tives to make sure the final oil clears
our performance standards. Thus,
Yamalube mineral, semisynthetic and
synthetic oils have their own distinct
characters and value. Yamaha’s expe-
rience gained over many years of re-
search and development into oil since
the 1960’s helps make Yamalube the
best choice for your Yamaha engine.
Recommended engine oil:
See page 8-1.
Oil quantity:
Oil change:
0.85 L (0.90 US qt, 0.75 Imp.qt)
With oil filter removal:
0.95 L (1.00 US qt, 0.84 Imp.qt)
UB5GE0E0.book Page 12 Thursday, August 23, 2018 10:05 AM
Page 69 of 96
Periodic maintenance and adjustment
6-26
6 3. Tighten the axle nut, then the lock-
nuts to their specified torques.
4. Make sure that the drive chain
pullers are in the same position,
the drive chain slack is correct,
and the drive chain moves
smoothly.
EAU23026
Cleaning and lubricating the
drive chain
The drive chain must be cleaned and
lubricated at the intervals specified in
the periodic maintenance and lubrica-
tion chart, otherwise it will quickly wear
out, especially when riding in dusty or
wet areas. Service the drive chain as
follows.
NOTICE
ECA10584
The drive chain must be lubricated
after washing the motorcycle, riding
in the rain or riding in wet areas.
1. Clean the drive chain with kero-
sene and a small soft brush.
NOTICE: To prevent damaging
the O-rings, do not clean the
drive chain with steam cleaners,
high-pressure washers or inap-
propriate solvents.
[ECA11122]
2. Wipe the drive chain dry.
3. Thoroughly lubricate the drive
chain with a special O-ring chain
lubricant. NOTICE: Do not use
engine oil or any other lubri-
cants for the drive chain, as they
may contain substances that
could damage the O-rings.
[ECA11112]
Tightening torques:
Axle nut:
85 N·m (8.5 kgf·m, 63 lb·ft)
Locknut:
15 N·m (1.5 kgf·m, 11 lb·ft)
UB5GE0E0.book Page 26 Thursday, August 23, 2018 10:05 AM
Page 82 of 96

Motorcycle care and storage
7-1
7
EAU37834
Matte color caution
NOTICE
ECA15193
Some models are equipped with
matte colored finished parts. Be
sure to consult a Yamaha dealer for
advice on what products to use be-
fore cleaning the vehicle. Using a
brush, harsh chemical products or
cleaning compounds when cleaning
these parts will scratch or damage
their surface. Wax also should not
be applied to any matte colored fin-
ished parts.
EAUM2453
Care
While the open design of a motorcycle
reveals the attractiveness of the tech-
nology, it also makes it more vulnera-
ble. Rust and corrosion can develop
even if high-quality components are
used. A rusty exhaust pipe may go un-
noticed on a car, however, it detracts
from the overall appearance of a mo-
torcycle. Frequent and proper care
does not only comply with the terms of
the warranty, but it will also keep your
motorcycle looking good, extend its
life and optimize its performance.
Before cleaning
1. Cover the muffler outlet with a
plastic bag after the engine has
cooled down.
2. Make sure that all caps and cov-
ers as well as all electrical cou-
plers and connectors, including
the spark plug cap, are tightly in-
stalled.
3. Remove extremely stubborn dirt,
like oil burnt onto the crankcase,
with a degreasing agent and a
brush, but never apply such prod-
ucts onto seals, gaskets, sprock-
ets, the drive chain and wheel
axles. Always rinse the dirt and
degreaser off with water.
Cleaning
NOTICE
ECA10773
Avoid using strong acidic wheel
cleaners, especially on spoked
wheels. If such products are
used on hard-to-remove dirt, do
not leave the cleaner on the af-
UB5GE0E0.book Page 1 Thursday, August 23, 2018 10:05 AM