warning light YAMAHA YZF-R125 2020 User Guide
[x] Cancel search | Manufacturer: YAMAHA, Model Year: 2020, Model line: YZF-R125, Model: YAMAHA YZF-R125 2020Pages: 96, PDF Size: 5.7 MB
Page 57 of 96

Periodic maintenance and adjustment
6-13
6
EAU20071
Coolant
The coolant level should be checked
before each ride. In addition, the cool-
ant must be changed at the intervals
specified in the periodic maintenance
and lubrication chart.
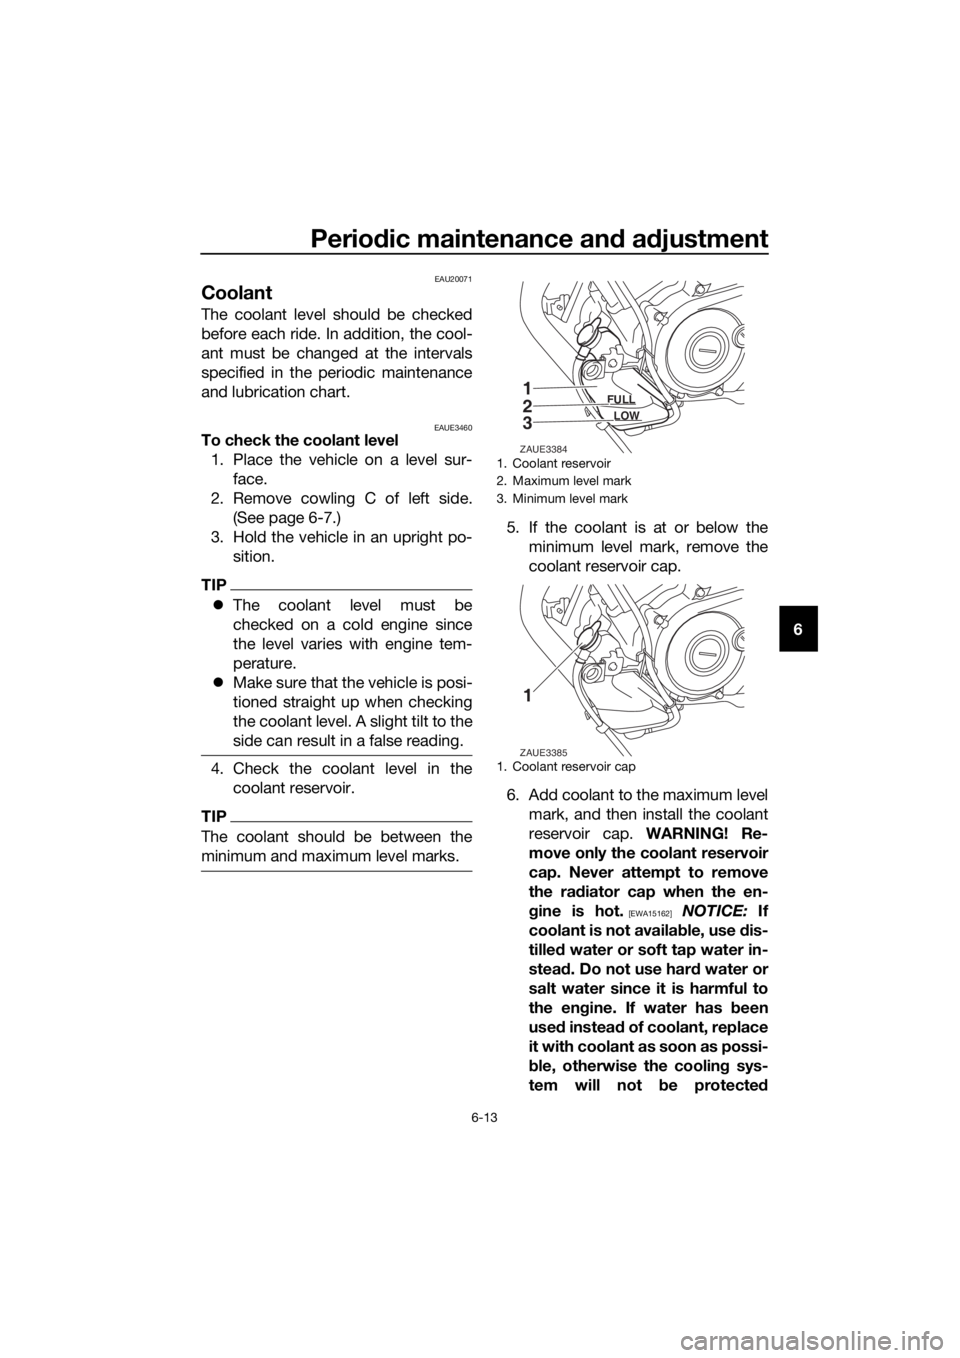
EAUE3460To check the coolant level
1. Place the vehicle on a level sur-
face.
2. Remove cowling C of left side.
(See page 6-7.)
3. Hold the vehicle in an upright po-
sition.
TIP
The coolant level must be
checked on a cold engine since
the level varies with engine tem-
perature.
Make sure that the vehicle is posi-
tioned straight up when checking
the coolant level. A slight tilt to the
side can result in a false reading.
4. Check the coolant level in the
coolant reservoir.
TIP
The coolant should be between the
minimum and maximum level marks.
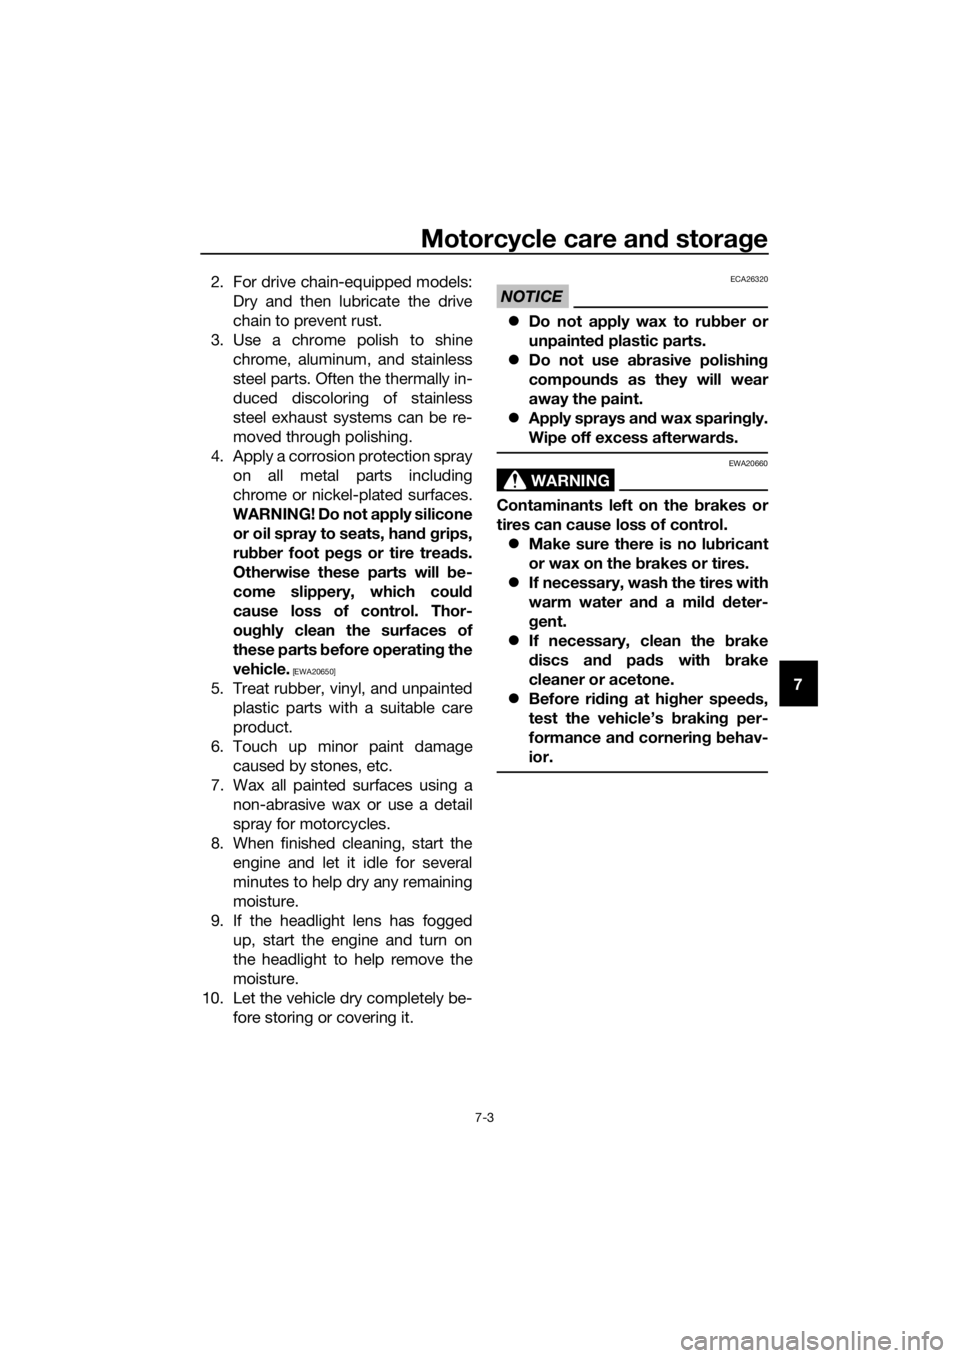
5. If the coolant is at or below the
minimum level mark, remove the
coolant reservoir cap.
6. Add coolant to the maximum level
mark, and then install the coolant
reservoir cap. WARNING! Re-
move only the coolant reservoir
cap. Never attempt to remove
the radiator cap when the en-
gine is hot.
[EWA15162] NOTICE: If
coolant is not available, use dis-
tilled water or soft tap water in-
stead. Do not use hard water or
salt water since it is harmful to
the engine. If water has been
used instead of coolant, replace
it with coolant as soon as possi-
ble, otherwise the cooling sys-
tem will not be protected
1. Coolant reservoir
2. Maximum level mark
3. Minimum level mark
1. Coolant reservoir cap
1
2
3FULL
LOW
ZAUE3384
1
ZAUE3385
UB5GE1E0.book Page 13 Monday, August 26, 2019 3:02 PM
Page 80 of 96

Periodic maintenance and adjustment
6-36
6
EAU67131
Supporting the motorcycle
Since this model is not equipped with a
centerstand, use maintenance stands
when removing the front or rear wheel
or when performing other maintenance
that requires the motorcycle to stand
up right.
Check that the motorcycle is in a stable
and level position before starting any
maintenance.
EAU25872
Troubleshooting
Although Yamaha motorcycles receive
a thorough inspection before shipment
from the factory, trouble may occur
during operation. Any problem in the
fuel, compression, or ignition systems,
for example, can cause poor starting
and loss of power.
The following troubleshooting charts
represent quick and easy procedures
for checking these vital systems your-
self. However, should your motorcycle
require any repair, take it to a Yamaha
dealer, whose skilled technicians have
the necessary tools, experience, and
know-how to service the motorcycle
properly.
Use only genuine Yamaha replace-
ment parts. Imitation parts may look
like Yamaha parts, but they are often
inferior, have a shorter service life and
can lead to expensive repair bills.
WARNING
EWA15142
When checking the fuel system, do
not smoke, and make sure there are
no open flames or sparks in the ar-
ea, including pilot lights from water
heaters or furnaces. Gasoline or
gasoline vapors can ignite or ex-
plode, causing severe injury or prop-
erty damage.
1. Maintenance stand (example)
1
UB5GE1E0.book Page 36 Monday, August 26, 2019 3:02 PM
Page 85 of 96

Motorcycle care and storage
7-3
7 2. For drive chain-equipped models:
Dry and then lubricate the drive
chain to prevent rust.
3. Use a chrome polish to shine
chrome, aluminum, and stainless
steel parts. Often the thermally in-
duced discoloring of stainless
steel exhaust systems can be re-
moved through polishing.
4. Apply a corrosion protection spray
on all metal parts including
chrome or nickel-plated surfaces.
WARNING! Do not apply silicone
or oil spray to seats, hand grips,
rubber foot pegs or tire treads.
Otherwise these parts will be-
come slippery, which could
cause loss of control. Thor-
oughly clean the surfaces of
these parts before operating the
vehicle. [EWA20650]
5. Treat rubber, vinyl, and unpainted
plastic parts with a suitable care
product.
6. Touch up minor paint damage
caused by stones, etc.
7. Wax all painted surfaces using a
non-abrasive wax or use a detail
spray for motorcycles.
8. When finished cleaning, start the
engine and let it idle for several
minutes to help dry any remaining
moisture.
9. If the headlight lens has fogged
up, start the engine and turn on
the headlight to help remove the
moisture.
10. Let the vehicle dry completely be-
fore storing or covering it.
NOTICE
ECA26320
Do not apply wax to rubber or
unpainted plastic parts.
Do not use abrasive polishing
compounds as they will wear
away the paint.
Apply sprays and wax sparingly.
Wipe off excess afterwards.
WARNING
EWA20660
Contaminants left on the brakes or
tires can cause loss of control.
Make sure there is no lubricant
or wax on the brakes or tires.
If necessary, wash the tires with
warm water and a mild deter-
gent.
If necessary, clean the brake
discs and pads with brake
cleaner or acetone.
Before riding at higher speeds,
test the vehicle’s braking per-
formance and cornering behav-
ior.
UB5GE1E0.book Page 3 Monday, August 26, 2019 3:02 PM
Page 93 of 96

10-1
10
Index
A
ABS ...................................................... 3-15
ABS warning light ................................... 3-3
Air filter element and check hose,
replacing and cleaning ....................... 6-14
B
Battery .................................................. 6-31
Brake and clutch levers, checking and
lubricating .......................................... 6-28
Brake and shift pedals, checking and
lubricating .......................................... 6-28
Brake fluid, changing ........................... 6-24
Brake fluid level, checking ................... 6-23
Brake lever ........................................... 3-14
Brake light switches ............................. 6-22
Brake pedal .......................................... 3-14
Brake pedal free play, adjusting........... 6-21
C
Cables, checking and lubricating ......... 6-27
Care ........................................................ 7-1
Catalytic converter ............................... 3-18
Clutch lever .......................................... 3-13
Clutch lever free play, adjusting ........... 6-20
Coolant ................................................. 6-13
Coolant temperature warning light ......... 3-2
Cowlings, removing and installing ......... 6-7
D
Data recording, vehicle .......................... 9-3
Diagnostic connectors ........................... 9-2
Dimmer/Pass switch ............................ 3-12
Drive chain, cleaning and lubricating ... 6-26
Drive chain slack .................................. 6-25
E
Engine break-in ...................................... 5-1
Engine idling speed .............................. 6-15
Engine oil and oil filter element ............ 6-10
Engine overheating............................... 6-38
Engine serial number.............................. 9-1
Engine stop switch ............................... 3-12
Engine trouble warning light................... 3-3
F
Front and rear brake pads, checking ... 6-22
Front brake lever free play, checking ... 6-21
Front fork, checking ............................. 6-30
Fuel....................................................... 3-16
Fuel consumption, tips for reducing ...... 5-5
Fuel tank cap........................................ 3-16
Fuel tank overflow hose ....................... 3-18
Fuses, replacing ................................... 6-33
H
Handlebar switches .............................. 3-12
High beam indicator light........................ 3-2
Horn switch........................................... 3-12
I
Identification numbers ............................ 9-1
Ignition circuit cut-off system ............... 3-21
Indicator lights and warning lights .......... 3-2
L
License plate light bulb, replacing ........ 6-35
M
Main switch/steering lock ....................... 3-1
Maintenance and lubrication, periodic ... 6-4
Maintenance, emission control
system .................................................. 6-3
Matte color, caution ................................ 7-1
Model label ............................................. 9-1
Multi-function meter unit ........................ 3-4
N
Neutral indicator light.............................. 3-2
P
Parking .................................................... 5-6
Part locations .......................................... 2-1
S
Safety information................................... 1-1
Seats ..................................................... 3-19
Shifting .................................................... 5-4
Shift light ................................................. 3-3
Shift pedal............................................. 3-13
Sidestand .............................................. 3-20
Sidestand, checking and lubricating .... 6-29
Spark plug, checking .............................. 6-9
Specifications ......................................... 8-1
Starting the engine.................................. 5-2
Start switch ........................................... 3-12
Steering, checking ................................ 6-30
Storage ................................................... 7-4
Supporting the motorcycle ................... 6-36
Swingarm pivots, lubricating ................ 6-29
T
Tail/brake light ...................................... 6-34
Throttle grip and cable, checking and
lubricating ........................................... 6-27
Throttle grip free play, adjusting ........... 6-15
Tires ...................................................... 6-17
Tool kit .................................................... 6-2
Troubleshooting .................................... 6-36
Troubleshooting chart........................... 6-37
Turn signal indicator light ....................... 3-2
Turn signal light bulb, replacing............ 6-35
UB5GE1E0.book Page 1 Monday, August 26, 2019 3:02 PM