front break YAMAHA YZF-R125 2021 Owners Manual
[x] Cancel search | Manufacturer: YAMAHA, Model Year: 2021, Model line: YZF-R125, Model: YAMAHA YZF-R125 2021Pages: 94, PDF Size: 3.34 MB
Page 6 of 94

Table of contentsSafety information ............................ 1-1
Description ....................................... 2-1
Left view ......................................... 2-1
Right view ....................................... 2-2
Controls and instruments ............... 2-3
Instrument an d control functions ... 3-1
Main switch/steering lock............... 3-1
Indicator lights and warning lights............................................ 3-2
Multi-function meter unit ................ 3-4
Handlebar switches ...................... 3-12
Clutch lever .................................. 3-13
Shift pedal .................................... 3-14
Brake lever.................................... 3-14
Brake pedal .................................. 3-14
ABS .............................................. 3-15
Fuel tank cap ................................ 3-16
Fuel ............................................... 3-16
Fuel tank breather hose and overflow hose ............................ 3-18
Catalytic converter ....................... 3-19
Seats ............................................ 3-19
Sidestand ..................................... 3-20
Ignition circuit cut-off system ....... 3-21 For your safety – pre-operation
checks
............................................... 4-1
Operation an d important ri din g
points ................................................. 5-1
Engine break-in ............................... 5-1
Starting the engine .......................... 5-2
Shifting ............................................ 5-3
Tips for reducing fuel consumption ................................ 5-4
Parking ............................................ 5-4
Perio dic maintenance an d
a d justment ........................................ 6-1
Tool kit ............................................ 6-2
Periodic maintenance chart for the emission control system .............. 6-3
General maintenance and lubrication chart ........................... 6-4
Removing and installing cowlings... 6-8
Checking the spark plug ................. 6-9
Canister ......................................... 6-10
Engine oil and oil filter element ..... 6-11
Why Yamalube .............................. 6-13
Coolant.......................................... 6-14
Replacing the air filter element
and cleaning the check hose..... 6-15
Adjusting the engine idling speed ......................................... 6-16
Adjusting the throttle grip free play ............................................ 6-16 Valve clearance............................. 6-17
Tires .............................................. 6-17
Cast wheels .................................. 6-19
Adjusting the clutch lever free
play ............................................ 6-20
Checking the front brake lever free play..................................... 6-21
Adjusting the brake pedal free
play ............................................ 6-21
Brake light switches ..................... 6-22
Checking the front and rear brake pads .......................................... 6-22
Checking the brake fluid level ...... 6-23
Changing the brake fluid .............. 6-24
Drive chain slack........................... 6-25
Cleaning and lubricating the drive chain.......................................... 6-26
Checking and lubricating the cables ........................................ 6-27
Checking and lubricating the
throttle grip and cable ............... 6-27
Checking and lubricating the brake and shift pedals............... 6-27
Checking and lubricating the brake and clutch levers ............. 6-28
Checking and lubricating the
sidestand................................... 6-29
Lubricating the rear suspension ... 6-29
Checking the front fork ................. 6-29
Checking the steering................... 6-30
Checking the wheel bearings ....... 6-30UB5GE2E0.book Page 1 Thursday, July 30, 2020 3:08 PM
Page 12 of 94

Safety information
1-5
1operator and may limit control
ability, therefore, such accesso-
ries are not recommended.
Use caution when adding electri-
cal accessories. If electrical ac-
cessories exceed the capacity of
the motorcycle’s electrical sys-
tem, an electric failure could re-
sult, which could cause a
dangerous loss of lights or engine
power.
Aftermarket Tires an d Rims
The tires and rims that came with your
motorcycle were designed to match
the performance capabilities and to
provide the best combination of han-
dling, braking, and comfort. Other
tires, rims, sizes, and combinations
may not be appropriate. See page 6-17
for tire specifications and for informa-
tion on servicing and replacing your
tires.
Transportin g the Motorcycle
Be sure to observe following instruc-
tions before transporting the motorcy-
cle in another vehicle.
Remove all loose items from the
motorcycle.
Check that the fuel cock (if
equipped) is in the off position and
that there are no fuel leaks.
Shift the transmission into gear
(for models with a manual trans-
mission).
Secure the motorcycle with tie-
downs or suitable straps that are
attached to solid parts of the mo-
torcycle, such as the frame or up-
per front fork triple clamp (and not,
for example, to rubber-mounted
handlebars or turn signals, or
parts that could break). Choose
the location for the straps carefully
so the straps will not rub against
painted surfaces during transport.
The suspension should be com-
pressed somewhat by the tie-
downs, if possible, so that the mo-
torcycle will not bounce exces-
sively during transport.
UB5GE2E0.book Page 5 Thursday, July 30, 2020 3:08 PM
Page 78 of 94

Periodic maintenance an d a djustment
6-34
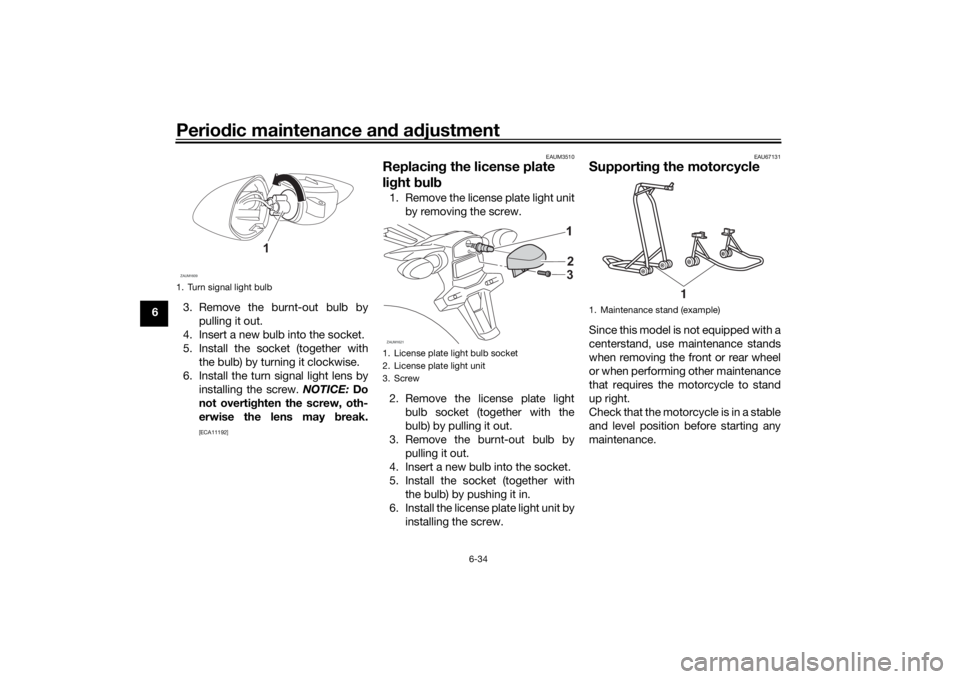
6 3. Remove the burnt-out bulb by
pulling it out.
4. Insert a new bulb into the socket.
5. Install the socket (together with the bulb) by turning it clockwise.
6. Install the turn signal light lens by installing the screw. NOTICE: Do
not overti ghten the screw, oth-
erwise the lens may break.
[ECA11192] EAUM3510
Replacin
g the license plate
li g ht bul b1. Remove the license plate light unit
by removing the screw.
2. Remove the license plate light bulb socket (together with the
bulb) by pulling it out.
3. Remove the burnt-out bulb by pulling it out.
4. Insert a new bulb into the socket.
5. Install the socket (together with the bulb) by pushing it in.
6. Install the license plate light unit by installing the screw.
EAU67131
Supportin g the motorcycleSince this model is not equipped with a
centerstand, use maintenance stands
when removing the front or rear wheel
or when performing other maintenance
that requires the motorcycle to stand
up right.
Check that the motorcycle is in a stable
and level position before starting any
maintenance.
1. Turn signal light bulbZAUM1609
1
1. License plate light bulb socket
2. License plate light unit
3. ScrewZAUM1621
2
3
1. Maintenance stand (example)
1
UB5GE2E0.book Page 34 Thursday, July 30, 2020 3:08 PM
Page 91 of 94

10-1
10
Index
AABS....................................................... 3-15
ABS warning light ................................... 3-3
Air filter element and check hose,
replacing and cleaning ....................... 6-15BBattery .................................................. 6-31
Brake and clutch levers, checking and lubricating........................................... 6-28
Brake and shift pedals, checking and lubricating........................................... 6-27
Brake fluid, changing............................ 6-24
Brake fluid level, checking.................... 6-23
Brake lever............................................ 3-14
Brake light switches ............................. 6-22
Brake pedal .......................................... 3-14
Brake pedal free play, adjusting ........... 6-21CCables, checking and lubricating ......... 6-27
Canister ................................................ 6-10
Care ........................................................ 7-1
Catalytic converter ............................... 3-19
Clutch lever........................................... 3-13
Clutch lever free play, adjusting ........... 6-20
Coolant ................................................. 6-14
Coolant temperature warning light ......... 3-2
Cowlings, removing and installing.......... 6-8DData recording, vehicle........................... 9-2
Diagnostic connector ............................. 9-2
Dimmer/Pass switch............................. 3-13
Drive chain, cleaning and lubricating ... 6-26
Drive chain slack .................................. 6-25
EEngine break-in ...................................... 5-1
Engine idling speed.............................. 6-16
Engine oil and oil filter element ............ 6-11
Engine overheating .............................. 6-37
Engine serial number ............................. 9-1
Engine stop switch............................... 3-13FFront and rear brake pads, checking ... 6-22
Front brake lever free play, checking ... 6-21
Front fork, checking ............................. 6-29
Fuel ...................................................... 3-16
Fuel consumption, tips for reducing ...... 5-4
Fuel tank breather hose and overflow hose ................................................... 3-18
Fuel tank cap........................................ 3-16
Fuses, replacing ................................... 6-32HHandlebar switches ............................. 3-12
High beam indicator light ....................... 3-2
Horn switch .......................................... 3-13IIdentification numbers ........................... 9-1
Ignition circuit cut-off system .............. 3-21
Indicator lights and warning lights ......... 3-2LLicense plate light bulb, replacing ....... 6-34MMain switch/steering lock ...................... 3-1
Maintenance and lubrication, periodic... 6-4
Maintenance, emission control system ................................................. 6-3
Malfunction indicator light (MIL)............. 3-3
Matte color, caution ............................... 7-1 Model label ............................................. 9-1
Multi-function meter unit ........................ 3-4
NNeutral indicator light ............................. 3-2PParking.................................................... 5-4
Part locations.......................................... 2-1RRear suspension, lubricating ................ 6-29SSafety information................................... 1-1
Seats ..................................................... 3-19
Shifting.................................................... 5-3
Shift light ................................................. 3-3
Shift pedal............................................. 3-14
Sidestand.............................................. 3-20
Sidestand, checking and lubricating .... 6-29
Spark plug, checking .............................. 6-9
Specifications ......................................... 8-1
Starting the engine ................................. 5-2
Start switch ........................................... 3-13
Steering, checking ................................ 6-30
Storage ................................................... 7-3
Supporting the motorcycle ................... 6-34TTail/brake light ...................................... 6-33
Throttle grip and cable, checking and
lubricating ........................................... 6-27
Throttle grip free play, adjusting ........... 6-16
Tires ...................................................... 6-17
Tool kit .................................................... 6-2
Troubleshooting .................................... 6-35
Troubleshooting chart........................... 6-36
Turn signal indicator light ....................... 3-2
UB5GE2E0.book Page 1 Thursday, July 30, 2020 3:08 PM