suspension YAMAHA YZF-R1M 2022 User Guide
[x] Cancel search | Manufacturer: YAMAHA, Model Year: 2022, Model line: YZF-R1M, Model: YAMAHA YZF-R1M 2022Pages: 136, PDF Size: 6.01 MB
Page 45 of 136
Instrument and control functions
4-22
4
3. Select the suspension item that
you want to adjust, and then ro-
tate the wheel switch to adjust the
setting level.
TIPAll ERS modes regardless of type are
independent. Offset level setting
changes made in one mode are not
transferred to another mode.4. To adjust other ERS modes of thesame type, repeat from step 1. To
switch types or when finished, se-
lect the Ž mark to return to the
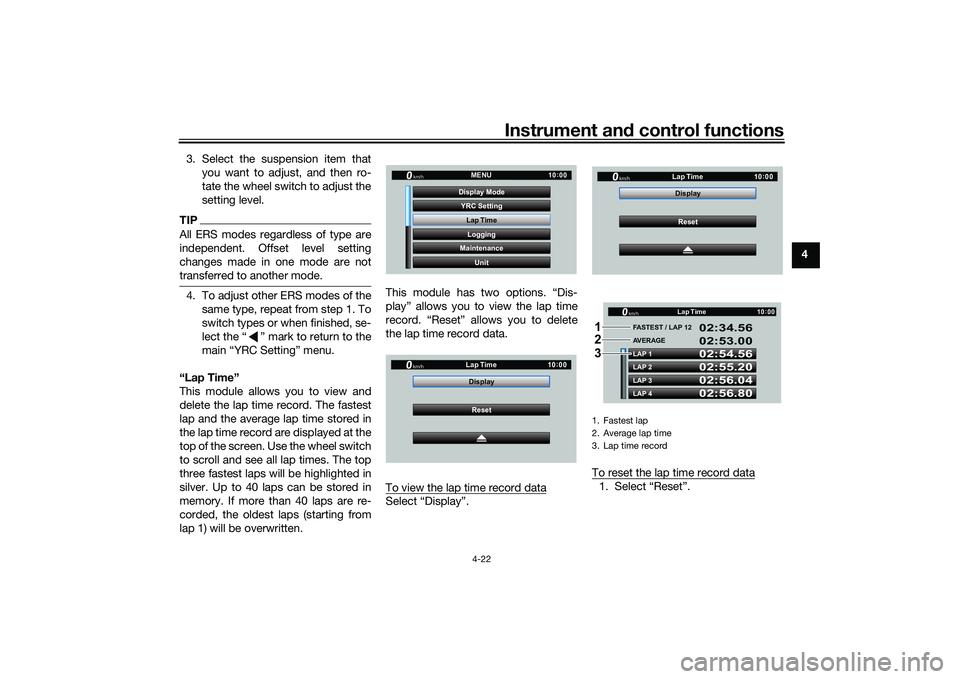
“Lap Time”
This module allows you to view and
delete the lap time record. The fastest
lap and the average lap time stored in
the lap time record are displayed at the
top of the screen. Use the wheel switch
to scroll and see all lap times. The top
three fastest laps will be highlighted in
silver. Up to 40 laps can be stored in
memory. If more than 40 laps are re-
corded, the oldest laps (starting from
lap 1) will be overwritten. This module has two options. “Dis-
play” allows you to view the lap time
record. “Reset” allows you to delete
the lap time record data.
To view the lap time record data
Select “Display”.
To reset the lap time record data
1. Select “Reset”.
YRC Setting
Lap TimeLogging
Maintenance
Unit
Display ModeMENU
km/h
GPS
10
:
00
km/h
10 :
00
Reset
Display
Lap Time
1. Fastest lap
2. Average lap time
3. Lap time record
km/h
10
:
00
Reset
Display
Lap Time
LAP 1
LAP 2
LAP 3
LAP 4 FASTEST / LAP 12
02:54.56
02:55.20
02:56.04
02:56.80 02:34.56
02:53.00
AVERAGE Lap Timekm/h
GP GPS
10
:
00
1
2
3
UB3LE1E0.book Page 22 Tuesday, August 10, 2021 2:28 PM
Page 65 of 136

Instrument and control functions
4-42
4
EAU39672
Rear view mirrorsThe rear view mirrors of this vehicle
can be folded forward or backward for
parking in narrow spaces. Fold the mir-
rors back to their original position be-
fore riding.
WARNING
EWA14372
Be sure to fold the rear view mirrors
back to their original position before
riding.
EAU66478
Adjusting the front forkNOTICE
ECA22472
Use extra care to avoid scratch-
ing the anodized finish when
making suspension adjust-
ments.
To avoid damaging the suspen-
sion’s internal mechanisms, do
not attempt to turn beyond the
maximum or minimum settings.YZF-R1
This model is equipped with adjustable
suspension. The spring preload, re-
bound damping force, and compres-
sion damping force of each leg can be
adjusted.
WARNING
EWA10181
Always adjust both fork legs equally,
otherwise poor handling and loss of
stability may result.Spring preload
Turn the adjusting nut in direction (a) to
increase the spring preload. Turn the adjusting nut in direction (b) to
decrease the spring preload.
To set the spring preload, turn the ad-
juster in direction (b) until it stops, and
then count the turns in direction (a).
1. Riding position
2. Parking position11
22
1. Spring preload adjusting nut
Spring preload setting:
Minimum (soft): 0 turn(s) in direction (a)
Standard: 6 turn(s) in direction (a)
Maximum (hard):
15 turn(s) in direction (a)
(b)
(a) 1
UB3LE1E0.book Page 42 Tuesday, August 10, 2021 2:28 PM
Page 66 of 136
Instrument and control functions
4-43
4
TIPWhen turning the spring preload ad-
juster in direction (a), it may turn be-
yond the stated specifications,
however such adjustments are ineffec-
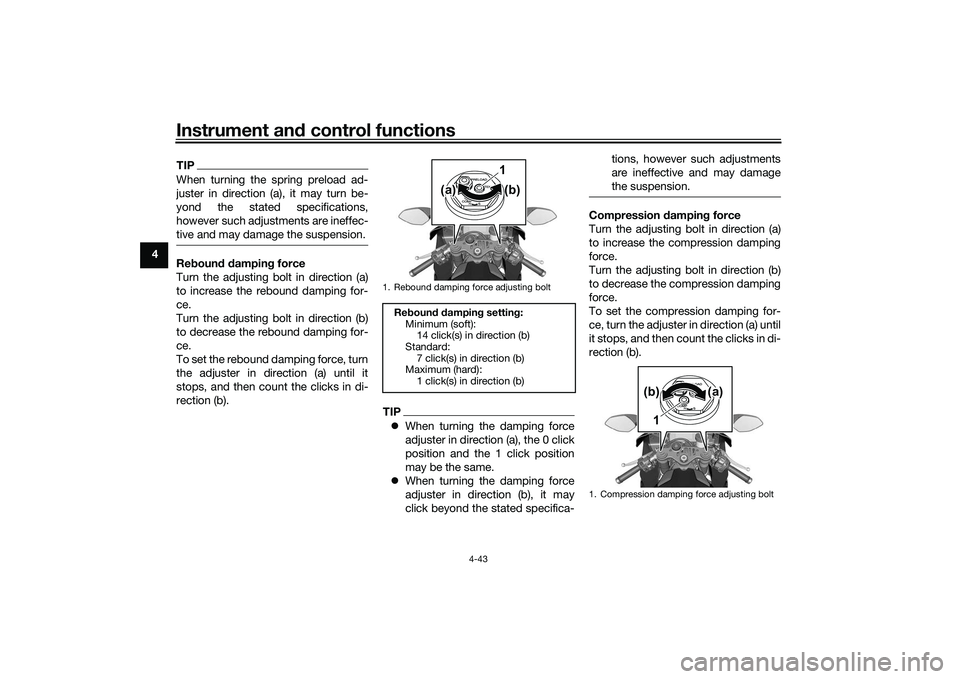
tive and may damage the suspension.Rebound damping force
Turn the adjusting bolt in direction (a)
to increase the rebound damping for-
ce.
Turn the adjusting bolt in direction (b)
to decrease the rebound damping for-
ce.
To set the rebound damping force, turn
the adjuster in direction (a) until it
stops, and then count the clicks in di-
rection (b).
TIPWhen turning the damping force
adjuster in direction (a), the 0 click
position and the 1 click position
may be the same.
When turning the damping force
adjuster in direction (b), it may
click beyond the stated specifica- tions, however such adjustments
are ineffective and may damage
the suspension.
Compression damping force
Turn the adjusting bolt in direction (a)
to increase the compression damping
force.
Turn the adjusting bolt in direction (b)
to decrease the compression damping
force.
To set the compression damping for-
ce, turn the adjuster in direction (a) until
it stops, and then count the clicks in di-
rection (b).
1. Rebound damping force adjusting boltRebound damping setting:
Minimum (soft):14 click(s) in direction (b)
Standard: 7 click(s) in direction (b)
Maximum (hard):
1 click(s) in direction (b)
(b)
(a) 1
1. Compression damping force adjusting bolt
(b)
(a)
1
UB3LE1E0.book Page 43 Tuesday, August 10, 2021 2:28 PM
Page 67 of 136
Instrument and control functions
4-44
4
TIPWhen turning the damping force
adjuster in direction (a), the 0 click
position and the 1 click position
may be the same.
When turning the damping force
adjuster in direction (b), it may
click beyond the stated specifica-
tions, however such adjustments
are ineffective and may damage
the suspension.YZF-R1M
This model is equipped with ÖHLINS
electronic racing suspension with gas
reservoir. The compression and re-
bound damping forces are electroni-
cally adjusted (see ERS on page 4-20).
The spring preload is manually adjust-
ed.
WARNING
EWA20900
The front fork legs contain highly
pressurized nitrogen gas. Read and
understand the following informa-
tion before handling the front fork
legs.
Do not subject the axle brackets
to open flame or other heat
source. This may cause the
units to explode due to exces-
sive gas pressure.
Do not attempt to open the gas
cylinder assemblies.
Do not deform or damage the
cylinders in any way. Cylinder
damage will result in poor
damping performance.
Do not dispose of a damaged or
worn-out front fork leg yourself.
Take the front fork leg to a
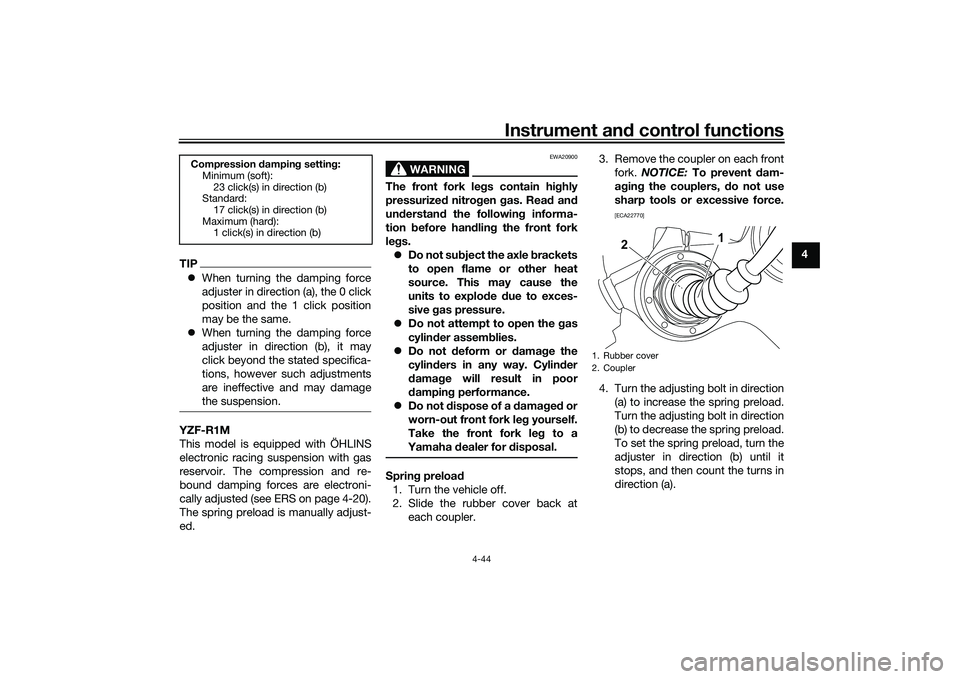
Yamaha dealer for disposal.Spring preload 1. Turn the vehicle off.
2. Slide the rubber cover back at each coupler. 3. Remove the coupler on each front
fork. NOTICE: To prevent dam-
aging the couplers, do not use
sharp tools or excessive force.
[ECA22770]
4. Turn the adjusting bolt in direction (a) to increase the spring preload.
Turn the adjusting bolt in direction
(b) to decrease the spring preload.
To set the spring preload, turn the
adjuster in direction (b) until it
stops, and then count the turns in
direction (a).
Compression damping setting:Minimum (soft):
23 click(s) in direction (b)
Standard:
17 click(s) in direction (b)
Maximum (hard): 1 click(s) in direction (b)
1. Rubber cover
2. Coupler
2
1
UB3LE1E0.book Page 44 Tuesday, August 10, 2021 2:28 PM
Page 68 of 136
Instrument and control functions
4-45
4
TIPWhen turning the spring preload ad-
juster in direction (a), it may turn be-
yond the stated specifications,
however such adjustments are ineffec-
tive and may damage the suspension.5. Attach the coupler on each fork.
6. Slide the rubber cover to the orig-inal position.
EAU66499
Adjusting the shock absorber
assembly
WARNING
EWA10222
This shock absorber assembly con-
tains highly pressurized nitrogen
gas. Read and understand the fol-
lowing information before handling
the shock absorber assembly.
Do not tamper with or attempt
to open the cylinder assembly.
Do not subject the shock ab-
sorber assembly to an open
flame or other high heat source.
This may cause the unit to ex-
plode due to excessive gas
pressure.
Do not deform or damage the
cylinder in any way. Cylinder
damage will result in poor
damping performance.
Do not dispose of a damaged or
worn-out shock absorber as-
sembly yourself. Take the shock
absorber assembly to a Yamaha
dealer for any service.
YZF-R1
This model is equipped with adjustable
suspension. The spring preload, re-
bound damping force, fast compres-
sion damping force, and slow
compression damping force can be
adjusted.NOTICE
ECA10102
To avoid damaging the mechanism,
do not attempt to turn beyond the
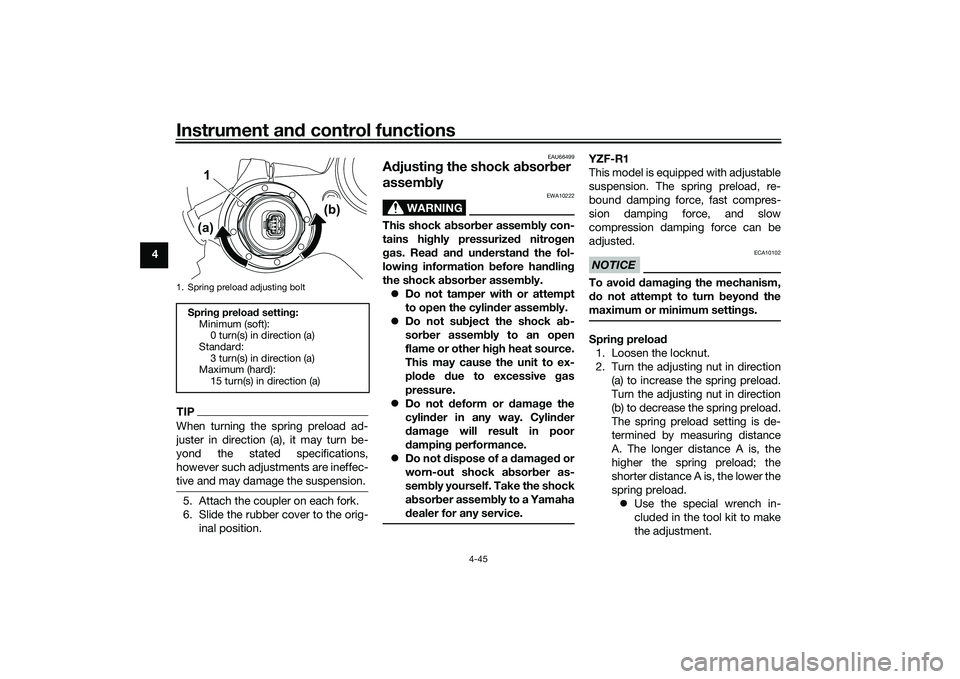
maximum or minimum settings.Spring preload
1. Loosen the locknut.
2. Turn the adjusting nut in direction (a) to increase the spring preload.
Turn the adjusting nut in direction
(b) to decrease the spring preload.
The spring preload setting is de-
termined by measuring distance
A. The longer distance A is, the
higher the spring preload; the
shorter distance A is, the lower the
spring preload. Use the special wrench in-
cluded in the tool kit to make
the adjustment.
1. Spring preload adjusting boltSpring preload setting:
Minimum (soft):0 turn(s) in direction (a)
Standard: 3 turn(s) in direction (a)
Maximum (hard):
15 turn(s) in direction (a)
1
(a) (b)
UB3LE1E0.book Page 45 Tuesday, August 10, 2021 2:28 PM
Page 70 of 136

Instrument and control functions
4-47
4tions, however such adjustments
are ineffective and may damage
the suspension.
Compression damping force
Fast compression damping forceTurn the adjusting bolt in direction (a)
to increase the compression damping
force.
Turn the adjusting bolt in direction (b)
to decrease the compression damping
force.
To set the compression damping for-
ce, turn the adjuster in direction (a) until
it stops, and then count the turns in di-
rection (b).
TIPWhen turning the damping force ad-
juster in direction (b), it may turn be-
yond the stated specifications,
however such adjustments are ineffec-
tive and may damage the suspension.Slow compression damping forceTurn the adjusting bolt in direction (a)
to increase the compression damping
force.
Turn the adjusting bolt in direction (b)
to decrease the compression damping
force.
To set the compression damping for-
ce, turn the adjuster in direction (a) until
it stops, and then count the clicks in di-
rection (b).
TIP
When turning the damping force
adjuster in direction (a), the 0 click
position and the 1 click position
may be the same.
When turning the damping force
adjuster in direction (b), it may
click beyond the stated specifica-
1. Fast compression damping force adjusting
bolt
1
(a) (b)
Fast compression damping settingMinimum (soft):
5.5 turn(s) in direction (b)
Standard:
3 turn(s) in direction (b)
Maximum (hard): 0 turn(s) in direction (b)
1. Slow compression damping force adjusting
boltSlow compression damping settingMinimum (soft):18 click(s) in direction (b)
Standard: 12 click(s) in direction (b)
Maximum (hard):
1 click(s) in direction (b)
1
(a) (b)
UB3LE1E0.book Page 47 Tuesday, August 10, 2021 2:28 PM
Page 71 of 136

Instrument and control functions
4-48
4
tions, however such adjustments
are ineffective and may damage
the suspension.
YZF-R1M
This model is equipped with ÖHLINS
electronic racing suspension.
Compression damping force and re-
bound damping force
The compression and rebound damp-
ing forces are electronically controlled
and can be adjusted from the MENU
screen. See ERS on page 4-20 for in-
formation on how to adjust these set-
tings.
Spring preload
The spring preload adjustment is per-
formed manually.
1. Loosen the locknut.
2. Turn the adjusting nut in direction (a) to increase the spring preload.
Turn the adjusting nut in direction
(b) to decrease the spring preload.
The spring preload setting is de-
termined by measuring distance
A. The longer distance A is, the higher the spring preload; the
shorter distance A is, the lower the
spring preload.
Use the special wrench in the
tool kit to make the adjust-
ment.
3. Tighten the locknut to the speci-fied torque. NOTICE: Always
tighten the locknut against the
adjusting nut, and then tighten
the locknut to the specified
torque.
[ECA10122]
NOTICE
ECA10102
To avoid damaging the mechanism,
do not attempt to turn beyond the
maximum or minimum settings.
1. Spring preload adjusting nut
2. Locknut
1. Distance A
1
(a) (b)
2
1
Spring preload:
Minimum (soft):
Distance A = 0.0 mm (0.00 in)
Standard:
Distance A = 4.0 mm (0.16 in)
Maximum (hard): Distance A = 9.0 mm (0.35 in)
Tightening torque: Locknut:
25 N·m (2.5 kgf·m, 18 lb·ft)
UB3LE1E0.book Page 48 Tuesday, August 10, 2021 2:28 PM
Page 88 of 136

Periodic maintenance and adjustment
7-7
7
20 Sidestand• Check operation.
• Lubricate with lithium-soap-
based grease. √√√√√
21 *Sidestand switch • Check operation and replace if
necessary. √√√√√√
22 *Front fork • Check operation and for oil leak-
age.
• Replace if necessary. √√√√
23 *Shock absorber as-
sembly • Check operation and for oil leak-
age.
• Replace if necessary. √√√√
24 *Rear suspension re-
lay arm and con-
necting arm
pivoting points
• Check operation.
√√√√
25 Engine oil • Change (warm engine before
draining).
• Check oil level and vehicle for oil leakage. √√√√√√
26 Engine oil filter car-
tridge • Replace.
√√√
27 *Cooling system • Check coolant level and vehicle
for coolant leakage. √√√√√
• Change. Every 3 years
28 *EXUP system • Check operation, cable free play
and pulley position. √√√
29 *Front and rear
brake switches
• Check operation.
√√√√√√
NO. ITEM CHECK OR MAINTENANCE JOB
ODOMETER READING
ANNUAL
CHECK
1000 km
(600 mi) 10000 km
(6000 mi) 20000 km
(12000 mi) 30000 km
(18000 mi) 40000 km
(24000 mi)UB3LE1E0.book Page 7 Tuesday, August 10, 2021 2:28 PM
Page 128 of 136

Specifications
9-2
9
Size:190/55ZR17M/C (75W) (YZF1000)
200/55ZR17M/C (78W) (YZF1000D)
Manufacturer/model: BRIDGESTONE/BATTLAX RACING
STREET RS11RLoading:Maximum load:185 kg (408 lb)
The vehicle’s maximum load is the combined
weight of the rider, passenger, cargo and any
accessories.Front brake:Type: Hydraulic dual disc brakeRear brake:Type:
Hydraulic single disc brakeFront suspension:Type:Telescopic forkRear suspension:Type:Swingarm (link suspension)Electrical system:System voltage:
12 VBattery:Model:YTZ7S(F)
Voltage, capacity:
12 V, 6.0 Ah (10 HR)
Bulb wattage:Headlight:LED
Brake/tail light:
LED
Front turn signal light: LED
Rear turn signal light: LED
Auxiliary light:
LED
License plate light: LED
UB3LE1E0.book Page 2 Tuesday, August 10, 2021 2:28 PM