ECU YAMAHA YZF-R6 2001 Owners Manual
[x] Cancel search | Manufacturer: YAMAHA, Model Year: 2001, Model line: YZF-R6, Model: YAMAHA YZF-R6 2001Pages: 118, PDF Size: 12.83 MB
Page 29 of 118

INSTRUMENT AND CONTROL FUNCTIONS
3-14
3
To install the rider seat
Insert the projection on the front of the
rider seat into the seat holder as
shown, place the seat in the original
position, and then install the bolts.Passenger seat
To remove the passenger seat
1. Insert the key into the seat lock,
and then turn it counterclockwise.
2. While holding the key in that posi-
tion, lift the front of the passenger
seat and pull it forward.To install the passenger seat
1. Insert the projection on the rear of
the passenger seat into the seat
holder as shown, and then push
the front of the seat down to lock it
in place.
2. Remove the key.NOTE:@ Make sure that the seats are properly
secured before riding. @
1. Projection
2. Seat holder
1. Passenger seat lock
2. Unlock.Left side
1. Projection
2. Seat holder
E_5mt.book Page 14 Monday, September 18, 2000 9:08 AM
Page 30 of 118

INSTRUMENT AND CONTROL FUNCTIONS
3-15
3
EAU03159
Helmet holders The helmet holders are located on the
bottom of the passenger seat.
To secure a helmet to a helmet hold-
er
1. Remove the passenger seat. (See
page 3-14 for removal and instal-
lation procedures.)
2. Attach the helmet to a helmet
holder, and then securely install
the passenger seat.
EWA00015
WARNING
_ Never ride with a helmet attached to
a helmet holder, since the helmet
may hit objects, causing loss of
control and possibly an accident. _To release the helmet from a helmet
holder
Remove the passenger seat, remove
the helmet from the helmet holder, and
then install the seat.
EAU03728
Storage compartment The storage compartment is located
under the passenger seat. (See
page 3-14 for passenger seat removal
and installation procedures.)
This storage compartment is designed
to hold a genuine Yamaha U-LOCK.
(Other locks may not fit.)
1. Helmet holder (´ 2)
1. Rubber cap
2. Owner’s tool kit
3. Hole (´ 2)
4. U-LOCK bar (optional)
5. Lock of U-LOCK (optional)
6. Strap (´ 2)
E_5mt.book Page 15 Monday, September 18, 2000 9:08 AM
Page 31 of 118

INSTRUMENT AND CONTROL FUNCTIONS
3-16
3
EWA00005
WARNING
_ l
Do not exceed the load limit of
3 kg for the storage compart-
ment.
l
Do not exceed the maximum
load of 189 kg for the vehicle.
_To place a U-LOCK in the storage
compartment:
1. Remove the rubber cap from the
hole at the bottom of the storage
compartment, and then store it in a
safe place to prevent losing the
cap.
2. Insert the ends of the U-LOCK bar
into the holes at the bottom of the
storage compartment as shown.
3. Place the lock of the U-LOCK un-
der the curved part of the U-LOCK
bar as shown.
4. Securely fasten the U-LOCK bar
and lock with the strap as shown.
NOTE:_ l
When the U-LOCK is not in the
storage compartment, be sure to
cover the hole at the bottom of the
storage compartment with the rub-
ber cap.
l
When storing items in the storage
compartment, be sure to wrap
them in a plastic bag to prevent
losing them.
_
E_5mt.book Page 16 Monday, September 18, 2000 9:08 AM
Page 74 of 118

PERIODIC MAINTENANCE AND MINOR REPAIR
6-23
6
EWA00012
WARNING
@ Because loading has an enormous
impact on the handling, braking,
performance and safety characteris-
tics of your motorcycle, you should
keep the following precautions in
mind. l
NEVER OVERLOAD THE
MOTORCYCLE! Operation of an
overloaded motorcycle may re-
sult in tire damage, loss of con-
trol, or severe injury. Make sure
that the total weight of rider,
passenger, cargo, and accesso-
ries does not exceed the speci-
fied maximum load for the
vehicle.
l
Do not carry along loosely
packed items, which can shift
during a ride.
l
Securely pack the heaviest
items close to the center of the
motorcycle and distribute the
weight evenly on both sides.
l
Adjust the suspension and tire
air pressure with regard to the
load.
l
Check the tire condition and air
pressure before each ride.
@
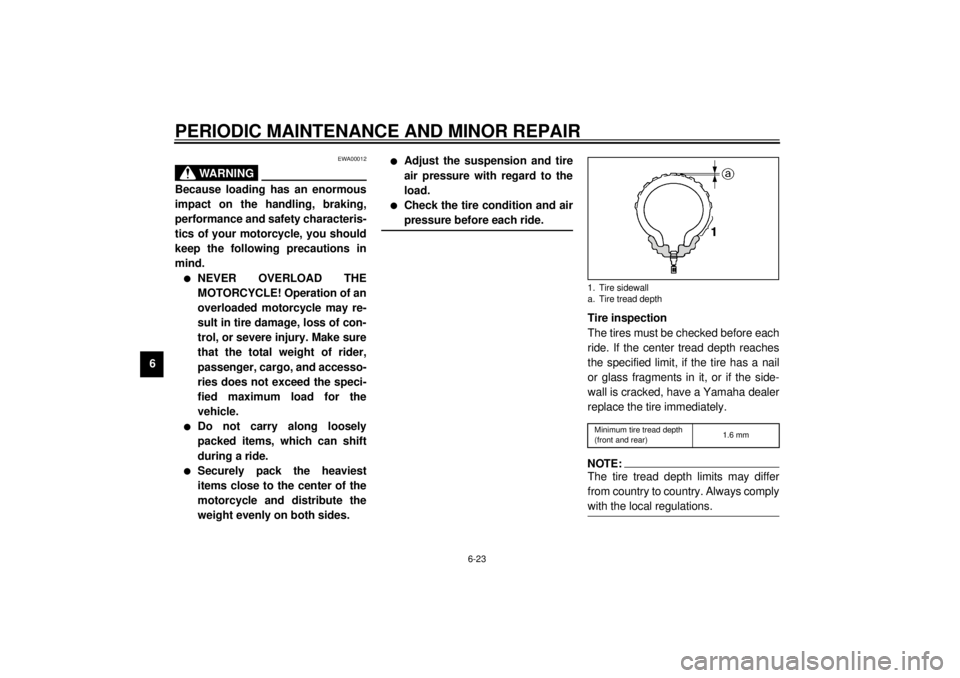
Tire inspection
The tires must be checked before each
ride. If the center tread depth reaches
the specified limit, if the tire has a nail
or glass fragments in it, or if the side-
wall is cracked, have a Yamaha dealer
replace the tire immediately.CE-08ENOTE:@ The tire tread depth limits may differ
from country to country. Always comply
with the local regulations. @1. Tire sidewall
a. Tire tread depthMinimum tire tread depth
(front and rear)1.6 mm
E_5mt.book Page 23 Monday, September 18, 2000 9:08 AM
Page 75 of 118

PERIODIC MAINTENANCE AND MINOR REPAIR
6-24
6
EW000079
WARNING
@ l
Have a Yamaha dealer replace
excessively worn tires. Besides
being illegal, operating the
motorcycle with excessively
worn tires decreases riding sta-
bility and can lead to loss of
control.
l
The replacement of all wheel-
and brake-related parts, includ-
ing the tires, should be left to a
Yamaha dealer, who has the
necessary professional knowl-
edge and experience.
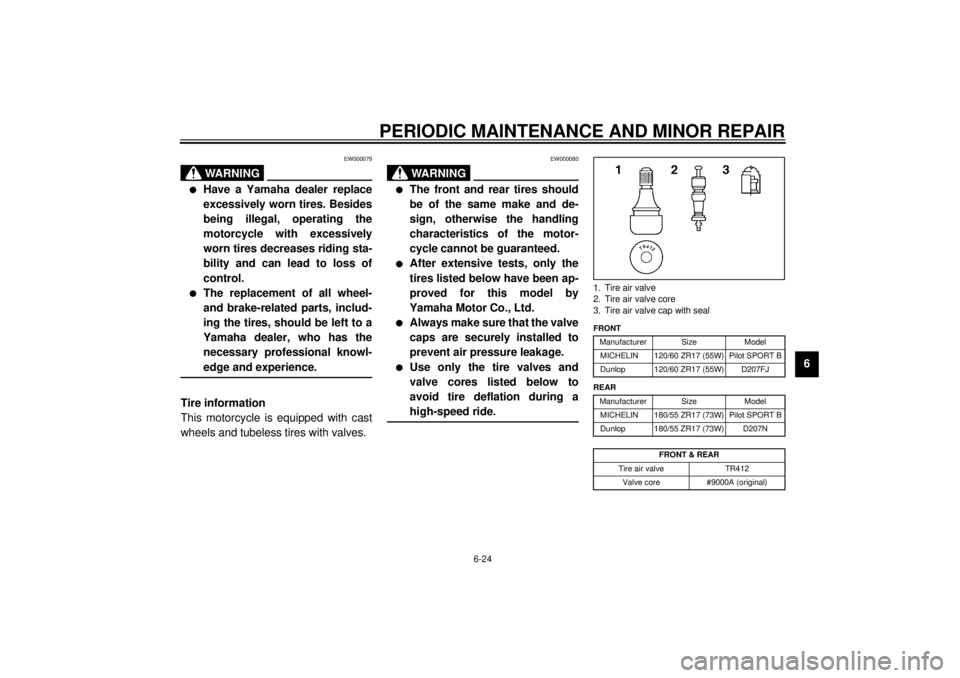
@Tire information
This motorcycle is equipped with cast
wheels and tubeless tires with valves.
EW000080
WARNING
@ l
The front and rear tires should
be of the same make and de-
sign, otherwise the handling
characteristics of the motor-
cycle cannot be guaranteed.
l
After extensive tests, only the
tires listed below have been ap-
proved for this model by
Yamaha Motor Co., Ltd.
l
Always make sure that the valve
caps are securely installed to
prevent air pressure leakage.
l
Use only the tire valves and
valve cores listed below to
avoid tire deflation during a
high-speed ride.
@
CE-10E
CE-14E1. Tire air valve
2. Tire air valve core
3. Tire air valve cap with sealFRONT
Manufacturer Size Model
MICHELIN 120/60 ZR17 (55W) Pilot SPORT B
Dunlop 120/60 ZR17 (55W) D207FJ
REAR
Manufacturer Size Model
MICHELIN 180/55 ZR17 (73W) Pilot SPORT B
Dunlop 180/55 ZR17 (73W) D207N
FRONT & REAR
Tire air valve TR412
Valve core #9000A (original)
E_5mt.book Page 24 Monday, September 18, 2000 9:08 AM
Page 86 of 118

PERIODIC MAINTENANCE AND MINOR REPAIR
6-35
6
EAU03166
Lubricating the rear
suspension The pivoting points of the rear suspen-
sion must be lubricated at the intervals
specified in the periodic maintenance
and lubrication chart.
EAU02939
Checking the front fork The condition and operation of the front
fork must be checked as follows at the
intervals specified in the periodic main-
tenance and lubrication chart.
To check the condition
EW000115
WARNING
@ Securely support the motorcycle so
that there is no danger of it falling
over. @Check the inner tubes for scratches,
damage and excessive oil leakage.To check the operation
1. Place the motorcycle on a level
surface and hold it in an upright
position.
2. While applying the front brake,
push down hard on the handle-
bars several times to check if the
front fork compresses and re-
bounds smoothly.
EC000098
CAUTION:@ If any damage is found or the front
fork does not operate smoothly,
have a Yamaha dealer check or re-
pair it. @
Recommended lubricant:
Lithium-soap-based grease
(all-purpose grease)
E_5mt.book Page 35 Monday, September 18, 2000 9:08 AM
Page 87 of 118

PERIODIC MAINTENANCE AND MINOR REPAIR
6-36
6
EAU00794
Checking the steering Worn or loose steering bearings may
cause danger. Therefore, the operation
of the steering must be checked as fol-
lows at the intervals specified in the pe-
riodic maintenance and lubrication
chart.
1. Place a stand under the engine to
raise the front wheel off the
ground.
EW000115
WARNING
@ Securely support the motorcycle so
that there is no danger of it falling
over. @
2. Hold the lower ends of the front
fork legs and try to move them for-
ward and backward. If any free
play can be felt, have a Yamaha
dealer check or repair the
steering.
EAU01144
Checking the wheel bearings The front and rear wheel bearings must
be checked at the intervals specified in
the periodic maintenance and lubrica-
tion chart. If there is play in the wheel
hub or if the wheel does not turn
smoothly, have a Yamaha dealer
check the wheel bearings.
E_5mt.book Page 36 Monday, September 18, 2000 9:08 AM
Page 90 of 118

PERIODIC MAINTENANCE AND MINOR REPAIR
6-39
6
EC000103
CAUTION:@ Do not use a fuse of a higher amper-
age rating than recommended to
avoid causing extensive damage to
the electrical system and possibly a
fire. @3. Turn the key to “ON” and turn on
the electrical circuit in question to
check if the device operates.
4. If the fuse immediately blows
again, have a Yamaha dealer
check the electrical system.
EAU01822
Replacing the headlight bulb This motorcycle is equipped with a
quartz bulb headlight. If the headlight
bulb burns out, replace it as follows.
1. Remove panel C. (See page 6-8
for panel removal and installation
procedures.)
2. Disconnect the headlight coupler,
and then remove the headlight
bulb cover.3. Unhook the headlight bulb holder,
and then remove the defective
bulb.
EW000119
WARNING
@ Headlight bulbs get very hot. There-
fore, keep flammable products away
from a lit headlight bulb, and do not
touch the bulb until it has cooled
down. @4. Place a new bulb into position, and
then secure it with the bulb holder.
1. Headlight coupler
2. Headlight bulb cover
1. Headlight bulb holder
E_5mt.book Page 39 Monday, September 18, 2000 9:08 AM
Page 92 of 118

PERIODIC MAINTENANCE AND MINOR REPAIR
6-41
6
EAU01579
Supporting the motorcycle Since this model is not equipped with a
centerstand, follow these precautions
when removing the front and rear
wheel or performing other mainte-
nance requiring the motorcycle to
stand upright. Check that the motor-
cycle is in a stable and level position
before starting any maintenance. A
strong wooden box can be placed un-
der the engine for added stability.
To service the front wheel
1. Stabilize the rear of the motorcycle
by using a motorcycle stand or, if
an additional motorcycle stand is
not available, by placing a jack un-
der the frame in front of the rear
wheel.
2. Raise the front wheel off the
ground by using a motorcycle
stand.To service the rear wheel
Raise the rear wheel off the ground by
using a motorcycle stand or, if a motor-
cycle stand is not available, by placing
a jack either under each side of the
frame in front of the rear wheel or under
each side of the swingarm.
EAU01617
Front wheel To remove the front wheel
EW000122
WARNING
@ l
It is advisable to have a Yamaha
dealer service the wheel.
l
Securely support the motor-
cycle so that there is no danger
of it falling over.
@1. Loosen the front wheel axle pinch
bolt, then the brake caliper bolts.
2. Loosen the wheel axle with a
19-mm hexagon wrench.1. Wheel axle
2. Front wheel axle pinch bolt
E_5mt.book Page 41 Monday, September 18, 2000 9:08 AM
Page 94 of 118

PERIODIC MAINTENANCE AND MINOR REPAIR
6-43
6
EAU03537
Rear wheel To remove the rear wheel
EW000122
WARNING
_ l
It is advisable to have a Yamaha
dealer service the wheel.
l
Securely support the motor-
cycle so that there is no danger
of it falling over.
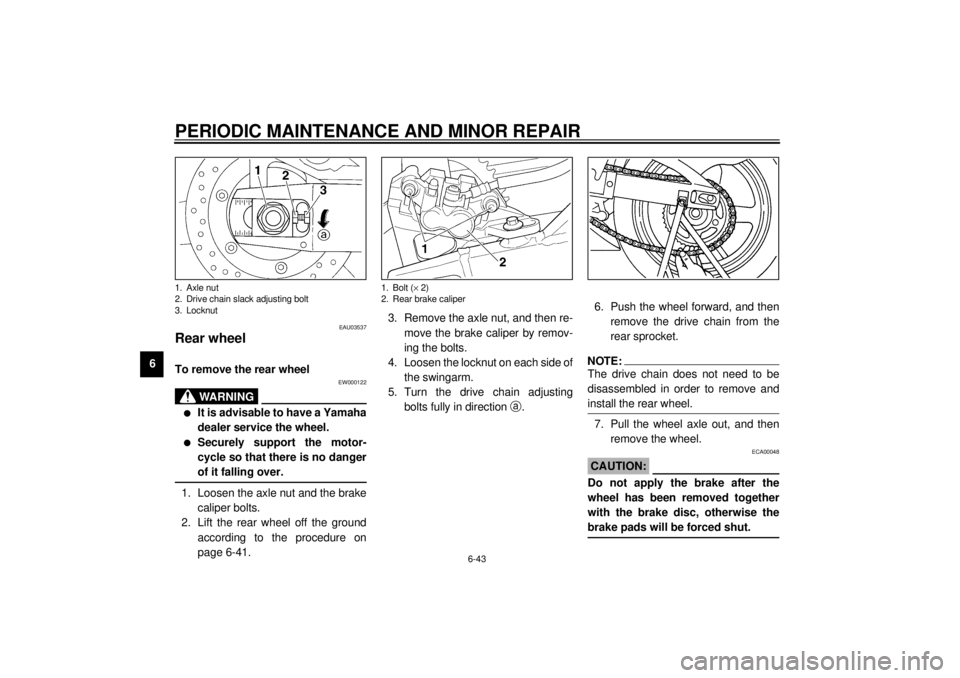
_1. Loosen the axle nut and the brake
caliper bolts.
2. Lift the rear wheel off the ground
according to the procedure on
page 6-41.3. Remove the axle nut, and then re-
move the brake caliper by remov-
ing the bolts.
4. Loosen the locknut on each side of
the swingarm.
5. Turn the drive chain adjusting
bolts fully in direction
a.6. Push the wheel forward, and then
remove the drive chain from the
rear sprocket.
NOTE:_ The drive chain does not need to be
disassembled in order to remove and
install the rear wheel. _7. Pull the wheel axle out, and then
remove the wheel.
ECA00048
CAUTION:_ Do not apply the brake after the
wheel has been removed together
with the brake disc, otherwise the
brake pads will be forced shut. _
1. Axle nut
2. Drive chain slack adjusting bolt
3. Locknut
1. Bolt (´ 2)
2. Rear brake caliper
E_5mt.book Page 43 Monday, September 18, 2000 9:08 AM