oil filter YAMAHA YZF-R6 2001 Owners Manual
[x] Cancel search | Manufacturer: YAMAHA, Model Year: 2001, Model line: YZF-R6, Model: YAMAHA YZF-R6 2001Pages: 118, PDF Size: 12.83 MB
Page 12 of 118
2-1
2
EAU00026
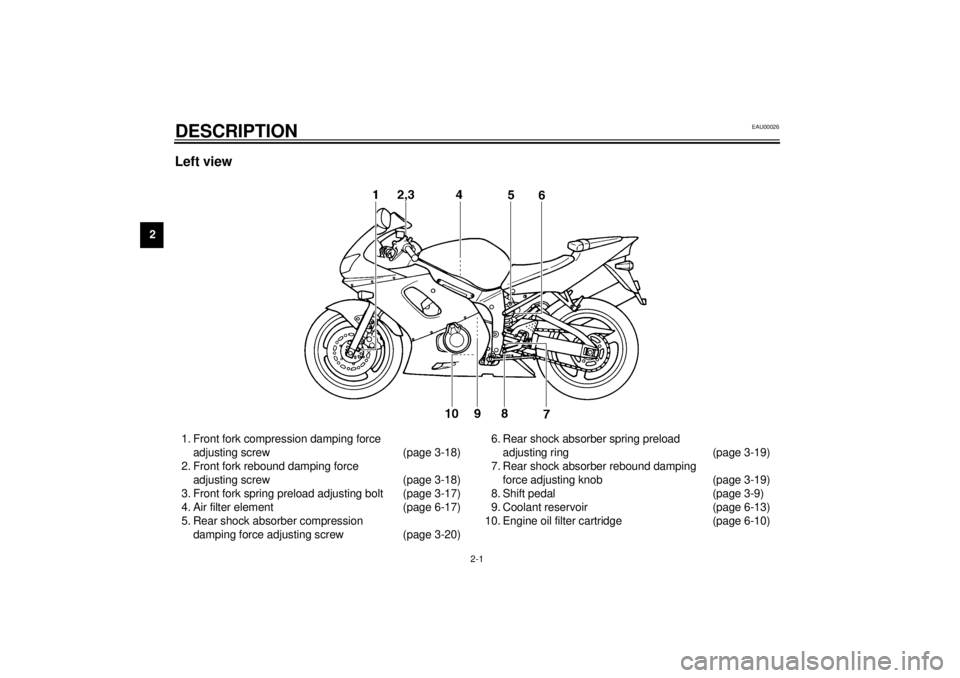
2-DESCRIPTION Left view1. Front fork compression damping force
adjusting screw (page 3-18)
2. Front fork rebound damping force
adjusting screw (page 3-18)
3. Front fork spring preload adjusting bolt (page 3-17)
4. Air filter element (page 6-17)
5. Rear shock absorber compression
damping force adjusting screw (page 3-20)6. Rear shock absorber spring preload
adjusting ring (page 3-19)
7. Rear shock absorber rebound damping
force adjusting knob (page 3-19)
8. Shift pedal (page 3-9)
9. Coolant reservoir (page 6-13)
10. Engine oil filter cartridge (page 6-10)
E_5mt.book Page 1 Monday, September 18, 2000 9:08 AM
Page 49 of 118
OPERATION AND IMPORTANT RIDING POINTS
5-4
5
EAU01128
Engine break-in There is never a more important period
in the life of your engine than the period
between 0 and 1,600 km. For this rea-
son, you should read the following ma-
terial carefully.
Since the engine is brand new, do not
put an excessive load on it for the first
1,600 km. The various parts in the en-
gine wear and polish themselves to the
correct operating clearances. During
this period, prolonged full-throttle oper-
ation or any condition that might result
in engine overheating must be avoided.
EAU01329*
0–1,000 km
Avoid prolonged operation above
5,000 r/min.
1,000–1,600 km
Avoid prolonged operation above
6,000 r/min.
EC000052*
CAUTION:@ After 1,000 km of operation, the en-
gine oil must be changed and the oil
filter cartridge replaced. @1,600 km and beyond
The vehicle can now be operated
normally.
EC000053
CAUTION:@ l
Keep the engine speed out of
the tachometer red zone.
l
If any engine trouble should oc-
cur during the engine break-in
period, immediately have a
Yamaha dealer check the
vehicle.
@
EAU00460
Parking When parking, stop the engine, and
then remove the key from the main
switch.
EW000058
WARNING
@ l
Since the engine and exhaust
system can become very hot,
park in a place where pedestri-
ans or children are not likely to
touch them.
l
Do not park on a slope or on
soft ground, otherwise the
motorcycle may overturn.
@
E_5mt.book Page 4 Monday, September 18, 2000 9:08 AM
Page 51 of 118
6
PERIODIC MAINTENANCE AND MINOR REPAIR
Owner’s tool kit .................................................... 6-1
Periodic maintenance and lubrication chart ......... 6-3
Removing and installing cowlings and panels ..... 6-6
Cowlings A and B ................................................. 6-6
Checking the spark plugs .................................... 6-9
Engine oil and oil filter cartridge ........................ 6-10
Coolant .............................................................. 6-13
Checking the air filter element ........................... 6-17
Air intake duct .................................................... 6-20
Adjusting the carburetors ................................... 6-20
Adjusting the engine idling speed ...................... 6-21
Adjusting the throttle cable free play .................. 6-21
Adjusting the valve clearance ............................ 6-22
Tires ................................................................... 6-22
Wheels ............................................................... 6-25
Adjusting the clutch lever free play .................... 6-25
Adjusting the brake pedal position ..................... 6-27
Adjusting the rear brake light switch .................. 6-27
Checking the front and rear brake pads ............. 6-28
Checking the brake fluid level ............................ 6-29
Changing the brake fluid .................................... 6-30
Drive chain slack ................................................ 6-31Lubricating the drive chain ................................ 6-32
Checking and lubricating the cables ................. 6-33
Checking and lubricating the throttle
grip and cable ................................................. 6-33
Lubricating the brake pedal ............................... 6-34
Checking and lubricating the brake and
clutch levers .................................................... 6-34
Checking and lubricating the sidestand ............ 6-34
Lubricating the rear suspension ........................ 6-35
Checking the front fork ...................................... 6-35
Checking the steering ....................................... 6-36
Checking the wheel bearings ............................ 6-36
Battery ............................................................... 6-37
Replacing the fuses .......................................... 6-38
Replacing the headlight bulb ............................. 6-39
Tail/brake light ................................................... 6-40
Replacing a turn signal light bulb ...................... 6-40
Supporting the motorcycle ................................ 6-41
Front wheel ....................................................... 6-41
Rear wheel ........................................................ 6-43
Troubleshooting ................................................. 6-44
Troubleshooting charts ...................................... 6-45
E_5mt.book Page 1 Monday, September 18, 2000 9:08 AM
Page 56 of 118
PERIODIC MAINTENANCE AND MINOR REPAIR
6-5
6
EAU03541
NOTE:@l
The air filter needs more frequent service if you are riding in unusually wet or dusty areas.
l
Hydraulic brake service
• Regularly check and, if necessary, correct the brake fluid level.
• Every two years replace the internal components of the brake master cylinder and caliper, and change the brake fluid.
• Replace the brake hoses every four years and if cracked or damaged.
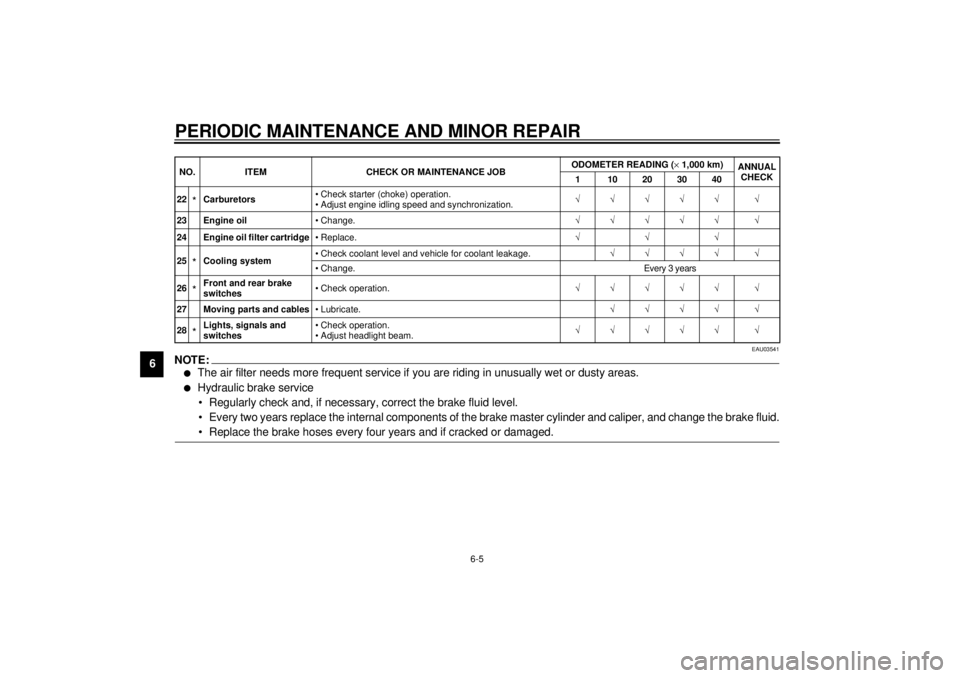
@22
*Carburetors• Check starter (choke) operation.
• Adjust engine idling speed and synchronization.ÖÖÖÖÖ Ö
23 Engine oil• Change.ÖÖÖÖÖ Ö
24 Engine oil filter cartridge•Replace.ÖÖÖ
25*Cooling system• Check coolant level and vehicle for coolant leakage.ÖÖÖÖ Ö
• Change. Every 3 years
26*Front and rear brake
switches• Check operation.ÖÖÖÖÖ Ö
27 Moving parts and cables• Lubricate.ÖÖÖÖ Ö
28*Lights, signals and
switches• Check operation.
• Adjust headlight beam.ÖÖÖÖÖ Ö NO. ITEM CHECK OR MAINTENANCE JOBODOMETER READING (´1,000 km)
ANNUAL
CHECK
1 10203040
E_5mt_Periodic.fm Page 5 Tuesday, December 12, 2000 5:49 PM
Page 61 of 118
PERIODIC MAINTENANCE AND MINOR REPAIR
6-10
6
ECA00021
CAUTION:@ Do not use any tools to remove or
install the spark plug cap, otherwise
the ignition coil coupler may get
damaged. The spark plug cap may
be difficult to remove because the
rubber seal on the end of the cap fits
tightly. To remove the spark plug
cap, simply twist it back and forth
while pulling it out; to install it, twist
it back and forth while pushing it in. @
EAU01610
Engine oil and oil filter
cartridge The engine oil level should be checked
before each ride. In addition, the oil
must be changed and the oil filter car-
tridge replaced at the intervals speci-
fied in the periodic maintenance and
lubrication chart.
To check the engine oil level
1. Place the motorcycle on a level
surface and hold it in an upright
position.NOTE:@ Make sure that the motorcycle is posi-
tioned straight up when checking the oil
level. A slight tilt to the side can result in
a false reading. @
2. Start the engine, warm it up for
several minutes, and then turn it
off.
3. Wait a few minutes until the oil set-
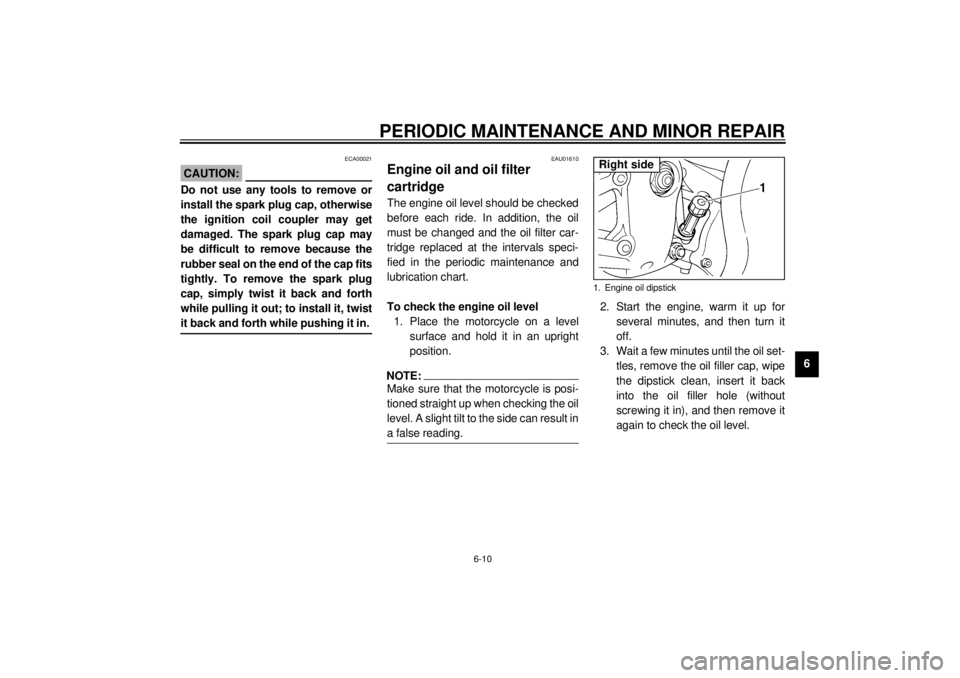
tles, remove the oil filler cap, wipe
the dipstick clean, insert it back
into the oil filler hole (without
screwing it in), and then remove it
again to check the oil level.1. Engine oil dipstickRight side
E_5mt.book Page 10 Monday, September 18, 2000 9:08 AM
Page 62 of 118
PERIODIC MAINTENANCE AND MINOR REPAIR
6-11
6
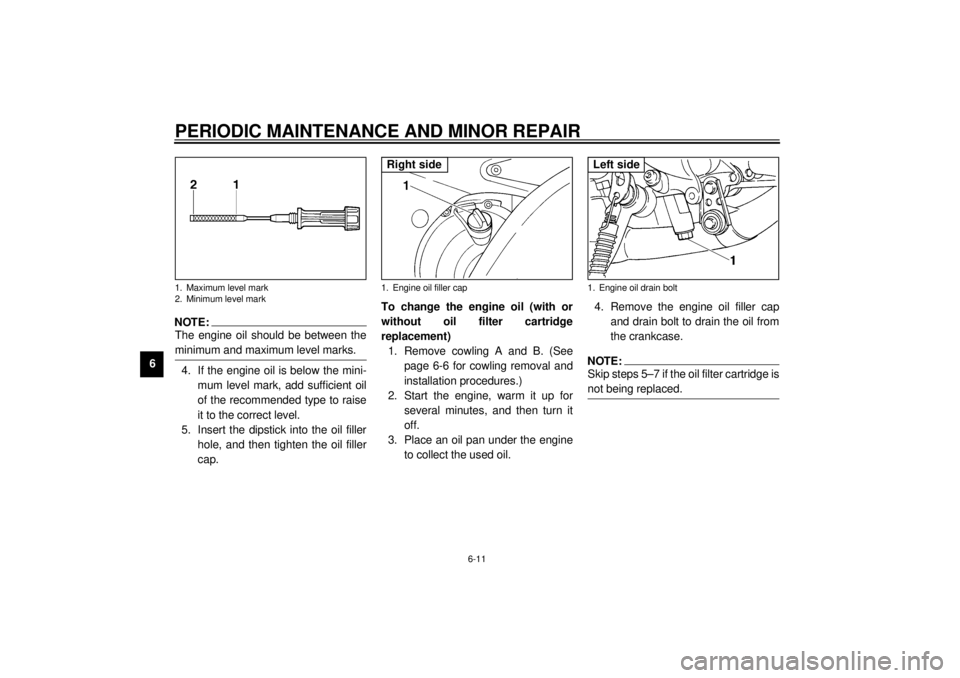
NOTE:@ The engine oil should be between the
minimum and maximum level marks. @4. If the engine oil is below the mini-
mum level mark, add sufficient oil
of the recommended type to raise
it to the correct level.
5. Insert the dipstick into the oil filler
hole, and then tighten the oil filler
cap.To change the engine oil (with or
without oil filter cartridge
replacement)
1. Remove cowling A and B. (See
page 6-6 for cowling removal and
installation procedures.)
2. Start the engine, warm it up for
several minutes, and then turn it
off.
3. Place an oil pan under the engine
to collect the used oil.4. Remove the engine oil filler cap
and drain bolt to drain the oil from
the crankcase.
NOTE:@ Skip steps 5–7 if the oil filter cartridge is
not being replaced. @
1. Maximum level mark
2. Minimum level mark
1. Engine oil filler capRight side
1. Engine oil drain boltLeft side
E_5mt.book Page 11 Monday, September 18, 2000 9:08 AM
Page 63 of 118
PERIODIC MAINTENANCE AND MINOR REPAIR
6-12
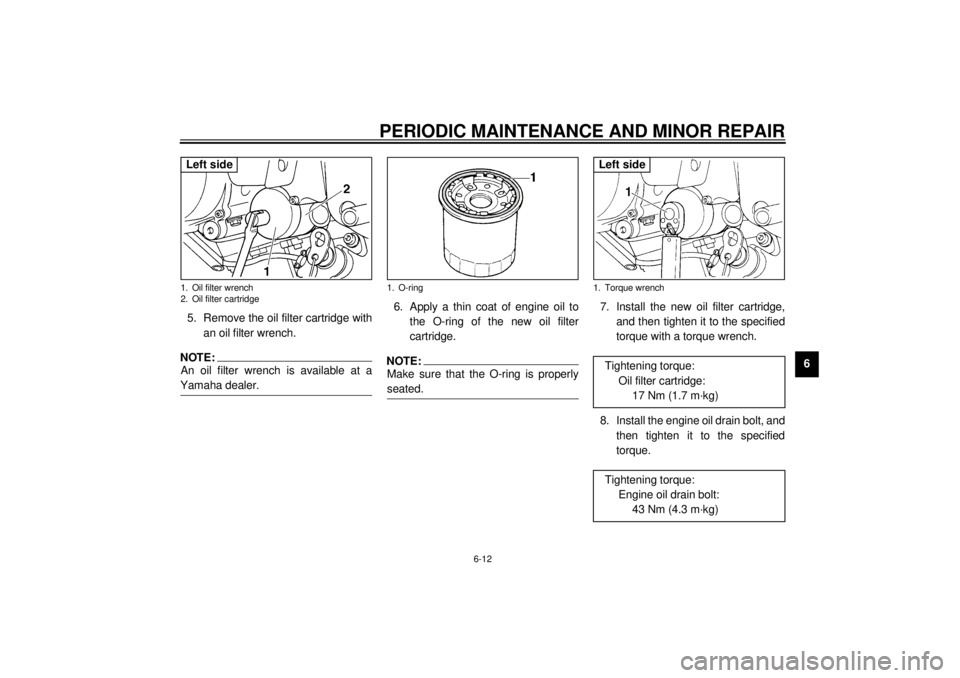
6 5. Remove the oil filter cartridge with
an oil filter wrench.
NOTE:@ An oil filter wrench is available at a
Yamaha dealer. @
6. Apply a thin coat of engine oil to
the O-ring of the new oil filter
cartridge.NOTE:@ Make sure that the O-ring is properly
seated. @
7. Install the new oil filter cartridge,
and then tighten it to the specified
torque with a torque wrench.
8. Install the engine oil drain bolt, and
then tighten it to the specified
torque.
1. Oil filter wrench
2. Oil filter cartridgeLeft side
1. O-ring
1. Torque wrenchTightening torque:
Oil filter cartridge:
17 Nm (1.7 m·kg)
Tightening torque:
Engine oil drain bolt:
43 Nm (4.3 m·kg)Left side
E_5mt.book Page 12 Monday, September 18, 2000 9:08 AM
Page 64 of 118
PERIODIC MAINTENANCE AND MINOR REPAIR
6-13
69. Add the specified amount of the
recommended engine oil, and
then install and tighten the oil filler
cap.
EC000072
CAUTION:@ l
In order to prevent clutch slip-
page (since the engine oil also
lubricates the clutch), do not
mix any chemical additives with
the oil or use oils of a higher
grade than “CD”. In addition, do
not use oils labeled “ENERGY
CONSERVING II” or higher.
l
Make sure that no foreign mate-
rial enters the crankcase.
@10. Start the engine, and then let it idle
for several minutes while checking
it for oil leakage. If oil is leaking,
immediately turn the engine off
and check for the cause.NOTE:@ After the engine is started, the engine
oil level warning light should go off if the
oil level is sufficient. @
EC000067
CAUTION:@ If the oil level warning light flickers
or remains on, immediately turn the
engine off and have a Yamaha deal-
er check the vehicle. @11. Turn the engine off, and then
check the oil level and correct it if
necessary.
12. Install the cowling.
EAU01611
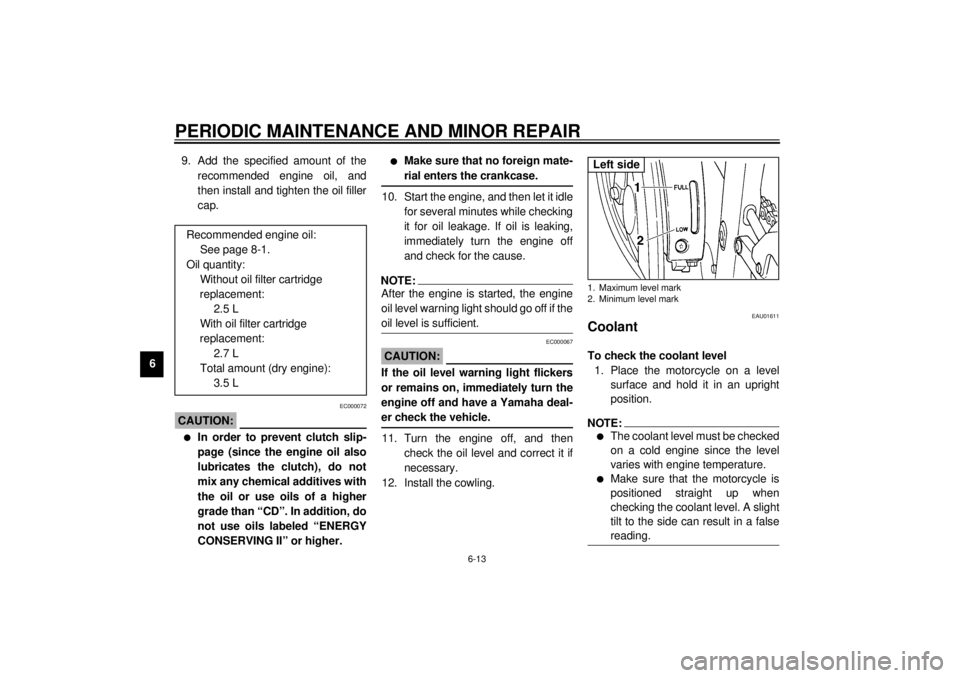
Coolant To check the coolant level
1. Place the motorcycle on a level
surface and hold it in an upright
position.NOTE:@ l
The coolant level must be checked
on a cold engine since the level
varies with engine temperature.
l
Make sure that the motorcycle is
positioned straight up when
checking the coolant level. A slight
tilt to the side can result in a false
reading.
@
Recommended engine oil:
See page 8-1.
Oil quantity:
Without oil filter cartridge
replacement:
2.5 L
With oil filter cartridge
replacement:
2.7 L
Total amount (dry engine):
3.5 L
1. Maximum level mark
2. Minimum level markLeft side
E_5mt.book Page 13 Monday, September 18, 2000 9:08 AM
Page 106 of 118
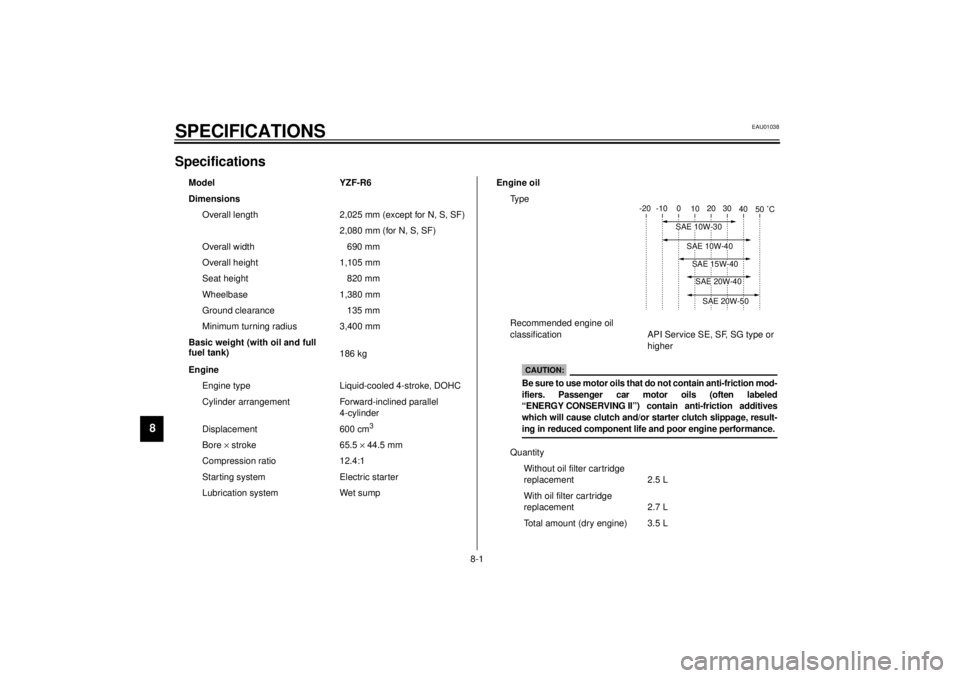
8-1
8
EAU01038
8-SPECIFICATIONSSpecifications CS-01E
Model YZF-R6
Dimensions
Overall length 2,025 mm (except for N, S, SF)
2,080 mm (for N, S, SF)
Overall width 690 mm
Overall height 1,105 mm
Seat height 820 mm
Wheelbase 1,380 mm
Ground clearance 135 mm
Minimum turning radius 3,400 mm
Basic weight (with oil and full
fuel tank)
186 kg
Engine
Engine type Liquid-cooled 4-stroke, DOHC
Cylinder arrangement Forward-inclined parallel
4-cylinder
Displacement 600 cm
3
Bore ´ stroke 65.5 ´ 44.5 mm
Compression ratio 12.4:1
Starting system Electric starter
Lubrication system Wet sumpEngine oil
Ty p e
Recommended engine oil
classification API Service SE, SF, SG type or
higher
Quantity
Without oil filter cartridge
replacement 2.5 L
With oil filter car tridge
replacement 2.7 L
Total amount (dry engine) 3.5 L
-20 -10 0
10 20 30
40
50 ˚C
SAE 10W-30
SAE 15W-40SAE 20W-40SAE 20W-50
SAE 10W-40
CAUTION:Be sure to use motor oils that do not contain anti-friction mod-
ifiers. Passenger car motor oils (often labeled
“ENERGY CONSERVING II”) contain anti-friction additives
which will cause clutch and/or starter clutch slippage, result-
ing in reduced component life and poor engine performance.
E_5mt.book Page 1 Monday, September 18, 2000 9:08 AM
Page 114 of 118

10-INDEXAAir filter element, checking ..................... 6-17
Air intake duct ........................................ 6-20
Anti-theft alarm ...................................... 3-10BBattery ................................................... 6-37
Brake and clutch levers, checking and
lubricating ............................................ 6-34
Brake fluid, changing ............................. 6-30
Brake fluid level, checking...................... 6-29
Brake lever...............................................3-9
Brake light switch (rear), adjusting ......... 6-27
Brake pads, checking............................. 6-28
Brake pedal............................................ 3-10
Brake pedal, lubricating.......................... 6-34
Brake pedal position, adjusting .............. 6-27CCables, checking and lubricating............ 6-33
Carburetors, adjusting............................ 6-20
Care.........................................................7-1
Clutch lever ..............................................3-9
Clutch lever free play, adjusting ............. 6-25
Conversion table ......................................8-5
Coolant .................................................. 6-13
Changing .......................................... 6-15
Checking .......................................... 6-13
Cowlings and panels, removing and
installing ................................................6-6DDimmer switch .........................................3-7
Drive chain, lubricating ........................... 6-32
Drive chain slack ................................... 6-31
Adjusting .......................................... 6-31
Checking .......................................... 6-31EEngine break-in ....................................... 5-4
Engine oil and oil filter cartridge ............. 6-10
Engine stop switch................................... 3-8FFront and rear suspension settings ........ 3-21
Front fork, adjusting ............................... 3-17
Front fork, checking ............................... 6-35
Fuel ....................................................... 3-11
Fuel consumption, tips for reducing ......... 5-3
Fuel level warning light ............................ 3-2
Fuel tank breather hose ......................... 3-12
Fuel tank cap ......................................... 3-11
Fuses, replacing .................................... 6-38HHandlebar switches ................................. 3-7
Headlight bulb, replacing ....................... 6-39
Helmet holder ........................................ 3-15
High beam indicator light ......................... 3-2
Horn switch ............................................. 3-8IIdentification numbers ............................. 9-1
Idling speed, adjusting ........................... 6-21
Ignition circuit cut-off system.................. 3-23
Indicator and warning lights ..................... 3-2KKey identification number ........................ 9-1
LLight switch ..............................................3-8
Luggage strap holders ...........................3-22MMain switch/steering lock .........................3-1
Model label ..............................................9-2NNeutral indicator light ...............................3-2OOil level/coolant temperature warning
light ........................................................3-3PParking.....................................................5-4
Part locations ...........................................2-1
Pass switch ..............................................3-7
Periodic maintenance and lubrication
chart ......................................................6-3
Pre-operation check list ............................4-1SSafety information ....................................1-1
Seats .....................................................3-13
Passenger seat.................................3-14
Rider seat .........................................3-13
Self-diagnosis device ...............................3-7
Shifting .....................................................5-3
Shift pedal ................................................3-9
Shock absorber assembly, adjusting ......3-19
Sidestand ...............................................3-22
Sidestand, checking and lubricating .......6-34
Spark plugs, checking ..............................6-9
E_5mt.book Page 1 Monday, September 18, 2000 9:08 AM