torque YAMAHA YZF-R6 2015 Owners Manual
[x] Cancel search | Manufacturer: YAMAHA, Model Year: 2015, Model line: YZF-R6, Model: YAMAHA YZF-R6 2015Pages: 112, PDF Size: 2.51 MB
Page 53 of 112
PERIODIC MAINTENANCE AND ADJUSTMENT
6-2
6
EAU17543
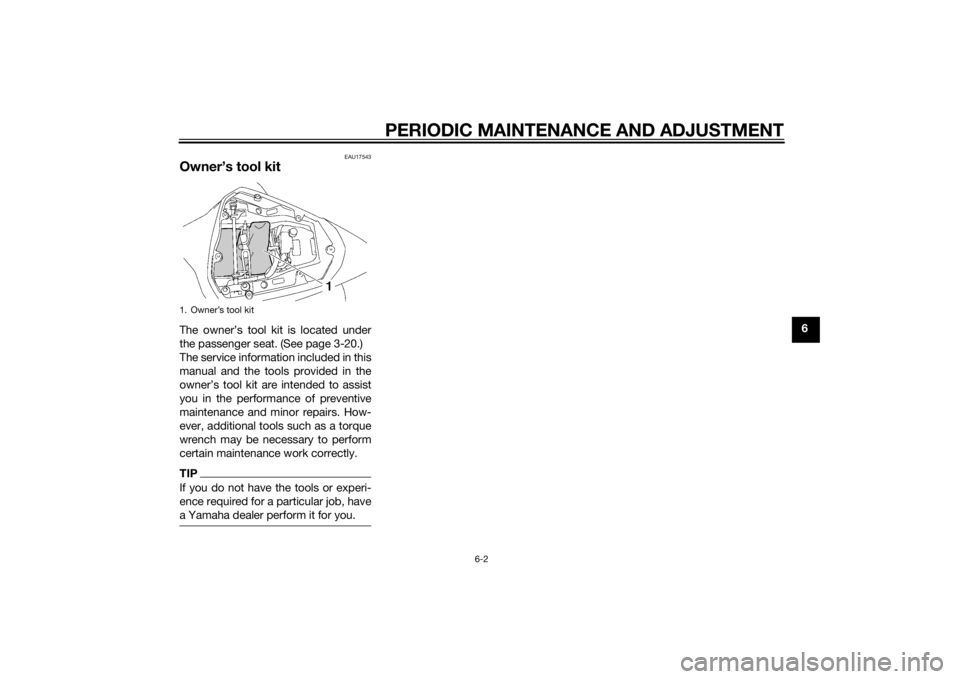
Owner’s tool kitThe owner’s tool kit is located under
the passenger seat. (See page 3-20.)
The service information included in this
manual and the tools provided in the
owner’s tool kit are intended to assist
you in the performance of preventive
maintenance and minor repairs. How-
ever, additional tools such as a torque
wrench may be necessary to perform
certain maintenance work correctly.TIPIf you do not have the tools or experi-
ence required for a particular job, have
a Yamaha dealer perform it for you.1. Owner’s tool kit
U2CXE1E0.book Page 2 Friday, July 25, 2014 11:05 AM
Page 63 of 112
PERIODIC MAINTENANCE AND ADJUSTMENT
6-12
6
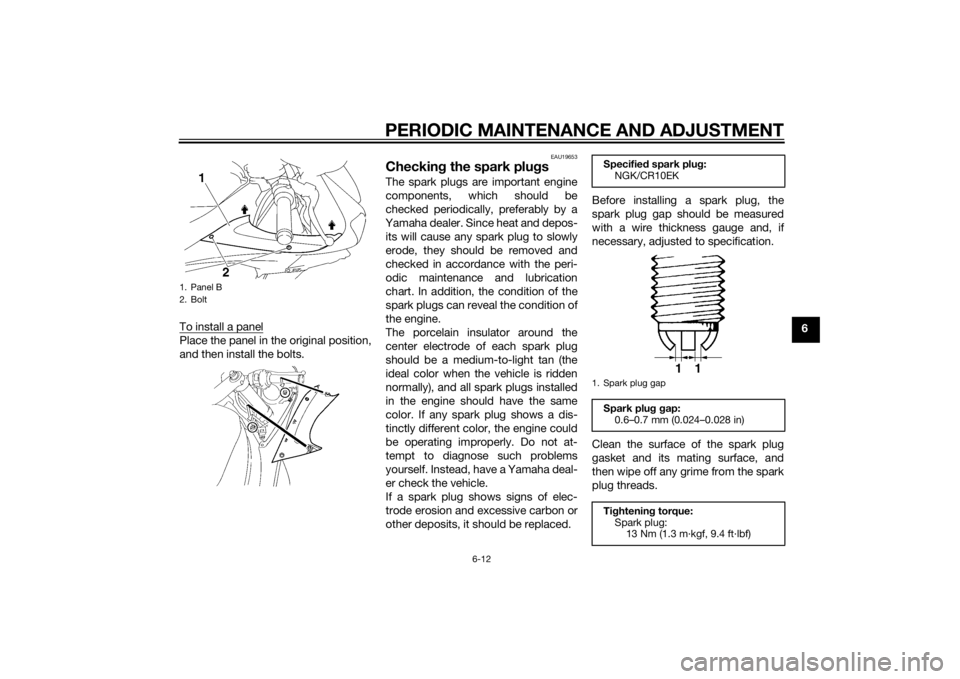
To install a panel
Place the panel in the original position,
and then install the bolts.
EAU19653
Checkin
g the spark plu gsThe spark plugs are important engine
components, which should be
checked periodically, preferably by a
Yamaha dealer. Since heat and depos-
its will cause any spark plug to slowly
erode, they should be removed and
checked in accordance with the peri-
odic maintenance and lubrication
chart. In addition, the condition of the
spark plugs can reveal the condition of
the engine.
The porcelain insulator around the
center electrode of each spark plug
should be a medium-to-light tan (the
ideal color when the vehicle is ridden
normally), and all spark plugs installed
in the engine should have the same
color. If any spark plug shows a dis-
tinctly different color, the engine could
be operating improperly. Do not at-
tempt to diagnose such problems
yourself. Instead, have a Yamaha deal-
er check the vehicle.
If a spark plug shows signs of elec-
trode erosion and excessive carbon or
other deposits, it should be replaced. Before installing a spark plug, the
spark plug gap should be measured
with a wire thickness gauge and, if
necessary, adjusted to specification.
Clean the surface of the spark plug
gasket and its mating surface, and
then wipe off any grime from the spark
plug threads.
1. Panel B
2. Bolt
Specified
spark plu g:
NGK/CR10EK
1. Spark plug gap
Spark plu g g ap:
0.6–0.7 mm (0.024–0.028 in)
Ti ghtenin g torque:
Spark plug: 13 Nm (1.3 m·kgf, 9.4 ft·lbf)
1
1
U2CXE1E0.book Page 12 Friday, July 25, 2014 11:05 AM
Page 64 of 112
PERIODIC MAINTENANCE AND ADJUSTMENT
6-13
6
TIPIf a torque wrench is not available
when installing a spark plug, a good
estimate of the correct torque is 1/4–
1/2 turn past finger tight. However, the
spark plug should be tightened to the
specified torque as soon as possible.NOTICE
ECA10841
Do not use any tools to remove or in-
stall the spark plug cap, otherwise
the i gnition coil coupler may get
d amag ed . The spark plu g cap may
b e difficult to remove because the
ru bber seal on the en d of the cap fits
ti g htly. To remove the spark plu g
cap, simply twist it b ack and forth
while pullin g it out; to install it, twist
it back an d forth while pushin g it in.
EAU3899D
En gine oil an d oil filter car-
tri dgeThe engine oil level should be checked
before each ride. In addition, the oil
must be changed and the oil filter car-
tridge replaced at the intervals speci-
fied in the periodic maintenance and
lubrication chart.
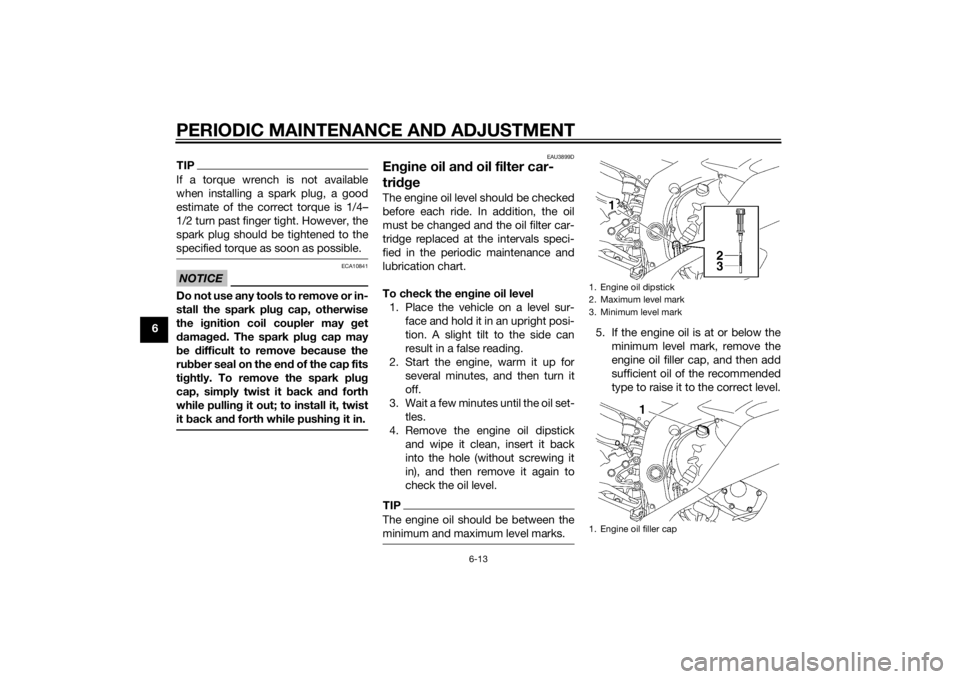
To check the en gine oil level
1. Place the vehicle on a level sur- face and hold it in an upright posi-
tion. A slight tilt to the side can
result in a false reading.
2. Start the engine, warm it up for several minutes, and then turn it
off.
3. Wait a few minutes until the oil set- tles.
4. Remove the engine oil dipstick and wipe it clean, insert it back
into the hole (without screwing it
in), and then remove it again to
check the oil level.TIPThe engine oil should be between the
minimum and maximum level marks.
5. If the engine oil is at or below theminimum level mark, remove the
engine oil filler cap, and then add
sufficient oil of the recommended
type to raise it to the correct level.1. Engine oil dipstick
2. Maximum level mark
3. Minimum level mark
1. Engine oil filler cap
U2CXE1E0.book Page 13 Friday, July 25, 2014 11:05 AM
Page 66 of 112
PERIODIC MAINTENANCE AND ADJUSTMENT
6-15
6
TIPAn oil filter wrench is available at a
Yamaha dealer.9. Apply a thin coat of clean engine oil to the O-ring of the new oil filter
cartridge.TIPMake sure that the O-ring is properly
seated.10. Install the new oil filter cartridge with an oil filter wrench, and then
tighten it to the specified torque
with a torque wrench. 11. Install the fuel tank breather hose
and overflow hose into the guides,
then place them in their original
position.
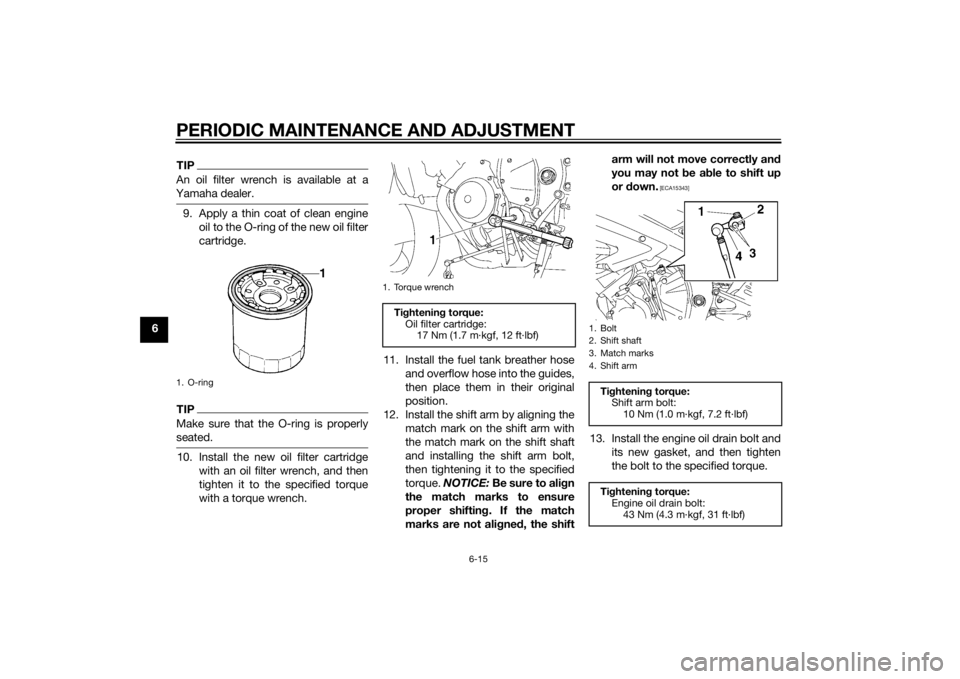
12. Install the shift arm by aligning the match mark on the shift arm with
the match mark on the shift shaft
and installing the shift arm bolt,
then tightening it to the specified
torque. NOTICE: Be sure to ali gn
the match marks to ensure
proper shiftin g. If the match
marks are not ali gne d, the shift arm will not move correctly an
d
you may not be a ble to shift up
or down.
[ECA15343]
13. Install the engine oil drain bolt and
its new gasket, and then tighten
the bolt to the specified torque.
1. O-ring
1. Torque wrenchTightenin g torque:
Oil filter cartridge: 17 Nm (1.7 m·kgf, 12 ft·lbf)
1. Bolt
2. Shift shaft
3. Match marks
4. Shift armTightenin g torque:
Shift arm bolt: 10 Nm (1.0 m·kgf, 7.2 ft·lbf)
Ti ghtenin g torque:
Engine oil drain bolt:
43 Nm (4.3 m·kgf, 31 ft·lbf)
U2CXE1E0.book Page 15 Friday, July 25, 2014 11:05 AM
Page 69 of 112
PERIODIC MAINTENANCE AND ADJUSTMENT
6-18
6
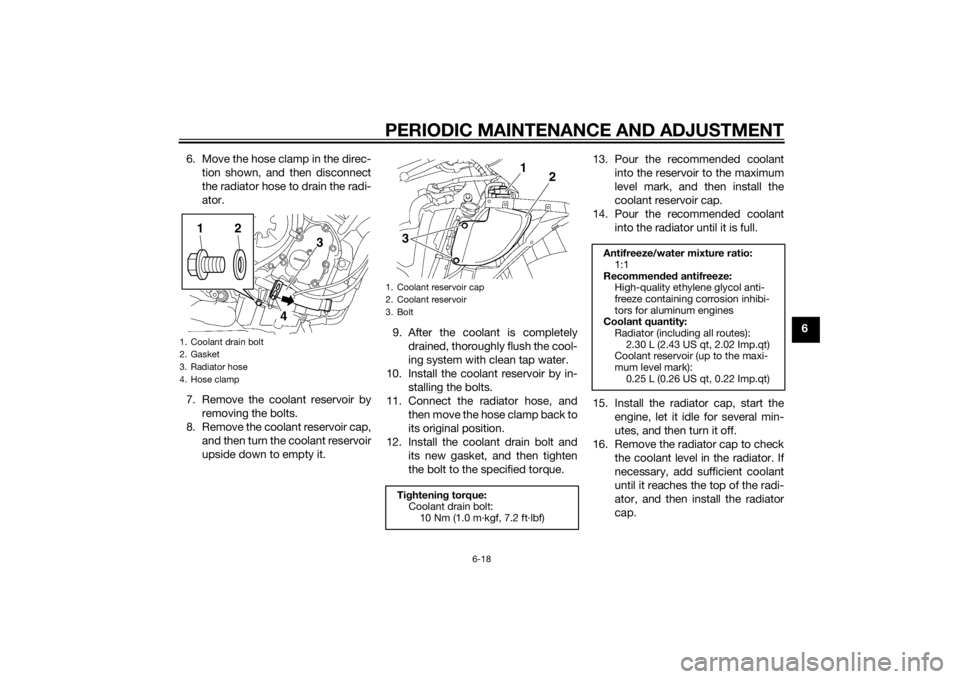
6. Move the hose clamp in the direc-
tion shown, and then disconnect
the radiator hose to drain the radi-
ator.
7. Remove the coolant reservoir by removing the bolts.
8. Remove the coolant reservoir cap, and then turn the coolant reservoir
upside down to empty it. 9. After the coolant is completely
drained, thoroughly flush the cool-
ing system with clean tap water.
10. Install the coolant reservoir by in- stalling the bolts.
11. Connect the radiator hose, and then move the hose clamp back to
its original position.
12. Install the coolant drain bolt and its new gasket, and then tighten
the bolt to the specified torque. 13. Pour the recommended coolant
into the reservoir to the maximum
level mark, and then install the
coolant reservoir cap.
14. Pour the recommended coolant into the radiator until it is full.
15. Install the radiator cap, start the engine, let it idle for several min-
utes, and then turn it off.
16. Remove the radiator cap to check the coolant level in the radiator. If
necessary, add sufficient coolant
until it reaches the top of the radi-
ator, and then install the radiator
cap.
1. Coolant drain bolt
2. Gasket
3. Radiator hose
4. Hose clamp
1
2
4
3
1. Coolant reservoir cap
2. Coolant reservoir
3. Bolt
Tightenin g torque:
Coolant drain bolt:
10 Nm (1.0 m·kgf, 7.2 ft·lbf)
2
1
3
Antifreeze/water mixture ratio: 1:1
Recommen ded antifreeze:
High-quality ethylene glycol anti-
freeze containing corrosion inhibi-
tors for aluminum engines
Coolant quantity:
Radiator (including all routes): 2.30 L (2.43 US qt, 2.02 Imp.qt)
Coolant reservoir (up to the maxi-
mum level mark): 0.25 L (0.26 US qt, 0.22 Imp.qt)
U2CXE1E0.book Page 18 Friday, July 25, 2014 11:05 AM
Page 79 of 112
PERIODIC MAINTENANCE AND ADJUSTMENT
6-28
6
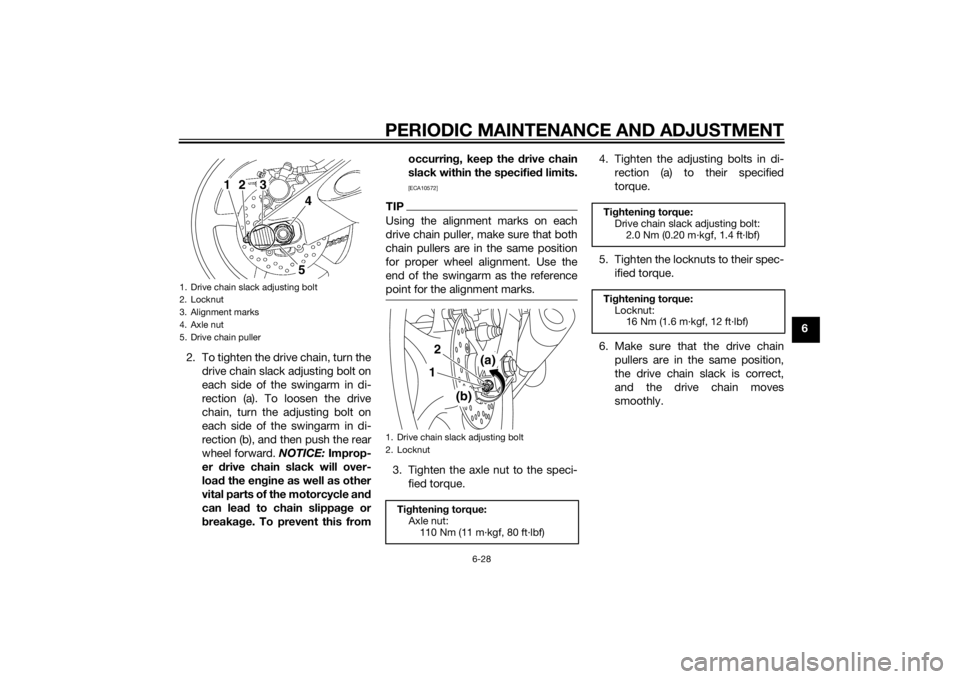
2. To tighten the drive chain, turn the drive chain slack adjusting bolt on
each side of the swingarm in di-
rection (a). To loosen the drive
chain, turn the adjusting bolt on
each side of the swingarm in di-
rection (b), and then push the rear
wheel forward. NOTICE: Improp-
er drive chain slack will over-
loa d the en gine as well as other
vital parts of the motorcycle and
can lead to chain slippa ge or
b reakag e. To prevent this from occurrin
g, keep the d rive chain
slack within the specified limits.
[ECA10572]
TIPUsing the alignment marks on each
drive chain puller, make sure that both
chain pullers are in the same position
for proper wheel alignment. Use the
end of the swingarm as the reference
point for the alignment marks.3. Tighten the axle nut to the speci-
fied torque. 4. Tighten the adjusting bolts in di-
rection (a) to their specified
torque.
5. Tighten the locknuts to their spec- ified torque.
6. Make sure that the drive chain pullers are in the same position,
the drive chain slack is correct,
and the drive chain moves
smoothly.
1. Drive chain slack adjusting bolt
2. Locknut
3. Alignment marks
4. Axle nut
5. Drive chain puller
45
1
2
3
1. Drive chain slack adjusting bolt
2. Locknut
Tightenin g torque:
Axle nut: 110 Nm (11 m·kgf, 80 ft·lbf)
(a)
(b)
12
Tightenin g torque:
Drive chain slack adjusting bolt: 2.0 Nm (0.20 m·kgf, 1.4 ft·lbf)
Ti ghtenin g torque:
Locknut: 16 Nm (1.6 m·kgf, 12 ft·lbf)
U2CXE1E0.book Page 28 Friday, July 25, 2014 11:05 AM
Page 92 of 112
![YAMAHA YZF-R6 2015 Owners Manual PERIODIC MAINTENANCE AND ADJUSTMENT
6-41
6have
been removed , otherwise
the brake pa ds will be forced
shut.
[ECA11052]
To install the front wheel 1. Lift the wheel up between the fork legs.
2. In YAMAHA YZF-R6 2015 Owners Manual PERIODIC MAINTENANCE AND ADJUSTMENT
6-41
6have
been removed , otherwise
the brake pa ds will be forced
shut.
[ECA11052]
To install the front wheel 1. Lift the wheel up between the fork legs.
2. In](/img/51/54349/w960_54349-91.png)
PERIODIC MAINTENANCE AND ADJUSTMENT
6-41
6have
been removed , otherwise
the brake pa ds will be forced
shut.
[ECA11052]
To install the front wheel 1. Lift the wheel up between the fork legs.
2. Insert the wheel axle.
3. Install the axle bolt, lower the front wheel so that it is on the ground,
and then put the sidestand down.
4. Install the brake caliper on each side by installing the bolts.
TIPMake sure that there is enough space
between the brake pads before install-
ing the brake calipers onto the brake
discs.5. Install the brake hose holder oneach side by installing the bolt and
nut.
6. Tighten the brake caliper bolts and the brake hose holder bolts to the
specified torques.
7. Tighten the axle bolt to the speci- fied torque.TIPWhile tightening the axle bolt, hold the
wheel axle with a 19-mm hexagon
wrench to keep it from turning.
8. Tighten wheel axle pinch bolt B,then pinch bolt A to the specified
torque.
9. Retighten pinch bolt B to the specified torque.
10. Tap the outer side of the right fork leg with a rubber mallet to align it
with the end of the wheel axle.
11. Tighten wheel axle pinch bolt D, then pinch bolt C to the specified
torque.
1. Wheel axle
Tightenin g torques:
Brake caliper bolt: 35 Nm (3.5 m·kgf, 25 ft·lbf)
Brake hose holder bolt:
7 Nm (0.7 m·kgf, 5.1 ft·lbf)
Ti ghtenin g torque:
Axle bolt: 91 Nm (9.1 m·kgf, 66 ft·lbf)
1. Front wheel axle pinch bolt A
2. Front wheel axle pinch bolt B
3. Front wheel axle pinch bolt C
4. Front wheel axle pinch bolt DTightenin g torque:
Wheel axle pinch bolt: 21 Nm (2.1 m·kgf, 15 ft·lbf)
U2CXE1E0.book Page 41 Friday, July 25, 2014 11:05 AM
Page 93 of 112
PERIODIC MAINTENANCE AND ADJUSTMENT
6-42
6
12. Retighten pinch bolt D to the
specified torque.
13. While applying the front brake, push down hard on the handlebar
several times to check for proper
fork operation.
EAU25081
Rear wheel
EAU56721
To remove the rear wheel
WARNING
EWA10822
To avoi d injury, securely support the
vehicle so there is no dan ger of it
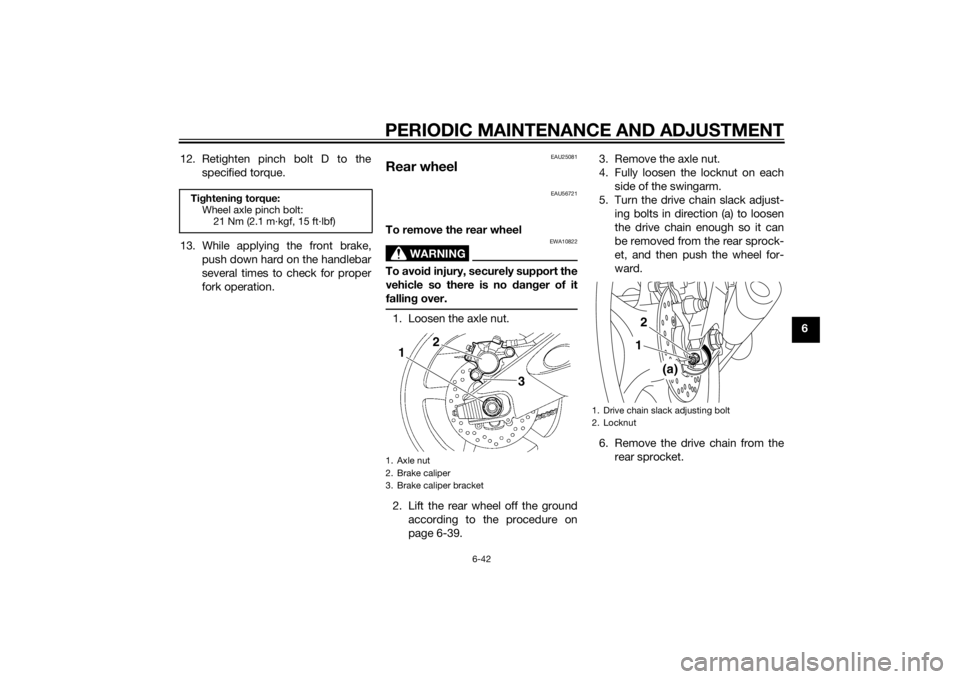
fallin g over.1. Loosen the axle nut.
2. Lift the rear wheel off the ground
according to the procedure on
page 6-39. 3. Remove the axle nut.
4. Fully loosen the locknut on each
side of the swingarm.
5. Turn the drive chain slack adjust- ing bolts in direction (a) to loosen
the drive chain enough so it can
be removed from the rear sprock-
et, and then push the wheel for-
ward.
6. Remove the drive chain from the rear sprocket.
Tightenin g torque:
Wheel axle pinch bolt: 21 Nm (2.1 m·kgf, 15 ft·lbf)
1. Axle nut
2. Brake caliper
3. Brake caliper bracket
1
2
3
1. Drive chain slack adjusting bolt
2. Locknut
(a)
12
U2CXE1E0.book Page 42 Friday, July 25, 2014 11:05 AM
Page 94 of 112
PERIODIC MAINTENANCE AND ADJUSTMENT
6-43
6
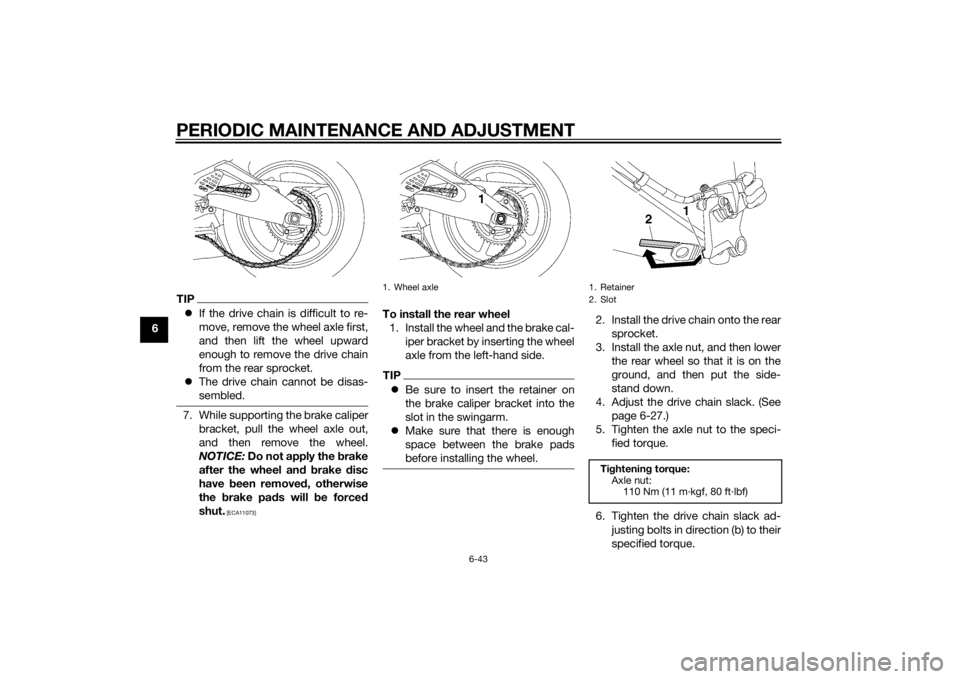
TIPIf the drive chain is difficult to re-
move, remove the wheel axle first,
and then lift the wheel upward
enough to remove the drive chain
from the rear sprocket.
The drive chain cannot be disas-
sembled.7. While supporting the brake caliper
bracket, pull the wheel axle out,
and then remove the wheel.
NOTICE: Do not apply the b rake
after the wheel an d b rake disc
have been removed , otherwise
the brake pa ds will be forced
shut.
[ECA11073]
To install the rear wheel 1. Install the wheel and the brake cal- iper bracket by inserting the wheel
axle from the left-hand side.TIPBe sure to insert the retainer on
the brake caliper bracket into the
slot in the swingarm.
Make sure that there is enough
space between the brake pads
before installing the wheel.
2. Install the drive chain onto the rear
sprocket.
3. Install the axle nut, and then lower the rear wheel so that it is on the
ground, and then put the side-
stand down.
4. Adjust the drive chain slack. (See page 6-27.)
5. Tighten the axle nut to the speci- fied torque.
6. Tighten the drive chain slack ad- justing bolts in direction (b) to their
specified torque.
1. Wheel axle
1. Retainer
2. SlotTightenin g torque:
Axle nut: 110 Nm (11 m·kgf, 80 ft·lbf)
U2CXE1E0.book Page 43 Friday, July 25, 2014 11:05 AM
Page 95 of 112
PERIODIC MAINTENANCE AND ADJUSTMENT
6-44
6
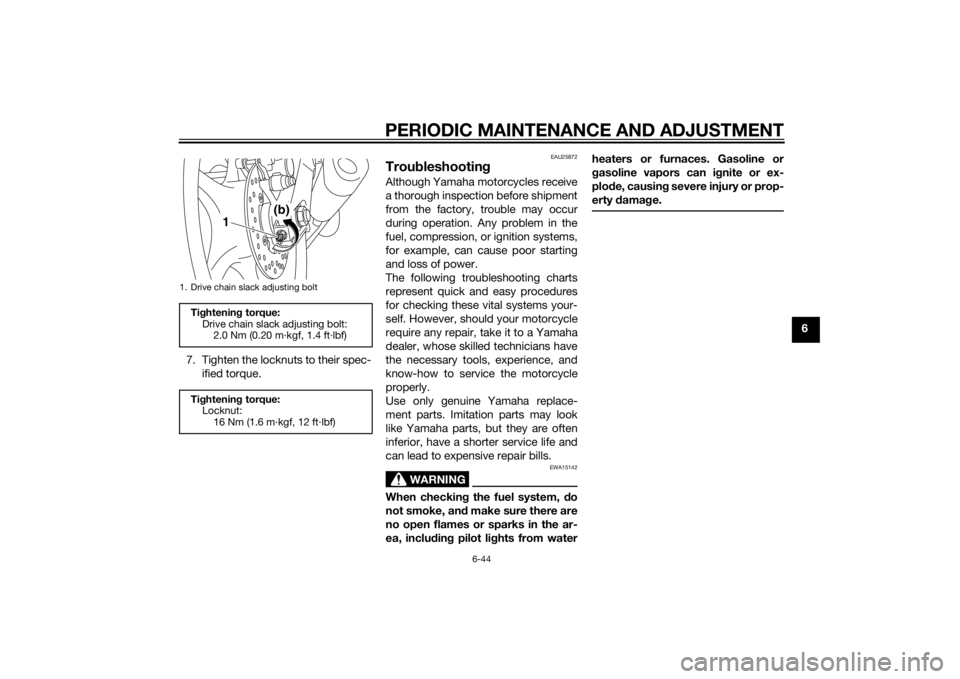
7. Tighten the locknuts to their spec- ified torque.
EAU25872
Trou bleshootin gAlthough Yamaha motorcycles receive
a thorough inspection before shipment
from the factory, trouble may occur
during operation. Any problem in the
fuel, compression, or ignition systems,
for example, can cause poor starting
and loss of power.
The following troubleshooting charts
represent quick and easy procedures
for checking these vital systems your-
self. However, should your motorcycle
require any repair, take it to a Yamaha
dealer, whose skilled technicians have
the necessary tools, experience, and
know-how to service the motorcycle
properly.
Use only genuine Yamaha replace-
ment parts. Imitation parts may look
like Yamaha parts, but they are often
inferior, have a shorter service life and
can lead to expensive repair bills.
WARNING
EWA15142
When checkin g the fuel system, d o
not smoke, an d make sure there are
no open flames or sparks in the ar-
ea, inclu din g pilot li ghts from water heaters or furnaces. Gasoline or
g
asoline vapors can i gnite or ex-
plo de, causin g severe injury or prop-
erty damag e.
1. Drive chain slack adjusting boltTightenin g torque:
Drive chain slack adjusting bolt: 2.0 Nm (0.20 m·kgf, 1.4 ft·lbf)
Ti ghtenin g torque:
Locknut:
16 Nm (1.6 m·kgf, 12 ft·lbf)
(b)
1
U2CXE1E0.book Page 44 Friday, July 25, 2014 11:05 AM