fuel YAMAHA YZF-R6 2016 User Guide
[x] Cancel search | Manufacturer: YAMAHA, Model Year: 2016, Model line: YZF-R6, Model: YAMAHA YZF-R6 2016Pages: 112, PDF Size: 2.57 MB
Page 45 of 112
For your safety – pre-operation checks
4-1
4
EAU15599
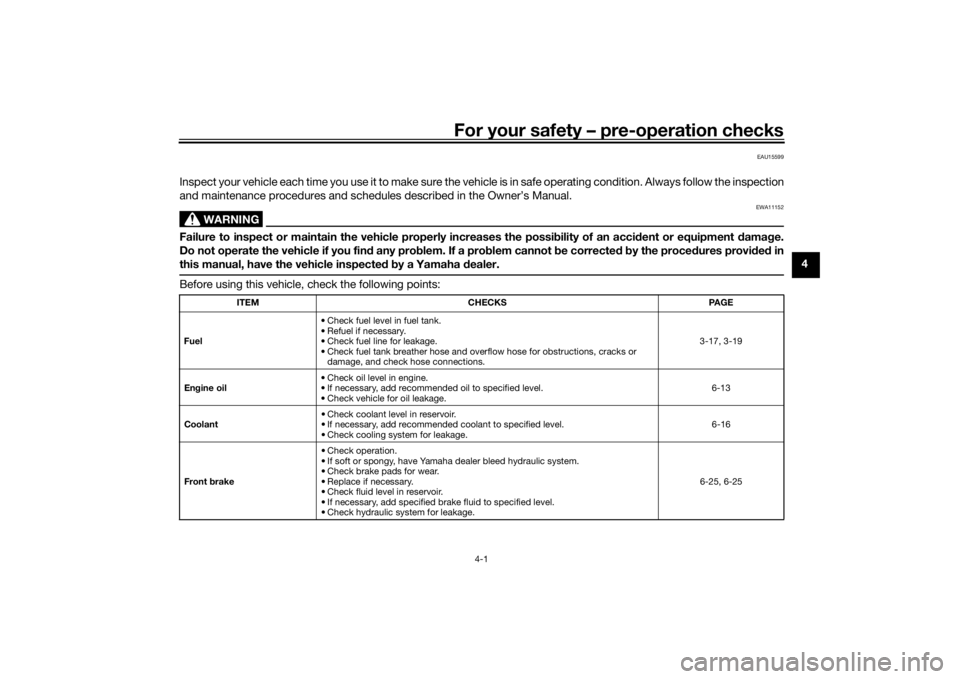
Inspect your vehicle each time you use it to make sure the vehicle is in safe operating condition. Always follow the inspection
and maintenance procedures and schedules described in the Owner’s Manual.
WARNING
EWA11152
Failure to inspect or maintain the vehicle properly increases the possibility of an accident or equipment d amage.
Do not operate the vehicle if you fin d any pro blem. If a pro blem cannot b e corrected b y the proce dures provi ded in
this manual, have the vehicle inspecte d b y a Yamaha dealer.Before using this vehicle, check the following points:
ITEM CHECKS PAGE
Fuel • Check fuel level in fuel tank.
• Refuel if necessary.
• Check fuel line for leakage.
• Check fuel tank breather hose and overflow hose for obstructions, cracks or
damage, and check hose connections. 3-17, 3-19
En gine oil • Check oil level in engine.
• If necessary, add recommended oil to specified level.
• Check vehicle for oil leakage. 6-13
Coolant • Check coolant level in reservoir.
• If necessary, add recommended coolant to specified level.
• Check cooling system for leakage. 6-16
Front brake • Check operation.
• If soft or spongy, have Yamaha dealer bleed hydraulic system.
• Check brake pads for wear.
• Replace if necessary.
• Check fluid level in reservoir.
• If necessary, add specified brake fluid to specified level.
• Check hydraulic system for leakage. 6-25, 6-25
U2CXE2E0.book Page 1 Tuesday, June 9, 2015 5:04 PM
Page 48 of 112
Operation and important rid ing points
5-1
5
EAU15952
Read the Owner’s Manual carefully to
become familiar with all controls. If
there is a control or function you do not
understand, ask your Yamaha dealer.
WARNING
EWA10272
Failure to familiarize yourself with
the controls can lead to loss of con-
trol, which coul d cause an acci dent
or injury.
EAU47152
TIPThis model is equipped with: a lean angle sensor to stop the en-
gine in case of a turnover. In this
case, the display will indicate error
code 30, but this is not a malfunc-
tion. Turn the key to “OFF” and
then to “ON” to clear the error co-
d e . F ai l in g to do s o wi ll pr e v e nt the
engine from starting even though
the engine will crank when push-
ing the start switch.
an engine auto-stop system. The
engine stops automatically if left
idling for 20 minutes. In this case,
the display will indicate error code
70, but this is not a malfunction.
Push the start switch to clear the
error code and to restart the en-
gine.
EAU33016
Startin g the en gineIn order for the ignition circuit cut-off
system to enable starting, one of the
following conditions must be met:
The transmission is in the neutral
position.
The transmission is in gear with
the clutch lever pulled and the
sidestand up.
See page 3-28 for more informa-
tion.
1. Turn the key to “ON” and make sure that the engine stop switch is
set to “ ”.
The following warning lights and
indicator lights should come on for
a few seconds, then go off. Oil level warning light
Fuel level warning light
Coolant temperature warning
light
Shift timing indicator light
Engine trouble warning light
Immobilizer system indicator
light
U2CXE2E0.book Page 1 Tuesday, June 9, 2015 5:04 PM
Page 50 of 112
Operation and important rid ing points
5-3
5
EAU16811
Tips for re ducin g fuel con-
sumptionFuel consumption depends largely on
your riding style. Consider the follow-
ing tips to reduce fuel consumption:
Shift up swiftly, and avoid high en-
gine speeds during acceleration.
Do not rev the engine while shift-
ing down, and avoid high engine
speeds with no load on the en-
gine.
Turn the engine off instead of let-
ting it idle for an extended length
of time (e.g., in traffic jams, at traf-
fic lights or at railroad crossings).
EAU16842
Engine break-inThere is never a more important period
in the life of your engine than the period
between 0 and 1600 km (1000 mi). For
this reason, you should read the fol-
lowing material carefully.
Since the engine is brand new, do not
put an excessive load on it for the first
1600 km (1000 mi). The various parts in
the engine wear and polish themselves
to the correct operating clearances.
During this period, prolonged full-throt-
tle operation or any condition that
might result in engine overheating
must be avoided.
EAU17085
0–1000 km (0–600 mi)
Avoid prolonged operation above 8300
r/min. NOTICE: After 1000 km (600
mi) of operation, the en gine oil must
b e chan ged an d the oil filter car-
tri dg e or element replace d.
[ECA10303]
1000–1600 km (600–1000 mi)
Avoid prolonged operation above 9900
r/min. 1600 km (1000 mi) an
d b eyon d
The vehicle can now be operated nor-
mally.
NOTICE
ECA10311
Keep the en gine spee d out of
the tachometer red zone.
If any en gine trou ble shoul d oc-
cur during the en gine break-in
period , imme diately have a
Yamaha dealer check the vehi-
cle.TIPDuring and after the engine break-in
period, the exhaust heat may cause
discoloration of the exhaust pipe, but
this is normal.
U2CXE2E0.book Page 3 Tuesday, June 9, 2015 5:04 PM
Page 51 of 112
Operation and important ri din g points
5-4
5
EAU17214
Parkin gWhen parking, stop the engine, and
then remove the key from the main
switch.
WARNING
EWA10312
Since the en gine an d exhaust
system can b ecome very hot,
park in a place where pe destri-
ans or chil dren are not likely to
touch them an d b e burne d.
Do not park on a slope or on soft
groun d, otherwise the vehicle
may overturn, increasin g the
risk of a fuel leak an d fire.
Do not park near grass or other
flamma ble materials which
mi ght catch fire.
U2CXE2E0.book Page 4 Tuesday, June 9, 2015 5:04 PM
Page 54 of 112

Periodic maintenance an d a djustment
6-3
6
EAU46862
TIP The annual checks must b e performed every year, except if a kilometer- based maintenance, or for the UK, a
milea ge- based maintenance, is performed instead.
From 50000 km (30000 mi), repeat the maintenance intervals starting from 10000 km (6000 mi).
Items marked with an asterisk should be performed by a Yamaha dealer as they require special tools, data and tech-
nical skills.
EAU46911
Perio dic maintenance chart for the emission control systemNO. ITEM CHECK OR MAINTENANCE JOB ODOMETER READING
ANNUAL
CHECK
1000 km
(600 mi) 10000 km
(6000 mi) 20000 km
(12000 mi) 30000 km
(18000 mi) 40000 km
(24000 mi)
1 *Fuel line • Check fuel hoses for cracks or
damage. √√√√√
2 *Spark plu gs • Check condition.
• Clean and regap.
√√
• Replace. √√
3 *Va l ve s • Check valve clearance.
•Adjust.
Every 40000 km (24000 mi)
4 *Fuel injection sys-
tem • Adjust synchronization.
√√√√√√
5 *Muffler an
d ex-
haust pipe • Check the screw clamp(s) for
looseness. √√√√√
6 *Air in
duction sys-
tem • Check the air cut-off valve, reed
valve, and hose for damage.
• Replace any damaged parts if necessary. √√√√√
U2CXE2E0.book Page 3 Tuesday, June 9, 2015 5:04 PM
Page 65 of 112
Periodic maintenance an d a djustment
6-14
6
6. Insert and tighten the engine oil
dipstick, and then install and tight-
en the oil filler cap.
To chan ge the en gine oil (with or
without oil filter cartri dge replace-
ment) 1. Place the vehicle on a level surfa- ce.
2. Remove cowling A. (See page 6-8.)
3. Start the engine, warm it up for several minutes, and then turn it
off.
4. Place an oil pan under the engine to collect the used oil.
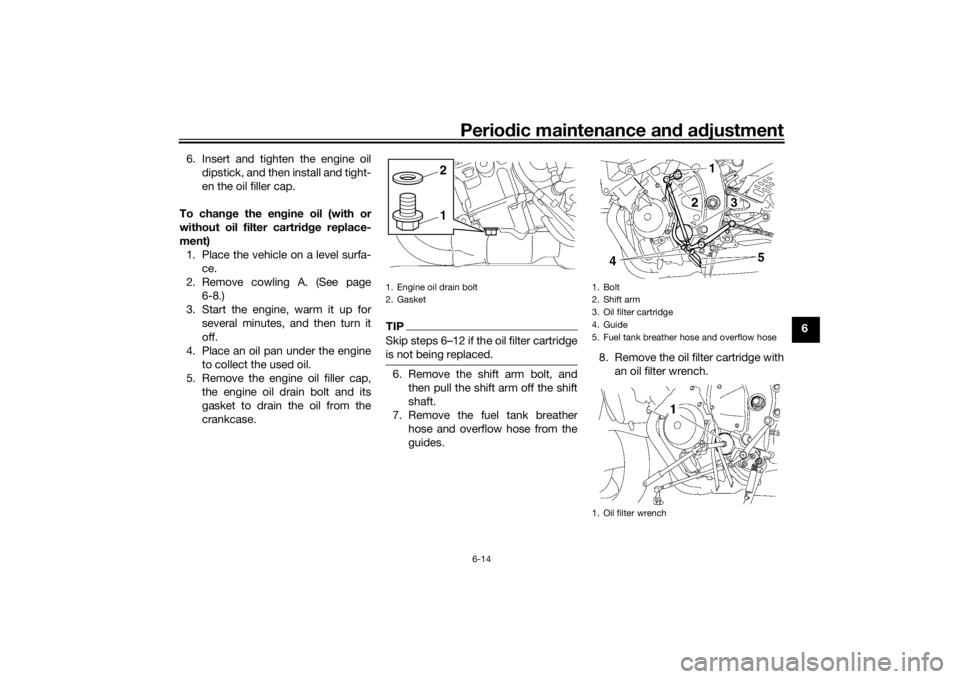
5. Remove the engine oil filler cap, the engine oil drain bolt and its
gasket to drain the oil from the
crankcase.
TIPSkip steps 6–12 if the oil filter cartridge
is not being replaced.6. Remove the shift arm bolt, andthen pull the shift arm off the shift
shaft.
7. Remove the fuel tank breather hose and overflow hose from the
guides. 8. Remove the oil filter cartridge with
an oil filter wrench.1. Engine oil drain bolt
2. Gasket
12
1. Bolt
2. Shift arm
3. Oil filter cartridge
4. Guide
5. Fuel tank breather hose and overflow hose
1. Oil filter wrench
U2CXE2E0.book Page 14 Tuesday, June 9, 2015 5:04 PM
Page 66 of 112
Periodic maintenance an d a djustment
6-15
6
TIPAn oil filter wrench is available at a
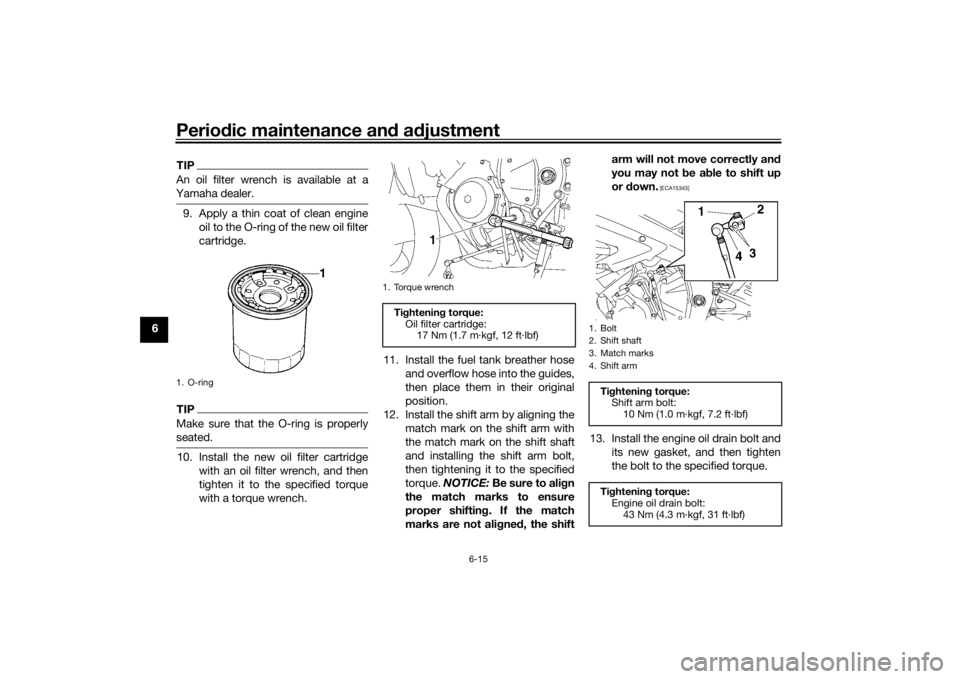
Yamaha dealer.9. Apply a thin coat of clean engine oil to the O-ring of the new oil filter
cartridge.TIPMake sure that the O-ring is properly
seated.10. Install the new oil filter cartridge with an oil filter wrench, and then
tighten it to the specified torque
with a torque wrench. 11. Install the fuel tank breather hose
and overflow hose into the guides,
then place them in their original
position.
12. Install the shift arm by aligning the match mark on the shift arm with
the match mark on the shift shaft
and installing the shift arm bolt,
then tightening it to the specified
torque. NOTICE: Be sure to ali gn
the match marks to ensure
proper shiftin g. If the match
marks are not ali gne d, the shift arm will not move correctly an
d
you may not be a ble to shift up
or down.
[ECA15343]
13. Install the engine oil drain bolt and
its new gasket, and then tighten
the bolt to the specified torque.
1. O-ring
1. Torque wrenchTightenin g torque:
Oil filter cartridge: 17 Nm (1.7 m·kgf, 12 ft·lbf)
1. Bolt
2. Shift shaft
3. Match marks
4. Shift armTightenin g torque:
Shift arm bolt: 10 Nm (1.0 m·kgf, 7.2 ft·lbf)
Ti ghtenin g torque:
Engine oil drain bolt:
43 Nm (4.3 m·kgf, 31 ft·lbf)
U2CXE2E0.book Page 15 Tuesday, June 9, 2015 5:04 PM
Page 71 of 112

Periodic maintenance an d a djustment
6-20
6
EAU21385
Checkin g the throttle grip free
playThe throttle grip free play should mea-
sure 3.0–5.0 mm (0.12–0.20 in) at the
inner edge of the throttle grip. Periodi-
cally check the throttle grip free play
and, if necessary, have a Yamaha deal-
er adjust it.
EAU21402
Valve clearanceThe valve clearance changes with use,
resulting in improper air-fuel mixture
and/or engine noise. To prevent this
from occurring, the valve clearance
must be adjusted by a Yamaha dealer
at the intervals specified in the periodic
maintenance and lubrication chart.
EAU64320
TiresTires are the only contact between the
vehicle and the road. Safety in all con-
ditions of riding depends on a relatively
small area of road contact. Therefore, it
is essential to maintain the tires in good
condition at all times and replace them
at the appropriate time with the speci-
fied tires.
Tire air pressure
The tire air pressure should be
checked and, if necessary, adjusted
before each ride.
WARNING
EWA10504
Operation of this vehicle with im-
proper tire pressure may cause se-
vere injury or d eath from loss of
control. The tire air pressure must be
checked and a djuste d on col d
tires (i.e., when the temperature
of the tires equals the am bient
temperature).
The tire air pressure must be
a d juste d in accor dance with the
ri din g spee d an d with the total
1. Throttle grip free play
U2CXE2E0.book Page 20 Tuesday, June 9, 2015 5:04 PM
Page 86 of 112

Periodic maintenance an d a djustment
6-35
6
EAU23708
Replacin g the fusesThe main fuse, the fuel injection sys-
tem fuse, and fuse box 1 are located
under the rider seat. (See page 3-20.)TIPTo access the fuel injection system
fuse, remove the starter relay cover by
pulling it upward.
Fuse box 2 is located under panel A.
(See page 6-8.)
If a fuse is blown, replace it as follows.
1. Turn the key to “OFF” and turn off the electrical circuit in question.
2. Remove the blown fuse, and then install a new fuse of the specified
amperage. WARNING! Do not
use a fuse of a hi gher ampera ge
ratin g than recommen ded to avoi
d causin g extensive d am-
a g e to the electrical system an d
possi bly a fire.
[EWA15132]
3. Turn the key to “ON” and turn on
the electrical circuit in question to
check if the device operates.
4. If the fuse immediately blows again, have a Yamaha dealer
check the electrical system.
1. Main fuse
2. Fuel injection system spare fuse
3. Starter relay cover
4. Fuel injection system fuse
5. Fuse box 1
6. Backup fuse (for clock and immobilizer sys-tem)
7. Electronic throttle valve fuse
8. Spare fuse
2
1
5
6
3
748
1. Fuse box 2
2. Left radiator fan motor fuse
3. Right radiator fan motor fuse
4. Signaling system fuse
5. Ignition fuse
6. Taillight fuse
7. Headlight fuse
8. Spare fuse
Specifie d fuses:
Main fuse: 50.0 A
Fuel injection system fuse:
15.0 A
Electronic throttle valve fuse: 7.5 A
Backup fuse: 7.5 A
Radiator fan motor fuse:
15.0 A × 2
Ignition fuse: 15.0 A
Signaling system fuse: 10.0 A
Taillight fuse:
7.5 A
Headlight fuse: 15.0 A
U2CXE2E0.book Page 35 Tuesday, June 9, 2015 5:04 PM
Page 95 of 112

Periodic maintenance an d a djustment
6-44
6
EAU25872
Trou bleshootin gAlthough Yamaha motorcycles receive
a thorough inspection before shipment
from the factory, trouble may occur
during operation. Any problem in the
fuel, compression, or ignition systems,
for example, can cause poor starting
and loss of power.
The following troubleshooting charts
represent quick and easy procedures
for checking these vital systems your-
self. However, should your motorcycle
require any repair, take it to a Yamaha
dealer, whose skilled technicians have
the necessary tools, experience, and
know-how to service the motorcycle
properly.
Use only genuine Yamaha replace-
ment parts. Imitation parts may look
like Yamaha parts, but they are often
inferior, have a shorter service life and
can lead to expensive repair bills.
WARNING
EWA15142
When checkin g the fuel system, d o
not smoke, an d make sure there are
no open flames or sparks in the ar-
ea, inclu din g pilot li ghts from water heaters or furnaces. Gasoline or
g
asoline vapors can i gnite or ex-
plo de, causin g severe injury or prop-
erty damag e.
U2CXE2E0.book Page 44 Tuesday, June 9, 2015 5:04 PM