set clock YAMAHA YZF-R6 2020 Owners Manual
[x] Cancel search | Manufacturer: YAMAHA, Model Year: 2020, Model line: YZF-R6, Model: YAMAHA YZF-R6 2020Pages: 112, PDF Size: 5.44 MB
Page 27 of 112

Instrument and control functions
4-8
4
3. If the engine starts, turn it off, and
try starting the engine with the
standard keys.
4. If one or both of the standard keys do not start the engine, take the
vehicle and all 3 keys to a Yamaha
dealer to have the standard keys
re-registered.
EAU3904G
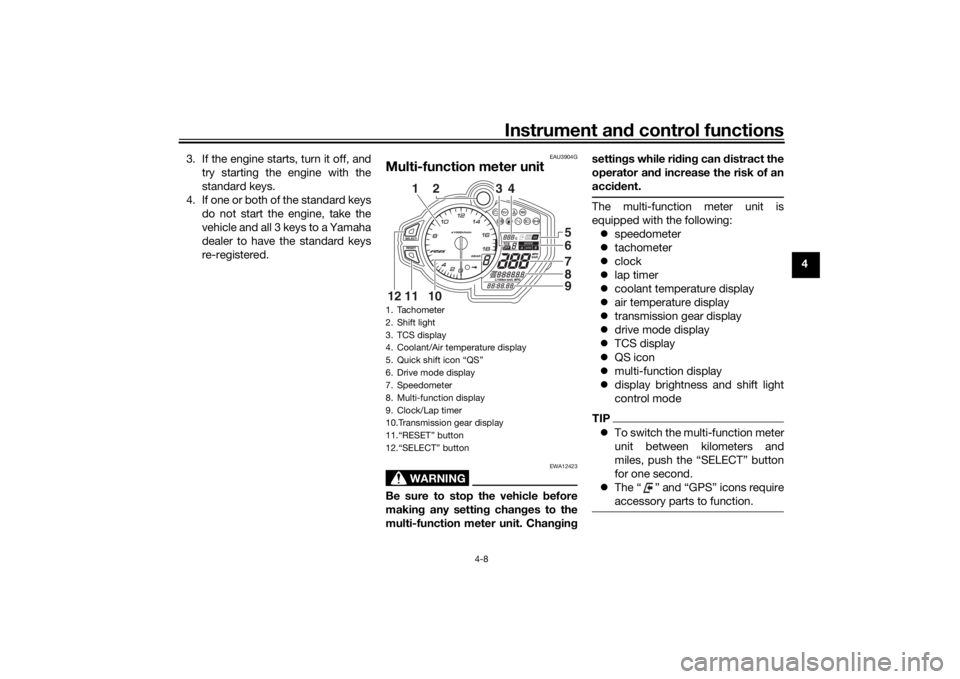
Multi-function meter unit
WARNING
EWA12423
Be sure to stop the vehicle before
making any setting changes to the
multi-function meter unit. Changing settings while riding can distract the
operator and increase the risk of an
accident.
The multi-function meter unit is
equipped with the following:
speedometer
tachometer
clock
lap timer
coolant temperature display
air temperature display
transmission gear display
drive mode display
TCS display
QS icon
multi-function display
display brightness and shift light
control modeTIPTo switch the multi-function meter
unit between kilometers and
miles, push the “SELECT” button
for one second.
The “ ” and “GPS” icons require
accessory parts to function.
1. Tachometer
2. Shift light
3. TCS display
4. Coolant/Air temperature display
5. Quick shift icon “QS”
6. Drive mode display
7. Speedometer
8. Multi-function display
9. Clock/Lap timer
10.Transmission gear display
11.“RESET” button
12.“SELECT” button
65789
2
3
4
10
11
12
1
UBN6E3E0.book Page 8 Wednesday, September 25, 2019 3:31 PM
Page 28 of 112

Instrument and control functions
4-9
4 Speed
ometer
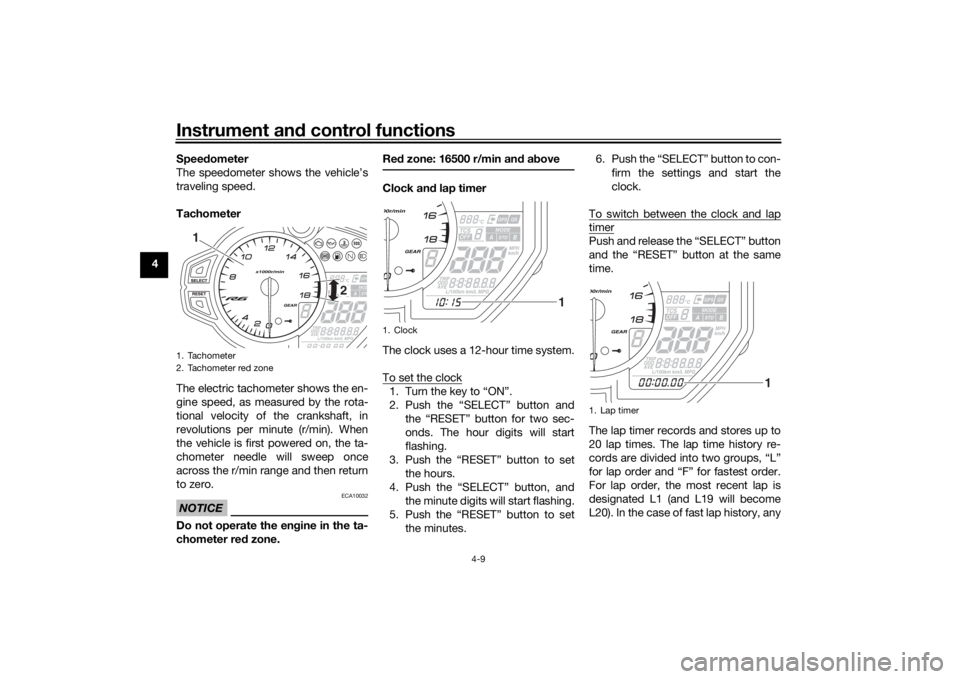
The speedometer shows the vehicle’s
traveling speed.
Tachometer
The electric tachometer shows the en-
gine speed, as measured by the rota-
tional velocity of the crankshaft, in
revolutions per minute (r/min). When
the vehicle is first powered on, the ta-
chometer needle will sweep once
across the r/min range and then return
to zero.
NOTICE
ECA10032
Do not operate the en gine in the ta-
chometer red zone. Re
d zone: 16500 r/min an d a bove
Clock an d lap timer
The clock uses a 12-hour time system.
To set the clock1. Turn the key to “ON”.
2. Push the “SELECT” button and the “RESET” button for two sec-
onds. The hour digits will start
flashing.
3. Push the “RESET” button to set the hours.
4. Push the “SELECT” button, and the minute digits will start flashing.
5. Push the “RESET” button to set the minutes. 6. Push the “SELECT” button to con-
firm the settings and start the
clock.
To switch between the clock and lap
timerPush and release the “SELECT” button
and the “RESET” button at the same
time.
The lap timer records and stores up to
20 lap times. The lap time history re-
cords are divided into two groups, “L”
for lap order and “F” for fastest order.
For lap order, the most recent lap is
designated L1 (and L19 will become
L20). In the case of fast lap history, any
1. Tachometer
2. Tachometer red zone
2
1
1. Clock
1
1. Lap timer
1
UBN6E2E0.book Page 9 Friday, December 7, 2018 2:56 PM