oil YAMAHA YZF-R7 1999 Owners Manual
[x] Cancel search | Manufacturer: YAMAHA, Model Year: 1999, Model line: YZF-R7, Model: YAMAHA YZF-R7 1999Pages: 381, PDF Size: 18.88 MB
Page 7 of 381
EB004000
SYMBOLS
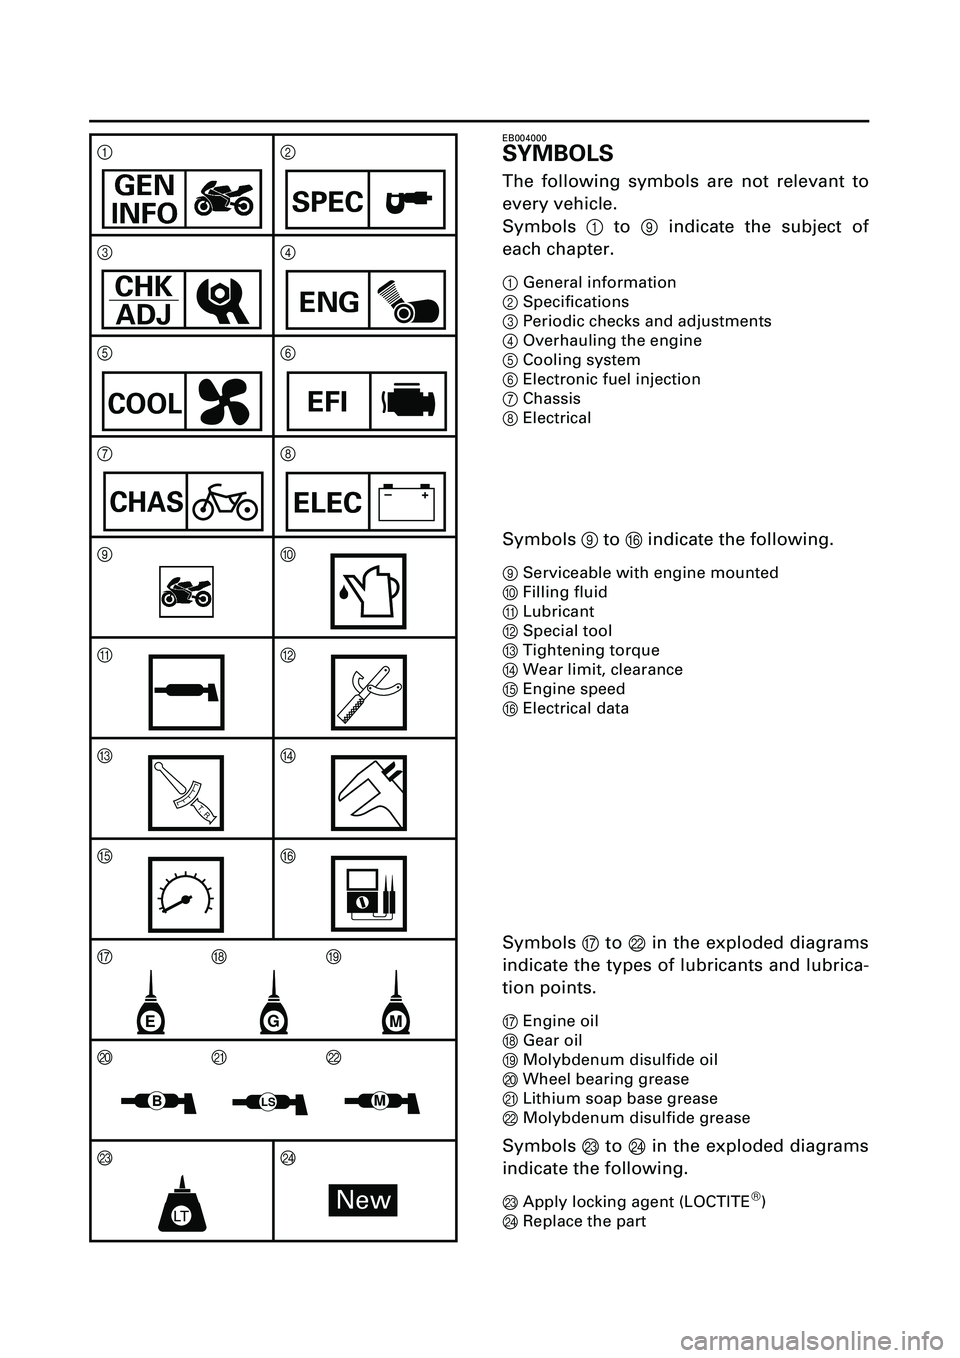
The following symbols are not relevant to
every vehicle.
Symbols
1
to
9
indicate the subject of
each chapter.
1
General information
2
Specifications
3
Periodic checks and adjustments
4
Overhauling the engine
5
Cooling system
6
Electronic fuel injection
7
Chassis
8
Electrical
Symbols
9
to
F
indicate the following.
9
Serviceable with engine mounted
0
Filling fluid
A
Lubricant
B
Special tool
C
Tightening torque
D
Wear limit, clearance
E
Engine speed
F
Electrical data
Symbols
G
to
L
in the exploded diagrams
indicate the types of lubricants and lubrica-
tion points.
G
Engine oil
H
Gear oil
I
Molybdenum disulfide oil
J
Wheel bearing grease
K
Lithium soap base grease
L
Molybdenum disulfide grease
Symbols
M
to
N
in the exploded diagrams
indicate the following.
MApply locking agent (LOCTITE
â)
NReplace the part 12
34
56
78
90
AB
CD
E F
GHI
JKL
M N
SPEC
CHK
ADJENG
COOLEFI
CHAS–+ELEC
T R..
GME
BLSM
LTNew
Page 10 of 381
EC0A0000
CONTENTS
CHAPTER 1
GENERAL INFORMATION
GIVE SAFETY THE RIGHT OF WAY ........ 1-1
DESCRIPTION ........................................... 1-2
INSTRUMENT AND CONTROL
FUNCTIONS .............................................. 1-4
OPERATION AND IMPORTANT
RIDING POINTS ...................................... 1-12
INCLUDED ACCESSORIES ..................... 1-14
MOTORCYCLE CARE AND
STORAGE ................................................ 1-15
CONSUMER INFORMATION ................. 1-17
TROUBLESHOOTING .............................. 1-18
IMPORTANT INFORMATION ................. 1-20
CHECKING THE CONNECTIONS ........... 1-22
SPECIAL TOOLS ..................................... 1-23
CHAPTER 2
SPECIFICATIONS
GENERAL SPECIFICATIONS .................... 2-1
ENGINE SPECIFICATIONS ....................... 2-2
CHASSIS SPECIFICATIONS ................... 2-11
ELECTRICAL SPECIFICATIONS ............. 2-15
TIGHTENING TORQUES ........................ 2-17
LUBRICATION POINTS AND
LUBRICANT TYPES ................................ 2-22
OIL FLOW CHART ................................... 2-24
COOLANT FLOW CHART ....................... 2-25
CABLE ROUTING .................................... 2-26
Page 11 of 381

CHAPTER 3
PERIODIC CHECKS AND
ADJUSTMENTS
INTRODUCTION ....................................... 3-1
PERIODIC MAINTENANCE AND
LUBRICATION INTERVALS ...................... 3-1
GENERAL MAINTENANCE AND
LUBRICATION CHART .............................. 3-2
FUEL TANK AND AIR FILTER .................. 3-4
COWLINGS ............................................... 3-6
ENGINE ..................................................... 3-9
CHASSIS ................................................. 3-36
ELECTRICAL SYSTEM ............................ 3-55
CHAPTER 4
OVERHAULING THE ENGINE
ENGINE ..................................................... 4-1
CAMSHAFTS ............................................. 4-8
CYLINDER HEAD .................................... 4-18
VALVES AND VALVE SPRINGS ............ 4-21
GENERATOR ........................................... 4-32
PICKUP COIL ........................................... 4-35
CLUTCH ................................................... 4-39
SHIFT SHAFT .......................................... 4-48
OIL PAN AND OIL PUMP ....................... 4-50
CRANKCASE ........................................... 4-56
CONNECTING RODS AND
PISTONS ................................................. 4-63
CRANKSHAFT ......................................... 4-74
TRANSMISSION ..................................... 4-79
CHAPTER 5
COOLING SYSTEM
RADIATOR AND THERMOSTAT .............. 5-1
RADIATOR AND THERMOSTAT .............. 5-3
OIL COOLER .............................................. 5-9
WATER PUMP ......................................... 5-12
Page 14 of 381

1 - 2
DESCRIPTION
DESCRIPTION
Left view
Right view
1. Front fork compression damping force adjusting screw
2. Front fork rebound damping force adjusting screw
3. Front fork spring preload adjusting bolt
4. Air filter
5. Starter (choke) “ “
6. Shift pedal
7. Rear shock absorber spring preload adjusting ring
8. Rear shock absorber compression damping force adjusting screw
9. Rear shock absorber rebound damping force adjusting screw
10. Fuses
11. Rear brake resorvoir
12. Rear brake pedal
13. Radiator cap and coolant reservoir tank cap
14. Engine oil filter
14
56
78
9
2,3
10
11
1213 14
1
Page 17 of 381

1 - 5
INSTRUMENT AND CONTROL FUNCTIONS
4 681012
14
x1000r/min
0
1 12
3 3
4
1. Warning light
2. Oil level symbol “ ”
3. Coolant temperature symbol “ ”
4. Engine trouble symbol “ ”
EAU01564
Warning light
This indicator light has three functions.
l
The light will come on and symbol
“ ” will flash if the engine oil
level is low.
If this symbol flashes, stop the en-
gine immediately and fill it with oil
to the specified level.
l
The light will come on and symbol
“ ” will flash if trouble occurs in
a monitoring circuit. In such a
case, take the motorcycle to a
Yamaha dealer to have the self-
diagnostic systems checked.
l
The light will come on and symbol
“ ” will flash if the coolant tem-
perature is too high. The following
chart shows the conditions of the
indicator light, symbol and tem-
perature display in accordance to
coolant temperature.
The light circuit can be checked by the
procedure on page 1-6.
EC000118
CAUTION:
l
Do not run the motorcycle until
you know it has sufficient en-
gine oil.
l
Do not run the motorcycle if the
engine is overheated.
NOTE:
Even if the oil is filled to the specified
level, the indicator light may flicker
when riding on a slope or during sud-
den acceleration or deceleration, but
this is normal.
CB-74ECB-74E
Coolant
temperatureDisplay Conditions What to do
~ 39 ˚CSymbol is on and “LO” is
displayed.OK. Go ahead with riding.
40 ˚C ~ 120 ˚CSymbol is on and temper-
ature is displayed.OK. Go ahead with riding.
121 ˚C ~ 139 ˚CSymbol and temperature
flash.
Warning light comes on.Stop the motorcycle and al-
low it to idle until coolant tem-
perature goes down.
If the temperature does not
go down, stop the engine.
140 ˚C ~ Symbol and message
“HI” flash.
Warning light comes on.Stop the engine and allow it
to cool. Seen page 1-19 if the
engine overheats.
—Symbol and message
“Err” flash.
Warning light comes on.Ask a Yamaha dealer to in-
spect the motorcycle.
C
C
C
C
C
Page 18 of 381

1 - 6
INSTRUMENT AND CONTROL FUNCTIONS
Warning light circuit check
CB-75ECB-75E
Warning light comes on. After a few seconds:Warning light does not come on.
Have a Yamaha
dealer inspect the
electrical circuit.
Turn the main switch to “ON”.
Have a Yamaha dealer inspect
the electrical circuit.
If symbol “ ” is on, check the
engine temperature. (See page 1-5.)
Warning light goes off.
No symbol is on.Symbol “ ”,
“ ” “ ” is on.
OK. Go ahead
with riding.
Warning light does not go off.
If symbol “ ”
is on, inspect the
oil level.
Oil level is OK.Oil level is low.
Have a Yamaha dealer
inspect the electrical
circuit.Supply
recommended
engine oil.
If the engine is hot,
allow it to cool and see
“Engine overheating”
in the troubleshooting
chart on page 1-19 for
instructions.If the engine
temperature is
normal, have a
Yamaha dealer
inspect the
electrical circuit.
If symbol “ ” is on.
Have a Yamaha dealer
inspect the self-
diagnostic systems.
Page 26 of 381

1 - 14
OPERATION AND IMPORTANT RIDING POINTS/
INCLUDED ACCESSORIES
EAU01128
Engine break-in
There is never a more important period
in the life of your motorcycle than the
period between zero and 1,600 km. For
this reason we ask that you carefully
read the following material. Because
the engine is brand new, you must not
put an excessive load on it for the first
1,600 km. The various parts in the en-
gine wear and polish themselves to the
correct operating clearances. During
this period, prolonged full throttle oper-
ation, or any condition which might re-
sult in excessive heating of the engine,
must be avoided.
EAU013290 ~ 1,000 km
Avoid operation above 5,500 r/min.
1,000 ~ 1,600 km
Avoid cruising speeds in excess of
7,000 r/min.
EC000052
CAUTION:
After 1,000 km of operation, be sure
to replace the engine oil and oil fil-
ter.
1,600 km and beyond
Proceed with normal riding.
EC000053
CAUTION:
lNever let engine speeds enter
the red zone.
lIf any engine trouble should oc-
cur during the break-in period,
consult a Yamaha dealer imme-
diately.
EAU00460
Parking
When parking the motorcycle, stop the
engine and remove the ignition key.
EW000058
WARNING
The exhaust system is hot. Park the
motorcycle in a place where pedes-
trians or children are not likely to
touch the motorcycle. Do not park
the motorcycle on a slope or soft
ground; the motorcycle may over-
turn.
INCLUDED ACCESSORIES
EAU01575
Tool kit
The tools provided in the owner’s tool
kit are to assist you in the performance
of periodic maintenance. However,
some other tools such as a torque
wrench are also necessary to perform
the maintenance correctly.
The service information included in this
manual is intended to provide you, the
owner, with the necessary information
for completing some of your own pre-
ventive maintenance and minor re-
pairs.
NOTE:
If you do not have necessary tools re-
quired during a service operation, take
your motorcycle to a Yamaha dealer
for service.
EW000063
WARNING
Modifications to this motorcycle not
approved by Yamaha may cause
loss of performance, and render it
unsafe for use. Consult a Yamaha
dealer before attempting any chang-
es.
Page 27 of 381
1 - 15
MOTORCYCLE CARE AND STORAGE
Care
The exposure of its technology makes
a motorcycle charming but also vulner-
able. Although high-quality compo-
nents are used, they are not all rust-
resistant. While a rusty exhaust pipe
may remain unnoticed on a car, it does
look unattractive on a motorcycle. Fre-
quent and proper care, however, will
keep your motorcycle looking good, ex-
tend its life and maintain its perfor-
mance. Moreover, the warranty states
that the vehicle must be properly taken
care of. For all these reasons, it is rec-
ommended that you observe the fol-
lowing cleaning and storing
precautions.Before cleaning
1. Cover up the muffler outlet with a
plastic bag.
2. Make sure that all caps and cov-
ers as well as all electrical cou-
plers and connectors, including
the spark plug caps, are tightly in-
stalled.
3. Remove extremely stubborn dirt,
like oil burnt onto the crankcase,
with a degreasing agent and a
brush, but never apply such prod-
ucts onto seals, gaskets, sprock-
ets, the drive chain and wheel
axles. Always rinse the dirt and
degreaser off with water.Cleaning
After normal useRemove dirt with warm water, a neutral
detergent and a soft clean sponge,
then rinse with plenty of clean water.
Use a tooth or bottle brush for hard-to-
reach parts. Tougher dirt and insects
will come off more easily if the area is
covered with a wet cloth for a few min-
utes before cleaning.
MOTORCYCLE CARE AND STORAGE
ECA00010
CAUTION:
lAvoid using strong acidic
wheel cleaners, especially on
spoked wheels. If you do use
such products for hard-to-re-
move dirt, do not leave it on any
longer than instructed, then
thoroughly rinse it off with wa-
ter, immediately dry the area
and apply a corrosion protec-
tion spray.
lImproper cleaning can damage
windshields, cowlings, panels
and other plastic parts. Use
only a soft, clean cloth or
sponge with mild detergent and
water to clean plastic.
lDo not use any harsh chemical
products on plastic parts. Be
sure to avoid using cloths or
sponges which have been in
contact with strong or abrasive
cleaning products, solvent or
thinner, fuel (gasoline), rust re-
movers or inhibitors, brake flu-
id, antifreeze or electrolyte.
lDo not use high-pressure
washers or steam-jet cleaners
since they cause water seep-
age and deterioration in the fol-
lowing areas: seals (of wheel
bearings, swingarm bearings,
forks and brakes), electric com-
ponents (couplers, connectors,
instruments, switches and
lights), breather hoses and
vents.
lFor motorcycles equipped with
a windshield: Do not use strong
cleaners or hard sponges as
they will cause dulling or
scratching. Some cleaning
compounds for plastic may
leave scratches on the wind-
shield. Test the product on a
small hidden part of the wind-
shield to make sure they do not
leave any marks. If the wind-
shield is scratched, use a quali-
ty plastic polishing compound
after washing.
lDo not rub the frame, swingarm
and other similar matte metal
parts with a cloth (neither one
dampened with solvents or
gasoline nor a dry one), as this
may deteriorate their finish.
Wash off dirt with water only.
For hard-to-remove dirt, add a
mild detergent and rub only
lightly.
After riding in the rain, near the sea or
on salt-sprayed roads
Since sea salt or salt sprayed on the
roads in the winter are extremely corro-
sive in combination with water, carry
out the following steps after each ride
in the rain, near the sea or on salt-
sprayed roads. (Salt sprayed in the
winter may remain on the roads well
into spring.)
Page 28 of 381

1 - 16
MOTORCYCLE CARE AND STORAGE
1. Clean your motorcycle with cold
water and soap after the engine
has cooled down.
ECA00012
CAUTION:
Do not use warm water since it in-
creases the corrosive action of the
salt.
2. Be sure to apply a corrosion pro-
tection spray on all (even chrome-
and nickel-plated) metal surfaces
to prevent corrosion.After cleaning
1. Dry the motorcycle with a cham-
ois or an absorbing cloth.
2. Immediately dry the drive chain
and lubricate it to prevent it from
rusting.
3. Use a chrome polish to shine
chrome, aluminum and stainless-
steel parts, including the exhaust
system. (Even the thermally in-
duced discoloring of stainless-
steel exhaust systems can be re-
moved through polishing.)
4. To prevent corrosion, it is recom-
mended to apply a corrosion pro-
tection spray on all (even chrome-
and nickel-plated) metal surfaces.
5. Use spray oil as a universal clean-
er to remove any remaining dirt.
6. Touch up minor paint damage
caused by stones, etc.
7. Wax all painted surfaces.
CAUTION:
Do not wax the frame, swingarm and
other similar matte metal parts, as
this may deteriorate their finish.
8. Let the motorcycle dry completely
before storing it or covering it.
EWA00001
WARNING
Make sure that there is no oil or wax
on the brakes and tires. If necessary,
clean the brake discs and linings
with a regular brake disc cleaner or
acetone, and wash the tires with
warm water and mild soap. Then,
carefully test the motorcycle for its
braking performance and cornering
behavior.
ECA00013
CAUTION:
lApply spray oil and wax spar-
ingly and wipe off any excess.
lNever apply oil or wax on rub-
ber and plastic parts, but treat
them with a suitable care prod-
uct.
lAvoid using abrasive polishing
compounds as they wear away
the paint.
NOTE:
Consult a Yamaha dealer for advice on
what products to use.
Storage
Short-term
Always store your motorcycle in a cool,
dry place and, if necessary, protect it
against dust with a porous cover.
ECA00014
CAUTION:
lStoring the motorcycle in a
poorly ventilated room or cov-
ering it with a tarp while it is still
wet will allow water and humid-
ity to seep in and cause rust.
lTo prevent corrosion, avoid
damp cellars, stables (because
of the presence of ammonia)
and areas where strong chemi-
cals are stored.Long-term
Long term storage (60 days or more) of
your motorcycle will require some pre-
ventive procedures to guard against
deterioration. After throughly cleaning
the motorcycle, prepare for storage as
follows:
1. Drain the fuel tank.
2. Remove the empty fuel tank, pour
a cup of engine oil in the tank,
shake the tank to coat the inner
surfaces thoroughly and drain off
the excess oil. Reinstall the tank.
3. Remove the spark plug, pour
about one tablespoon of engine
oil in the spark plug hole and rein-
stall the spark plug. Turn the en-
gine over several times (ground
spark plug lead wires) to coat the
cylinder walls with oil.
Page 29 of 381
1 - 17
MOTORCYCLE CARE AND STORAGE/
CONSUMER INFORMATION
WARNING
When using the starter motor to
crank the engine, remove the spark
plug wires, and ground them to pre-
vent sparking.
4. Remove the drive chain. Thor-
oughly clean the chain with kero-
sene and lubricate it. Reinstall the
chain or store it in a plastic bag
(tied to frame for safekeeping).
5. Lubricate all control cables.
6. Block up the frame to raise both
wheels off the ground.
7. Tie a plastic bag over the exhaust
pipe outlet to prevent moisture
from entering.
8. If strong in a humid or salt-air at-
mosphere, coat all exposed metal
surfaces with a light film of oil. Do
not apply oil to any rubber parts or
the seat cover.9. Remove the battery and charge it.
Store it in a dry place and re-
change it once a month. Do not
store the battery in an excessively
warm or cold place (less than 0°C
(30°F) or more than 30°C (90°F)).
NOTE:
Make any necessary repairs before
storing the motorcycle.
CONSUMER INFORMATION
EAU01040
Identification numbers record
Record the key identification number,
vehicle identification number and mod-
el label information in the spaces pro-
vided for assistance when ordering
spare parts from a Yamaha dealer or
for reference in case the vehicle is sto-
len.
1. KEY IDENTIFICATION
NUMBER:
2. VEHICLE IDENTIFICATION
NUMBER:
3. MODEL LABEL INFORMATION:
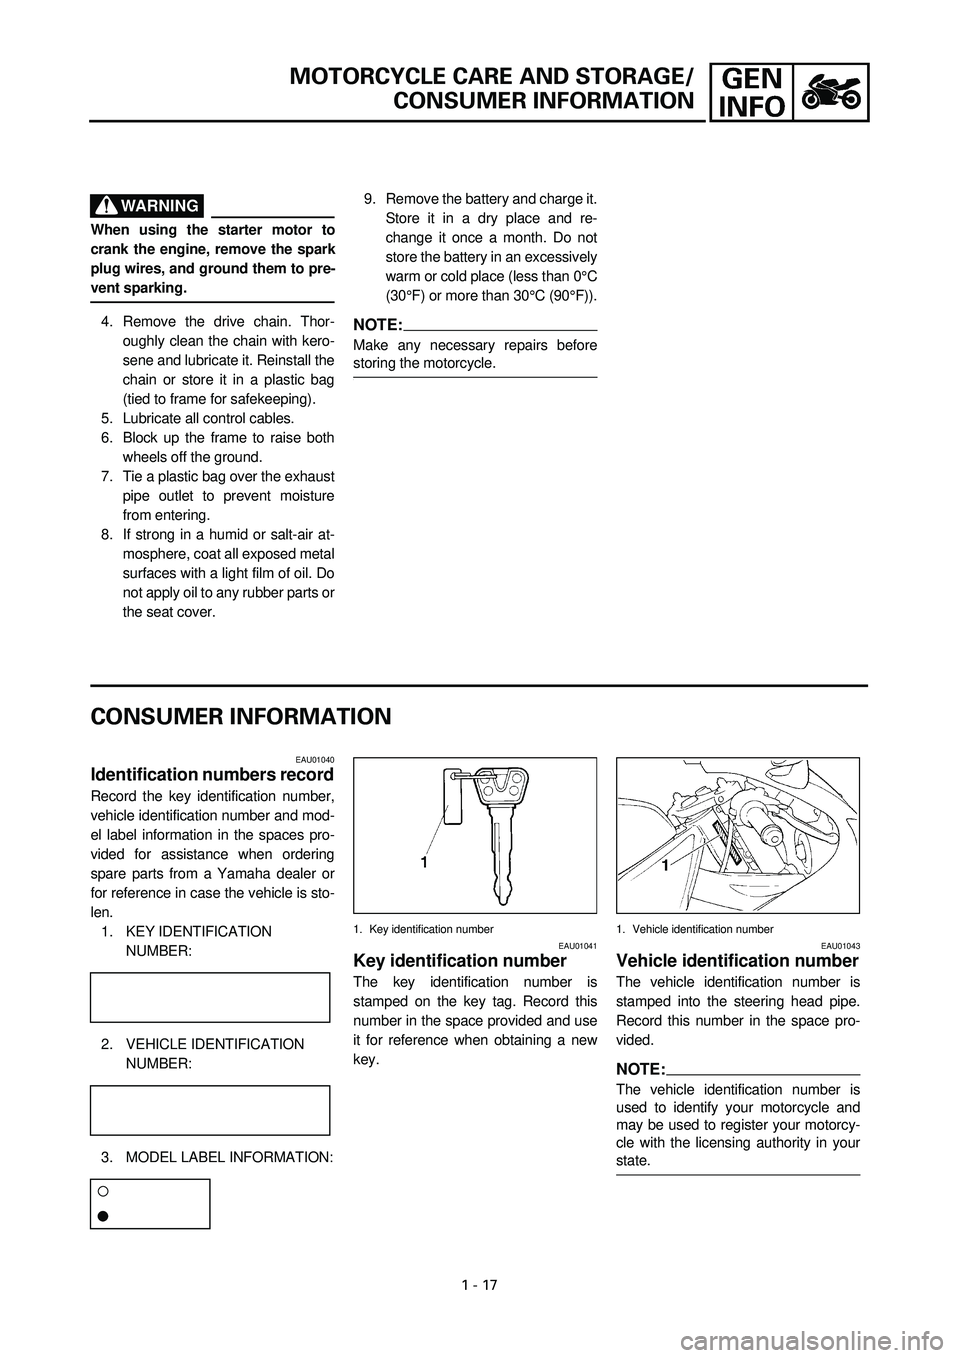
1. Key identification numberEAU01041
Key identification number
The key identification number is
stamped on the key tag. Record this
number in the space provided and use
it for reference when obtaining a new
key.
1. Vehicle identification numberEAU01043
Vehicle identification number
The vehicle identification number is
stamped into the steering head pipe.
Record this number in the space pro-
vided.
NOTE:
The vehicle identification number is
used to identify your motorcycle and
may be used to register your motorcy-
cle with the licensing authority in your
state.