recommended oil YAMAHA YZF-R7 1999 Owners Manual
[x] Cancel search | Manufacturer: YAMAHA, Model Year: 1999, Model line: YZF-R7, Model: YAMAHA YZF-R7 1999Pages: 381, PDF Size: 18.88 MB
Page 18 of 381

1 - 6
INSTRUMENT AND CONTROL FUNCTIONS
Warning light circuit check
CB-75ECB-75E
Warning light comes on. After a few seconds:Warning light does not come on.
Have a Yamaha
dealer inspect the
electrical circuit.
Turn the main switch to “ON”.
Have a Yamaha dealer inspect
the electrical circuit.
If symbol “ ” is on, check the
engine temperature. (See page 1-5.)
Warning light goes off.
No symbol is on.Symbol “ ”,
“ ” “ ” is on.
OK. Go ahead
with riding.
Warning light does not go off.
If symbol “ ”
is on, inspect the
oil level.
Oil level is OK.Oil level is low.
Have a Yamaha dealer
inspect the electrical
circuit.Supply
recommended
engine oil.
If the engine is hot,
allow it to cool and see
“Engine overheating”
in the troubleshooting
chart on page 1-19 for
instructions.If the engine
temperature is
normal, have a
Yamaha dealer
inspect the
electrical circuit.
If symbol “ ” is on.
Have a Yamaha dealer
inspect the self-
diagnostic systems.
Page 40 of 381

ENGINE SPECIFICATIONS
SPEC
2 - 2
ENGINE SPECIFICATIONS
Item Standard Limit
Engine
Engine type Liquid-cooled, 4-stroke, DOHC ----
Displacement 749 cm
3
----
Cylinder arrangement Forward-inclined parallel 4-cylinder ----
Bore
´
stroke 72
´
46 mm (2.83
´
1.81 in) ----
Compression ratio 11.4:1 ----
Engine idling speed 1,000 ~ 1,200 r/min ----
Vacuum pressure at engine idling
speed15.8 ~ 18.4 kPa
(120 ~ 140 mm Hg, 4.72 ~ 5.51 in Hg)----
Standard compression pressure
(at sea level) 157 kPa
(1.57 kgf/cm
2
, 22.3 psi) at 500 r/min----
Fuel
Recommended fuel Premium unleaded gasoline ----
Fuel tank capacity
Total (including reserve) 23 L (20.2 Imp qt, 24.3 US qt) ----
Reserve only 4.8 L (4.22 Imp qt, 5.07 US qt) ----
Engine oil
Lubrication system Wet sump ----
Recommended oil
Yamalube 4 (20W40) or SAE 20W40 type
SE motor oil (40˚F/5˚C or above)
(Non-Friction modified)
Yamalube 4 (10W40) or SAE 10W40 type
SE motor oil (60˚F/15˚C or below)
(Non-Friction modified)----
Quantity
Total amount 3.6 L (3.2 Imp qt, 3.8 US qt) ----
Without oil filter cartridge
replacement2.6 L (2.3 Imp qt, 2.7 US qt) ----
With oil filter cartridge replace-
ment2.8 L (2.5 Imp qt, 3.0 US qt) ----
Oil pressure (hot) 40 kPa (0.4 kgf/cm
2
, 5.69 psi) at
1,100 r/min ----
Relief valve opening pressure 480 ~ 560 kPa
(4.8 ~ 5.6 kgf/cm
2
, 68.3 ~ 79.7 psi)----
2
Page 47 of 381

ENGINE SPECIFICATIONS
SPEC
2 - 9
Oil ring
Dimensions (B
´
T) 1.5
´
2.5 mm (0.059
´
0.098 in) ----
End gap (installed) 0.1 ~ 0.3 mm (0.004 ~ 0.012 in) ----
Connecting rods
Crankshaft pin-to-big end bearing
clearance0.058 ~ 0.078 mm (0.0023 ~ 0.0031 in) ----
Bearing color code 2 = Blue, 3·4 = Black, 5·6 = Brown,
7·8 = Green, 9 = Yellow----
Crankshaft
Width A 54.4 ~ 56.0 mm (2.142 ~ 2.205 in) ----
Width B 292.8 ~ 294.0 mm (11.53 ~ 11.57 in) ----
Maximum runout C 0.035 mm
(0.0014 in)
Big end side clearance D 0.16 ~ 0.26 mm (0.006 ~ 0.010 in) ----
Crankshaft journal-to-crankshaft
journal bearing clearance0.036 ~ 0.056 mm (0.0014 ~ 0.0022 in) ----
Bearing color code1·2 = Blue, 3·4 = Black, 5·6 = Brown, 7·8 =
Green, 9·10 = Yellow, 11 = Violet----
Clutch
Clutch type Wet, multiple disc ----
Clutch release method Hydraulic inner push ----
Operation Left-hand operation ----
Recommended fluid Brake fluid DOT4 ----
Friction plates #1
Thickness 2.9 ~ 3.1 mm (0.114 ~ 0.122 in) 2.8 mm
(0.110 in)
Plate quantity 8 ----
Friction plate #2
Thickness 3.7 ~ 3.9 mm (0.146 ~ 0.154 in) 3.6 mm
(0.142 in)
Plate quantity 1 ----Item Standard Limit
B
T
D
FCCC
A
B
E
Page 51 of 381
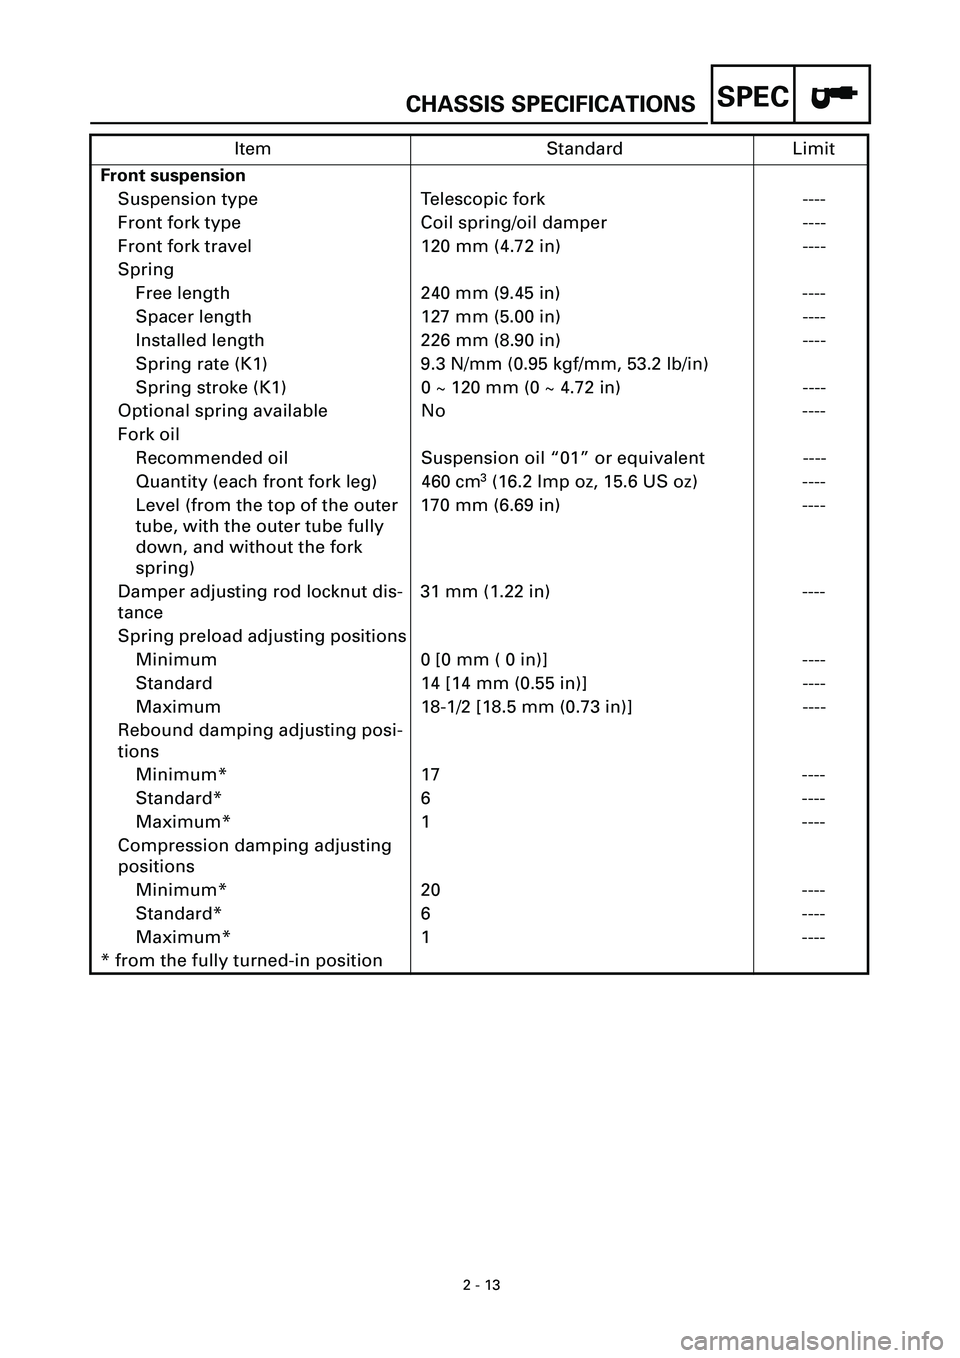
CHASSIS SPECIFICATIONSSPEC
2 - 13
Front suspension
Suspension type Telescopic fork ----
Front fork type Coil spring/oil damper ----
Front fork travel 120 mm (4.72 in) ----
Spring
Free length 240 mm (9.45 in) ----
Spacer length 127 mm (5.00 in) ----
Installed length 226 mm (8.90 in) ----
Spring rate (K1) 9.3 N/mm (0.95 kgf/mm, 53.2 lb/in)
Spring stroke (K1) 0 ~ 120 mm (0 ~ 4.72 in) ----
Optional spring available No ----
Fork oil
Recommended oil Suspension oil “01” or equivalent ----
Quantity (each front fork leg) 460 cm
3 (16.2 Imp oz, 15.6 US oz) ----
Level (from the top of the outer
tube, with the outer tube fully
down, and without the fork
spring)170 mm (6.69 in) ----
Damper adjusting rod locknut dis-
tance31 mm (1.22 in) ----
Spring preload adjusting positions
Minimum 0 [0 mm ( 0 in)] ----
Standard 14 [14 mm (0.55 in)] ----
Maximum 18-1/2 [18.5 mm (0.73 in)] ----
Rebound damping adjusting posi-
tions
Minimum* 17 ----
Standard* 6 ----
Maximum* 1 ----
Compression damping adjusting
positions
Minimum* 20 ----
Standard* 6 ----
Maximum* 1 ----
* from the fully turned-in positionItem Standard Limit
Page 92 of 381

3 - 23
CHK
ADJ
CHECKING THE ENGINE OIL LEVEL
EB303070
CHECKING THE ENGINE OIL LEVEL
1. Stand the motorcycle on a level surface.
NOTE:
• Place the motorcycle on a suitable stand.
• Make sure that the motorcycle is
upright.
2. Start the engine, let it idle for several
minutes, and then stop it.
3. Check:
• engine oil level
The engine oil level should be between
the minimum level mark a and maxi-
mum level mark b.
Below the minimum level mark ® Add
the recommended engine oil to the
proper level.
Recommended oil
Refer to the chart for the
engine oil grade which is best
suited for certain atmo-
spheric temperatures.
API standard
SE or higher grade
(Non-Friction modified)
ACHTUNG:CAUTION:
• Engine oil also lubricates the clutch
and the wrong oil types or additives
could cause clutch slippage. There-
fore, do not add any chemical addi-
tives or use engine oils with a grade of
CD c or higher and do not use oils
labeled “ENERGY CONSERVING II” d
or higher.
• Do not allow foreign materials to
enter the crankcase.
4. Start the engine, warm it up for several
minutes, and then turn it off.
5. Check:
• engine oil level
NOTE:
Before checking the engine oil level,
wait a few minutes until the oil has set-
tled.
Page 95 of 381

3 - 26
CHK
ADJCHANGING THE ENGINE OIL/
CHECKING THE CLUTCH FLUID LEVEL
15.Install:
• front cowling
• bottom cowling
Refer to “COWLINGS”.
EB303100
CHECKING THE CLUTCH FLUID LEVEL
1. Stand the motorcycle on a level surface.
NOTE:
• Place the motorcycle on a suitable
stand.
• Make sure that the motorcycle is
upright.
2. Check:
• clutch fluid level
Below the minimum level mark a ®
Add the recommended clutch fluid to
the proper level.
WARNINGWARNING
• Use only the designated clutch fluid.
Other fluids may cause the rubber
seals to deteriorate, causing leakage
and poor clutch performance.
• Refill with the same type of fluid. Mix-
ing fluids may result in a harmful
chemical reaction leading to poor
clutch performance.
• When refilling, be careful that water
does not enter the clutch fluid reser-
voir. Water will significantly lower the
boiling point of the fluid and could
cause vapor lock.
ACHTUNG:CAUTION:
Clutch fluid may damage painted sur-
faces and plastic parts. Always clean up
any split fluid immediately.
NOTE:
In order to ensure a correct reading of
the clutch fluid level, make sure that the
top of the clutch fluid reservoir is hori-
zontal.
Recommended clutch fluid
Brake fluid DOT 4aa
Page 106 of 381

3 - 37
CHK
ADJADJUSTING THE REAR BRAKE/
CHECKING THE BRAKE FLUID LEVEL
ACHTUNG:CAUTION:
After adjusting the brake pedal position,
make sure that there is no brake drag.
s s s s s s s s s s s s s s s s s s s s s s s s s s s
3. Adjust:
• rear brake light switch
Refer to “ADJUSTING THE REAR
BRAKE LIGHT SWITCH”.
EB304020
CHECKING THE BRAKE FLUID LEVEL
1. Stand the motorcycle on a level surface.
NOTE:
• Place the motorcycle on a suitable
stand.
• Make sure that the motorcycle is
upright.
2. Check:
• brake fluid level
Below the minimum level mark a ®
Add the recommended brake fluid to
the proper level.
Front brake
õRear brake
WARNINGWARNING
• Use only the designated brake fluid.
Other brake fluids may cause the rub-
ber seals to deteriorate, causing leak-
age and poor brake performance.
• Refill with the same type of brake fluid
that is already in the system. Mixing
brake fluids may result in a harmful
chemical reaction, leading to poor
brake performance.
• When refilling, be careful that water
does not enter the brake fluid reser-
voir. Water will significantly lower the
boiling point of the brake fluid and
could cause vapor lock.
ACHTUNG:CAUTION:
Brake fluid may damage painted sur-
faces and plastic parts. Therefore,
always clean up any spilt brake fluid
immediately.
NOTE:
In order to ensure a correct reading of the
brake fluid level, make sure that the top of
the brake fluid reservoir is horizontal.
Recommended brake fluid
DOT 4
õ
Page 112 of 381

3 - 43
CHK
ADJLUBRICATING THE DRIVE CHAIN/
CHECKING AND ADJUSTING THE STEERING HEAD
EB304100
LUBRICATING THE DRIVE CHAIN
The drive chain consists of many interact-
ing parts. If the drive chain is not main-
tained properly, it will wear out rapidly.
Therefore, the drive chain should be ser-
viced, especially when the motorcycle is
used in dusty areas. This motorcycle has a
drive chain with small rubber O-rings
between each side plate. Steam cleaning,
high-pressure washing, certain solvents,
and the use of a coarse brush can damage
these O-rings. Therefore, use only kerosine
to clean the drive chain. Wipe the drive
chain dry and thoroughly lubricate it with
engine oil or chain lubricant that is suitable
for O-ring chains. Do not use any other
lubricants on the drive chain since they may
contain solvents that could damage the O-
rings.
Recommended lubricant
Engine oil or chain lubricant
suitable for O-ring chains
EB304130
CHECKING AND ADJUSTING THE
STEERING HEAD
1. Stand the motorcycle on a level surface.
WARNINGWARNING
Securely support the motorcycle so that
there is no danger of it falling over.
NOTE:
Place the motorcycle on a suitable stand
so that the front wheel is elevated.
2. Check:
• steering head
Grasp the bottom of the front fork legs
and gently rock the front fork.
Looseness/binding ® Adjust the steer-
ing head.
Page 123 of 381

3 - 54
CHK
ADJ
EB304200
CHECKING AND LUBRICATING THE
CABLES
The following procedure applies to all of
the cable sheaths and cables.
WARNINGWARNING
Damaged cable sheaths may cause the
cable to corrode and interfere with its
movement. Replace damaged cable
sheaths and cables as soon as possible.
1. Check:
• cable sheath
Damage ® Replace.
2. Check:
• cable operation
Rough movement ® Lubricate.
NOTE:
Hold the cable end upright and pour a
few drops of lubricant into the cable
sheath or use a suitable lubing device.
EB304210
LUBRICATING THE LEVERS AND PEDALS
Lubricate the pivoting point and metal-to-
metal moving parts of the levers and ped-
als.
EB304220
LUBRICATING THE SIDESTAND
Lubricate the pivoting point and metal-to-
metal moving parts of the sidestand.
EB304240
LUBRICATING THE REAR SUSPENSION
Lubricate the pivoting point and metal-to-
metal moving parts of the rear suspension.
Recommended lubricant
Engine oil or a suitable cable
lubricant
Recommended lubricant
Lithium soap base grease
Recommended lubricant
Lithium soap base grease
Recommended lubricant
Molybdenum disulfide grease
CHECKING AND LUBRICATING THE CABLES/
LUBRICATING THE LEVERS AND PEDALS/LUBRICATING THE
SIDESTAND/LUBRICATING THE REAR SUSPENSION
Page 162 of 381
4 - 30
ENGVALVES AND VALVE SPRINGS
EB403702
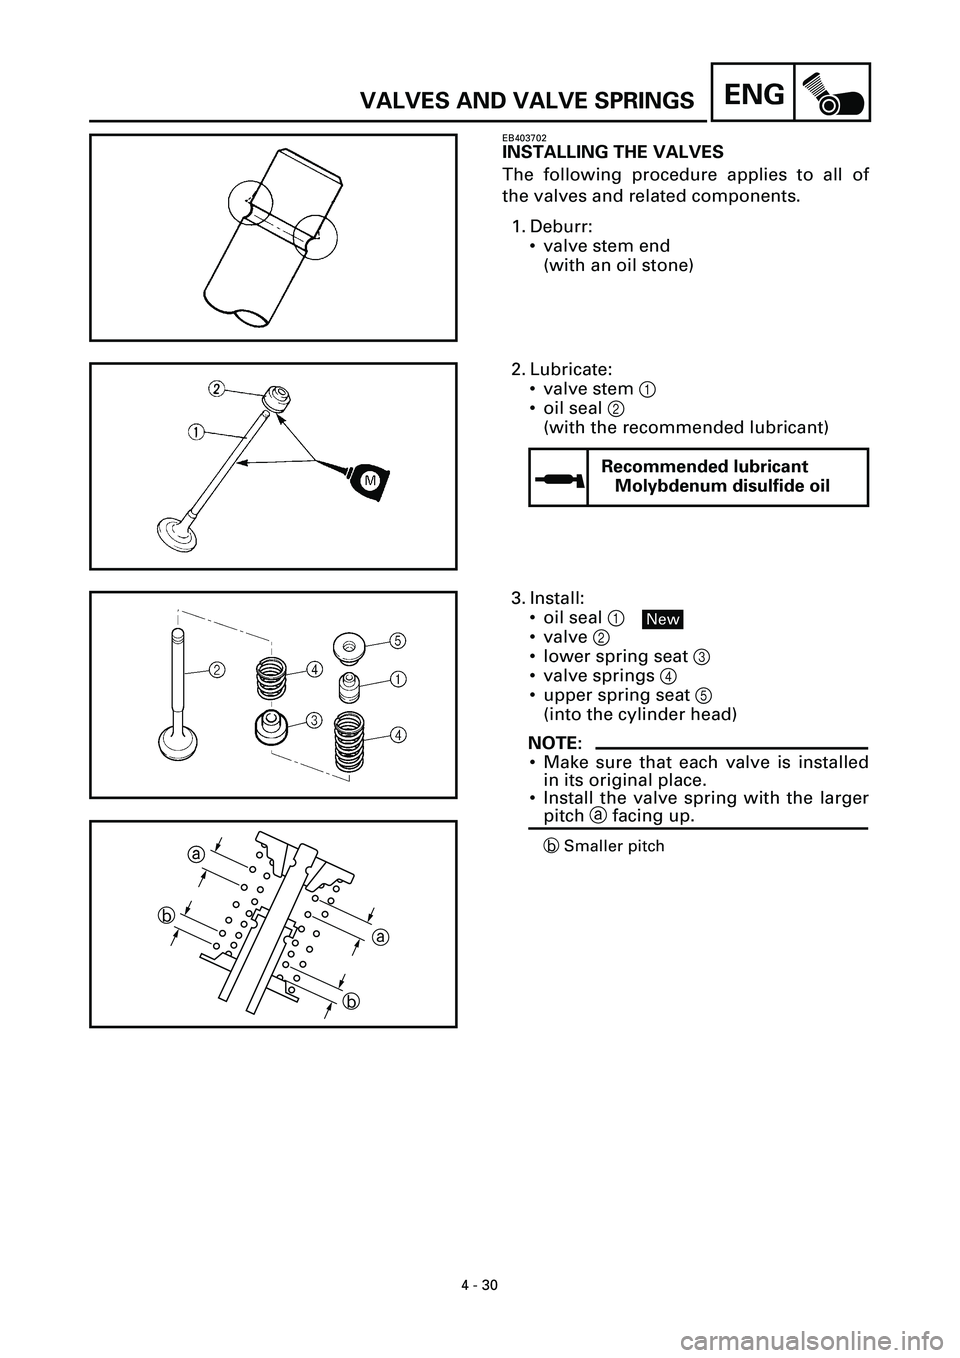
INSTALLING THE VALVES
The following procedure applies to all of
the valves and related components.
1. Deburr:
• valve stem end
(with an oil stone)
2. Lubricate:
• valve stem 1
• oil seal 2
(with the recommended lubricant)
Recommended lubricant
Molybdenum disulfide oil
3. Install:
• oil seal 1
• valve 2
• lower spring seat 3
• valve springs 4
• upper spring seat 5
(into the cylinder head)
NOTE:
• Make sure that each valve is installed
in its original place.
• Install the valve spring with the larger
pitch a facing up.
b Smaller pitch
New
aa
b
ba