spark plugs replace YAMAHA YZF-R7 1999 Owners Manual
[x] Cancel search | Manufacturer: YAMAHA, Model Year: 1999, Model line: YZF-R7, Model: YAMAHA YZF-R7 1999Pages: 381, PDF Size: 18.88 MB
Page 30 of 381

1 - 18
CONSUMER INFORMATION/
TROUBLESHOOTING CHART
1. Model labelEAU01049
Model label
The model label is affixed to the loca-
tion shown in the figure. Record the in-
formation on this label in the space
provided. This information will be need-
ed to order spare parts from your
Yamaha dealer.
1 1
TROUBLESHOOTING
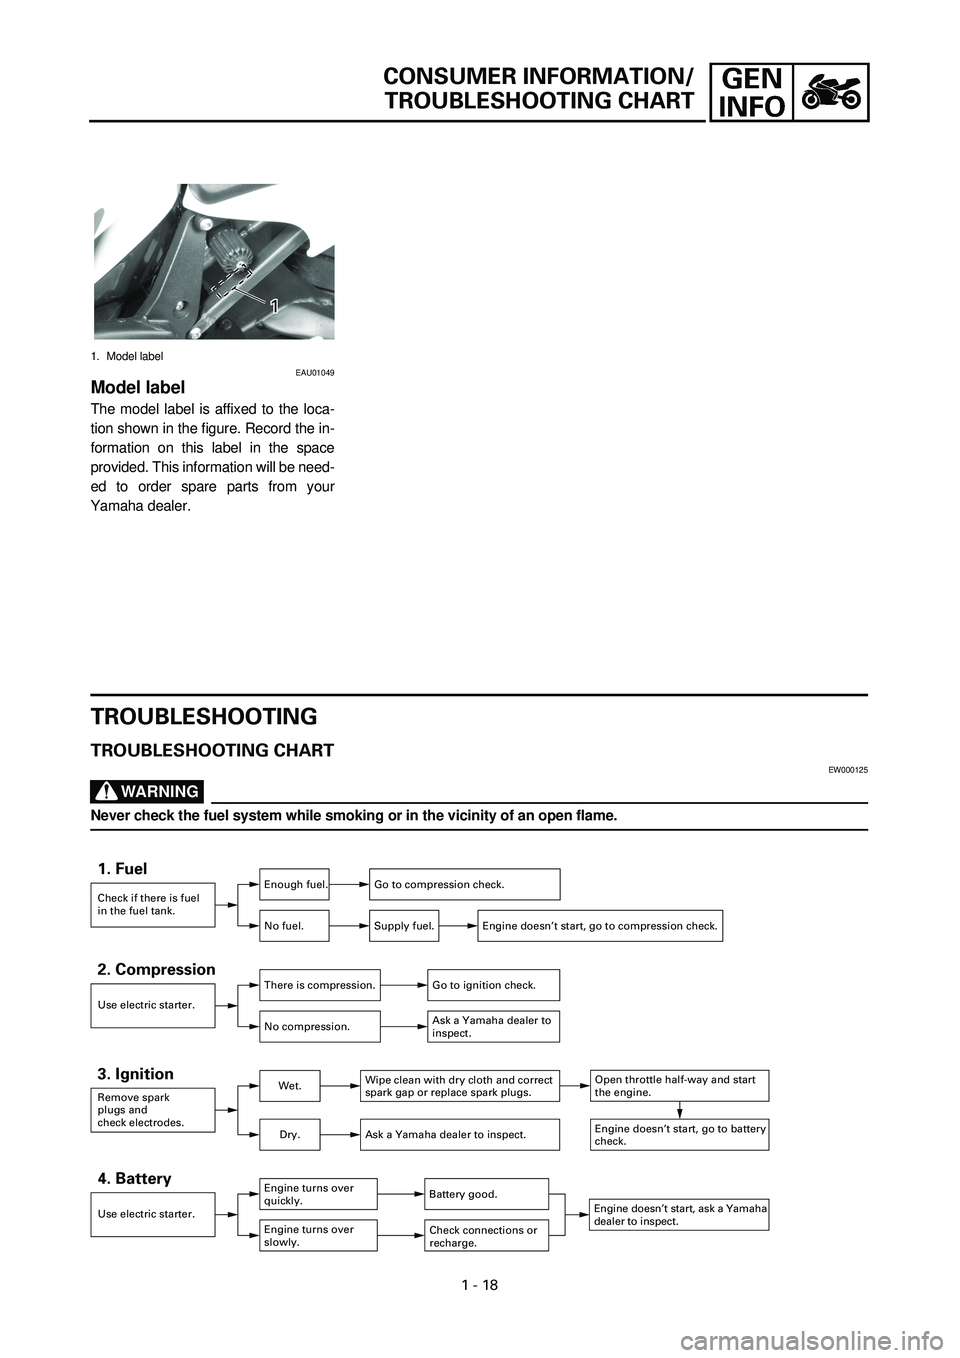
TROUBLESHOOTING CHARTEW000125
WARNING
Never check the fuel system while smoking or in the vicinity of an open flame.
Check if there is fuel
in the fuel tank.
1. FuelEnough fuel.
No fuel.Go to compression check.
Supply fuel.
Use electric starter.
2. CompressionThere is compression.
No compression.Go to ignition check.
Ask a Yamaha dealer to
inspect.
Remove spark
plugs and
check electrodes.
3. IgnitionWet.
Dry.Wipe clean with dry cloth and correct
spark gap or replace spark plugs.
Ask a Yamaha dealer to inspect.
Engine doesn’t start, go to battery
check.
Open throttle half-way and start
the engine.
Use electric starter.
4. BatteryEngine turns over
quickly.
Engine turns over
slowly.Battery good.
Check connections or
recharge.
Engine doesn’t start, ask a Yamaha
dealer to inspect.
Engine doesn’t start, go to compression check.
Page 70 of 381

3 - 1
CHK
ADJ
INTRODUCTION/PERIODIC MAINTENANCE AND
LUBRICATION INTERVALS
EB300000
PERIODIC CHECKS AND ADJUSTMENTS
INTRODUCTION
This chapter includes all information necessary to perform recommended checks and adjust-
ments. If followed, these preventive maintenance procedures will ensure more reliable vehi-
cle operation, a longer service life and reduce the need for costly overhaul work. This
information applies to vehicles already in service as well as to new vehicles that are being
prepared for sale. All service technicians should be familiar with this entire chapter.
PERIODIC MAINTENANCE AND LUBRICATION INTERVALS
No. ITEM CHECKS AND MAINTENANCE JOBSINITIAL
1,000 km EVERY
6,000 km or
6 months
(whichever
comes first)12,000 km or
12 months
(whichever
comes first)
1
*
Fuel line
• Check fuel hoses for cracks or damage.
• Replace if necessary.
ÖÖ
2
*
Fuel filter
• Check condition.
• Replace if necessary.
Every 50,000 km
3 Spark plugs
• Check condition.
• Clean, regap or replace if necessary.
ÖÖÖ
4
*
Valves
• Check valve clearance.
• Adjust if necessary.
Every 42,000 km or 42 months (whichever
comes first)
5 Air filter element
• Clean or replace if necessary.
ÖÖ
6 Clutch
• Check operation and fluid leakage. (See NOTE on
page 3-2.)
• Correct if necessary.
ÖÖÖ
7
*
Front brake
• Check operation, fluid level and vehicle for fluid leak-
age. (See NOTE on page 3-2.)
• Correct accordingly.
• Replace brake pads if necessary.
ÖÖÖ
8
*
Rear brake
• Check operation, fluid level and vehicle for fluid leak-
age. (See NOTE on page 3-2.)
• Correct accordingly.
• Replace brake pads if necessary.
ÖÖÖ
9
*
Wheels
• Check balance, runout and for damage.
• Rebalance or replace if necessary.
ÖÖ
10
*
Tires
• Check tread depth and for damage.
• Replace if necessary.
• Check air pressure.
• Correct if necessary.
ÖÖ
11
*
Wheel bearings
• Check bearing for looseness or damage.
• Replace if necessary.
ÖÖ
12
*
Swingarm
• Check swingarm pivoting point for play.
• Correct if necessary.
• Lubricate with lithium soap base grease every 24,000
km or 24 months (whichever comes first).
ÖÖ
13 Drive chain
• Check chain slack.
• Adjust if necessary. Make sure that the rear wheel is
properly aligned.
• Clean and lubricate.
Every 1,000 km and after washing the
motorcycle or riding in rain.
14
*
Steering bearings
• Check bearing play and steering for roughness.
• Correct accordingly.
• Lubricate with lithium soap base grease every 24,000
km or 24 months (whichever comes first).
ÖÖ
3
Page 89 of 381

3 - 20
CHK
ADJCHECKING THE SPARK PLUGS/
MEASURING THE COMPRESSION PRESSURE
5. Check:
• electrodes 1
Damage/wear ® Replace the spark
plug.
• insulator 2
Abnormal color ® Replace the spark
plug.
Normal color is medium-to-light tan.
6. Clean:
• spark plug
(with a spark plug cleaner or wire
brush)
7. Measure:
• spark plug gap a
(with a wire gauge)
Out of specification ® Regap.
8. Install:
• spark plug
NOTE:
Before installing the spark plug, clean
the spark plug and gasket surface.
Spark plug gap
0.7 ~ 0.8 mm (0.028 ~ 0.031 in)
T R..13 Nm (1.3 m · kg, 9.4 ft · lb)
EB303060
MEASURING THE COMPRESSION
PRESSURE
The following procedure applies to all of
the cylinders.
NOTE:
Insufficient compression pressure will
result in a loss of performance.
1. Measure:
• valve clearance
Out of specification ® Adjust.
Refer to “ADJUSTING THE VALVE
CLEARANCE”.
2. Start the engine, warm it up for several
minutes, and then stop it.
Page 345 of 381

8 - 9
–+ELECIGNITION SYSTEM
BAD
NOTE:
• Before troubleshooting, remove the following part(-s):
1) fuel tank
2) air filter case
3) bottom cowling
4) front cowling
5) rear cowling
• Troubleshoot with the following special tool(-s).
Replace the ECU.
Ignition checker
90890-06754
Pocket tester
90890-03112
MEASURING THE IGNITION SPARK GAP
The following procedure applies to all of
the spark plugs.
• Disconnect the ignition coil from the spark
plug.
• Connect the ignition checker 1 as shown.
2 Ignition coil
• Set the main switch to “ON”.
• Measure the ignition spark gap a.
• Crank the engine by pushing the start
switch and gradually increase the spark
gap until a misfire occurs.
• Is there a spark and is the spark gap
within specification?
Yes ® Good.
No ® Measure the ignition coil resistance.
Minimum ignition spark gap
6 mm (0.24 in)