Swing YAMAHA YZF-R7 2022 Owners Manual
[x] Cancel search | Manufacturer: YAMAHA, Model Year: 2022, Model line: YZF-R7, Model: YAMAHA YZF-R7 2022Pages: 100, PDF Size: 3.78 MB
Page 6 of 100

Table of contentsSafety information ............................ 1-1
Description ....................................... 2-1
Left view ......................................... 2-1
Right view ....................................... 2-2
Controls and instruments ............... 2-3
Instrument an d control functions ... 3-1
Immobilizer system......................... 3-1
Main switch/steering lock............... 3-2
Indicator lights and warning lights............................................ 3-3
Multi-function meter unit ................ 3-6
Handlebar switches ...................... 3-12
Clutch lever .................................. 3-14
Shift pedal .................................... 3-14
Brake lever.................................... 3-14
Brake pedal .................................. 3-15
ABS .............................................. 3-15
Fuel tank cap ................................ 3-16
Fuel ............................................... 3-17
Fuel tank overflow hose ............... 3-18
Catalytic converter ....................... 3-19
Seats ............................................ 3-19
Rear view mirrors.......................... 3-21
Adjusting the front fork ................. 3-22
Adjusting the shock absorber assembly ................................... 3-24
Auxiliary DC connector ................. 3-26
Sidestand ..................................... 3-26
Ignition circuit cut-off system ....... 3-27 For your safety – pre-operation
checks
............................................... 4-1
Operation an d important ri din g
points ................................................. 5-1
Engine break-in ............................... 5-1
Starting the engine .......................... 5-2
Shifting ............................................ 5-3
Tips for reducing fuel consumption ................................ 5-4
Parking ............................................ 5-4
Perio dic maintenance an d
a d justment ........................................ 6-1
Tool kits........................................... 6-2
Periodic maintenance charts .......... 6-3
Periodic maintenance chart for the emission control system .............. 6-3
General maintenance and lubrication chart ........................... 6-5
Removing and installing cowlings... 6-9
Checking the spark plugs ............. 6-10
Canister ......................................... 6-11
Engine oil and oil filter cartridge.... 6-11
Why Yamalube .............................. 6-14
Coolant.......................................... 6-14
Replacing the air filter element and cleaning the check hose..... 6-16
Checking the engine idling
speed ......................................... 6-16 Checking the throttle grip free
play ............................................ 6-17
Valve clearance............................. 6-17
Tires .............................................. 6-17
Cast wheels .................................. 6-20
Adjusting the clutch lever free play ............................................ 6-20
Checking the brake lever free
play ............................................ 6-21
Brake light switches ..................... 6-21
Checking the front and rear brake pads ................................ 6-22
Checking the brake fluid level ...... 6-22
Changing the brake fluid .............. 6-24
Drive chain slack........................... 6-24
Cleaning and lubricating the drive chain ................................. 6-26
Checking and lubricating the cables ........................................ 6-26
Checking and lubricating the
throttle grip and cable ............... 6-27
Checking and lubricating the brake and shift pedals............... 6-27
Checking and lubricating the brake and clutch levers ............. 6-28
Checking and lubricating the
sidestand................................... 6-28
Lubricating the rear suspension ... 6-29
Lubricating the swingarm pivots......................................... 6-29
Checking the front fork ................. 6-29UBEBE0E0.book Page 1 Monday, July 5, 2021 2:26 PM
Page 56 of 100

Periodic maintenance and adjustment
6-6
6
11*Wheel bearings • Check bearing for looseness or
damage. √√√√
12 *Swingarm pivot
bearings • Check operation and for exces-
sive play. √√√√
• Lubricate with lithium-soap- based grease. Every 50000 km (30000 mi)
13 Drive chain • Check chain slack, alignment and
condition.
• Adjust and lubricate chain with a special O-ring chain lubricant
thoroughly. Every 1000 km (600 mi) and after washing the motorcycle, riding in the rain or
riding in wet areas
14 *Steering bearings • Check bearing assemblies for
looseness. √√
√
• Moderately repack with lithium- soap-based grease. √√
15 *Chassis fasteners • Make sure that all nuts, bolts and
screws are properly tightened. √√√√√
16 Brake lever pivot
shaft
• Lubricate with silicone grease.
√√√√√
17 Brake pedal pivot
shaft • Lubricate with lithium-soap-
based grease. √√√√√
18 Clutch lever pivot
shaft • Lubricate with lithium-soap-
based grease. √√√√√
19 Shift pedal pivot
shaft • Lubricate with lithium-soap-
based grease. √√√√√
NO. ITEM CHECK OR MAINTENANCE JOB
ODOMETER READING
ANNUAL
CHECK
1000 km
(600 mi) 10000 km
(6000 mi) 20000 km
(12000 mi) 30000 km
(18000 mi) 40000 km
(24000 mi)UBEBE0E0.book Page 6 Monday, July 5, 2021 2:26 PM
Page 74 of 100

Periodic maintenance and adjustment
6-24
6
EAU22734
Changing the brake fluidHave a Yamaha dealer change the
brake fluid every 2 years. In addition,
have the seals of the master cylinders
and brake calipers, as well as the brake
hoses replaced at the intervals listed
below or sooner if they are damaged or
leaking. Brake seals: every 2 years
Brake hoses: every 4 years
EAU22762
Drive chain slackThe drive chain slack should be
checked before each ride and adjusted
if necessary.
EAU60046
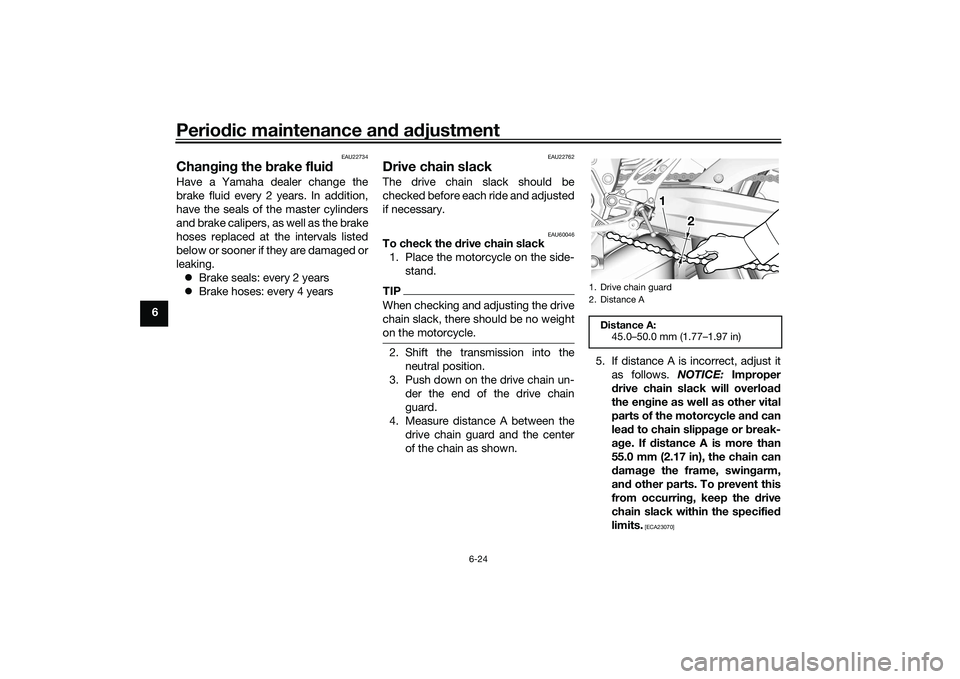
To check the drive chain slack
1. Place the motorcycle on the side- stand.TIPWhen checking and adjusting the drive
chain slack, there should be no weight
on the motorcycle.2. Shift the transmission into theneutral position.
3. Push down on the drive chain un- der the end of the drive chain
guard.
4. Measure distance A between the drive chain guard and the center
of the chain as shown. 5. If distance A is incorrect, adjust it
as follows. NOTICE: Improper
drive chain slack will overload
the engine as well as other vital
parts of the motorcycle and can
lead to chain slippage or break-
age. If distance A is more than
55.0 mm (2.17 in), the chain can
damage the frame, swingarm,
and other parts. To prevent this
from occurring, keep the drive
chain slack within the specified
limits.
[ECA23070]
1. Drive chain guard
2. Distance ADistance A: 45.0–50.0 mm (1.77–1.97 in)
2 2 2
1 1
UBEBE0E0.book Page 24 Monday, July 5, 2021 2:26 PM
Page 75 of 100

Periodic maintenance and adjustment
6-25
6
EAU59921
To adjust the drive chain slack
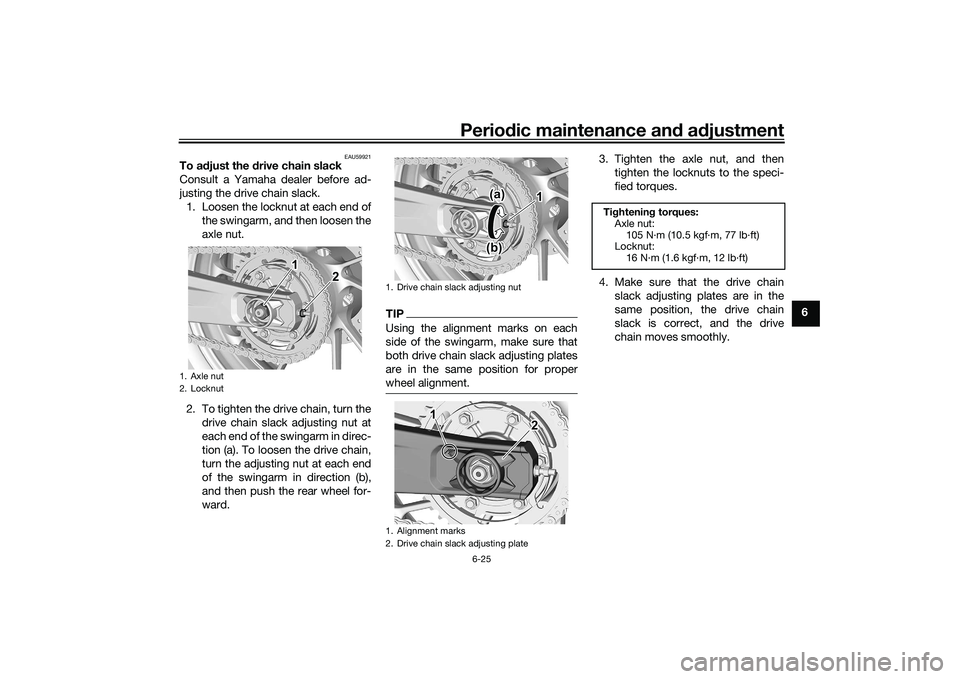
Consult a Yamaha dealer before ad-
justing the drive chain slack.1. Loosen the locknut at each end of the swingarm, and then loosen the
axle nut.
2. To tighten the drive chain, turn the drive chain slack adjusting nut at
each end of the swingarm in direc-
tion (a). To loosen the drive chain,
turn the adjusting nut at each end
of the swingarm in direction (b),
and then push the rear wheel for-
ward.
TIPUsing the alignment marks on each
side of the swingarm, make sure that
both drive chain slack adjusting plates
are in the same position for proper
wheel alignment.
3. Tighten the axle nut, and thentighten the locknuts to the speci-
fied torques.
4. Make sure that the drive chain slack adjusting plates are in the
same position, the drive chain
slack is correct, and the drive
chain moves smoothly.
1. Axle nut
2. Locknut
1 1 1 2 2
1. Drive chain slack adjusting nut
1. Alignment marks
2. Drive chain slack adjusting plate
1 1 1
(a) (a) (a)
(b) (b) (b)
1 1 1 2 2
Tightening torques:
Axle nut: 105 N·m (10.5 kgf·m, 77 lb·ft)
Locknut:
16 N·m (1.6 kgf·m, 12 lb·ft)
UBEBE0E0.book Page 25 Monday, July 5, 2021 2:26 PM
Page 79 of 100

Periodic maintenance and adjustment
6-29
6
EAU23252
Lubricating the rear suspen-
sionThe pivoting points of the rear suspen-
sion must be lubricated by a Yamaha
dealer at the intervals specified in the
periodic maintenance and lubrication
chart.
EAUM1653
Lubricating the swingarm piv-
otsThe swingarm pivots must be lubricat-
ed by a Yamaha dealer at the intervals
specified in the periodic maintenance
and lubrication chart.
EAU23273
Checking the front forkThe condition and operation of the
front fork must be checked as follows
at the intervals specified in the periodic
maintenance and lubrication chart.
To check the condition
Check the inner tubes for scratches,
damage and excessive oil leakage.
To check the operation1. Place the vehicle on a level sur- face and hold it in an upright posi-
tion. WARNING! To avoid injury,
securely support the vehicle so
there is no danger of it falling
over.
[EWA10752]
2. While applying the front brake, push down hard on the handle-
bars several times to check if the
front fork compresses and re-
bounds smoothly.
Recommended lubricant:Lithium-soap-based grease
Recommended lubricant:Lithium-soap-based grease
UBEBE0E0.book Page 29 Monday, July 5, 2021 2:26 PM
Page 93 of 100

Specifications
8-2
8
Loading:Maximum load:162 kg (357 lb)
(Total weight of rider, passenger, cargo and
accessories)Front brake:Type: Hydraulic dual disc brakeRear brake:Type:Hydraulic single disc brakeFront suspension:Type:
Telescopic forkRear suspension:Type:Swingarm (link suspension)Electrical system:System voltage:12 VBattery:Model:
YTZ7S(F)
Voltage, capacity: 12 V, 6.0 Ah (10 HR)Bulb wattage:Headlight:
LED
Brake/tail light: LED
Front turn signal light: LED
Rear turn signal light:
LED Auxiliary light:
LED
License plate light: 5.0 W
UBEBE0E0.book Page 2 Monday, July 5, 2021 2:26 PM
Page 98 of 100

Index
10-2
10
Sidestand, checking and lubricating .... 6-28
Spark plugs, checking .......................... 6-10
Specifications ......................................... 8-1
Speedometer .......................................... 3-6
Starting the engine.................................. 5-2
Start switch ........................................... 3-13
Steering, checking ................................ 6-30
Storage ................................................... 7-3
Supporting the motorcycle ................... 6-34
Swingarm pivots, lubricating ................ 6-29TTachometer ............................................. 3-6
Throttle grip and cable, checking and
lubricating ........................................... 6-27
Throttle grip free play, checking ........... 6-17
Tires ...................................................... 6-17
Tool kits .................................................. 6-2
Transmission gear display ...................... 3-7
Troubleshooting .................................... 6-35
Troubleshooting chart........................... 6-36
Turn signal indicator lights ...................... 3-3
Turn signal switch ................................. 3-13VValve clearance..................................... 6-17
Vehicle identification number ................. 9-1
Vehicle lights ......................................... 6-33WWheel bearings, checking..................... 6-30
Wheels .................................................. 6-20YYamalube .............................................. 6-14
UBEBE0E0.book Page 2 Monday, July 5, 2021 2:26 PM