engine YAMAHA YZF600 2000 Owner's Guide
[x] Cancel search | Manufacturer: YAMAHA, Model Year: 2000, Model line: YZF600, Model: YAMAHA YZF600 2000Pages: 109, PDF Size: 5.01 MB
Page 68 of 109
PERIODIC MAINTENANCE AND MINOR REPAIR
6-18
6
EAU00632
Idle speed adjustment1. Start the engine and warm it up for
a few minutes at approximately
1,000 to 2,000 r/min. Occasionally
rev the engine to 4,000 to
5,000 r/min. The engine is warm
when it quickly responds to the
throttle.
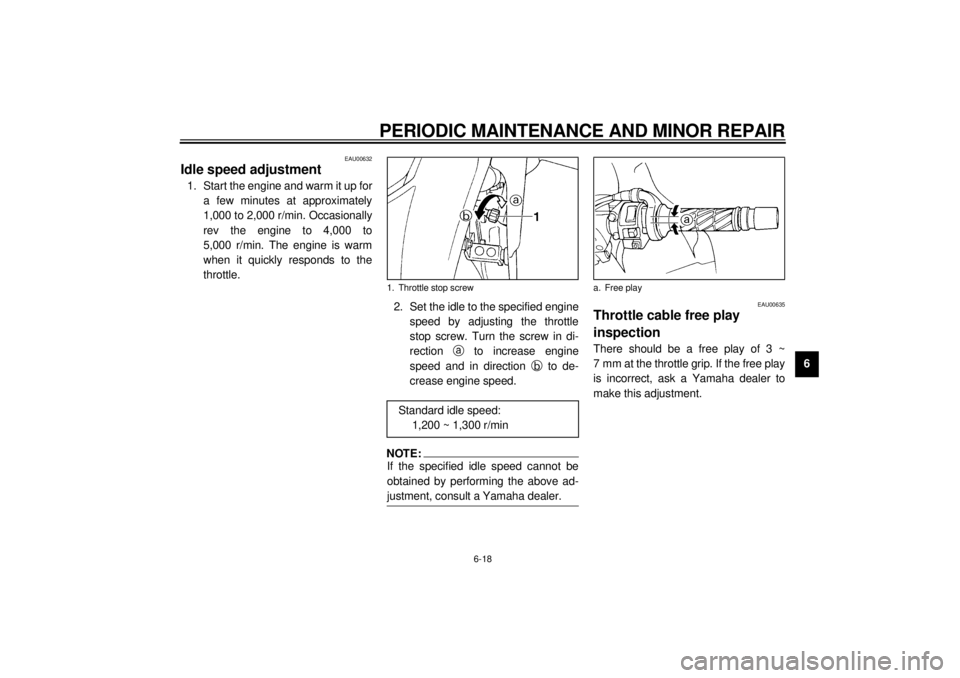
2. Set the idle to the specified engine
speed by adjusting the throttle
stop screw. Turn the screw in di-
rection a
to increase engine
speed and in direction b
to de-
crease engine speed.
NOTE:@ If the specified idle speed cannot be
obtained by performing the above ad-
justment, consult a Yamaha dealer. @
EAU00635
Throttle cable free play
inspectionThere should be a free play of 3 ~
7 mm at the throttle grip. If the free play
is incorrect, ask a Yamaha dealer to
make this adjustment.
1. Throttle stop screw
Standard idle speed:
1,200 ~ 1,300 r/min
a. Free play
E_4tv_Periodic.fm Page 18 Wednesday, September 1, 1999 11:12 AM
Page 69 of 109
PERIODIC MAINTENANCE AND MINOR REPAIR
6-19
6
EAU00637
Valve clearance adjustmentThe correct valve clearance changes
with use, resulting in improper fuel/air
supply or engine noise. To prevent this,
the valve clearance must be adjusted
regularly. This adjustment however,
should be left to a professional
Yamaha service technician.
EAU00658
TiresTo ensure maximum performance,
long service and safe operation, note
the following:
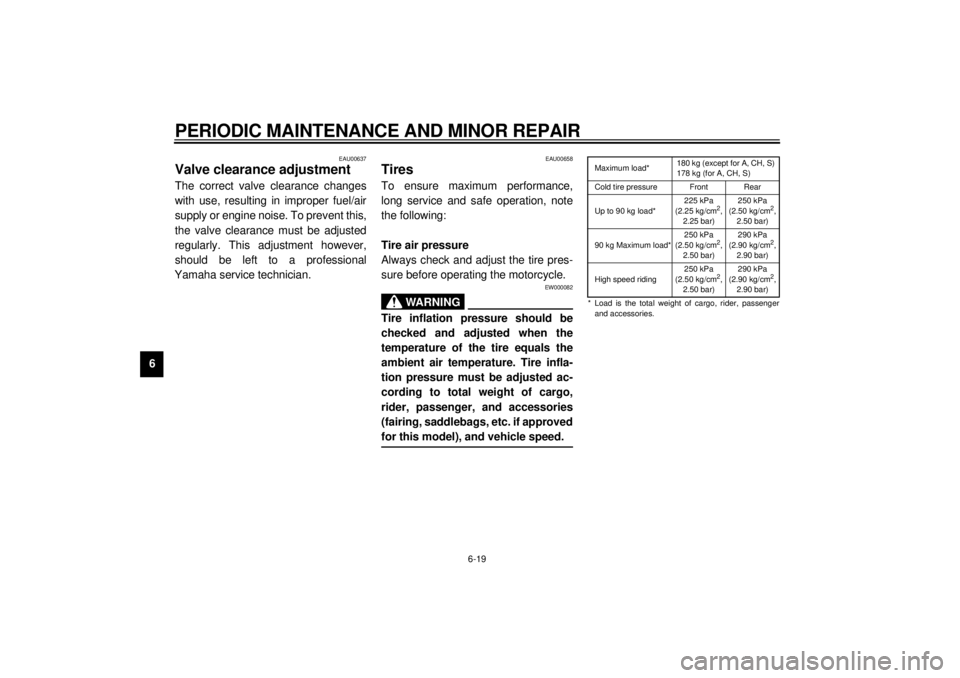
Tire air pressure
Always check and adjust the tire pres-
sure before operating the motorcycle.
EW000082
WARNING
@ Tire inflation pressure should be
checked and adjusted when the
temperature of the tire equals the
ambient air temperature. Tire infla-
tion pressure must be adjusted ac-
cording to total weight of cargo,
rider, passenger, and accessories
(fairing, saddlebags, etc. if approved
for this model), and vehicle speed. @
CE-33EMaximum load*180 kg (except for A, CH, S)
178 kg (for A, CH, S)
Cold tire pressure Front Rear
Up to 90 kg load*225 kPa
(2.25 kg/cm
2,
2.25 bar)250 kPa
(2.50 kg/cm
2,
2.50 bar)
90 kg Maximum load*250 kPa
(2.50 kg/cm
2,
2.50 bar)290 kPa
(2.90 kg/cm
2,
2.90 bar)
High speed riding250 kPa
(2.50 kg/cm
2,
2.50 bar)290 kPa
(2.90 kg/cm
2,
2.90 bar)
* Load is the total weight of cargo, rider, passenger
and accessories.
E_4tv_Periodic.fm Page 19 Wednesday, September 1, 1999 11:12 AM
Page 77 of 109
PERIODIC MAINTENANCE AND MINOR REPAIR
6-27
6
EAU00744
Drive chain slack checkNOTE:@ Spin the wheel several times and find
the tightest position of the chain. Check
and/or adjust the chain slack while it’s
in this tightest position. @To check the chain slack the motor-
cycle must be held straight up with both
wheels on the ground and without rider.
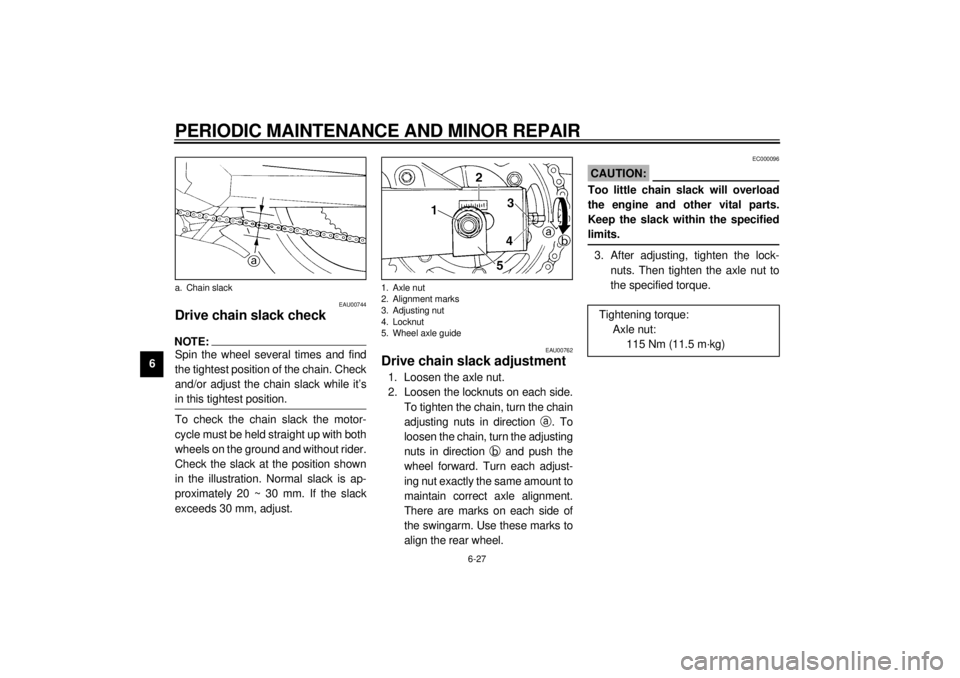
Check the slack at the position shown
in the illustration. Normal slack is ap-
proximately 20 ~ 30 mm. If the slack
exceeds 30 mm, adjust.
EAU00762
Drive chain slack adjustment1. Loosen the axle nut.
2. Loosen the locknuts on each side.
To tighten the chain, turn the chain
adjusting nuts in direction a
. To
loosen the chain, turn the adjusting
nuts in direction b
and push the
wheel forward. Turn each adjust-
ing nut exactly the same amount to
maintain correct axle alignment.
There are marks on each side of
the swingarm. Use these marks to
align the rear wheel.
EC000096
CAUTION:@ Too little chain slack will overload
the engine and other vital parts.
Keep the slack within the specified
limits. @3. After adjusting, tighten the lock-
nuts. Then tighten the axle nut to
the specified torque.
a. Chain slack
1. Axle nut
2. Alignment marks
3. Adjusting nut
4. Locknut
5. Wheel axle guide
Tightening torque:
Axle nut:
115 Nm (11.5 m·kg)
E_4tv_Periodic.fm Page 27 Wednesday, September 1, 1999 11:12 AM
Page 78 of 109
PERIODIC MAINTENANCE AND MINOR REPAIR
6-28
6
EAU03006
Drive chain lubricationThe chain consists of many parts which
work with each other. If the chain is not
maintained properly, it will wear out
quickly. Therefore, the chain must be
serviced regularly. This service is es-
pecially necessary when riding in dusty
areas. This motorcycle is equipped
with a sealed type chain. Steam clean-
ing, high-pressure washers, and sol-
vents can damage the drive chain, so
do not use these for cleaning it. Use
only kerosene to clean the drive chain.
Wipe it dry, and thoroughly lubricate it
with SAE 30 ~ 50W motor oil. Do not
use any other lubricants on the drive
chain. They may contain solvents that
could damage the sealed chain.
EC000097
CAUTION:@ Be sure to oil the chain after wash-
ing the motorcycle or riding in the
rain. @
EAU02962
Cable inspection and
lubrication
EW000112
WA R N I N G
@ Damage to the outer housing of ca-
bles may lead to internal rusting and
interfere with the cable movement.
Replace damaged cables as soon as
possible to prevent unsafe condi-
tions. @Lubricate the cables and cable ends. If
a cable does not operate smoothly, ask
a Yamaha dealer to replace it.
EAU00773
Throttle cable and grip
lubricationThe throttle twist grip assembly should
be greased at the time that the cable is
lubricated, since the grip must be re-
moved to get at the end of the throttle
cable. After removing the screws, hold
the end of the cable up in the air and
put in several drops of lubricant. With
the throttle grip disassembled, coat the
metal surface of the grip assembly with
a suitable all-purpose grease.
Recommended lubricant:
Engine oil
E_4tv_Periodic.fm Page 28 Wednesday, September 1, 1999 11:12 AM
Page 79 of 109
PERIODIC MAINTENANCE AND MINOR REPAIR
6-29
6
EAU02984
Brake and shift pedal
lubricationLubricate the pivoting parts.
EAU02985
Brake and clutch lever
lubricationLubricate the pivoting parts.
EAU02986
Sidestand lubricationLubricate the sidestand pivoting point
and metal-to-metal contact surfaces.
Check that the sidestand moves up
and down smoothly.
EW000113
WA R N I N G
@ If the sidestand does not move
smoothly, consult a Yamaha dealer. @
Recommended lubricant:
Engine oil
Recommended lubricant:
Engine oil
Recommended lubricant:
Engine oil
E_4tv_Periodic.fm Page 29 Wednesday, September 1, 1999 11:12 AM
Page 81 of 109
PERIODIC MAINTENANCE AND MINOR REPAIR
6-31
6
EAU00794
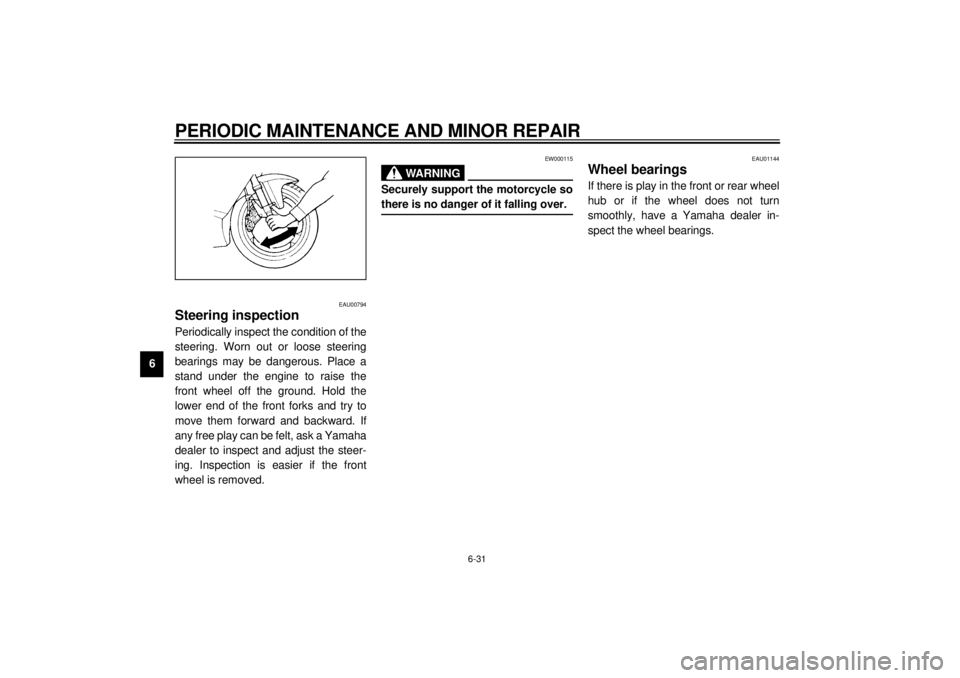
Steering inspectionPeriodically inspect the condition of the
steering. Worn out or loose steering
bearings may be dangerous. Place a
stand under the engine to raise the
front wheel off the ground. Hold the
lower end of the front forks and try to
move them forward and backward. If
any free play can be felt, ask a Yamaha
dealer to inspect and adjust the steer-
ing. Inspection is easier if the front
wheel is removed.
EW000115
WARNING
@ Securely support the motorcycle so
there is no danger of it falling over. @
EAU01144
Wheel bearingsIf there is play in the front or rear wheel
hub or if the wheel does not turn
smoothly, have a Yamaha dealer in-
spect the wheel bearings.
E_4tv_Periodic.fm Page 31 Wednesday, September 1, 1999 11:12 AM
Page 90 of 109
PERIODIC MAINTENANCE AND MINOR REPAIR
6-40
6
EAU02990*
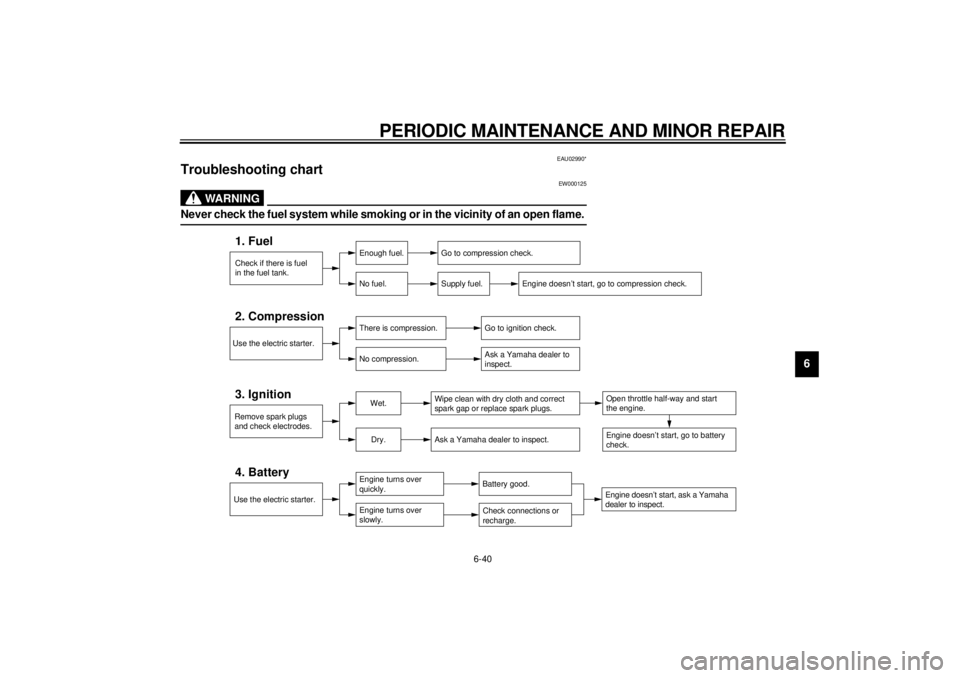
Troubleshooting chart
EW000125
WARNING
@ Never check the fuel system while smoking or in the vicinity of an open flame. @
Check if there is fuel
in the fuel tank.1. Fuel
Enough fuel.
No fuel.
Go to compression check.
Supply fuel.
Engine doesn’t start, go to compression check.
Use the electric starter.2. Compression
There is compression.
No compression.
Go to ignition check.
Ask a Yamaha dealer to
inspect.
Remove spark plugs
and check electrodes.3. Ignition
Wet.
Dry.
Wipe clean with dry cloth and correct
spark gap or replace spark plugs.
Ask a Yamaha dealer to inspect.
Engine doesn’t start, ask a Yamaha
dealer to inspect.Engine doesn’t start, go to battery
check.Open throttle half-way and start
the engine.
Use the electric starter.4. Battery
Engine turns over
quickly.
Engine turns over
slowly.
Battery good.Check connections or
recharge.
E_4tv_Periodic.fm Page 40 Wednesday, September 1, 1999 11:12 AM
Page 91 of 109
PERIODIC MAINTENANCE AND MINOR REPAIR
6-41
6
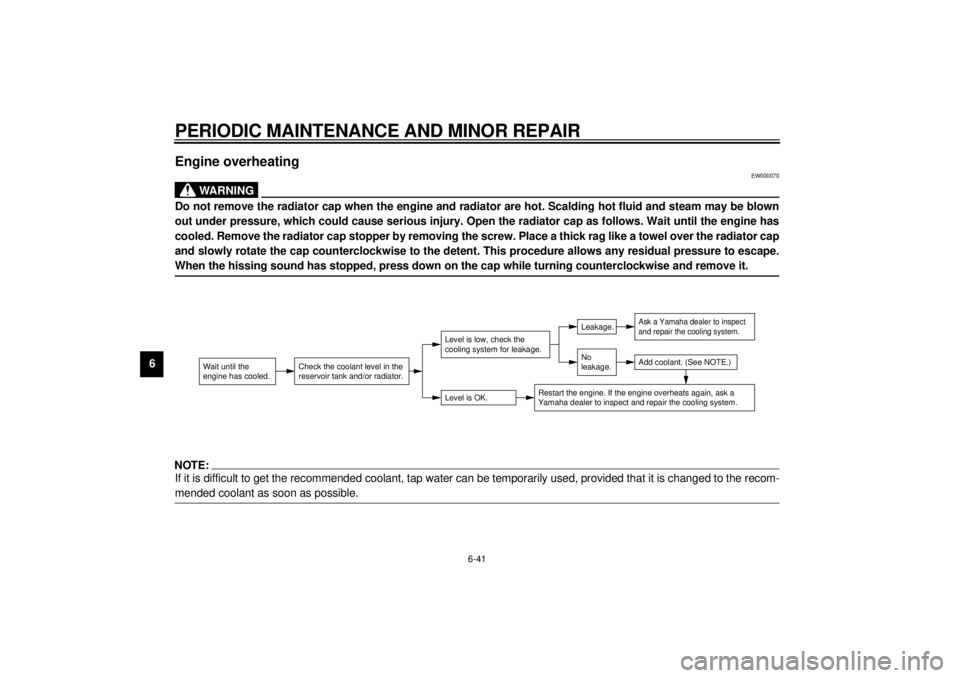
Engine overheating
EW000070
WARNING
@ Do not remove the radiator cap when the engine and radiator are hot. Scalding hot fluid and steam may be blown
out under pressure, which could cause serious injury. Open the radiator cap as follows. Wait until the engine has
cooled. Remove the radiator cap stopper by removing the screw. Place a thick rag like a towel over the radiator cap
and slowly rotate the cap counterclockwise to the detent. This procedure allows any residual pressure to escape.
When the hissing sound has stopped, press down on the cap while turning counterclockwise and remove it. @NOTE:@ If it is difficult to get the recommended coolant, tap water can be temporarily used, provided that it is changed to the recom-
mended coolant as soon as possible. @
Wait until the
engine has cooled.
Check the coolant level in the
reservoir tank and/or radiator.
Level is OK.Level is low, check the
cooling system for leakage.
No
leakage.Leakage.
Ask a Yamaha dealer to inspect
and repair the cooling system.Add coolant. (See NOTE.)
Restart the engine. If the engine overheats again, ask a
Yamaha dealer to inspect and repair the cooling system.
E_4tv_Periodic.fm Page 41 Wednesday, September 1, 1999 11:12 AM
Page 95 of 109
MOTORCYCLE CARE AND STORAGE
7-3
71. Clean your motorcycle with cold
water and soap after the engine
has cooled down.
ECA00012
CAUTION:@ Do not use warm water since it in-
creases the corrosive action of the
salt. @2. Be sure to apply a corrosion pro-
tection spray on all (even chrome-
and nickel-plated) metal surfaces
to prevent corrosion.After cleaning
1. Dry the motorcycle with a chamois
or an absorbing cloth.
2. Immediately dry the drive chain
and lubricate it to prevent it from
rusting.
3. Use a chrome polish to shine
chrome, aluminum and stainless-
steel parts, including the exhaust
system. (Even the thermally in-
duced discoloring of stainless-
steel exhaust systems can be re-
moved through polishing.)
4. To prevent corrosion, it is recom-
mended to apply a corrosion pro-
tection spray on all (even chrome-
and nickel-plated) metal surfaces.
5. Use spray oil as a universal clean-
er to remove any remaining dirt.
6. Touch up minor paint damage
caused by stones, etc.
7. Wax all painted surfaces.
8. Let the motorcycle dry completely
before storing it or covering it.
EWA00001
WA R N I N G
@ Make sure that there is no oil or wax
on the brakes and tires. If neces-
sary, clean the brake discs and lin-
ings with a regular brake disc
cleaner or acetone, and wash the
tires with warm water and mild soap.
Then, carefully test the motorcycle
for its braking performance and cor-
nering behavior. @
E_4tv_Cleaning.fm Page 3 Wednesday, September 1, 1999 11:13 AM
Page 97 of 109
MOTORCYCLE CARE AND STORAGE
7-5
7a. Remove the spark plug caps and
spark plugs.
b. Pour a teaspoonful of engine oil
into each spark plug bore.
c. Install the spark plug caps onto the
spark plugs and place the spark
plugs on the cylinder head so that
the electrodes are grounded. (This
will limit sparking during the next
step.)
d. Turn the engine over several times
with the starter. (This will coat the
cylinder walls with oil.)
e. Remove the spark plug caps from
the spark plugs, install the spark
plugs and then the spark plug
caps.
EWA00003
WARNING
@ When turning the engine over, be
sure to ground the spark plug elec-
trodes to prevent damage or injury
from sparking. @
6. Lubricate all control cables and
the pivoting points of all levers and
pedals as well as of the sidestand/
centerstand.
7. Check and, if necessary, correct
the tire air pressure, then raise the
motorcycle so that both of its
wheels are off the ground. Alterna-
tively, turn the wheels a little every
month in order to prevent the tires
from becoming degraded in one
spot.
8. Cover up the muffler outlet with a
plastic bag to prevent moisture
from entering.9. Remove the battery and fully
charge it. Store it in a cool, dry
place and recharge it once a
month. Do not store the battery in
an excessively cold or warm place
(less than 0 °C or more than
30 °C). For more information, see
“Battery storage” in the chapter
“PERIODIC MAINTENANCE AND
MINOR REPAIRS”.
NOTE:@ Make any necessary repairs before
storing the motorcycle. @
E_4tv_Cleaning.fm Page 5 Wednesday, September 1, 1999 11:13 AM