height adjustment YAMAHA YZF600 2000 Owners Manual
[x] Cancel search | Manufacturer: YAMAHA, Model Year: 2000, Model line: YZF600, Model: YAMAHA YZF600 2000Pages: 109, PDF Size: 5.01 MB
Page 50 of 109

6
PERIODIC MAINTENANCE AND MINOR REPAIR
Tool kit................................................................... 6-1
Periodic maintenance and lubrication ................... 6-2
Cowling and panel removal and installation.......... 6-5
Cowling A and B ................................................... 6-5
Cowling C ............................................................. 6-7
Spark plugs........................................................... 6-7
Engine oil .............................................................. 6-9
Cooling system ................................................... 6-12
Changing the coolant.......................................... 6-13
Air filter ............................................................... 6-15
Air vent hose ....................................................... 6-17
Air intake duct ..................................................... 6-17
Carburetor adjustment ........................................ 6-17
Idle speed adjustment ........................................ 6-18
Throttle cable free play inspection ...................... 6-18
Valve clearance adjustment ................................ 6-19
Tires .................................................................... 6-19
Wheels................................................................ 6-22
Clutch lever free play adjustment........................ 6-23
Rear brake pedal height adjustment ................... 6-23
Brake light switch adjustment ............................. 6-24
Checking the front and rear brake pads.............. 6-25
Inspecting the brake fluid level............................ 6-25
Brake fluid replacement ...................................... 6-26Drive chain slack check...................................... 6-27
Drive chain slack adjustment ............................. 6-27
Drive chain lubrication........................................ 6-28
Cable inspection and lubrication ........................ 6-28
Throttle cable and grip lubrication ...................... 6-28
Brake and shift pedal lubrication ........................ 6-29
Brake and clutch lever lubrication ...................... 6-29
Sidestand lubrication.......................................... 6-29
Rear suspension lubrication............................... 6-30
Front fork inspection ........................................... 6-30
Steering inspection ............................................ 6-31
Wheel bearings .................................................. 6-31
Battery................................................................ 6-32
Fuse replacement .............................................. 6-33
Headlight bulb replacement ............................... 6-33
Tail/brake light bulb replacement ........................ 6-35
Turn signal light bulb replacement...................... 6-35
Front wheel removal ........................................... 6-35
Front wheel installation ...................................... 6-36
Rear wheel removal ........................................... 6-37
Rear wheel installation ....................................... 6-38
Troubleshooting .................................................. 6-39
Troubleshooting chart......................................... 6-40
E_4tv_PeriodicTOC.fm Page 1 Wednesday, September 1, 1999 11:11 AM
Page 73 of 109

PERIODIC MAINTENANCE AND MINOR REPAIR
6-23
6
EAU00692
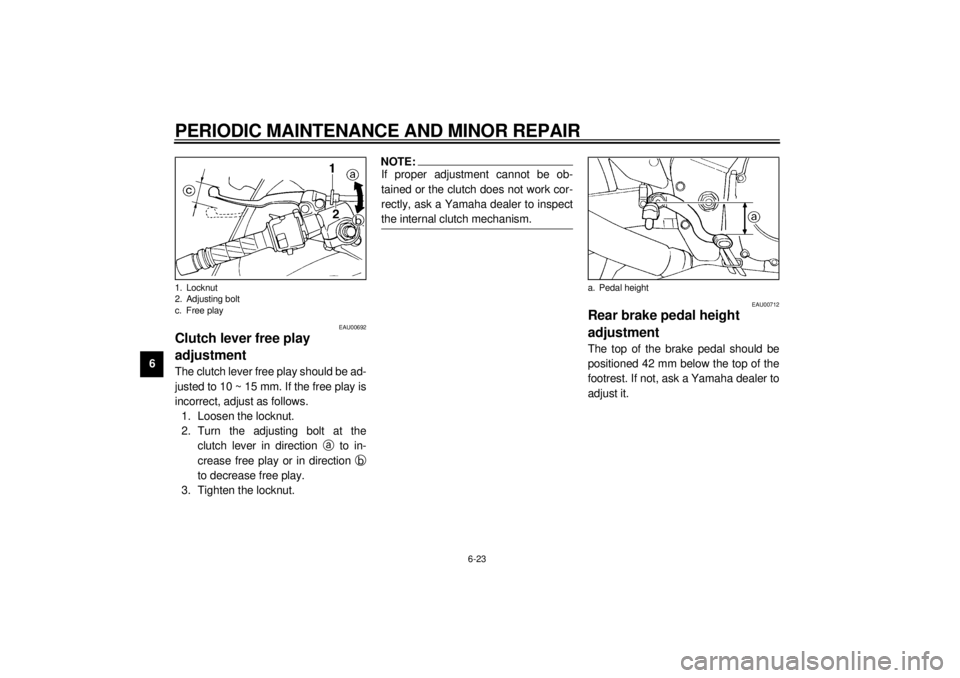
Clutch lever free play
adjustmentThe clutch lever free play should be ad-
justed to 10 ~ 15 mm. If the free play is
incorrect, adjust as follows.
1. Loosen the locknut.
2. Turn the adjusting bolt at the
clutch lever in direction a
to in-
crease free play or in direction b
to decrease free play.
3. Tighten the locknut.
NOTE:@ If proper adjustment cannot be ob-
tained or the clutch does not work cor-
rectly, ask a Yamaha dealer to inspect
the internal clutch mechanism. @
EAU00712
Rear brake pedal height
adjustmentThe top of the brake pedal should be
positioned 42 mm below the top of the
footrest. If not, ask a Yamaha dealer to
adjust it.
1. Locknut
2. Adjusting bolt
c. Free play
a. Pedal height
E_4tv_Periodic.fm Page 23 Wednesday, September 1, 1999 11:12 AM
Page 108 of 109

INDEX
MMain switch/steering lock ......................... 3-1
Model label .............................................. 9-2NNeutral indicator light ............................... 3-2OOil level indicator circuit check ................. 3-4
Oil level indicator light .............................. 3-2PParking .................................................... 5-6
Pass switch ............................................. 3-8
Periodic maintenance and lubrication ...... 6-2
Pre-operation check list ........................... 4-1RRear brake pedal ................................... 3-10
Rear brake pedal height adjustment ...... 6-23
Rear shock absorber adjustment ........... 3-18
Rear suspension lubrication................... 6-30
Rear wheel installation........................... 6-38
Rear wheel removal............................... 6-37
Recommended combinations of the
front fork and the rear shock
absorber settings................................. 3-20
Recommended shift points
(for Switzerland only)............................. 5-5
Right view................................................ 2-2
SSeat ...................................................... 3-14
Shifting .................................................... 5-4
Shift pedal ............................................. 3-10
Sidestand .............................................. 3-21
Sidestand/clutch switch operation
check .................................................. 3-22
Sidestand lubrication ............................. 6-29
Spark plugs ............................................. 6-7
Specifications .......................................... 8-1
Speedometer .......................................... 3-6
Starter (choke) “ ” ............................. 3-13
Starting a warm engine ........................... 5-4
Starting the engine .................................. 5-1
Start switch ............................................. 3-9
Steering inspection................................ 6-31
Storage ................................................... 7-4
Storage compartment............................ 3-15TTachometer............................................. 3-6
Tail/brake light bulb replacement ........... 6-35
Throttle cable and grip lubrication.......... 6-28
Throttle cable free play inspection ......... 6-18
Tips for reducing fuel consumption .......... 5-5
Tires...................................................... 6-19
Tool kit .................................................... 6-1
Troubleshooting .................................... 6-39
Troubleshooting chart ........................... 6-40
Turn indicator light................................... 3-3
Turn signal light bulb replacement ......... 6-35
Turn signal switch ................................... 3-8
VValve clearance adjustment ................... 6-19
Vehicle identification number ................... 9-1WWheel bearings...................................... 6-31
Wheels .................................................. 6-22
E_4tvIX.fm Page 2 Wednesday, September 1, 1999 11:15 AM