oil filter YAMAHA YZF600 2000 Owners Manual
[x] Cancel search | Manufacturer: YAMAHA, Model Year: 2000, Model line: YZF600, Model: YAMAHA YZF600 2000Pages: 109, PDF Size: 5.01 MB
Page 50 of 109
6
PERIODIC MAINTENANCE AND MINOR REPAIR
Tool kit................................................................... 6-1
Periodic maintenance and lubrication ................... 6-2
Cowling and panel removal and installation.......... 6-5
Cowling A and B ................................................... 6-5
Cowling C ............................................................. 6-7
Spark plugs........................................................... 6-7
Engine oil .............................................................. 6-9
Cooling system ................................................... 6-12
Changing the coolant.......................................... 6-13
Air filter ............................................................... 6-15
Air vent hose ....................................................... 6-17
Air intake duct ..................................................... 6-17
Carburetor adjustment ........................................ 6-17
Idle speed adjustment ........................................ 6-18
Throttle cable free play inspection ...................... 6-18
Valve clearance adjustment ................................ 6-19
Tires .................................................................... 6-19
Wheels................................................................ 6-22
Clutch lever free play adjustment........................ 6-23
Rear brake pedal height adjustment ................... 6-23
Brake light switch adjustment ............................. 6-24
Checking the front and rear brake pads.............. 6-25
Inspecting the brake fluid level............................ 6-25
Brake fluid replacement ...................................... 6-26Drive chain slack check...................................... 6-27
Drive chain slack adjustment ............................. 6-27
Drive chain lubrication........................................ 6-28
Cable inspection and lubrication ........................ 6-28
Throttle cable and grip lubrication ...................... 6-28
Brake and shift pedal lubrication ........................ 6-29
Brake and clutch lever lubrication ...................... 6-29
Sidestand lubrication.......................................... 6-29
Rear suspension lubrication............................... 6-30
Front fork inspection ........................................... 6-30
Steering inspection ............................................ 6-31
Wheel bearings .................................................. 6-31
Battery................................................................ 6-32
Fuse replacement .............................................. 6-33
Headlight bulb replacement ............................... 6-33
Tail/brake light bulb replacement ........................ 6-35
Turn signal light bulb replacement...................... 6-35
Front wheel removal ........................................... 6-35
Front wheel installation ...................................... 6-36
Rear wheel removal ........................................... 6-37
Rear wheel installation ....................................... 6-38
Troubleshooting .................................................. 6-39
Troubleshooting chart......................................... 6-40
E_4tv_PeriodicTOC.fm Page 1 Wednesday, September 1, 1999 11:11 AM
Page 54 of 109
PERIODIC MAINTENANCE AND MINOR REPAIR
6-4
6
* Since these items require special tools, data and technical skills, they should be serviced by a Yamaha dealer.
EAU02970*
NOTE:@ l
The air filter needs more frequent service if you are riding in unusually wet or dusty areas.
l
Hydraulic brake system
• When disassembling the master cylinder or caliper cylinder, always replace the brake fluid. Check the brake fluid level
regularly and fill as required.
• Replace the oil seals on the inner parts of the master cylinder and caliper cylinder every two years.
• Replace the brake hoses every four years or if cracked or damaged.
@21
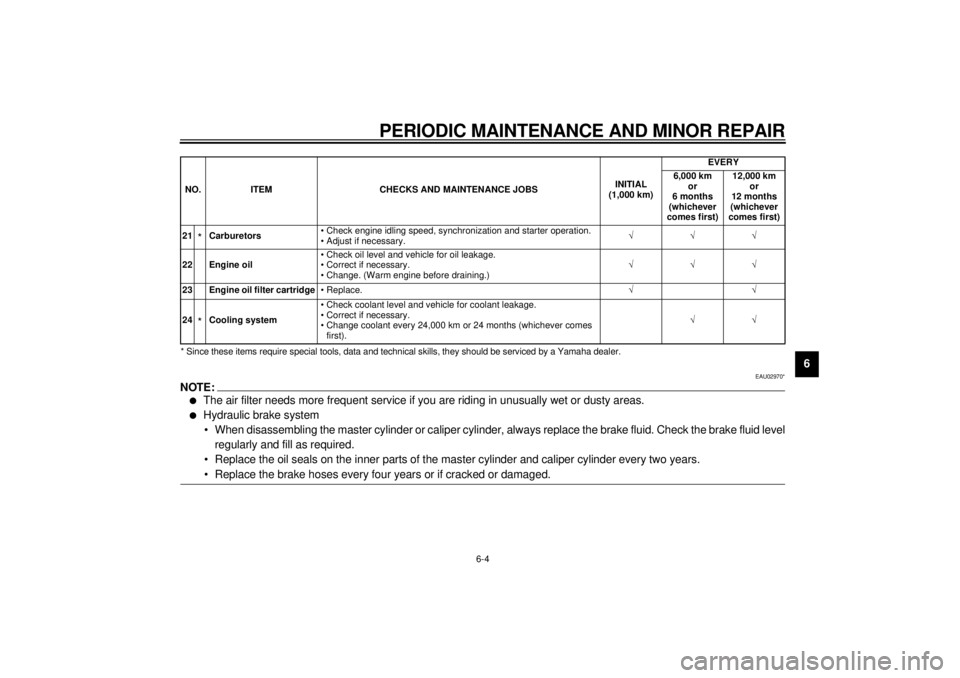
*Carburetors• Check engine idling speed, synchronization and starter operation.
• Adjust if necessary.ÖÖÖ
22 Engine oil• Check oil level and vehicle for oil leakage.
• Correct if necessary.
• Change. (Warm engine before draining.)ÖÖÖ
23 Engine oil filter cartridge
• Replace.ÖÖ
24*Cooling system• Check coolant level and vehicle for coolant leakage.
• Correct if necessary.
• Change coolant every 24,000 km or 24 months (whichever comes
first).ÖÖ NO. ITEM CHECKS AND MAINTENANCE JOBSINITIAL
(1,000 km)EVERY
6,000 km
or
6 months
(whichever
comes first)12,000 km
or
12 months
(whichever
comes first)
E_4tv_Periodic.fm Page 4 Wednesday, September 1, 1999 11:12 AM
Page 60 of 109
PERIODIC MAINTENANCE AND MINOR REPAIR
6-10
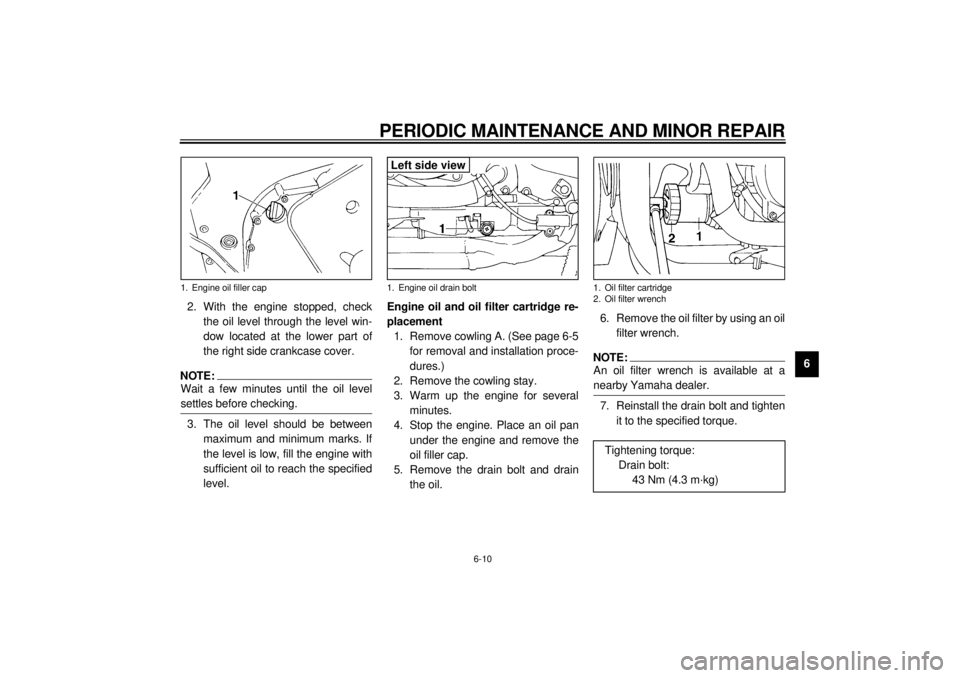
6 2. With the engine stopped, check
the oil level through the level win-
dow located at the lower part of
the right side crankcase cover.
NOTE:@ Wait a few minutes until the oil level
settles before checking. @3. The oil level should be between
maximum and minimum marks. If
the level is low, fill the engine with
sufficient oil to reach the specified
level.Engine oil and oil filter cartridge re-
placement
1. Remove cowling A. (See page 6-5
for removal and installation proce-
dures.)
2. Remove the cowling stay.
3. Warm up the engine for several
minutes.
4. Stop the engine. Place an oil pan
under the engine and remove the
oil filler cap.
5. Remove the drain bolt and drain
the oil.6. Remove the oil filter by using an oil
filter wrench.
NOTE:@ An oil filter wrench is available at a
nearby Yamaha dealer. @7. Reinstall the drain bolt and tighten
it to the specified torque.
1. Engine oil filler cap
1. Engine oil drain boltLeft side view
1. Oil filter cartridge
2. Oil filter wrenchTightening torque:
Drain bolt:
43 Nm (4.3 m·kg)
E_4tv_Periodic.fm Page 10 Wednesday, September 1, 1999 11:12 AM
Page 61 of 109
PERIODIC MAINTENANCE AND MINOR REPAIR
6-11
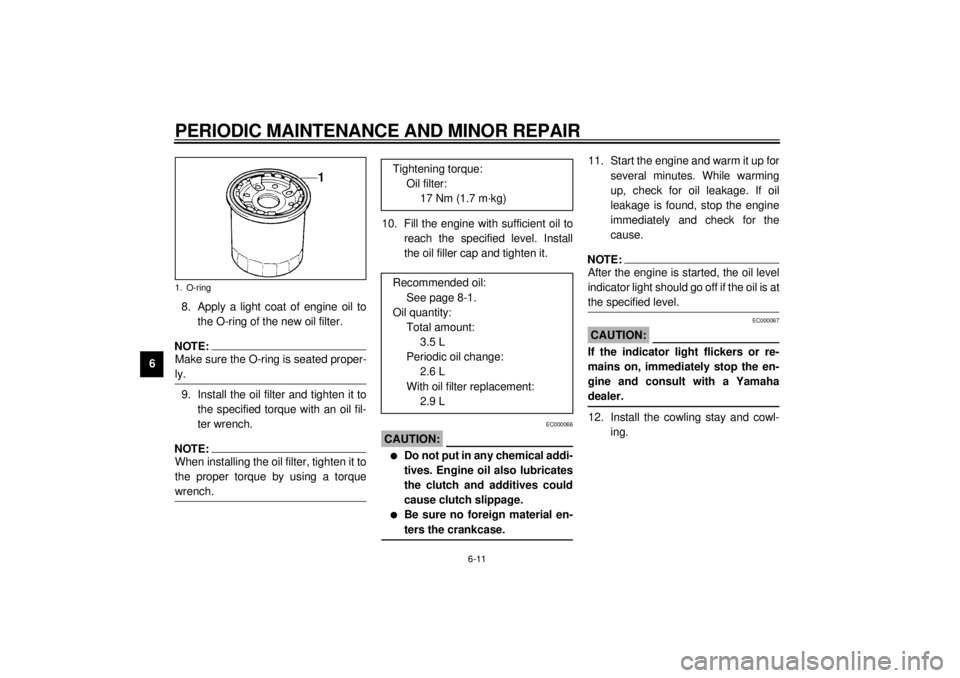
68. Apply a light coat of engine oil to
the O-ring of the new oil filter.
NOTE:@ Make sure the O-ring is seated proper-
ly. @9. Install the oil filter and tighten it to
the specified torque with an oil fil-
ter wrench.NOTE:When installing the oil filter, tighten it to
the proper torque by using a torque
wrench.
10. Fill the engine with sufficient oil to
reach the specified level. Install
the oil filler cap and tighten it.
EC000066
CAUTION:@ l
Do not put in any chemical addi-
tives. Engine oil also lubricates
the clutch and additives could
cause clutch slippage.
l
Be sure no foreign material en-
ters the crankcase.
@
11. Start the engine and warm it up for
several minutes. While warming
up, check for oil leakage. If oil
leakage is found, stop the engine
immediately and check for the
cause.NOTE:@ After the engine is started, the oil level
indicator light should go off if the oil is at
the specified level. @
EC000067
CAUTION:@ If the indicator light flickers or re-
mains on, immediately stop the en-
gine and consult with a Yamaha
dealer. @12. Install the cowling stay and cowl-
ing.
1. O-ring
Tightening torque:
Oil filter:
17 Nm (1.7 m·kg)
Recommended oil:
See page 8-1.
Oil quantity:
Total amount:
3.5 L
Periodic oil change:
2.6 L
With oil filter replacement:
2.9 L
E_4tv_Periodic.fm Page 11 Wednesday, September 1, 1999 11:12 AM
Page 66 of 109
PERIODIC MAINTENANCE AND MINOR REPAIR
6-16
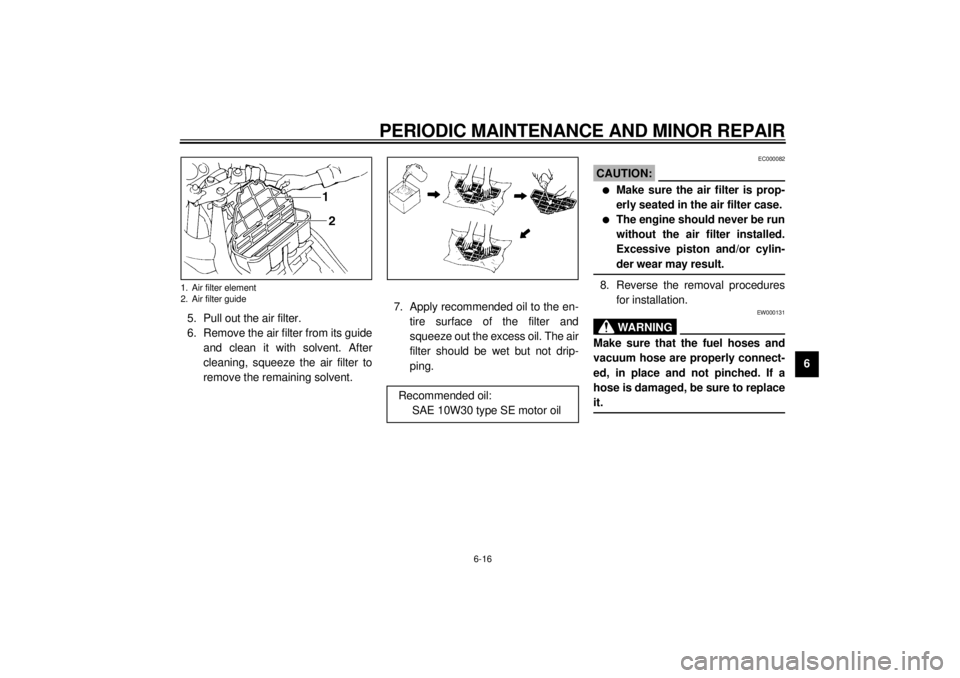
6 5. Pull out the air filter.
6. Remove the air filter from its guide
and clean it with solvent. After
cleaning, squeeze the air filter to
remove the remaining solvent.7. Apply recommended oil to the en-
tire surface of the filter and
squeeze out the excess oil. The air
filter should be wet but not drip-
ping.
EC000082
CAUTION:@ l
Make sure the air filter is prop-
erly seated in the air filter case.
l
The engine should never be run
without the air filter installed.
Excessive piston and/or cylin-
der wear may result.
@8. Reverse the removal procedures
for installation.
EW000131
WA R N I N G
@ Make sure that the fuel hoses and
vacuum hose are properly connect-
ed, in place and not pinched. If a
hose is damaged, be sure to replace
it. @
1. Air filter element
2. Air filter guide
Recommended oil:
SAE 10W30 type SE motor oil
E_4tv_Periodic.fm Page 16 Wednesday, September 1, 1999 11:12 AM
Page 99 of 109
8-1
8
EAU01038
8-SPECIFICATIONSSpecifications01E
Model YZF600R
Dimensions
Overall length 2,060 mm (for F, E, I, GR)
2,145 mm
(except for F, E, I, GR)
Overall width 725 mm
Overall height 1,190 mm
Seat height 805 mm
Wheelbase 1,415 mm
Ground clearance 135 mm
Minimum turning radius 3,200 mm
Basic weight (with oil and full
fuel tank)
212 kg (except for A, CH, S)
214 kg (for A, CH, S)
Engine
Engine type Liquid-cooled 4-stroke, DOHC
Cylinder arrangement Forward-inclined parallel
4-cylinder
Displacement 599 cm
3
Bore ´ Stroke 62.0 ´ 49.6 mm
Compression ratio 12:1
Starting system Electric starter
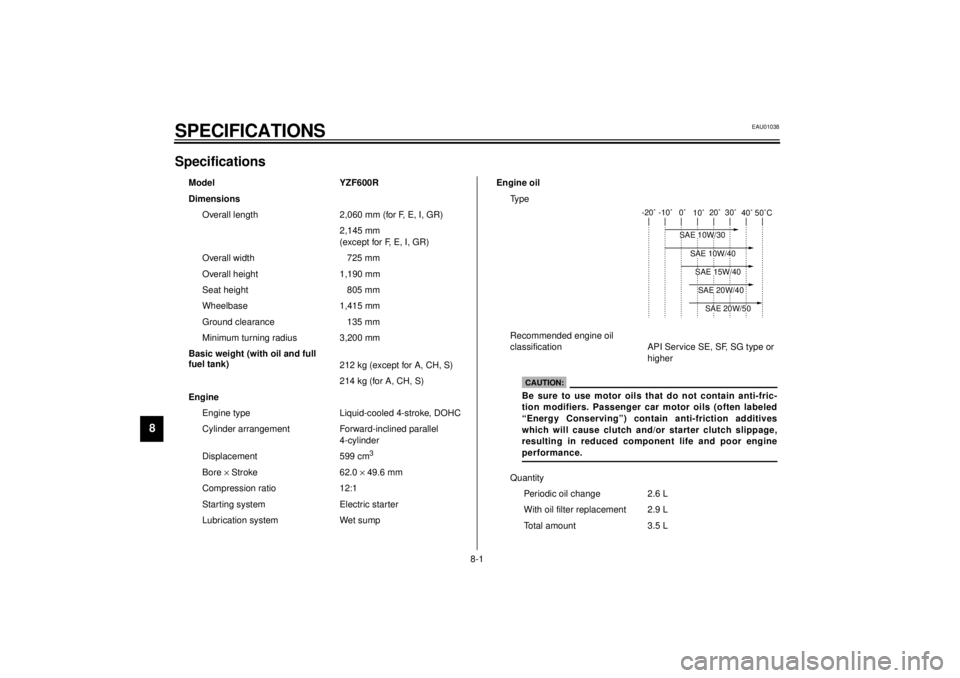
Lubrication system Wet sumpEngine oil
Ty p e
Recommended engine oil
classification API Service SE, SF, SG type or
higher
Quantity
Periodic oil change 2.6 L
With oil filter replacement 2.9 L
Total amount 3.5 L
-20˚ -10˚ 0˚
10˚20˚ 30˚
40˚50˚C
SAE 10W/30
SAE 15W/40SAE 20W/40SAE 20W/50
SAE 10W/40
CAUTION:Be sure to use motor oils that do not contain anti-fric-
tion modifiers. Passenger car motor oils (often labeled
“Energy Conserving”) contain anti-friction additives
which will cause clutch and/or starter clutch slippage,
resulting in reduced component life and poor engine
performance.
E_4tv_Spec.fm Page 1 Wednesday, September 1, 1999 11:14 AM
Page 107 of 109
10-INDEXAAir filter ..................................................6-15
Air intake duct ........................................6-17
Air vent hose .......................................... 6-17
Antitheft alarm (optional) .......................... 3-7BBattery ................................................... 6-32
Brake and clutch lever lubrication........... 6-29
Brake and shift pedal lubrication ............ 6-29
Brake fluid replacement ......................... 6-26
Brake light switch adjustment ................. 6-24CCable inspection and lubrication ............ 6-28
Carburetor adjustment ...........................6-17
Care.........................................................7-1
Changing the coolant ............................. 6-13
Checking the front and
rear brake pads ................................... 6-25
Clutch lever .............................................. 3-9
Clutch lever free play adjustment ........... 6-23
Controls/Instruments ................................2-3
Coolant temperature gauge ..................... 3-8
Cooling system ...................................... 6-12
Cowling A and B ......................................6-5
Cowling C ................................................6-7
Cowling and panel removal and
installation .............................................6-5
DDiagnosis device ..................................... 3-7
Dimmer switch ......................................... 3-8
Drive chain lubrication ........................... 6-28
Drive chain slack adjustment ................. 6-27
Drive chain slack check ......................... 6-27EEngine break-in ....................................... 5-5
Engine oil ................................................ 6-9
Engine stop switch................................... 3-9FFront brake lever ................................... 3-10
Front fork adjustment............................. 3-16
Front fork inspection .............................. 6-30
Front wheel installation .......................... 6-36
Front wheel removal .............................. 6-35
Fuel ....................................................... 3-11
Fuel indicator circuit check....................... 3-5
Fuel indicator light ................................... 3-2
Fuel tank breather hose
(for Germany only) .............................. 3-13
Fuel tank cap ......................................... 3-11
Fuse replacement.................................. 6-33GGive safety the right of way ..................... 1-1
HHandlebar switches ..................................3-8
Dimmer switch ....................................3-8
Engine stop switch..............................3-9
Horn switch.........................................3-8
Lights switch .......................................3-9
Pass switch ........................................3-8
Start switch .........................................3-9
Turn signal switch ...............................3-8
Headlight bulb replacement....................6-33
Helmet holder.........................................3-15
High beam indicator light ..........................3-3
Horn switch ..............................................3-8IIdentification number records ...................9-1
Idle speed adjustment ............................6-18
Indicator lights ..........................................3-2
Fuel indicator light...............................3-2
High beam indicator light ....................3-3
Neutral indicator light ..........................3-2
Oil level indicator light .........................3-2
Turn indicator light ..............................3-3
Inspecting the brake fluid level ...............6-25KKey identification number .........................9-1LLeft view...................................................2-1
Lights switch ............................................3-9
Luggage strap holders ...........................3-21
E_4tvIX.fm Page 1 Wednesday, September 1, 1999 11:15 AM