ignition Abarth 124 Spider 2016 Owner handbook (in English)
[x] Cancel search | Manufacturer: ABARTH, Model Year: 2016, Model line: 124 Spider, Model: Abarth 124 Spider 2016Pages: 224, PDF Size: 2.89 MB
Page 105 of 224

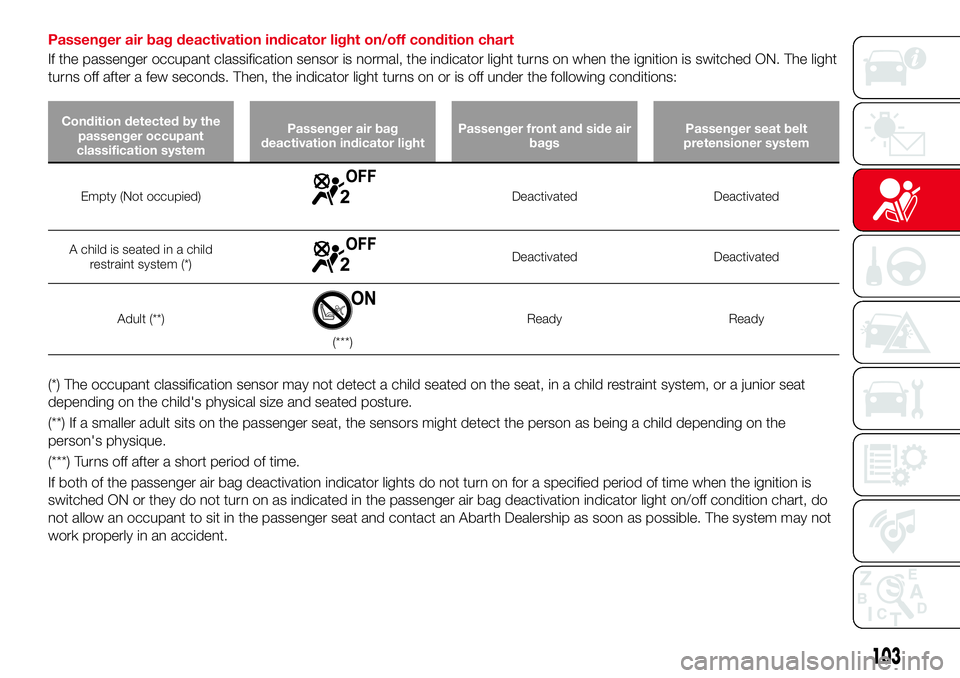
Passenger air bag deactivation indicator light on/off condition chart
If the passenger occupant classification sensor is normal, the indicator light turns on when the ignition is switched ON. The light
turns off after a few seconds. Then, the indicator light turns on or is off under the following conditions:
Condition detected by the
passenger occupant
classification systemPassenger air bag
deactivation indicator lightPassenger front and side air
bagsPassenger seat belt
pretensioner system
Empty (Not occupied)Deactivated Deactivated
A child is seated in a child
restraint system (*)
Deactivated Deactivated
Adult (**)
(***)Ready Ready
(*) The occupant classification sensor may not detect a child seated on the seat, in a child restraint system, or a junior seat
depending on the child's physical size and seated posture.
(**) If a smaller adult sits on the passenger seat, the sensors might detect the person as being a child depending on the
person's physique.
(***) Turns off after a short period of time.
If both of the passenger air bag deactivation indicator lights do not turn on for a specified period of time when the ignition is
switched ON or they do not turn on as indicated in the passenger air bag deactivation indicator light on/off condition chart, do
not allow an occupant to sit in the passenger seat and contact an Abarth Dealership as soon as possible. The system may not
work properly in an accident.
103
Page 110 of 224

CONSTANT
MONITORING
The following components of the air
bag systems and the active bonnet are
monitored by a diagnostic system:
Crash sensors, and diagnostic
module (SAS unit)
Front air bag sensors
Air bag modules
Side crash sensors
Air bag/Seat belt pretensioner
system warning light
Seat belt pretensioners
Related wiring
Passenger air bag deactivation
indicator light
Passenger occupant classification
sensor
Passenger occupant classification
module (where provided)
Active bonnet sensors
Active bonnet modules
Active bonnet warning light
The diagnostic module continuously
monitors the system's readiness. This
begins when the ignition is switched
ON and continues while the vehicle is
being driven.
108
SAFETY
Page 112 of 224

STARTING THE
ENGINE
130) 131) 132)
24)
Before starting the engine, adjust the
seat, the interior rear view mirrors, the
door mirrors and fasten the seat belt
correctly.
Never press the accelerator pedal for
starting the engine.
For starting procedure see “Starting the
engine” in “Getting to know your
vehicle” chapter.
STOPPING THE ENGINE
Proceed as follows:
park the car in a position that is not
dangerous for oncoming traffic; engage
a gear (versions with manual
transmission) or position the gear lever
to P (Parking) (versions with automatic
transmission);
turn the ignition device to STOP with
the engine idling.
WARNING
130)It is dangerous to run the engine in
enclosed areas. The engine takes in
oxygen and releases carbon dioxide,
carbon monoxide and other toxic gases.131)The brake servo is not active until the
engine is started, so you would need to
apply much more force than usual to the
brake pedal.
132)Do not start the engine by pushing,
towing or driving downhill. These
manoeuvres may damage the catalytic
converter.
IMPORTANT
24)A quick burst on the accelerator before
turning off the engine serves absolutely no
practical purpose; it wastes fuel and is
damaging for the engine.
PARKING
Keep away the key when leaving the
vehicle and take it with you.
When parking and leaving the vehicle,
proceed as follows:
engage a gear (first gear if facing
uphill or reverse if facing downhill) and
leave the wheels turned;
stop the engine and engage the
handbrake.
Block the wheels with a wedge or a
stone if the car is parked on a steep
slope.
On versions equipped with automatic
transmission, before releasing the brake
pedal, wait for letter P to be displayed.
IMPORTANT NEVER leave the vehicle
with the gearbox in neutral (or, on
versions equipped with automatic
transmission, before placing the gear
lever at P).
110
STARTING AND OPERATING
Page 114 of 224

MANUAL
TRANSMISSION
136) 137) 138)
25)
To engage the gears, press the clutch
pedal fully and put the gear lever into
the required position. The diagram for
gear engagement is shown on the knob
fig. 85.
Depress the clutch pedal all the way
down while shifting; then release it
slowly.
Your vehicle is equipped with a device
to prevent shifting to R (reverse) by
mistake. Push the shift lever downward
and shift to R.
If shifting to R is difficult, shift back into
neutral, release the clutch pedal, and try
again.With Parking Sensor system
When the shift lever is shifted to the R
position with the ignition switched ON,
the parking sensor system is activated
and a beep sound is heard.IMPORTANT Keep your foot off the
clutch pedal except when shifting
gears. Also, do not use the clutch to
hold the vehicle on an upgrade. Riding
the clutch will cause needless clutch
wear and damage.
IMPORTANT Do not apply any
excessive lateral force to the shift lever
when changing from 5
thto 4thgear.
This could lead to the accidental
selection of 2
ndgear, which could
result in damage to the transmission.
IMPORTANT Make sure the vehicle
comes to a complete stop before
shifting to R. Shifting to R while the
vehicle is still moving may damage the
transmission.
IMPORTANT Reverse can only be
engaged when the vehicle is completely
stationary. With the engine running, wait
at least 2 seconds with the clutch pedal
fully pressed before engaging reverse to
prevent damage to the gears and
grating.
WARNING
136)Depress the clutch pedal fully to
change gear correctly. Therefore, the floor
area underneath the pedal unit must not be
obstructed in any way. Ensure that the floor
mat is always laid flat and does not
interfere with use of the pedals.
137)Do not use sudden engine braking on
slippery road surfaces or at high speeds.
Shifting down while driving on wet, snowy,
or frozen roads, or while driving at high
speeds causes sudden engine braking,
which is dangerous. The sudden change in
tyre speed could cause the tyres to skid.
This could lead to loss of vehicle control
and an accident.
138)Always leave the shift lever in 1 or R
position and set the parking brake when
leaving the vehicle unattended. Otherwise
the vehicle could move and cause an
accident.
IMPORTANT
25)Do not drive with your hand resting on
the gear lever as the force exerted, even if
slight, could lead over time to premature
wear of the gearbox internal components.8505987654-12A-001AB
112
STARTING AND OPERATING
Page 115 of 224

AUTOMATIC
TRANSMISSION
(where provided)
VARIOUS LOCKOUTS
To shift from P to R you must depress
the brake pedal and hold in the
lock-release button to shift (the ignition
must be switched ON).
To shift from R to N, from N to D (or D
to N), from D to M (or M to D) and from
M to + and - the selector lever can be
shifted freely into any position.
To shift from N to R and from R to P
you must hold in the lock-release
button fig. 86 to shift.
Sport mode
The Sport automatic transmission has
an option that is not included in the
traditional automatic transmission that
gives the driver the option of selecting
each gear instead of leaving it to the
transmission to shift gears. Even if you
intend to use the automatic
transmission functions as a traditional
automatic, you should also be aware
that you can inadvertently shift into
manual shift mode and an inappropriate
gear may be retained as the vehiclespeed increases. If you notice the
engine speed going higher or hear the
engine racing, confirm you have not
accidentally slipped into manual shift
mode.
GEAR LEVER POSITIONS
P (Park)
139) 140)
P locks the transmission and prevents
the rear wheels from rotating. The
selector lever must be in P or N to
operate the starter.
IMPORTANT Shifting into P, N or R
while the vehicle is moving can damage
your transmission.
IMPORTANT Shifting into a driving gear
or reverse when the engine is running
faster than idle can damage the
transmission.
R (Reverse)
In position R, the vehicle moves only
backward. You must be at a complete
stop before shifting to or from R, except
under rare circumstances.
With Parking Sensor system: when
the selector lever is shifted to the R
position with the ignition switched ON,
the parking sensor system is activated
and a beep sound is heard.
8605210200-LHD12AT-001AB
113
Page 116 of 224

N (Neutral)
141)
In N, the wheels and transmission are
not locked. The vehicle will roll freely
even on the slightest incline unless the
parking brake or brakes are on.
IMPORTANT Do not shift into N when
driving the vehicle. Doing so can cause
transaxle damage. Apply the parking
brake or depress the brake pedal
before moving the selector lever from N
to prevent the vehicle from moving
unexpectedly.
D (Drive)
D is the normal driving position. From a
stop, the transmission will automatically
shift through a 6-gear sequence.
M (Manual)
M is the manual shift mode position.
Gears can be shifted up or down by
operating the selector lever. Refer to
“Manual shift mode”.
SHIFT-LOCK SYSTEM
The shift-lock system prevents shifting
out of P unless the brake pedal is
depressed.
To shift from P:
depress and hold the brake pedal;
start the engine;
press and hold the lock-release
button;
move the selector lever.
When the ignition is switched to ACC or
the ignition is switched off, the selector
lever cannot be shifted from P.
The ignition cannot be switched to OFF
if the selector lever is not in P.
SHIFT-LOCK OVERRIDE
If the selector lever will not move from P
using the proper shift procedure,
continue to hold down the brake pedal.
Proceed as follows:
remove the shift-lock override cover
using a cloth-wrapped flat head
screwdriver fig. 87;
insert a screwdriver and push it
down;
press and hold the lock-release
button and move the selector lever;
take the vehicle to an Abarth
Dealership.For some versions
Proceed as follows:
press the lock-release button with
the button pressed fig. 88;
move the selector lever;
take the vehicle to an Abarth
Dealership.
MANUAL SHIFT MODE
To change to manual shift mode, shift
the lever from D to M. To return to
automatic shift mode, shift the lever
fromMtoD.
IMPORTANT Changing to manual shift
mode while driving will not damage the
transmission.
IMPORTANT If you change to manual
shift mode when the vehicle is stopped,
the gear may shift to M1.
IMPORTANT If you change to manual
shift mode without depressing the
8705210206-12A-002AB
8805210206-122-001AB
114
STARTING AND OPERATING
Page 119 of 224

NOTE When the ignition is switched off,
the sport mode is cancelled.
NOTE Depending on the driving
conditions when sport mode is
selected, the vehicle may perform
shift-down or slightly accelerate.CRUISE CONTROL
This is an electronically controlled
driving assistance device that allows the
desired vehicle speed to be maintained,
without having to press the accelerator
pedal.
This device can be used at a speed
above 25 km/h on long stretches of dry,
straight roads with few variations (e.g.
motorways).
It is therefore not recommended to use
this device on extra-urban roads with
traffic. Do not use it in town.
ACTIVATION /
DEACTIVATION
145) 146) 147) 148)
IMPORTANT When the ignition is
switched off, the system status before it
was turned off is maintained. For
example, if the ignition is switched off
while the cruise control is operating, the
system will be operable when the
ignition is switched ON the next time.
Activating the device
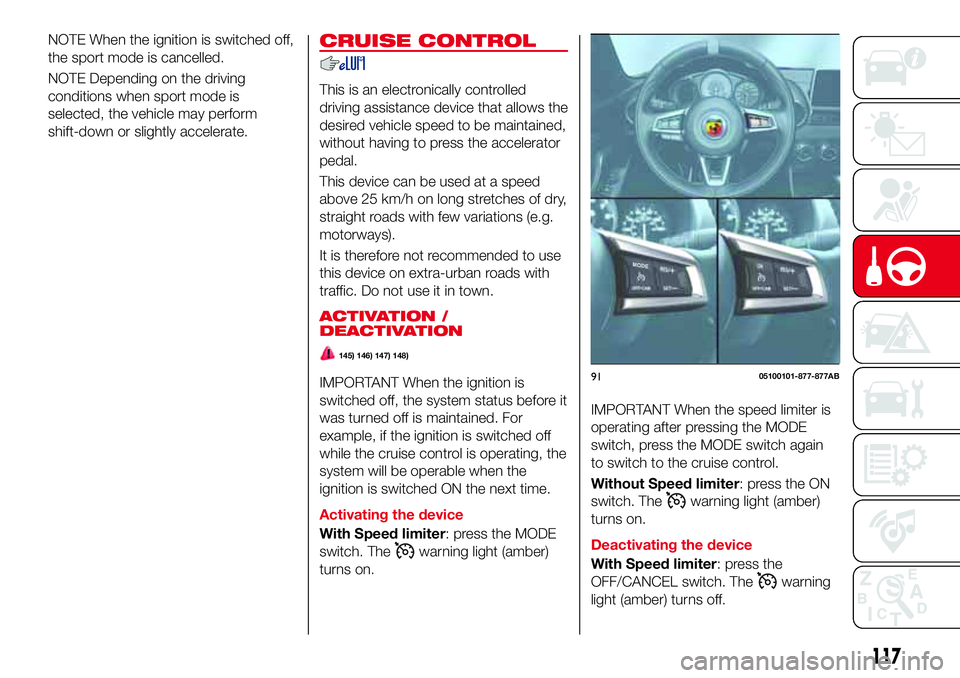
With Speed limiter: press the MODE
switch. The
warning light (amber)
turns on.
IMPORTANT When the speed limiter is
operating after pressing the MODE
switch, press the MODE switch again
to switch to the cruise control.
Without Speed limiter: press the ON
switch. The
warning light (amber)
turns on.
Deactivating the device
With Speed limiter: press the
OFF/CANCEL switch. The
warning
light (amber) turns off.
9105100101-877-877AB
117
Page 125 of 224

PARKING SENSOR
SYSTEM
(where provided)
151) 152)
26) 27) 28)
The parking sensor system uses
4 ultrasonic sensors (2 rear sensors and
2 rear corner sensors) fig. 96 to detect
obstructions around the vehicle while
parking the vehicle in a garage or
during parallel parking when the shift
lever (manual transmission)/selector
lever (automatic transmission) is in
reverse (R).
SENSOR DETECTION
RANGE
The sensors detect obstructions within
the following range:
Lateral detection range: about
50 cm
Rear detection range: about
150 cm
SYSTEM OPERATION
When the ignition is switched ON and
the shift lever (manual transmission)/
selector lever (automatic transmission)
is shifted to the reverse (R), the beep
sound activates and the system is
enabled for use.
9605200100-121-001AB
123
Page 128 of 224

WARNING
153)When removing the fuel filler cap,
loosen the cap slightly and wait for any
hissing to stop, then remove it: fuel spray is
dangerous. Fuel can burn skin and eyes
and cause illness if ingested. Fuel spray is
released when there is pressure in the fuel
tank and the fuel filler cap is removed too
quickly.
154)Before refuelling, stop the engine, and
always keep sparks and flames away from
the filler neck: fuel vapour is dangerous. It
could be ignited by sparks or flames
causing serious burns and injuries.
Additionally, use of the incorrect fuel filler
cap or not using a fuel filler cap may result
in a fuel leak, which could result in serious
burns or death in an accident.155)Do not continue refuelling after the
fuel pump nozzle shuts off automatically:
continuing to add fuel after the fuel pump
nozzle has shut off automatically is
dangerous because overfilling the fuel tank
may cause fuel overflow or leakage. Fuel
overflow and leakage could damage the
vehicle and if the fuel ignites it could cause
a fire and explosion resulting in serious
injury or death.
156)Do not apply any object/plug to the
end of the filler which is not provided for
the car. The use of non-compliant
objects/plugs could cause a pressure
increase inside the tank, resulting in
dangerous situations.
157)Do not bring naked flames or lit
cigarettes near to the fuel filler: fire risk.
Keep your face away from the fuel filler to
prevent breathing in harmful vapours.
158)Do not use a mobile phone near the
refuelling pump: risk of fire.
REAR CAMERA
(PARKVIEW REAR
BACKUP CAMERA)
(where provided)
OPERATION
159)
29)
The camera is located on the tailgate
fig. 101.
Switching to the rear view monitor
display
Shift the selector lever or shift lever to
reverse (R) with the ignition switched
ON to switch the display to the rear
view monitor display.10008100100-122-001AB
10107040110-124-008AB
126
STARTING AND OPERATING
Page 139 of 224

Front direction indicator lights
Proceed as follows:
if you are changing the right bulb,
start the engine, turn the steering wheel
all the way to the right, and turn off
engine. If you are changing the left bulb,
turn the steering wheel to the left.
make sure the ignition is switched
off, and the headlight switch is off;
remove the fasteners in the five
locations fig. 110, and partially peel
back the mud guard;
disconnect the connector from the
unit by pressing the tab on the
connector with your finger and pulling
the connector;
turn the socket and bulb assembly 1
fig. 111 counterclockwise and remove
it;
disconnect the bulb 2 from the
socket;
install the new bulb in the reverse
order of the removal procedure.Fog lights
Proceed as follows:
if you are changing the right bulb,
start the engine, turn the steering wheel
all the way to the right, and turn off
engine. If you are changing the left bulb,
turn the steering wheel to the left;
make sure the ignition is switched
off, and the headlight switch is off;
remove the fasteners in the five
locations and partially peel back the
mud guard;
disconnect the connector from the
unit by pressing the tab on the
connector with your finger and pulling
the connector;
turn the socket 1 fig. 112 and bulb
assembly counterclockwise, extract the
bulb 2 and remove it;
disconnect the bulb from the socket;
install the new bulb in the reverse
order of the removal procedure.
10908020499-000-010AB
11007031501-206-002AB
11107031501-207-001AB11207031501-208-001AB
137