ignition Abarth 124 Spider 2017 Owner handbook (in English)
[x] Cancel search | Manufacturer: ABARTH, Model Year: 2017, Model line: 124 Spider, Model: Abarth 124 Spider 2017Pages: 220, PDF Size: 2.9 MB
Page 143 of 220

163)Halogen bulbs contain pressurised
gas, in the case of breakage they may
burst causing glass fragments to be
projected outwards.
164)Only replace bulbs when the engine is
off. Also ensure that the engine is cold, to
prevent the risk of burns.
IMPORTANT
30)Where possible, it is advisable to have
bulbs changed at Abarth Dealership.
Proper operation and direction of the
external lights are essential for driving in
safety and comply with law.
31)Halogen bulbs must be handled
holding the metallic part only. Touching the
transparent part of the bulb with your
fingers may reduce the intensity of the
emitted light and even reduce the lifespan
of the bulb. In the event of accidental
contact, wipe the bulb with a cloth
moistened with alcohol and let the bulb dry
REPLACING FUSES
GENERAL INFORMATION
165) 166) 167) 168) 169)
32) 33)
Fuse location
Fuses are grouped together in two fuse
boxes located on the left side of the
vehicle and under the bonnet.
FUSES ON THE LEFT
SIDE OF THE VEHICLE
Proceed as follows:
make sure the ignition is switched
off, and other switches are off;
open the fuse panel cover
fig. 125 (located near the door);
press retaining clip and remove
protection cover;
pull the fuse straight out with the fuse
puller provided on the fuse block
located in the engine compartment
fig. 126;
inspect the fuse and replace it if it is
blown;
insert a new fuse of the same
amperage rating, and make sure it fits
tightly. If it does not fit tightly, contact an
Abarth Dealership. If you have no spare
fuses, borrow one of the same rating
from a circuit not essential to vehicle
operation, such as the AUDIO or
OUTLET circuit;
reinstall the cover and make sure that
it is securely installed.
IMPORTANT Always replace a fuse with
a genuine FCA fuse or equivalent of the
same rating. Otherwise you may
damage the electric system.12507031601-121-001AB
12607031601-122-001AB
141
Page 144 of 220

FUSES UNDER THE
BONNET
Make sure the ignition is switched off,
and other switches are off and remove
the fuse block cover. If the lock is
forcefully opened, the fuse block cover
may come in contact with the frame
when it is removed and become
scratched.When removing the cover, remove it
slowly according to the following
procedure:disengage the rear lock 1 fig. 127 by
pressing down on the front tab with
your fingers;
remove the front tab while slightly
lifting the front of the cover 2;
remove the cover while lifting it and
sliding it to the rear;
if any fuse but the MAIN fuse is
blown, replace it with a new one of the
same amperage rating;
reinstall the cover and make sure that
it is securely installed.
12707031601-123-001AB
142
IN CASE OF EMERGENCY
Page 150 of 220

WARNING
165)If the fuse blows again contact an
Abarth Dealership.
166)Never replace a fuse with another
with a higher amp rating; DANGER OF
FIRE.
167)Contact an Abarth Dealership if a
safety system (airbags, brakes), power unit
system (engine, gearbox) or steering
system general protection fuse blows.
168)Do not replace the main fuse and
multiplex slow blow fuse by yourself.
Contact an Abarth Dealership to perform
the replacement. Replacing these fuses by
yourself is dangerous because they are
high current fuses. Incorrect replacement
could cause an electrical shock or a short
circuit resulting in a fire.
169)Before replacing a fuse, make sure
that the ignition device is in OFF position
and that all the other services are switched
off and/or deactivated.
IMPORTANT
32)Never replace a fuse with metal wires
or anything else.
33)If it is necessary to wash the engine
compartment, take care not to directly hit
the junction unit and the window wiper
motors with the water jet.
TIRE SERVICE KIT
(where provided)
170) 171) 172) 173) 174) 175) 176)
3)
TOOL STORAGE
Your vehicle is not equipped with a
spare tire, jack and wheel brace. For
details, contact an Abarth Dealership.
Tools are stored in the locations
illustrated in fig. 130:
1: jack lever;
2: towing eyelet
Inside the boot lid is also located the
emergency flat tire repair kit.
TIRE SERVICE STORAGE
The tire service kit is located inside the
boot lid fig. 131.
IMPORTANT Your vehicle is not
equipped with a spare tire. In the event
of a flat tire, use the tire service kit to
repair the tire temporarily. When doing
the repair, refer to the instructions
included in the tire service kit. If an
emergency repair was performed on a
flat tire using the tire service kit, contact
an Abarth Dealership, repair or replace
the tire as soon as possible.
TIRE SERVICE KIT
COMPONENTS AND
OPERATION
The tire service kit includes the
following items:
tire sealant;
compressor;
valve core tool;
injection hose;
spare valve core;
speed restriction sticker;
instruction handbook.
13008020100-733-733AB
13108020202-121-003AB
148
IN CASE OF EMERGENCY
Page 153 of 220

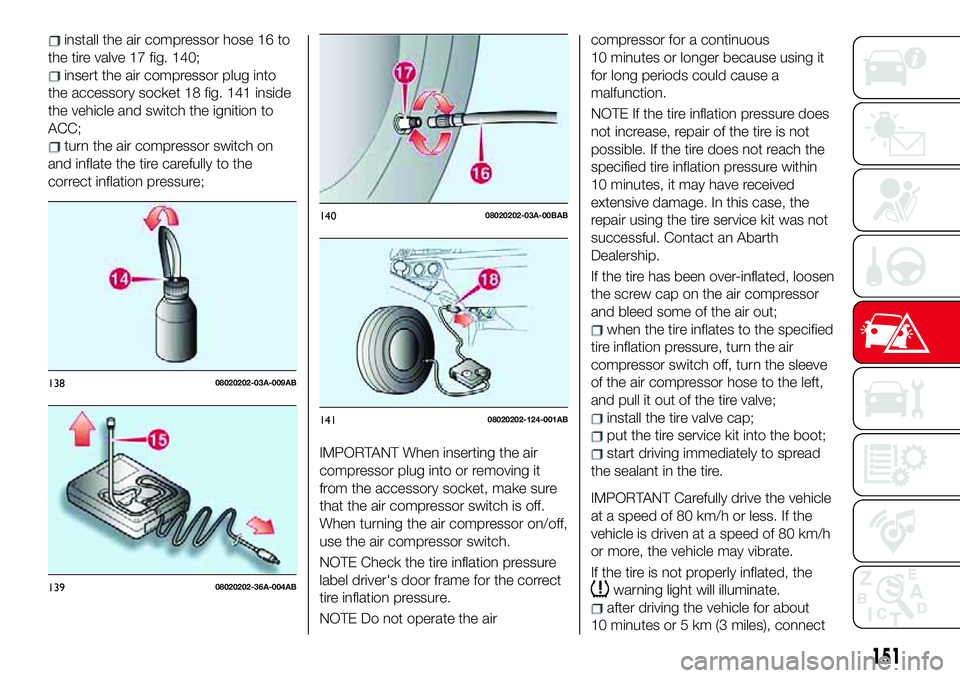
install the air compressor hose 16 to
the tire valve 17 fig. 140;
insert the air compressor plug into
the accessory socket 18 fig. 141 inside
the vehicle and switch the ignition to
ACC;
turn the air compressor switch on
and inflate the tire carefully to the
correct inflation pressure;
IMPORTANT When inserting the air
compressor plug into or removing it
from the accessory socket, make sure
that the air compressor switch is off.
When turning the air compressor on/off,
use the air compressor switch.
NOTE Check the tire inflation pressure
label driver's door frame for the correct
tire inflation pressure.
NOTE Do not operate the aircompressor for a continuous
10 minutes or longer because using it
for long periods could cause a
malfunction.
NOTE If the tire inflation pressure does
not increase, repair of the tire is not
possible. If the tire does not reach the
specified tire inflation pressure within
10 minutes, it may have received
extensive damage. In this case, the
repair using the tire service kit was not
successful. Contact an Abarth
Dealership.
If the tire has been over-inflated, loosen
the screw cap on the air compressor
and bleed some of the air out;
when the tire inflates to the specified
tire inflation pressure, turn the air
compressor switch off, turn the sleeve
of the air compressor hose to the left,
and pull it out of the tire valve;
install the tire valve cap;
put the tire service kit into the boot;
start driving immediately to spread
the sealant in the tire.
IMPORTANT Carefully drive the vehicle
at a speed of 80 km/h or less. If the
vehicle is driven at a speed of 80 km/h
or more, the vehicle may vibrate.
If the tire is not properly inflated, the
warning light will illuminate.
after driving the vehicle for about
10 minutes or 5 km (3 miles), connect
13808020202-03A-009AB
13908020202-36A-004AB
14008020202-03A-00BAB
14108020202-124-001AB
151
Page 155 of 220

IMPORTANT
3)Dispose of the bottle and the sealant
liquid properly. Have them disposed of in
compliance with national and local
regulations.
JUMP STARTING
PREPARATIONS FOR
JUMP STARTING
177) 178) 179) 180) 181) 182) 183) 184) 185) 186)
34)
Jump-starting is dangerous if done
incorrectly. So follow the procedure
carefully fig. 142. If you feel unsure
about jump-starting, we strongly
recommend that you have a competent
service technician do the work.
IMPORTANT When using booster
battery is used, comply with the
utilisation and precaution instructions
specified by the producer.
IMPORTANT Do not use the booster
battery or any other source of external
supply with a voltage above 12 V: the
battery, the starter, the alternator and
the electrical system of the vehicle
could be damaged. You can damage a
12 V starter, ignition system, and other
electrical parts beyond repair with a
24 V power supply (two 12 V batteries
in series or a 24 V motor generator set).
14208030100-121-001-1AB
153
Page 156 of 220

IMPORTANT Do not attempt jump
starting if the battery is wet. The battery
could break and explode!
JUMP-STARTING
PROCEDURE
IMPORTANT If the procedure below is
carried out incorrectly can cause severe
injuries to people or damage the
recharging system of one or both
vehicles. Carefully follow the
instructions given below.
Proceed as follows to carry out a jump
starting:
remove the battery cover fig. 143;
make sure the booster battery is
12 V and that its negative terminal is
grounded;
if the booster battery is in another
vehicle, do not allow both vehicles to
touch. Turn off the engine of the vehicle
with the booster battery and all
unnecessary electrical loads in both
vehicles;
connect the jumper leads in the
exact sequence as in “Preparations for
jump starting” paragraph:
–connectoneendofaleadtothe
positive terminal on the discharged
battery;
– attach the other end to the positive
terminal on the booster battery;
– connect one end of the other lead
to the negative terminal of the
booster battery;
– connect the other end to the
ground point indicated in the
illustration away from the
discharged battery.
start the engine of the booster
vehicle and run it a few minutes. Then
start the engine of the other vehicle;
when finished, carefully disconnect
the leads in the reverse order as
previously described;
if the battery cover has been
removed, install it in the reverse order of
removal.
IMPORTANT Verify that the covers are
securely installed.
IMPORTANT Perform the phonic wheel
learning procedure described in the
“Battery maintenance” section (see the
“Maintenance and care” chapter).
WARNING
177)Before opening the bonnet, make
sure that the engine is off and that the
ignition switch is in OFF position. During
refuelling, make sure that the engine is off
(and that the ignition switch is in OFF
position).
178)Do not get too close to the radiator
cooling fan: the electric fan may start;
danger of injury. Pay attention to scarves,
ties and other loose clothing which might
be pulled by moving parts.
179)Remove any metal objects (e.g. rings,
watches, bracelets), that might cause an
accidental electrical contact and cause
serious injury.
180)Batteries contain acid which may
burn skin and eyes. Batteries produce
hydrogen, which is easily flammable and
explosive. Thus keep away flames or
devices which may cause sparks.
14308030100-122-001AB
154
IN CASE OF EMERGENCY
Page 158 of 220

IMPORTANT Do not use excessive
force as it may damage the cap or
scratch the painted bumper surface.
IMPORTANT Remove the cap
completely and store it so as not to lose
it.
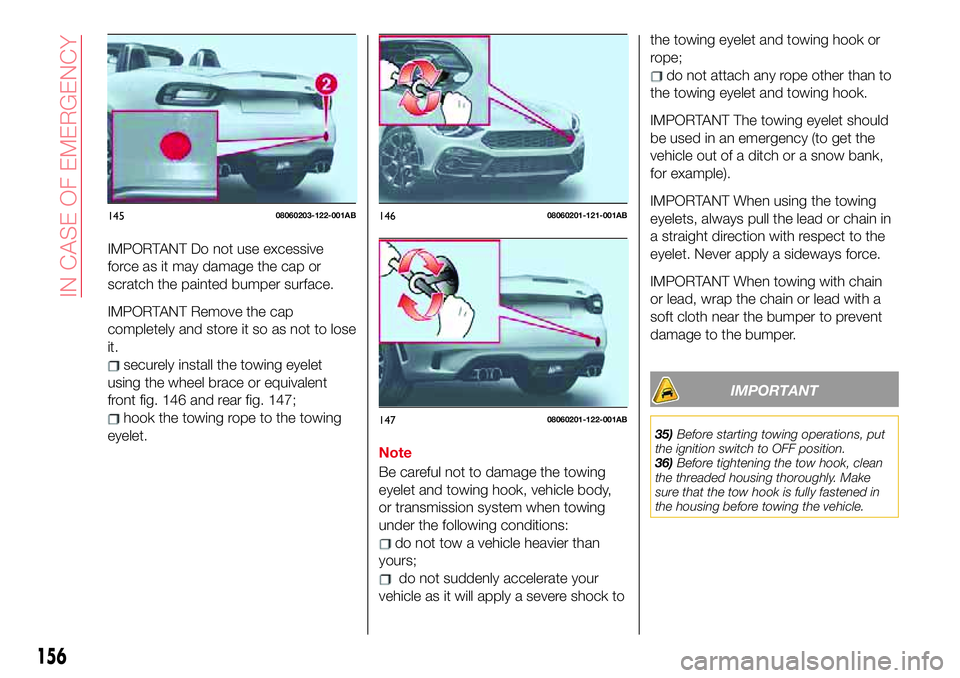
securely install the towing eyelet
using the wheel brace or equivalent
front fig. 146 and rear fig. 147;
hook the towing rope to the towing
eyelet.
Note
Be careful not to damage the towing
eyelet and towing hook, vehicle body,
or transmission system when towing
under the following conditions:
do not tow a vehicle heavier than
yours;
do not suddenly accelerate your
vehicle as it will apply a severe shock tothe towing eyelet and towing hook or
rope;
do not attach any rope other than to
the towing eyelet and towing hook.
IMPORTANT The towing eyelet should
be used in an emergency (to get the
vehicle out of a ditch or a snow bank,
for example).
IMPORTANT When using the towing
eyelets, always pull the lead or chain in
a straight direction with respect to the
eyelet. Never apply a sideways force.
IMPORTANT When towing with chain
or lead, wrap the chain or lead with a
soft cloth near the bumper to prevent
damage to the bumper.
IMPORTANT
35)Before starting towing operations, put
the ignition switch to OFF position.
36)Before tightening the tow hook, clean
the threaded housing thoroughly. Make
sure that the tow hook is fully fastened in
the housing before towing the vehicle.
14508060203-122-001AB14608060201-121-001AB
14708060201-122-001AB
156
IN CASE OF EMERGENCY
Page 159 of 220

37)The front and rear tow hooks should be
used only for emergencies on the road. You
are allowed to tow the vehicle for short
distances using an appropriate device in
accordance with the highway code (a rigid
bar), to move the vehicle on the road in
readiness for towing or transport via a
breakdown vehicle. Tow hooks MUST NOT
be used to tow vehicles off the road or
where there are obstacles and/or for
towing operations using ropes or other
non-rigid devices. Respecting the above
conditions, towing must take place with
two vehicles (one towing, the other towed)
aligned as much as possible along the
same center line.EMERGENCY
TOWING
TOWING DESCRIPTION
Proper lifting and towing are necessary
to prevent damage to the vehicle.
Government and local laws must be
followed.
A towed vehicle usually should have its
drive wheels (rear wheels) off the
ground. If excessive damage or other
conditions prevent this, use wheel
dollies.
When towing with the rear wheels on
the ground, release the parking brake.
IMPORTANT Do not tow the vehicle
pointed backward with driving wheels
on the ground. This may cause internal
damage to the transmission.
IMPORTANT Do not tow with sling-type
equipment. This could damage your
vehicle. Use wheel-lift or flatbed
equipment.
If towing service is not available in an
emergency, the vehicle may be towed
with all four wheels on the ground using
the towing hook at the front of the
vehicle. Only tow the vehicle on paved
surfaces for short distances at low
speeds.Follow these instructions when towing
the vehicle with all wheels on the
ground:
shift to neutral (manual transmission),
or the N position (automatic
transmission);
switch the ignition to ACC;
release the parking brake.
NOTE Remember that power assist for
the brakes and steering will not be
available when the engine is not
running.
157
Page 161 of 220

INTRODUCTION
Be extremely careful and prevent injury
to yourself and others or damage to
your vehicle when using this manual for
inspection and maintenance.
If you are unsure about any procedure it
describes, we strongly urge you to have
a reliable and qualified service shop
perform the work, preferably at Abarth
Dealership.
Factory-trained FCA technicians and
genuine FCA parts are best for your
vehicle. Without this expertise and the
parts that have been designed and
made especially for your vehicle,
inadequate, incomplete, and insufficient
servicing may result in problems. This
could lead to vehicle damage or an
accident and injuries.
For expert advice and quality service,
contact an Abarth Dealership.
The owner should retain evidence that
proper maintenance has been
performed as prescribed.
A claim against a warranty will not
qualify if it results from lack of
maintenance and not from defective
material or authorised workmanship.
Claims against the warranty resulting
from lack of maintenance, as opposed
to defective materials or authorized FCA
workmanship, will not be honored.Scheduled maintenance
NOTE After the prescribed period,
continue to follow the described
maintenance at the recommended
intervals.
Emission control and related
systems
The ignition and fuel systems are highly
important to the emission control
system and to efficient engine
operation. Do not tamper with them.
All inspections and adjustments must
be made by Abarth Dealership.
OWNER MAINTENANCE
PRECAUTIONS
187) 188) 189)
38)
Routine service
We highly recommend that these items
be inspected daily, or at least every
week:
Engine oil level
Engine coolant level
Brake and clutch fluid Level
Washer fluid level
Battery maintenance
Tire inflation pressure
Improper or incomplete service may
result in problems. This section gives
instructions only for items that are easy
to perform.As explained in the “Introduction”
paragraph, several procedures can be
done only by a qualified service
technician with special tools.
Improper do-it yourself maintenance
during the warranty period may affect
warranty coverage. For details, read the
separate Warranty statement provided
with the vehicle. If you are unsure about
any servicing or maintenance
procedure, have it done by Abarth
Dealership.
There are strict environmental laws
regarding the disposal of waste oil and
fluids. Please dispose of your waste
properly and with due regard to the
environment.
We recommend that you entrust the oil
and fluid changes of your vehicle to an
Abarth Dealership.
159
Page 166 of 220

WARNING
187)Do not perform maintenance work if
you lack sufficient knowledge and
experience or the proper tools and
equipment to do the work. Have
maintenance work done by a qualified
technician. Performing maintenance work
on a vehicle is dangerous if not done
properly. You can be seriously injured while
performing some maintenance procedures.
188)If you must run the engine while
working under the bonnet, make certain
that you remove all jewelry (especially
rings, bracelets, watches, and necklaces)
and all neckties, scarves, and similar loose
clothing before getting near the engine or
cooling fan which may turn on
unexpectedly. Either can become
entangled in moving parts and result in
injury.
189)Switch the ignition to off and make
sure the fan is not running before
attempting to work near the cooling fan.
Working near the cooling fan when it is
running is dangerous. The fan could
continue running indefinitely even if the
engine has stopped and the engine
compartment temperature is high. You
could be hit by the fan and seriously
injured.
IMPORTANT
38)Do not leave items in the engine
compartment. After you have finished
checking or doing servicing in the engine
compartment, do not forget and leave
items such as tools or rags in the engine
compartment. Tools or other items left in
the engine compartment could cause
engine damage or a fire leading to an
unexpected accident.
164
MAINTENANCE AND CARE