fuel Abarth 124 Spider 2018 Owner handbook (in English)
[x] Cancel search | Manufacturer: ABARTH, Model Year: 2018, Model line: 124 Spider, Model: Abarth 124 Spider 2018Pages: 220, PDF Size: 2.91 MB
Page 53 of 220
press the INFO switch and set the
two lower digits (tenths and ones place)
to the desired vehicle speed. The
numerical value changes each time the
INFO switch is pressed;
press the INFO switch continuously
until a beep sound is heard. The set
vehicle speed is displayed on the
vehicle speed alarm screen.
GEAR SHIFT INDICATOR
The gear shift indicator supports you to
obtain optimum fuel economy and
smooth driving.
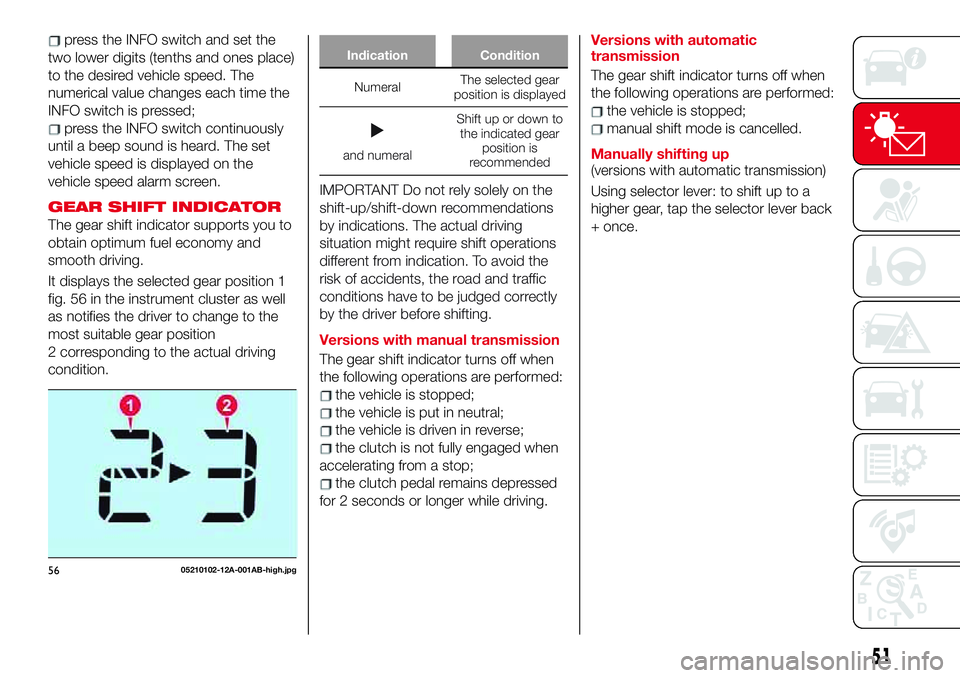
It displays the selected gear position 1
fig. 56 in the instrument cluster as well
as notifies the driver to change to the
most suitable gear position
2 corresponding to the actual driving
condition.
Indication Condition
NumeralThe selected gear
position is displayed
and numeralShift up or down to
the indicated gear
position is
recommended
IMPORTANT Do not rely solely on the
shift-up/shift-down recommendations
by indications. The actual driving
situation might require shift operations
different from indication. To avoid the
risk of accidents, the road and traffic
conditions have to be judged correctly
by the driver before shifting.
Versions with manual transmission
The gear shift indicator turns off when
the following operations are performed:
the vehicle is stopped;
the vehicle is put in neutral;
the vehicle is driven in reverse;
the clutch is not fully engaged when
accelerating from a stop;
the clutch pedal remains depressed
for 2 seconds or longer while driving.Versions with automatic
transmission
The gear shift indicator turns off when
the following operations are performed:
the vehicle is stopped;
manual shift mode is cancelled.
Manually shifting up
(versions with automatic transmission)
Using selector lever: to shift up to a
higher gear, tap the selector lever back
+ once.
5605210102-12A-001AB-high.jpg
51
Page 55 of 220
For the following warning/indicator
lights:
Master warning light;
Brake system warning light;
ABS warning light;
Charging system warning light;
Engine oil warning light;
Check engine light;
High engine coolant temperature
warning light;
Automatic transmission warning light;
Power steering malfunction indicator
light;
Air Bag/Seat Belt pretensioner
system warning light;
Active bonnet warning light;
Low fuel warning light;
Seat belt warning light;
Seat belt warning light;
Door-ajar warning light;
Low washer fluid level warning light;
Tyre Pressure Monitoring System
warning light;
KEY warning light;
LED headlight KEY warning light;
Wrench indicator light;
TCS/DSC indicator light;
DSC OFF indicator light;
Security indicator light;
Passenger Air Bag deactivation
indicator light (where provided).The light turns on when the ignition is
switched on for an operation check,
and turns off a few seconds later or
when the engine is started. If the light
does not turn on or remains turned on,
contact an Abarth Dealership.
Only for “Brake system warning
light”: the light turns on continuously
when the parking brake is applied.
53
MAINTENANCE
MONITOR
(where provided)
Reset method
Proceed as follows:
select the iconon the home
screen to display the “Applications”
screen;
select “Maintenance” to display the
maintenance list screen;
switch the tab and select the setting
item you want to change: “Scheduled”,
“Tire rotation”, “Oil Change”.
Page 60 of 220
Amber warning lights
Warning light What it means
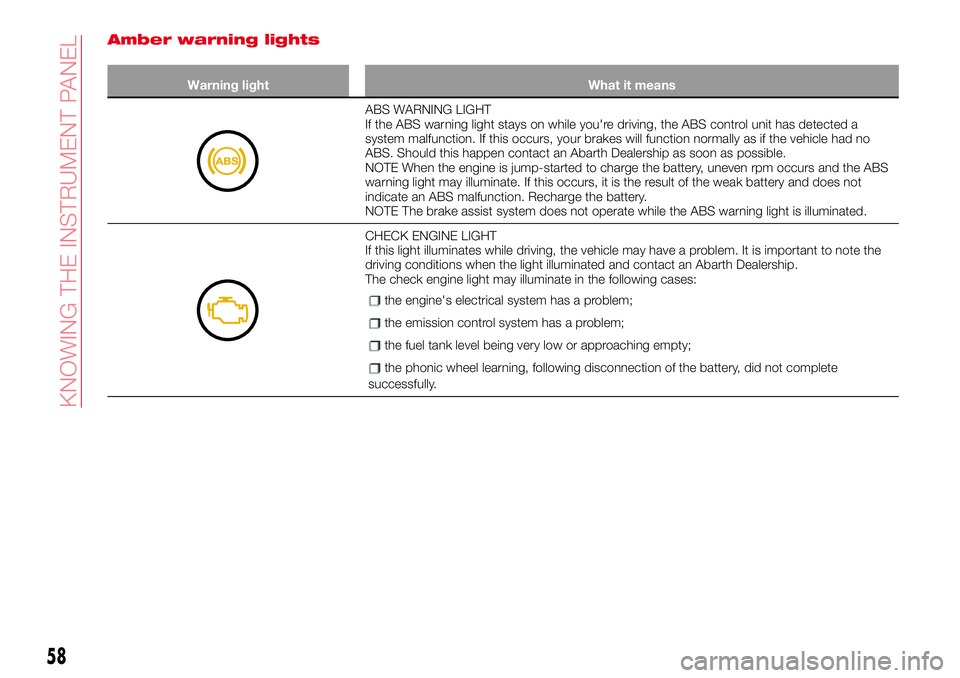
ABS WARNING LIGHT
If the ABS warning light stays on while you're driving, the ABS control unit has detected a
system malfunction. If this occurs, your brakes will function normally as if the vehicle had no
ABS. Should this happen contact an Abarth Dealership as soon as possible.
NOTE When the engine is jump-started to charge the battery, uneven rpm occurs and the ABS
warning light may illuminate. If this occurs, it is the result of the weak battery and does not
indicate an ABS malfunction. Recharge the battery.
NOTE The brake assist system does not operate while the ABS warning light is illuminated.
CHECK ENGINE LIGHT
If this light illuminates while driving, the vehicle may have a problem. It is important to note the
driving conditions when the light illuminated and contact an Abarth Dealership.
The check engine light may illuminate in the following cases:
the engine's electrical system has a problem;
the emission control system has a problem;
the fuel tank level being very low or approaching empty;
the phonic wheel learning, following disconnection of the battery, did not complete
successfully.
58
KNOWING THE INSTRUMENT PANEL
Page 63 of 220
Warning lights What it means
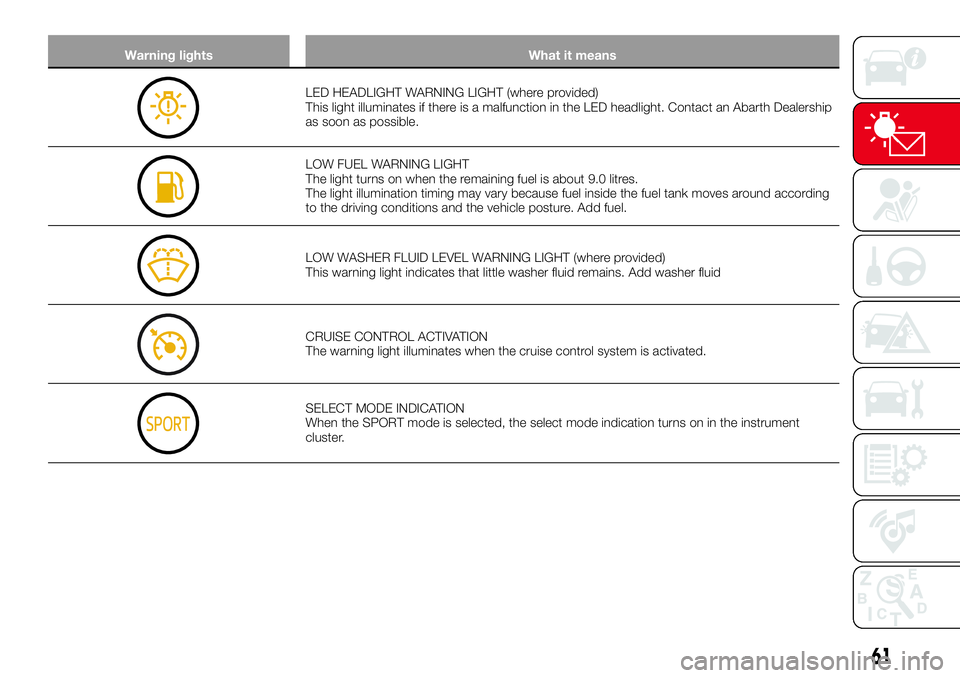
LED HEADLIGHT WARNING LIGHT (where provided)
This light illuminates if there is a malfunction in the LED headlight. Contact an Abarth Dealership
as soon as possible.
LOW FUEL WARNING LIGHT
The light turns on when the remaining fuel is about 9.0 litres.
The light illumination timing may vary because fuel inside the fuel tank moves around according
to the driving conditions and the vehicle posture. Add fuel.
LOW WASHER FLUID LEVEL WARNING LIGHT (where provided)
This warning light indicates that little washer fluid remains. Add washer fluid
CRUISE CONTROL ACTIVATION
The warning light illuminates when the cruise control system is activated.
SELECT MODE INDICATION
When the SPORT mode is selected, the select mode indication turns on in the instrument
cluster.
61
Page 74 of 220
74)The capability of the DSC system must
never be tested irresponsibly and
dangerously, in such a way as to
compromise personal safety and the safety
of others.
75)If the active bonnet has activated,
always contact an Abarth Dealership. If the
bonnet release handle is pulled after the
active bonnet has activated, the bonnet will
rise even further. If the vehicle is driven with
the bonnet raised it will obstruct visibility
and could result in an accident. In addition,
do not attempt to push the bonnet back
down. Otherwise, it could deform the
bonnet or cause injury because the
activated bonnet cannot be lowered
manually. Before driving the vehicle contact
an Abarth Dealership after the active
bonnet has activated, make sure that the
raised bonnet does not obstruct vision and
drive the vehicle at a low speed.AUXILIARY DRIVING
SYSTEMS
TPMS (Tire Pressure
Monitoring System)
76) 77) 78)
The Tire Pressure Monitoring System
(TPMS) monitors the pressure for each
tire. If tire pressure is too low in one or
more tires, the system will inform the
driver via the warning light in the
instrument cluster and by the warning
beep sound. Refer to “Warning lights
and messages” paragraph “Knowing
the instrument panel” chapter.
Refer to “Tire inflation pressure warning
beep” in “Warning sound is activated” in
Knowing the instrument panel” chapter.
The tire pressure sensors installed on
each wheel send tire pressure data by
radio signal to the receiver unit in the
vehicle.
NOTE When the ambient temperature is
low due to seasonal changes, tire
temperatures are also lower. When the
tire temperature decreases, the air
pressure decreases as well. The TPMS
warning light may illuminate more
frequently. Visually inspect the tires daily
before driving, and check tire pressures
monthly with a tire pressure gauge.
When checking tire pressures, use of adigital tire pressure gauge is
recommended.
TPMS does not alleviate your need to
check the pressure and condition of all
four tires regularly.IMPORTANT Each tire, including the
spare (where provided), should be
checked monthly when cold and
inflated to the inflation pressure
recommended by the vehicle
manufacturer on the vehicle placard or
tire inflation pressure label (if your
vehicle has tires of a different size than
the size indicated on the vehicle placard
or tire inflation pressure label, you
should determine the proper tire
inflation pressure for those tires).
IMPORTANT As an added safety
feature, your vehicle has been equipped
with a TMPS system that illuminates a
low tire pressure telltale when one or
more of your tires is significantly
under-inflated. Accordingly, when the
low tire pressure telltale illuminates, you
should stop and check your tires as
soon as possible, and inflate them to
the proper pressure. Driving on a
significantly under-inflated tire causes
the tire to overheat and can lead to tire
failure. Under-inflation also reduces fuel
efficiency and tire tread life, and may
affect the vehicle's handling and
stopping ability.
72
SAFETY
Page 111 of 220
STARTING AND OPERATING
Let’s get to the "heart" of the vehicle:
seeing how you can exploit all of its
potential to the full.
We’ll look at how to drive it safely in any
situation, so that it can be a welcome
companion, with our comfort and our
wallets in mind.STARTING THE ENGINE.......110
PARKING.................110
PARKING BRAKE............111
MANUAL TRANSMISSION......112
AUTOMATIC TRANSMISSION. . . .113
SPORTMODE..............116
CRUISE CONTROL...........117
SPEED LIMITER.............120
PARKING SENSOR SYSTEM.....123
REFUELLING THE VEHICLE.....125
REAR CAMERA (PARKVIEW REAR
BACKUP CAMERA)...........127
TOWING TRAILERS..........130
109
Page 112 of 220
STARTING THE
ENGINE
130) 131) 132)
24)
Before starting the engine, adjust the
seat, the interior rear view mirrors, the
door mirrors and fasten the seat belt
correctly.
Never press the accelerator pedal for
starting the engine.
For starting procedure see “Starting the
engine” in “Getting to know your
vehicle” chapter.
STOPPING THE ENGINE
Proceed as follows:
park the car in a position that is not
dangerous for oncoming traffic; engage
a gear (versions with manual
transmission) or position the gear lever
to P (Parking) (versions with automatic
transmission);
turn the ignition device to STOP with
the engine idling.
WARNING
130)It is dangerous to run the engine in
enclosed areas. The engine takes in
oxygen and releases carbon dioxide,
carbon monoxide and other toxic gases.
131)The brake servo is not active until the
engine is started, so you would need to
apply much more force than usual to the
brake pedal.
132)Do not start the engine by pushing,
towing or driving downhill. These
manoeuvres may damage the catalytic
converter.
IMPORTANT
24)A quick burst on the accelerator before
turning off the engine serves absolutely no
practical purpose; it wastes fuel and is
damaging for the engine.
PARKING
Keep away the key when leaving the
vehicle and take it with you.
When parking and leaving the vehicle,
proceed as follows:
engage a gear (first gear if facing
uphill or reverse if facing downhill) and
leave the wheels turned;
stop the engine and engage the
handbrake.
Block the wheels with a wedge or a
stone if the car is parked on a steep
slope.
On versions equipped with automatic
transmission, before releasing the brake
pedal, wait for letter P to be displayed.
IMPORTANT NEVER leave the vehicle
with the gearbox in neutral (or, on
versions equipped with automatic
transmission, before placing the gear
lever at P).
110
STARTING AND OPERATING
Page 127 of 220
REFUELLING THE
VEHICLE
153) 154) 155) 156) 157) 158)
Always stop the engine before
refuelling.
FUEL REQUIREMENTS
Only use premium unleaded fuel
(conforming to EN 228 specification
within E10) with a number of octanes
not lower than 95.
IMPORTANT USE ONLY UNLEADED
FUEL. Leaded fuel is harmful to the
catalytic converter and oxygen sensors
and will lead to deterioration of the
emission control system and or failures.
IMPORTANT The use of E10 fuel with
10% ethanol in Europe is safe for your
vehicle. Damage to your vehicle may
occur when ethanol exceeds this
recommendation.
IMPORTANT Never add fuel system
additives, otherwise the emission
control system could be damaged.
Contact an Abarth Dealership for
details.
REFUELLING
PROCEDURE
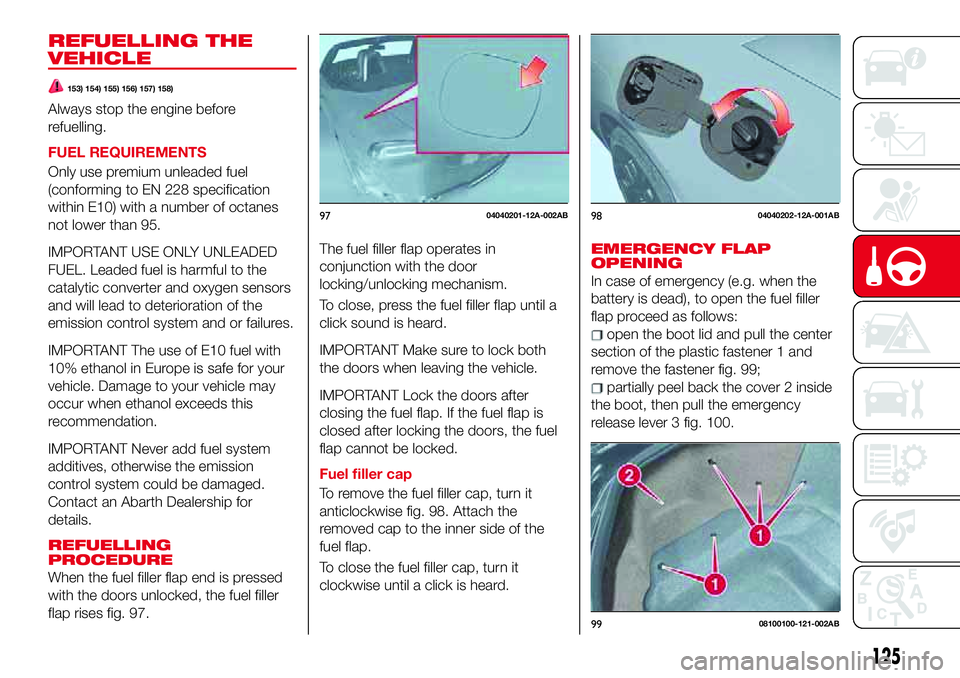
When the fuel filler flap end is pressed
with the doors unlocked, the fuel filler
flap rises fig. 97.The fuel filler flap operates in
conjunction with the door
locking/unlocking mechanism.
To close, press the fuel filler flap until a
click sound is heard.
IMPORTANT Make sure to lock both
the doors when leaving the vehicle.
IMPORTANT Lock the doors after
closing the fuel flap. If the fuel flap is
closed after locking the doors, the fuel
flap cannot be locked.
Fuel filler cap
To remove the fuel filler cap, turn it
anticlockwise fig. 98. Attach the
removed cap to the inner side of the
fuel flap.
To close the fuel filler cap, turn it
clockwise until a click is heard.
EMERGENCY FLAP
OPENING
In case of emergency (e.g. when the
battery is dead), to open the fuel filler
flap proceed as follows:
open the boot lid and pull the center
section of the plastic fastener 1 and
remove the fastener fig. 99;
partially peel back the cover 2 inside
the boot, then pull the emergency
release lever 3 fig. 100.
9704040201-12A-002AB9804040202-12A-001AB
9908100100-121-002AB
125
Page 128 of 220

WARNING
153)When removing the fuel filler cap,
loosen the cap slightly and wait for any
hissing to stop, then remove it: fuel spray is
dangerous. Fuel can burn skin and eyes
and cause illness if ingested. Fuel spray is
released when there is pressure in the fuel
tank and the fuel filler cap is removed too
quickly.
154)Before refuelling, stop the engine, and
always keep sparks and flames away from
the filler neck: fuel vapour is dangerous. It
could be ignited by sparks or flames
causing serious burns and injuries.
Additionally, use of the incorrect fuel filler
cap or not using a fuel filler cap may result
in a fuel leak, which could result in serious
burns or death in an accident.
155)Do not continue refuelling after the
fuel pump nozzle shuts off automatically:
continuing to add fuel after the fuel pump
nozzle has shut off automatically is
dangerous because overfilling the fuel tank
may cause fuel overflow or leakage. Fuel
overflow and leakage could damage the
vehicle and if the fuel ignites it could cause
a fire and explosion resulting in serious
injury or death.
156)Do not apply any object/plug to the
end of the filler which is not provided for
the car. The use of non-compliant
objects/plugs could cause a pressure
increase inside the tank, resulting in
dangerous situations.
157)Do not bring naked flames or lit
cigarettes near to the fuel filler: fire risk.
Keep your face away from the fuel filler to
prevent breathing in harmful vapours.
158)Do not use a mobile phone near the
refuelling pump: risk of fire.
10008100100-122-001AB
126
STARTING AND OPERATING
Fuels - identification of
vehicle compatibility
Symbol for consumer
information in
accordance with the
EN16942 specification
The symbols shown below help you to
recognise the correct type of fuel to use
in your vehicle. Before proceeding with
refuelling, check the symbols inside the
fuel filler flap (where provided) and
compare
them
with
the
symbols
shown
on the fuel pump (where provided).
E5: Unleaded petrol containing up to
2,7% (m/m) oxygen and with maximum
5,0% (V/V) ethanol compliant with the
EN228
E10: Unleaded petrol containing up to
3,7% (m/m) oxygen and with maximum
10,0% (V/V) ethanol compliant with the
EN228
specification
specification
Page 156 of 220
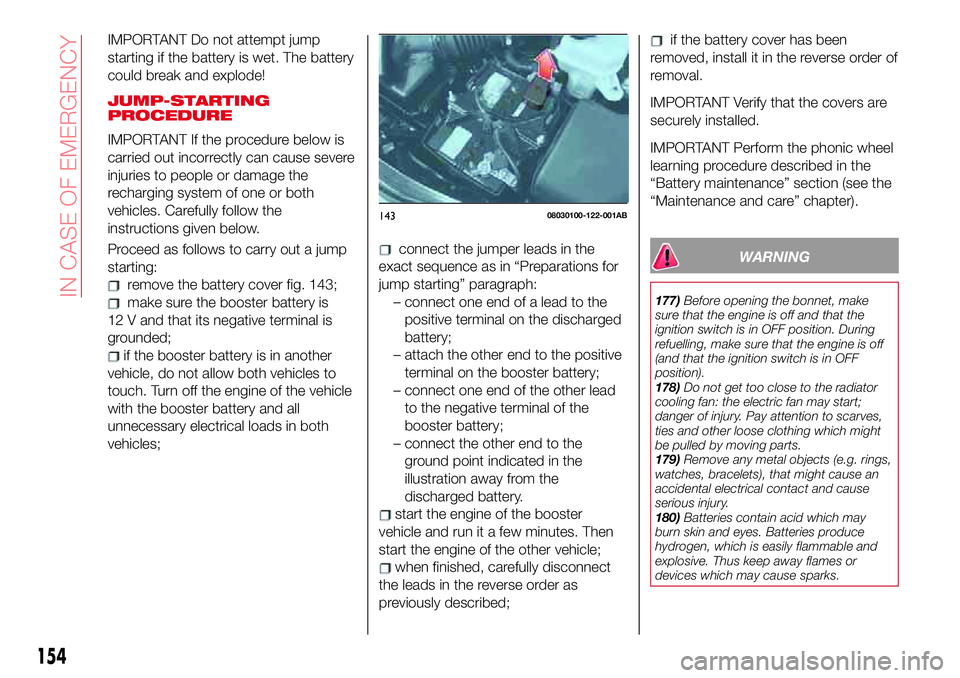
IMPORTANT Do not attempt jump
starting if the battery is wet. The battery
could break and explode!
JUMP-STARTING
PROCEDURE
IMPORTANT If the procedure below is
carried out incorrectly can cause severe
injuries to people or damage the
recharging system of one or both
vehicles. Carefully follow the
instructions given below.
Proceed as follows to carry out a jump
starting:
remove the battery cover fig. 143;
make sure the booster battery is
12 V and that its negative terminal is
grounded;
if the booster battery is in another
vehicle, do not allow both vehicles to
touch. Turn off the engine of the vehicle
with the booster battery and all
unnecessary electrical loads in both
vehicles;
connect the jumper leads in the
exact sequence as in “Preparations for
jump starting” paragraph:
–connectoneendofaleadtothe
positive terminal on the discharged
battery;
– attach the other end to the positive
terminal on the booster battery;
– connect one end of the other lead
to the negative terminal of the
booster battery;
– connect the other end to the
ground point indicated in the
illustration away from the
discharged battery.
start the engine of the booster
vehicle and run it a few minutes. Then
start the engine of the other vehicle;
when finished, carefully disconnect
the leads in the reverse order as
previously described;
if the battery cover has been
removed, install it in the reverse order of
removal.
IMPORTANT Verify that the covers are
securely installed.
IMPORTANT Perform the phonic wheel
learning procedure described in the
“Battery maintenance” section (see the
“Maintenance and care” chapter).
WARNING
177)Before opening the bonnet, make
sure that the engine is off and that the
ignition switch is in OFF position. During
refuelling, make sure that the engine is off
(and that the ignition switch is in OFF
position).
178)Do not get too close to the radiator
cooling fan: the electric fan may start;
danger of injury. Pay attention to scarves,
ties and other loose clothing which might
be pulled by moving parts.
179)Remove any metal objects (e.g. rings,
watches, bracelets), that might cause an
accidental electrical contact and cause
serious injury.
180)Batteries contain acid which may
burn skin and eyes. Batteries produce
hydrogen, which is easily flammable and
explosive. Thus keep away flames or
devices which may cause sparks.
14308030100-122-001AB
154
IN CASE OF EMERGENCY