fuse Abarth 124 Spider 2020 Owner handbook (in English)
[x] Cancel search | Manufacturer: ABARTH, Model Year: 2020, Model line: 124 Spider, Model: Abarth 124 Spider 2020Pages: 224, PDF Size: 3.9 MB
Page 19 of 224
interrupted (fuse blows or the battery is
disconnected), the system can only be
deactivated by unlocking a door with
the auxiliary key.
PASSIVE ENTRY(with Advanced Keyless function)
Both doors and the boot lid, fuel filler
flap can be locked/unlocked by
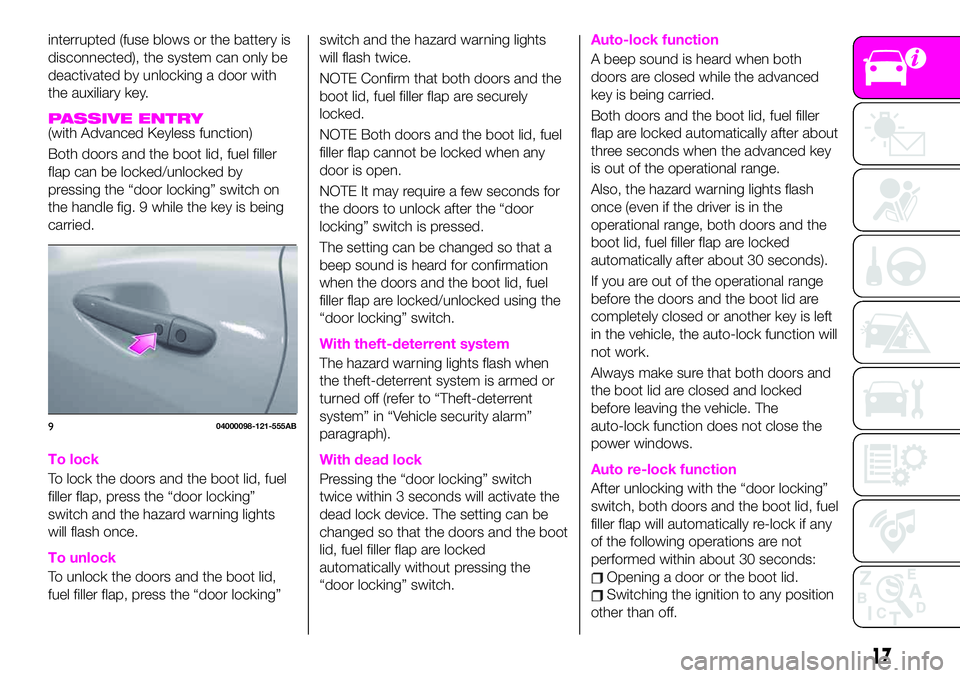
pressing the “door locking” switch on
the handle fig. 9 while the key is being
carried.
To lock
To lock the doors and the boot lid, fuel
filler flap, press the “door locking”
switch and the hazard warning lights
will flash once.
To unlock
To unlock the doors and the boot lid,
fuel filler flap, press the “door locking”switch and the hazard warning lights
will flash twice.
NOTE Confirm that both doors and the
boot lid, fuel filler flap are securely
locked.
NOTE Both doors and the boot lid, fuel
filler flap cannot be locked when any
door is open.
NOTE It may require a few seconds for
the doors to unlock after the “door
locking” switch is pressed.
The setting can be changed so that a
beep sound is heard for confirmation
when the doors and the boot lid, fuel
filler flap are locked/unlocked using the
“door locking” switch.
With theft-deterrent system
The hazard warning lights flash when
the theft-deterrent system is armed or
turned off (refer to “Theft-deterrent
system” in “Vehicle security alarm”
paragraph).
With dead lock
Pressing the “door locking” switch
twice within 3 seconds will activate the
dead lock device. The setting can be
changed so that the doors and the boot
lid, fuel filler flap are locked
automatically without pressing the
“door locking” switch.
Auto-lock function
A beep sound is heard when both
doors are closed while the advanced
key is being carried.
Both doors and the boot lid, fuel filler
flap are locked automatically after about
three seconds when the advanced key
is out of the operational range.
Also, the hazard warning lights flash
once (even if the driver is in the
operational range, both doors and the
boot lid, fuel filler flap are locked
automatically after about 30 seconds).
If you are out of the operational range
before the doors and the boot lid are
completely closed or another key is left
in the vehicle, the auto-lock function will
not work.
Always make sure that both doors and
the boot lid are closed and locked
before leaving the vehicle. The
auto-lock function does not close the
power windows.
Auto re-lock function
After unlocking with the “door locking”
switch, both doors and the boot lid, fuel
filler flap will automatically re-lock if any
of the following operations are not
performed within about 30 seconds:
Opening a door or the boot lid.
Switching the ignition to any position
other than off.
904000098-121-555AB
17
Page 52 of 224
ODOMETER / TRIP METER
The display mode can be changed from
odometer to “Trip meter A” to “Trip
meter B” and then back to odometer by
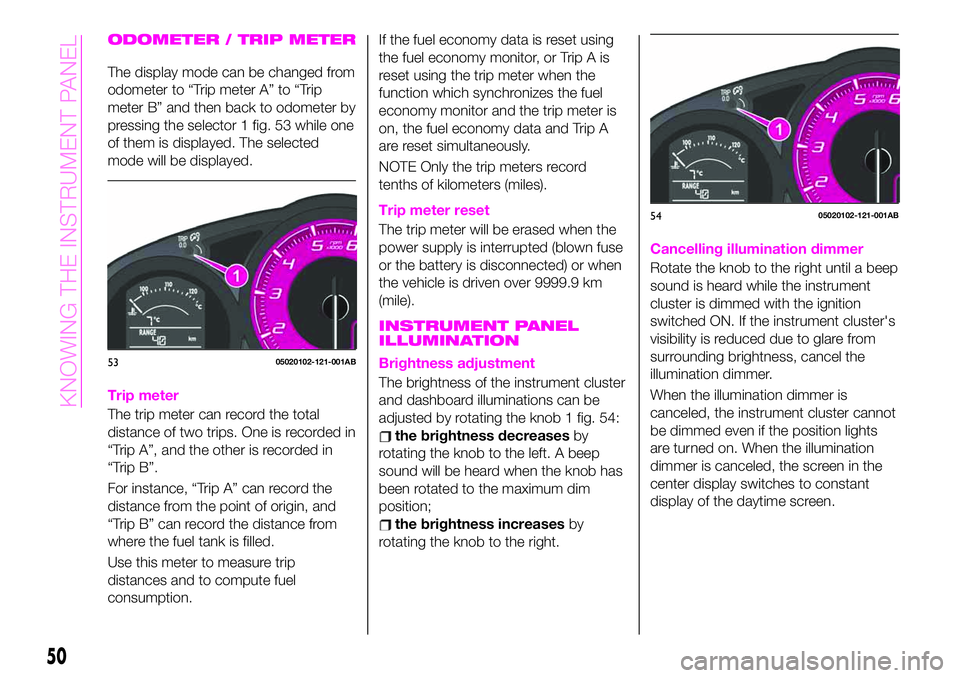
pressing the selector 1 fig. 53 while one
of them is displayed. The selected
mode will be displayed.
Trip meter
The trip meter can record the total
distance of two trips. One is recorded in
“Trip A”, and the other is recorded in
“Trip B”.
For instance, “Trip A” can record the
distance from the point of origin, and
“Trip B” can record the distance from
where the fuel tank is filled.
Use this meter to measure trip
distances and to compute fuel
consumption.If the fuel economy data is reset using
the fuel economy monitor, or Trip A is
reset using the trip meter when the
function which synchronizes the fuel
economy monitor and the trip meter is
on, the fuel economy data and Trip A
are reset simultaneously.
NOTE Only the trip meters record
tenths of kilometers (miles).
Trip meter reset
The trip meter will be erased when the
power supply is interrupted (blown fuse
or the battery is disconnected) or when
the vehicle is driven over 9999.9 km
(mile).
INSTRUMENT PANEL
ILLUMINATION
Brightness adjustment
The brightness of the instrument cluster
and dashboard illuminations can be
adjusted by rotating the knob 1 fig. 54:
the brightness decreasesby
rotating the knob to the left. A beep
sound will be heard when the knob has
been rotated to the maximum dim
position;
the brightness increasesby
rotating the knob to the right.
Cancelling illumination dimmer
Rotate the knob to the right until a beep
sound is heard while the instrument
cluster is dimmed with the ignition
switched ON. If the instrument cluster's
visibility is reduced due to glare from
surrounding brightness, cancel the
illumination dimmer.
When the illumination dimmer is
canceled, the instrument cluster cannot
be dimmed even if the position lights
are turned on. When the illumination
dimmer is canceled, the screen in the
center display switches to constant
display of the daytime screen.
5305020102-121-001AB
5405020102-121-001AB
50
KNOWING THE INSTRUMENT PANEL
Page 139 of 224
IN CASE OF EMERGENCY
A punctured tyre or a burnt-out bulb?
At times, a problem may interfere with
our journey.
The pages on emergencies can help
you to deal with critical situations
independently and with calm.
In an emergency we recommend that
you call the freephone number found in
the Warranty Booklet.
It is also possible to call the national or
international universal freephone
number to search for the nearest
Dealership.HAZARD WARNING LIGHTS.....138
REPLACING A BULB..........139
REPLACING FUSES..........147
TIRE SERVICE KIT...........154
JUMP STARTING............159
TOWING THE VEHICLE........161
EMERGENCY TOWING........163
137
Page 141 of 224
REPLACING A BULB
GENERAL
INSTRUCTIONS
165) 166) 167) 168)
30) 31)
Before replacing a bulb check the
contacts for oxidation;
replace blown bulbs with others of
the same type and power;
after replacing a headlight bulb,
always check its alignment;
to replace the bulb, contact an
Abarth Dealership;
use the protective cover and carton
for the replacement bulb to dispose of
the old bulb promptly and out of the
reach of children;
when a light is not working, check
that the corresponding fuse is intact
before replacing the bulb. For the
location of fuses, refer to the paragraph
“If a fuse blows” in this chapter.
IMPORTANT When removing the lens
or light unit using a flathead
screwdriver, make sure that the flathead
screwdriver does not contact the
interior terminal. If the flathead
screwdriver contacts the terminal, a
short circuit may occur.IMPORTANT When the weather is cold
or damp or after heavy rain or washing,
the surface of headlights or rear lights
may steam up and/or form drops of
condensation on the inside. This is a
natural phenomenon due to the
difference in temperature and humidity
between the inside and the outside of
the glass which does not indicate a
fault and does not compromise the
normal operation of lighting devices.
The mist disappears quickly when the
lights are turned on, starting from the
center of the diffuser, extending
progressively towards the edges.
139
Page 149 of 224

WARNING
165)Changes or repairs to the electrical
system carried out incorrectly and without
due consideration for the technical
specifications of the system may lead to
malfunctioning and generate a fire hazard.
166)Before replacing the bulb, wait for the
exhaust ducts to cool down: DANGER OF
SCALDING!167)Halogen bulbs contain pressurised
gas, in the case of breakage they may
burst causing glass fragments to be
projected outwards.
168)Only replace bulbs when the engine is
off. Also ensure that the engine is cold, to
prevent the risk of burns.
IMPORTANT
30)Where possible, it is advisable to have
bulbs changed at Abarth Dealership.
Proper operation and direction of the
external lights are essential for driving in
safety and comply with law.
31)Halogen bulbs must be handled
holding the metallic part only. Touching the
transparent part of the bulb with your
fingers may reduce the intensity of the
emitted light and even reduce the lifespan
of the bulb. In the event of accidental
contact, wipe the bulb with a cloth
moistened with alcohol and let the bulb dry
REPLACING FUSES
GENERAL INFORMATION
169) 170) 171) 172) 173)
32) 33)
Fuse location
Fuses are grouped together in two fuse
boxes located on the left side of the
vehicle and under the bonnet.
FUSES ON THE LEFT
SIDE OF THE VEHICLE
Proceed as follows:
make sure the ignition is switched
off, and other switches are off;
open the fuse panel cover
fig. 128 (located near the door);
press retaining clip and remove
protection cover;
12707031501-220-001AB
12807031601-121-001AB
147
Page 150 of 224

pull the fuse straight out with the fuse
puller provided on the fuse block
located in the engine compartment
fig. 129;
inspect the fuse and replace it if it is
blown;
insert a new fuse of the same
amperage rating, and make sure it fits
tightly. If it does not fit tightly, contact an
Abarth Dealership. If you have no spare
fuses, borrow one of the same rating
from a circuit not essential to vehicle
operation, such as the AUDIO or
OUTLET circuit;
reinstall the cover and make sure that
it is securely installed.
IMPORTANT Always replace a fuse with
a genuine FCA fuse or equivalent of the
same rating. Otherwise you may
damage the electric system.
FUSES UNDER THE
BONNET
Make sure the ignition is switched off,
and other switches are off and remove
the fuse block cover. If the lock is
forcefully opened, the fuse block cover
may come in contact with the frame
when it is removed and become
scratched.
When removing the cover, remove it
slowly according to the following
procedure:
disengage the rear lock 1 fig. 130 by
pressing down on the front tab with
your fingers;
remove the front tab while slightly
lifting the front of the cover 2;
remove the cover while lifting it and
sliding it to the rear;
if any fuse but the MAIN fuse is
blown, replace it with a new one of the
same amperage rating;
reinstall the cover and make sure that
it is securely installed.
12907031601-122-001AB
13007031601-123-001AB
148
IN CASE OF EMERGENCY
Page 151 of 224

FUSE BLOCK (ENGINE COMPARTMENT)
13107031602-121-001
149
Page 152 of 224

DESCRIPTION FUSE RATING PROTECTED COMPONENT
F03 HORN2 7.5 A Horn
F06 — — —
F07 INTERIOR 15 A Overhead light
F09 AUDIO2 15 A Audio system
F10 METER1 10 A Instrument cluster
F11 SRS1 7.5 A Air bag
F12 — — —
F13 RADIO 7.5 A Audio system
F17 AUDIO1 25 A Audio system
F18 A/C MAG 7.5 A Air conditioner
F20 AT 15 A Transmission control system (where provided)
F21 D LOCK 25 A Power door locks
F22 H/L RH 20 A Headlight (RH)
F24 TAIL 20 A Taillights/Number plate lights/Position lights
F25 DRL 15 A Daylight Running Lights
F26 ROOM 25 A Overhead light
F27 FOG 15 A Fog lights
F28 H/CLEAN 20 A Headlight washer (where provided)
F29 STOP 10 A Stop lights/Rear fog light (where provided)
F30 HORN 15 A Horn
F31 H/L LH 20 A Headlight (LH)
F33 HAZARD 15 A Hazard warning flashers/Direction indicators lights
F36 WIPER 20 A Windscreen wipers
150
IN CASE OF EMERGENCY
Page 153 of 224
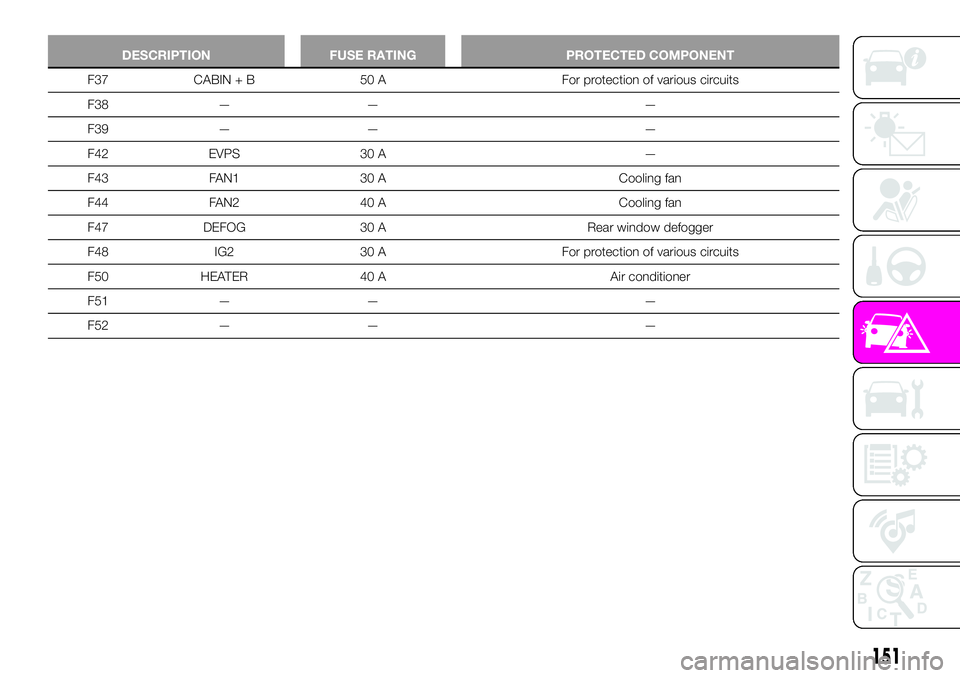
DESCRIPTION FUSE RATING PROTECTED COMPONENT
F37 CABIN + B 50 A For protection of various circuits
F38 — — —
F39 — — —
F42 EVPS 30 A —
F43 FAN1 30 A Cooling fan
F44 FAN2 40 A Cooling fan
F47 DEFOG 30 A Rear window defogger
F48 IG2 30 A For protection of various circuits
F50 HEATER 40 A Air conditioner
F51 — — —
F52 — — —
151
Page 154 of 224

FUSES ON THE LEFT SIDE OF THE VEHICLE
13207031602-03F-002
152
IN CASE OF EMERGENCY