fog light Abarth 124 Spider 2021 Owner handbook (in English)
[x] Cancel search | Manufacturer: ABARTH, Model Year: 2021, Model line: 124 Spider, Model: Abarth 124 Spider 2021Pages: 224, PDF Size: 3.9 MB
Page 27 of 224
HIGH BEAMS
The headlights switch between high
and low beams by moving the lever
forward or backward.
When the headlight high-beams are on,
the
warning light is turned on.
FLASH TO PASS
Can be used when the ignition is
switched ON.
To flash the headlights, pull the lever
fully towards you (the headlight switch
does not need to be on).
The
warning light in the instrument
cluster illuminates simultaneously.
The lever will return to the normal
position when released.
AUTOMATIC LIGHTING(where provided)
Light sensor
When the headlight switch is in the
AUTOposition and the ignition is
switched ON, the light sensor senses
the surrounding lightness or darkness
and automatically turns the headlights,
other exterior lights and dashboard
illumination on or off.
IMPORTANT The light sensor also
works as a rain sensor for the
auto-wiper control. Keep hands and
scrapers clear of the windscreen when
the wiper lever is in the AUTO position
and the ignition is switched ON as
fingers could be pinched or the wipers
and wiper blades damaged when the
wipers activate automatically. If you are
going to clean the windscreen, be sure
the wipers are turned off completely
(this is particularly important when
clearing ice and snow) when it is
particularly tempting to leave the engine
running.
COMING HOME LIGHT
SYSTEM
The coming me home light system
turns on the headlights (low beams)
when the lever is operated.
System activation
When the lever is pulled with the ignition
switched to ACC or OFF, the low beam
headlights turn on.
The headlights turn off after a certain
period of time has elapsed after the
doors are closed.
The time until the headlights turn off
after all of the doors are closed can be
changed. If no operations are done for
3 minutes after the lever is pulled, the
headlights turn off.
The headlights turn off if the lever is
pulled again while the headlights are on.
FRONT FOG LIGHTS
(where provided)
The front fog light can be used when
the ignition is switched to ON.
Use this switch to turn on the front fog
lights. The front fog lights will improve
visibility at night and during foggy
conditions.
Activation
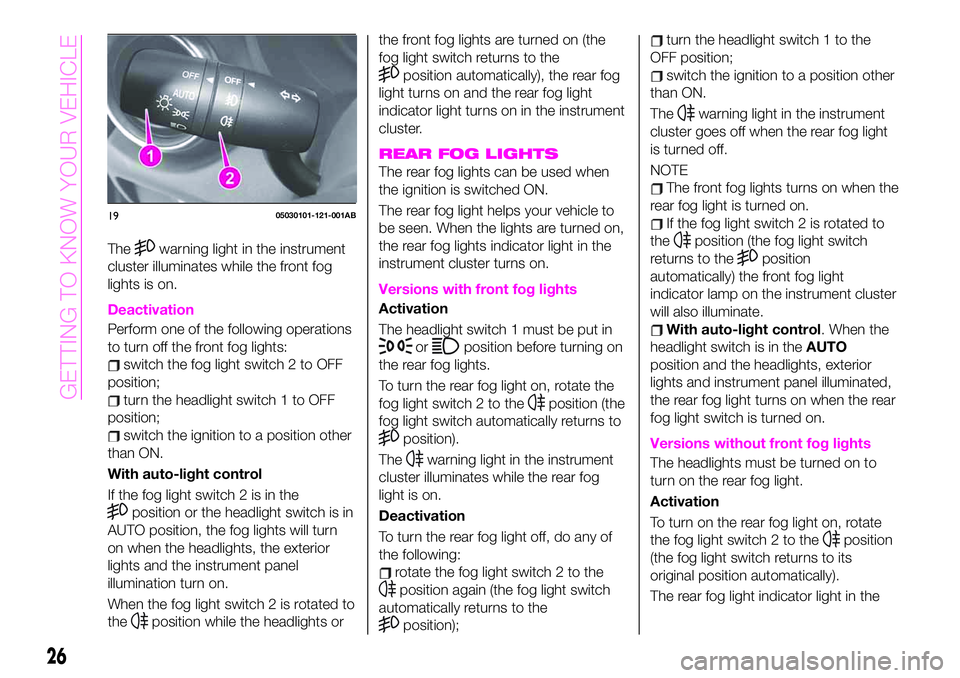
Turn the headlight switch 1 fig. 19 in
orposition before activate
front fog lights.
Rotate the fog light switch 2 to
or
position (switch automatically turns
in
position).
25
Page 28 of 224
Thewarning light in the instrument
cluster illuminates while the front fog
lights is on.
Deactivation
Perform one of the following operations
to turn off the front fog lights:
switch the fog light switch 2 to OFF
position;
turn the headlight switch 1 to OFF
position;
switch the ignition to a position other
than ON.
With auto-light control
If the fog light switch 2 is in the
position or the headlight switch is in
AUTO position, the fog lights will turn
on when the headlights, the exterior
lights and the instrument panel
illumination turn on.
When the fog light switch 2 is rotated to
the
position while the headlights orthe front fog lights are turned on (the
fog light switch returns to the
position automatically), the rear fog
light turns on and the rear fog light
indicator light turns on in the instrument
cluster.
REAR FOG LIGHTS
The rear fog lights can be used when
the ignition is switched ON.
The rear fog light helps your vehicle to
be seen. When the lights are turned on,
the rear fog lights indicator light in the
instrument cluster turns on.
Versions with front fog lights
Activation
The headlight switch 1 must be put in
orposition before turning on
the rear fog lights.
To turn the rear fog light on, rotate the
fog light switch 2 to the
position (the
fog light switch automatically returns to
position).
The
warning light in the instrument
cluster illuminates while the rear fog
light is on.
Deactivation
To turn the rear fog light off, do any of
the following:
rotate the fog light switch 2 to the
position again (the fog light switch
automatically returns to the
position);
turn the headlight switch 1 to the
OFF position;
switch the ignition to a position other
than ON.
The
warning light in the instrument
cluster goes off when the rear fog light
is turned off.
NOTE
The front fog lights turns on when the
rear fog light is turned on.
If the fog light switch 2 is rotated to
the
position (the fog light switch
returns to the
position
automatically) the front fog light
indicator lamp on the instrument cluster
will also illuminate.
With auto-light control. When the
headlight switch is in theAUTO
position and the headlights, exterior
lights and instrument panel illuminated,
the rear fog light turns on when the rear
fog light switch is turned on.
Versions without front fog lights
The headlights must be turned on to
turn on the rear fog light.
Activation
To turn on the rear fog light on, rotate
the fog light switch 2 to the
position
(the fog light switch returns to its
original position automatically).
The rear fog light indicator light in the
1905030101-121-001AB
26
GETTING TO KNOW YOUR VEHICLE
Page 29 of 224
instrument cluster illuminates while the
rear fog light is on.
Deactivation
To turn the rear fog light off, do any of
the following:
rotate the fog light switch 2 to the
position again (the fog light switch
automatically returns to the
position);
rotate the fog light switch 2 to the
OFF position;
turn the headlight switch 1 to the
OFF position.
The rear fog light indicator light in the
instrument cluster goes off when the
rear fog light is turned off.
TURN SIGNALS
The ignition must be switched ON to
use the turn and lane-change signals.
Direction indicators
Move the signal lever down (for a left
turn) or up (for a right turn) to the stop
position. The signal will self-cancel after
the turn is completed.
If the indicator light continues to flash
after a turn, manually return the lever to
its original position.
The turn signal indicators (green)
in the instrument cluster flash
according to the operation of the turn
signal lever to show which signal is
working.
NOTE If an indicator light stays on
without flashing or if it flashes
abnormally, one of the turn signal bulbs
may be burned out.
LANE CHANGE SIGNALS
Move the lever halfway toward the
direction of the lane change (until the
indicator flashes) and hold it there. It will
return to the off position when released.
Three-flash turn signal
After releasing the turn signal lever, the
turn signal indicator flashes three times.
The operation can be cancelled by
moving the lever in the direction
opposite to which it was operated.
Adaptive Front Lighting
System (AFS)
(where provided)
The adaptive front lighting system (AFS)
automatically adjusts the headlight
beams to the left or right in conjunction
with the operation of the steering wheel
after the headlights have been turned
on.
A system malfunction or operation
conditions are indicated by a warning.
Refer to “Warning lights on instrument
panel” paragraph in “Knowing the
instrument panel” chapter.
NOTE
Headlights are equipped which do
not blind drivers approaching in theopposite direction no matter what side
of the road you must drive your vehicle
(left-hand or right-hand traffic).
Therefore, it is not necessary to adjust
the optical axis of the headlights when
switching temporarily to driving on the
opposite side of the road (left-hand or
right-hand traffic).
The Adaptive Front Lighting System
(AFS) function can be switched to
operable/ inoperable using the
personalisation function. Refer to
“Personalisation features” paragraph in
“Knowing the instrument panel”
chapter.
LEAVING HOME LIGHT
SYSTEM
The leaving home light system turns on
the lights when the transmitter unlock
button is pressed while away from the
vehicle.
Activation
When the ignition switch and the
headlight switch are as indicated below,
the headlights will illuminate when the
transmitter unlock button is pressed
and the vehicle receives the transmitter
signal.
The headlights turn off after a certain
period of time has elapsed
(30 seconds).
Ignition switch:off.
27
Page 33 of 224
CLIMATE CONTROL
SYSTEM
OPERATING TIPS
2)
Operate the air-conditioning system
with the engine running.
To prevent the battery from being
discharged, do not leave the fan control
dial on for a long period of time with the
ignition switched ON when the engine
is not running.
Clear all obstructions such as leaves,
snow and ice from the bonnet and the
air inlet in the cowl grille to improve the
system efficiency.
Use the air-conditioning system to
defog the windows and dehumidify the
air.
The recirculate mode should be used
when driving through tunnels or while in
a traffic jam, or when you would like to
shut off outside air for quick cooling of
the interior.
Use the outside air position for
ventilation or windscreen defrosting.
If the vehicle has been parked in direct
sunlight during hot weather, open the
windows to let warm air escape, then
run the air-conditioning system.
Run the air conditioner about10 minutes at least once a month to
keep internal parts lubricated.
Have the air conditioner checked before
the weather gets hot. Lack of refrigerant
may make the air conditioner less
efficient. The refrigerant specifications
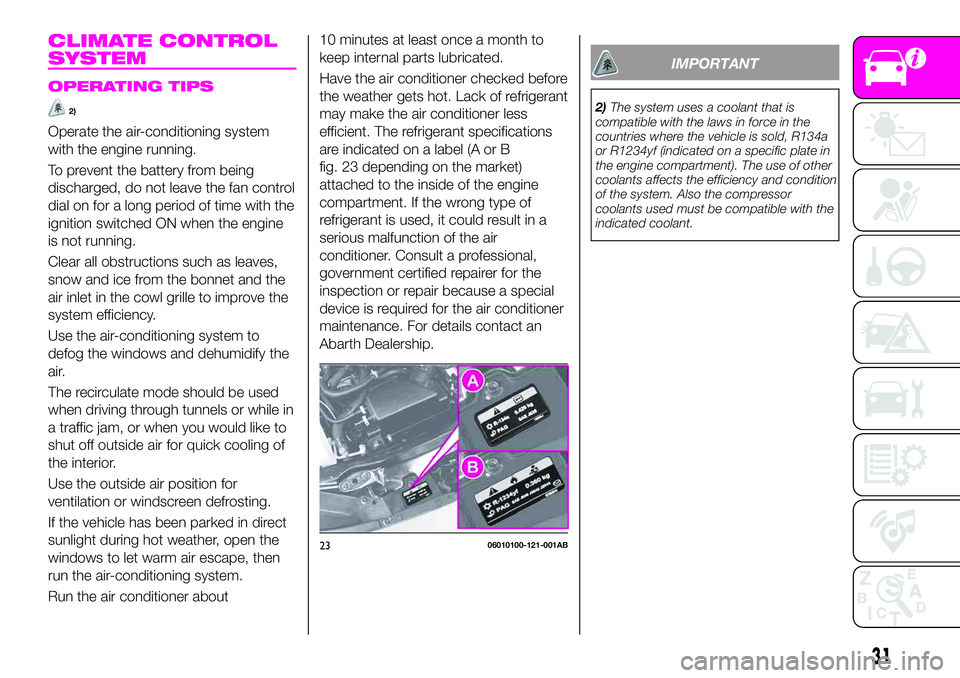
are indicated on a label (A or B
fig. 23 depending on the market)
attached to the inside of the engine
compartment. If the wrong type of
refrigerant is used, it could result in a
serious malfunction of the air
conditioner. Consult a professional,
government certified repairer for the
inspection or repair because a special
device is required for the air conditioner
maintenance. For details contact an
Abarth Dealership.
IMPORTANT
2)The system uses a coolant that is
compatible with the laws in force in the
countries where the vehicle is sold, R134a
or R1234yf (indicated on a specific plate in
the engine compartment). The use of other
coolants affects the efficiency and condition
of the system. Also the compressor
coolants used must be compatible with the
indicated coolant.
2306010100-121-001AB
31
Page 69 of 224

Warning light What it means What to do
TCS / DSC SYSTEM INDICATOR LIGHT
The warning light turns on when the in case of
intervention of TCS/DSC systems. This means
that the vehicle is in critical stability and grip
conditions.
DSC OFF INDICATOR LIGHT
This indicator light stays on for a few seconds
when the ignition is switched ON. It also
illuminates when the DSC OFF switch is
pressed and TCS/DSC is switched off. Refer
to “DSC OFF switch” in “Active safety
systems” paragraph (“Safety” chapter).If the light remains illuminated and the
TCS/DSC is not switched off, take your
vehicle to an Abarth Dealership. The DSC may
have a malfunction.
REAR FOG LIGHT INDICATOR LIGHT
The warning light switches on when the rear
fog light is turned on.
ADJUSTABLE SPEED LIMITER MAIN
INDICATOR LIGHT (where provided)
The warning light switches on when the
MODE switch on steering wheel is pressed
and the adjustable speed limiter is activated
(see “Speed limiter” paragraph in “Starting and
driving” chapter).
WRENCH INDICATOR LIGHT
(where provided)
When the ignition is switched ON, the wrench
indicator light is illuminated and then turns off
after a few seconds.The wrench indicator light turns on when the
preset maintenance period arrives. Verify the
content and perform maintenance. Refer to
“Maintenance monitor” paragraph in this
chapter.
67
Page 70 of 224

Green warning lights
Warning light What it means What to do
LEFT DIRECTION INDICATOR
The warning light turns on when the direction
indicator control stalk is moved downwards or,
together with the right direction indicator,
when the hazard warning light button is
pressed.
RIGHT DIRECTION INDICATOR
The warning light turns on when the direction
indicator control stalk is moved upwards or,
together with the left direction indicator, when
the hazard warning light button is pressed.
SIDE LIGHTS AND DIPPED BEAM
HEADLIGHTS
The warning light turns on when side lights or
dipped beam headlights are turned on.
FOG LIGHTS (where provided)
The warning light turns on when the fog lights
are turned on.
CRUISE CONTROL (SET INDICATOR LIGHT)
(where provided)
The warning light turns on when a cruising
speed has been set.
ADJUSTABLE SPEED LIMITER SET
INDICATOR (where provided)
The indicator light illuminates green when a
speed has been set (see “Speed limiter”
paragraph in “Starting and driving” chapter).
68
KNOWING THE INSTRUMENT PANEL
Page 142 of 224
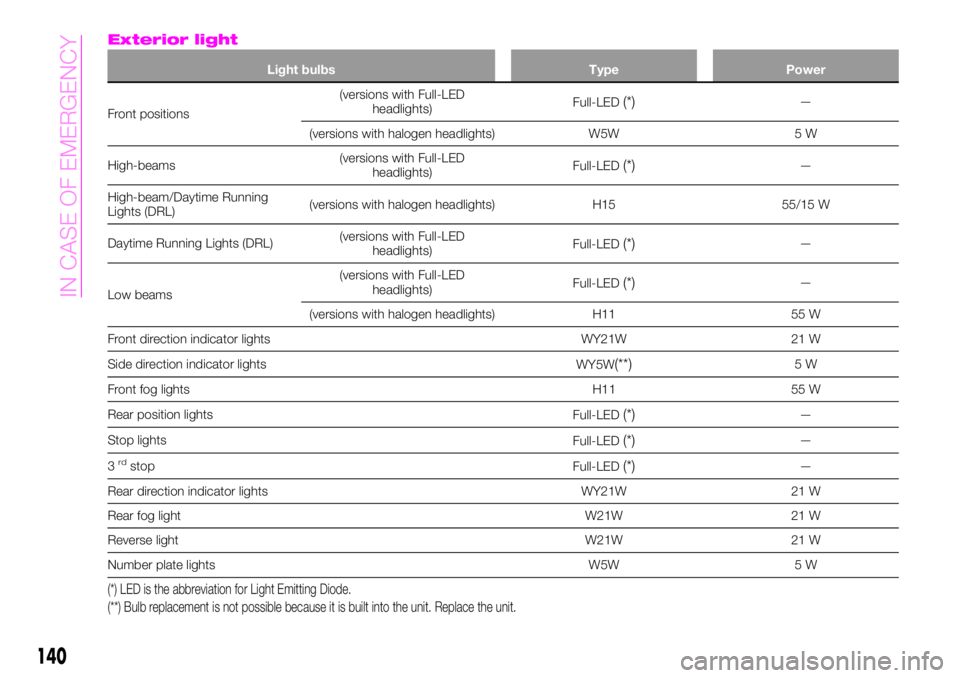
Exterior light
Light bulbs Type Power
Front positions(versions with Full-LED
headlights)Full-LED(*)—
(versions with halogen headlights) W5W 5 W
High-beams(versions with Full-LED
headlights)Full-LED
(*)—
High-beam/Daytime Running
Lights (DRL)(versions with halogen headlights) H15 55/15 W
Daytime Running Lights (DRL)(versions with Full-LED
headlights)Full-LED
(*)—
Low beams(versions with Full-LED
headlights)Full-LED
(*)—
(versions with halogen headlights) H11 55 W
Front direction indicator lights WY21W 21 W
Side direction indicator lights
WY5W
(**)5W
Front fog lights H11 55 W
Rear position lights
Full-LED
(*)—
Stop lights
Full-LED
(*)—
3
rdstop
Full-LED(*)—
Rear direction indicator lights WY21W 21 W
Rear fog light W21W 21 W
Reverse light W21W 21 W
Number plate lights W5W 5 W
(*) LED is the abbreviation for Light Emitting Diode.
(**) Bulb replacement is not possible because it is built into the unit. Replace the unit.
140
IN CASE OF EMERGENCY
Page 145 of 224
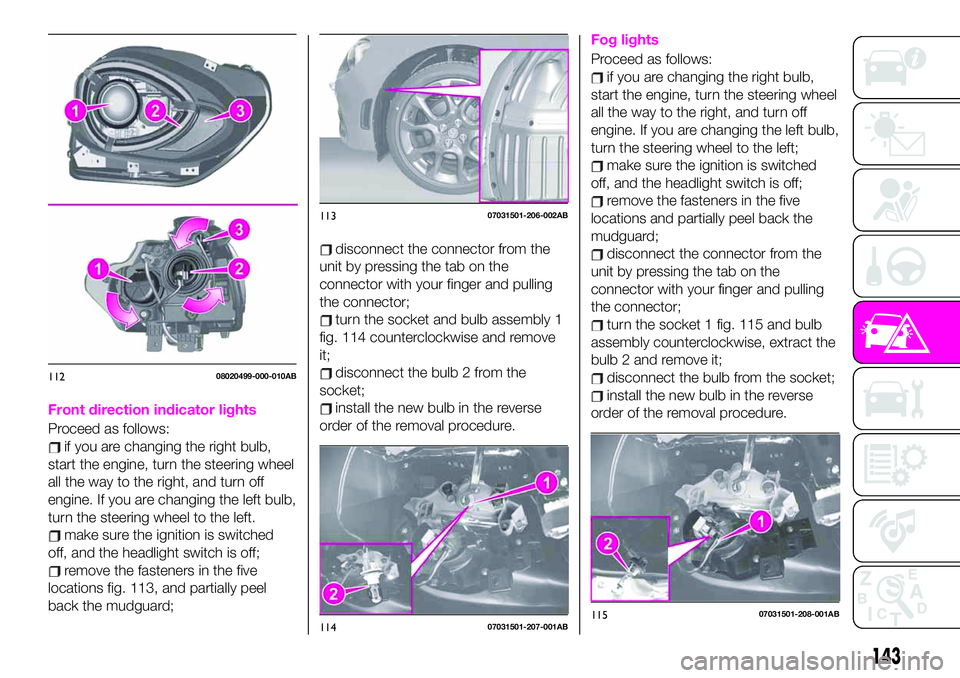
Front direction indicator lights
Proceed as follows:
if you are changing the right bulb,
start the engine, turn the steering wheel
all the way to the right, and turn off
engine. If you are changing the left bulb,
turn the steering wheel to the left.
make sure the ignition is switched
off, and the headlight switch is off;
remove the fasteners in the five
locations fig. 113, and partially peel
back the mudguard;
disconnect the connector from the
unit by pressing the tab on the
connector with your finger and pulling
the connector;
turn the socket and bulb assembly 1
fig. 114 counterclockwise and remove
it;
disconnect the bulb 2 from the
socket;
install the new bulb in the reverse
order of the removal procedure.
Fog lights
Proceed as follows:
if you are changing the right bulb,
start the engine, turn the steering wheel
all the way to the right, and turn off
engine. If you are changing the left bulb,
turn the steering wheel to the left;
make sure the ignition is switched
off, and the headlight switch is off;
remove the fasteners in the five
locations and partially peel back the
mudguard;
disconnect the connector from the
unit by pressing the tab on the
connector with your finger and pulling
the connector;
turn the socket 1 fig. 115 and bulb
assembly counterclockwise, extract the
bulb 2 and remove it;
disconnect the bulb from the socket;
install the new bulb in the reverse
order of the removal procedure.
11208020499-000-010AB
11307031501-206-002AB
11407031501-207-001AB11507031501-208-001AB
143
Page 148 of 224
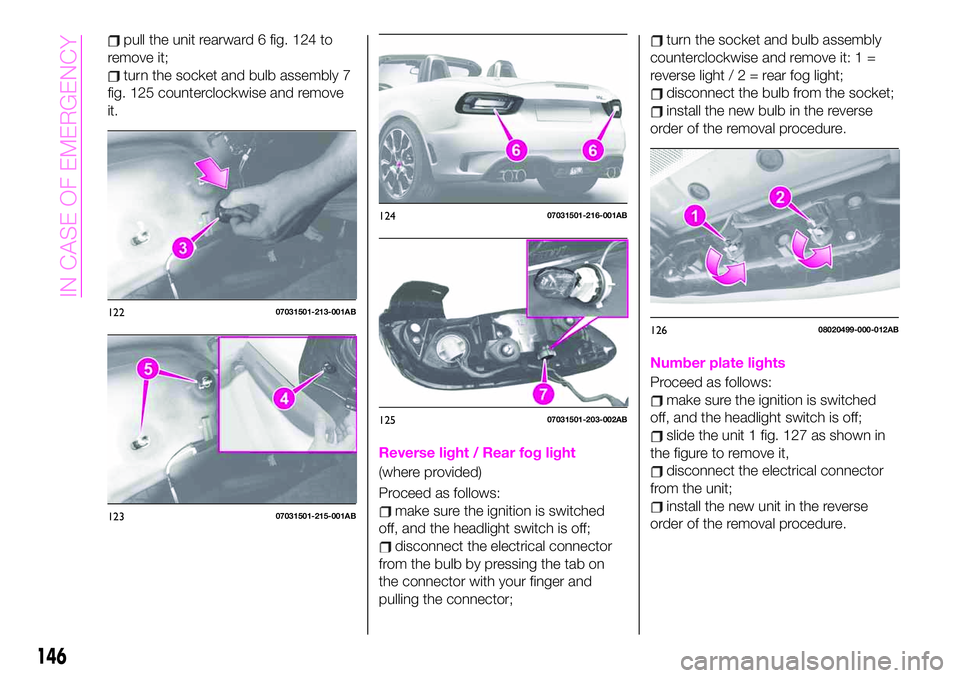
pull the unit rearward 6 fig. 124 to
remove it;
turn the socket and bulb assembly 7
fig. 125 counterclockwise and remove
it.
Reverse light / Rear fog light
(where provided)
Proceed as follows:
make sure the ignition is switched
off, and the headlight switch is off;
disconnect the electrical connector
from the bulb by pressing the tab on
the connector with your finger and
pulling the connector;
turn the socket and bulb assembly
counterclockwise and remove it: 1 =
reverse light/2=rearfoglight;
disconnect the bulb from the socket;
install the new bulb in the reverse
order of the removal procedure.
Number plate lights
Proceed as follows:
make sure the ignition is switched
off, and the headlight switch is off;
slide the unit 1 fig. 127 as shown in
the figure to remove it,
disconnect the electrical connector
from the unit;
install the new unit in the reverse
order of the removal procedure.
12207031501-213-001AB
12307031501-215-001AB
12407031501-216-001AB
12507031501-203-002AB
12608020499-000-012AB
146
IN CASE OF EMERGENCY
Page 152 of 224

DESCRIPTION FUSE RATING PROTECTED COMPONENT
F03 HORN2 7.5 A Horn
F06 — — —
F07 INTERIOR 15 A Overhead light
F09 AUDIO2 15 A Audio system
F10 METER1 10 A Instrument cluster
F11 SRS1 7.5 A Air bag
F12 — — —
F13 RADIO 7.5 A Audio system
F17 AUDIO1 25 A Audio system
F18 A/C MAG 7.5 A Air conditioner
F20 AT 15 A Transmission control system (where provided)
F21 D LOCK 25 A Power door locks
F22 H/L RH 20 A Headlight (RH)
F24 TAIL 20 A Taillights/Number plate lights/Position lights
F25 DRL 15 A Daylight Running Lights
F26 ROOM 25 A Overhead light
F27 FOG 15 A Fog lights
F28 H/CLEAN 20 A Headlight washer (where provided)
F29 STOP 10 A Stop lights/Rear fog light (where provided)
F30 HORN 15 A Horn
F31 H/L LH 20 A Headlight (LH)
F33 HAZARD 15 A Hazard warning flashers/Direction indicators lights
F36 WIPER 20 A Windscreen wipers
150
IN CASE OF EMERGENCY