engine Abarth 500 2016 Owner handbook (in English)
[x] Cancel search | Manufacturer: ABARTH, Model Year: 2016, Model line: 500, Model: Abarth 500 2016Pages: 215, PDF Size: 19.08 MB
Page 130 of 215

CONDITIONS OF USE
Cold starting
Short journeys and frequent cold starts
do not allow the engine to reach
optimum operating temperature. This
results in a significant increase in
consumption levels (from +15 to +30%
on the urban cycle) and emissions.
Traffic and road
conditions
High fuel consumption is caused by
heavy traffic, for instance when
travelling in a queue with frequent use
of low gears or in cities with many traffic
lights. Winding mountain roads and
rough road surfaces also adversely
affect consumption.
Stops in traffic
During prolonged hold-ups (e.g. level
crossings) switch off the engine.TOWING TRAILERS
IMPORTANT
INFORMATION
For towing caravans or trailers the car
must be fitted with a certified tow hook
and an adequate electrical system.
Installation should be carried out by
specialised personnel who will issue the
required papers for travelling on roads.
Install any specific and/or additional
door mirrors as specified by the
Highway Code.
Remember that when towing a trailer,
steep hills are harder to climb, braking
distances increase and overtaking
takes longer depending on the overall
weight of the trailer.
Engage a low gear when driving
downhill, rather than constantly using
the brake.
The weight the trailer exerts on the car
tow hook reduces the car's loading
capacity by the same amount. To make
sure that the maximum towable weight
is not exceeded (given in the car
registration document) account should
be taken of the fully laden trailer,
including accessories and luggage.Respect the speed limits specific to
each country for vehicles towing
trailers.
In any case, the top speed must not
exceed 100 km/h.
101) 102)
WARNING
101) The ABS with which the car is
equipped will not control the
braking system of the trailer.
Particular caution is therefore
required on slippery surfaces.
102) Never modify the braking
system of the car to control the
trailer brake. The trailer braking
system must be fully independent
of the car’s hydraulic system.
126
STARTING AND DRIVING
Page 132 of 215
CAR INACTIVITY
If the car is to be left inactive for longer
than a month, the following precautions
should be noted:
❒park the car in covered, dry and if
possible well-ventilated premises and
slightly open the windows;
❒check that the handbrake is not
engaged;
❒engage a gear;
❒disconnect the negative battery
terminal and check the battery
charge. Repeat this check once
every three months during storage;
❒if the battery is not disconnected
from the electrical system, check
its state of charge every thirty days;
❒clean and protect the painted parts
using protective wax;
❒clean and protect the shiny metal
parts using special compounds
available commercially;
❒sprinkle talcum powder on the
windscreen and rear window wiper
rubber blades and lift them off the
glass;❒cover the car with a cloth or
perforated plastic sheet. Do not use
compact plastic sheets which do
not allow humidity to evaporate from
the surface of the car;
❒inflate tyres to +0.5 bar above the
standard prescribed pressure and
check it periodically;
❒do not drain the engine cooling
system;
128
STARTING AND DRIVING
Page 133 of 215
IN AN EMERGENCY
A punctured tyre or a burnt-out bulb?
At times, a problem may interfere
with our journey.
The pages on emergencies can help
you to deal with critical situations
independently and with calm.
In an emergency we recommend that
you call the freephone number found in
the Warranty Booklet.
It is also possible to call the 00 800
3428 0000 freephone number to
search the nearest Abarth Authorised
Dealership.STARTING THE ENGINE .................130
"FIX&GO AUTOMATIC" KIT .............131
REPLACING A BULB .....................135
REPLACING AN EXTERIOR BULB ..139
REPLACING AN INTERIOR BULB ...142
REPLACING FUSES........................144
BATTERY RECHARGING ................149
LIFTING THE CAR...........................149
TOWING THE CAR .........................150
129
Page 134 of 215
STARTING THE
ENGINE
If thesymbol on the display turns
on constantly, contact an Abarth
Dealership immediately.
JUMP STARTING
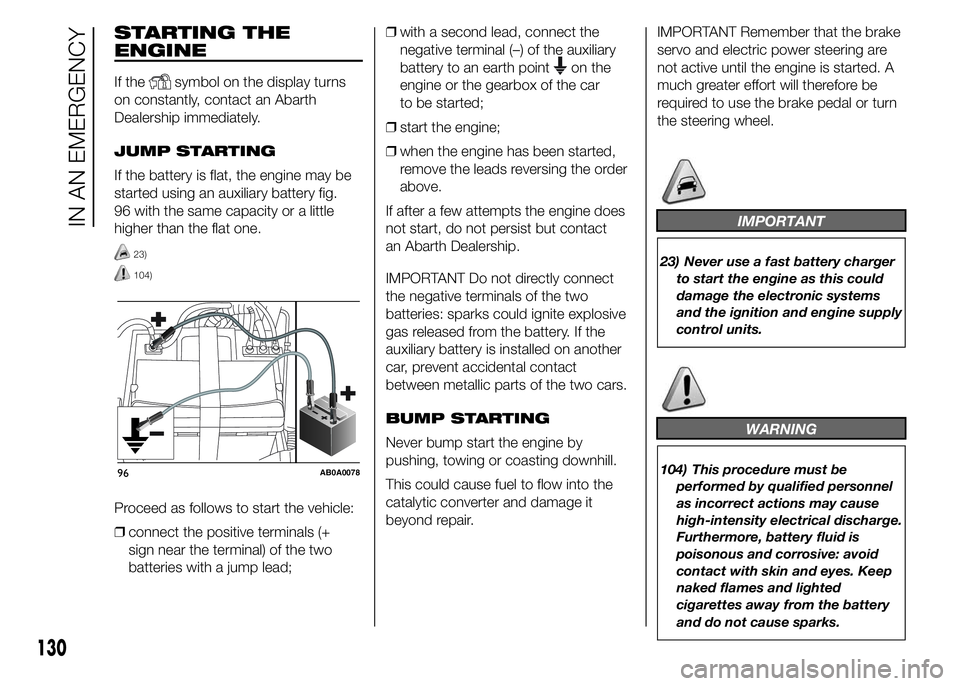
If the battery is flat, the engine may be
started using an auxiliary battery fig.
96 with the same capacity or a little
higher than the flat one.
23)
104)
Proceed as follows to start the vehicle:
❒connect the positive terminals (+
sign near the terminal) of the two
batteries with a jump lead;❒with a second lead, connect the
negative terminal (–) of the auxiliary
battery to an earth point
on the
engine or the gearbox of the car
to be started;
❒start the engine;
❒when the engine has been started,
remove the leads reversing the order
above.
If after a few attempts the engine does
not start, do not persist but contact
an Abarth Dealership.
IMPORTANT Do not directly connect
the negative terminals of the two
batteries: sparks could ignite explosive
gas released from the battery. If the
auxiliary battery is installed on another
car, prevent accidental contact
between metallic parts of the two cars.
BUMP STARTING
Never bump start the engine by
pushing, towing or coasting downhill.
This could cause fuel to flow into the
catalytic converter and damage it
beyond repair.IMPORTANT Remember that the brake
servo and electric power steering are
not active until the engine is started. A
much greater effort will therefore be
required to use the brake pedal or turn
the steering wheel.
IMPORTANT
23) Never use a fast battery charger
to start the engine as this could
damage the electronic systems
and the ignition and engine supply
control units.
WARNING
104) This procedure must be
performed by qualified personnel
as incorrect actions may cause
high-intensity electrical discharge.
Furthermore, battery fluid is
poisonous and corrosive: avoid
contact with skin and eyes. Keep
naked flames and lighted
cigarettes away from the battery
and do not cause sparks.96AB0A0078
130
IN AN EMERGENCY
Page 135 of 215

"Fix&Go Automatic"
kit
The kit (see fig. 97) in the luggage
compartment consists of:
❒a spray bottle A with the sealant,
equipped with filling pipe B,
separated by the compressor C;
❒compressor C with pressure gauge,
fitting valve to couple the bottle A,
cable with supply socket D and pipe
N to restore pressure (this is inside
the body as shown);
❒adhesive label under the spray bottle
A, with the message "max. 80 km/h"
to be placed where the driver can
easily see it (for example on the
dashboard) after repairing the tyre;
❒instruction booklet fig. 98, for using
the Fix&Go quickly and correctly;
❒a pair of protective gloves.
24)
105) 106) 107)
IMPORTANT
INFORMATION
The sealant of the Fix&Go kit is effective
at external temperatures of between
-20°C and +50°C.
The sealant has an expiry date.
108) 109)
2)
INFLATION PROCEDURE
110)
Proceed as follows:
❒engage the handbrake;
❒place the Fix&Go kit close to the tyre
to be repaired;
❒locate the fig. 100 filling pipe B
already connected to the spray bottle
A;
❒open the side lid E then connect the
spray bottle A to the fitting, following
the direction of the arrow;
❒undo the cap of the tyre valve F and
connect the filling pipe B, tightening
the relevant ring nut on the tyre valve;
❒make sure that the switch G fig. 101
is in position0(off), then start the
engine;
❒place the electric plug H fig. 102 in
the cigar lighter socket of the car
(12 V);
97AB0A0079
98AB0A0080
ON
OFF
99AB0A0081
131
Page 138 of 215

109) The spray bottle contains
ethylene glycol. It contains latex
that might cause allergic
reactions. It is harmful if
swallowed. Eye irritant. It may
cause sensitisation if inhaled or
on contact. Avoid contact with
eyes, skin and clothes. In the case
of contact, wash immediately
with plenty of water. In the event
that it is swallowed, do not induce
vomiting. Rinse out your mouth,
drink large quantities of water and
seek immediate medical attention.
Keep out of the reach of children.
The product must not be used
by asthmatics. Do not inhale the
vapours during insertion and
suction. Call a doctor immediately
if allergic reactions are noted.
Store the spray bottle away from
heat sources. The sealant has
an expiry date.
110) Wear the protective gloves
provided with the Fix&Go kit.
111) Apply the adhesive label where
it can be easily seen by the driver
as a reminder that the tyre has
been treated with the Fix&Go kit.
Drive carefully, particularly on
bends. Do not exceed 80 km/h. Do
not accelerate or brake suddenly.112) If the pressure falls below 1.5
bar, do not drive any further: the
kit cannot guarantee proper seal
because the tyre is too damaged.
Contact an Abarth Dealership. If
instead a pressure value of at
least 1.5 bar is detected, restore
the correct pressure (with the
engine running and the
handbrake engaged), resume
driving and drive with great care
to the nearest Abarth Dealership.
113) You must always indicate that
the tyre was repaired using the
kit. Give the booklet to the
technicians who will be handling
the tyre that was treated using
the kit.
IMPORTANT
2) Replace the spray bottle
containing the sealant after the
expiry date. Dispose of the bottle
and the sealant properly. Have
them disposed of in compliance
with national and local
regulations.
134
IN AN EMERGENCY
Page 143 of 215
REPLACING AN
EXTERIOR BULB
For the type of bulb and power rating,
see paragraph "Replacing a bulb".
FRONT LIGHT CLUSTERS
The front light clusters contain side
lights, dipped headlights, main beam
headlights and direction indicator bulbs.
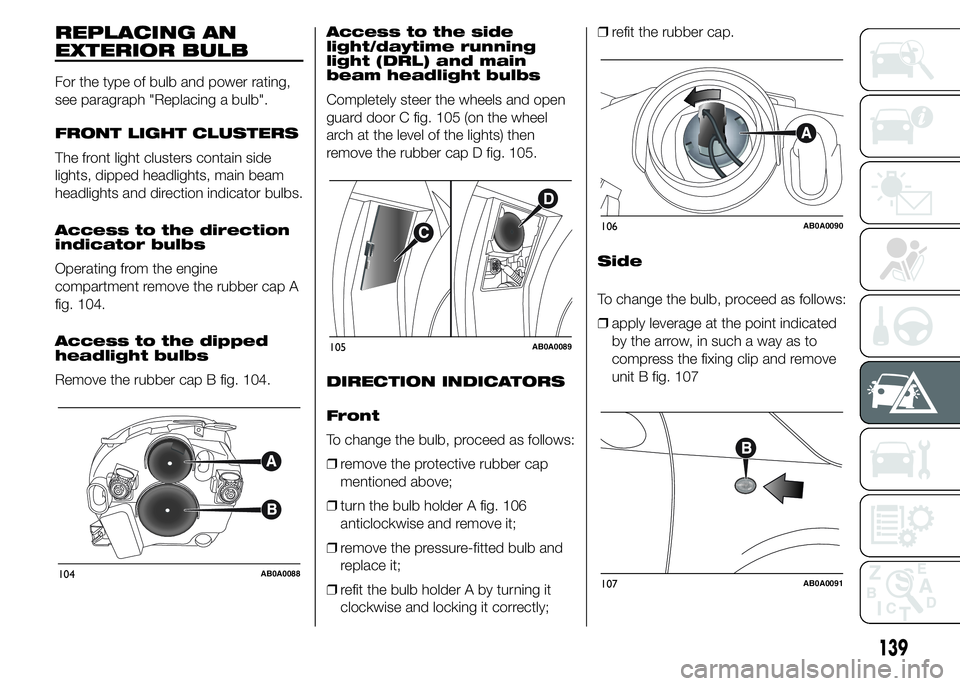
Access to the direction
indicator bulbs
Operating from the engine
compartment remove the rubber cap A
fig. 104.
Access to the dipped
headlight bulbs
Remove the rubber cap B fig. 104.Access to the side
light/daytime running
light (DRL) and main
beam headlight bulbs
Completely steer the wheels and open
guard door C fig. 105 (on the wheel
arch at the level of the lights) then
remove the rubber cap D fig. 105.
DIRECTION INDICATORS
Front
To change the bulb, proceed as follows:
❒remove the protective rubber cap
mentioned above;
❒turn the bulb holder A fig. 106
anticlockwise and remove it;
❒remove the pressure-fitted bulb and
replace it;
❒refit the bulb holder A by turning it
clockwise and locking it correctly;❒refit the rubber cap.
Side
104AB0A0088
105AB0A0089
106AB0A0090
107AB0A0091
139
To change the bulb, proceed as follows:
❒apply leverage at the point indicated
by the arrow, in such a way as to
compress the fixing clip and remove
unit B fig. 107
Page 149 of 215
Engine compartment
fuse box
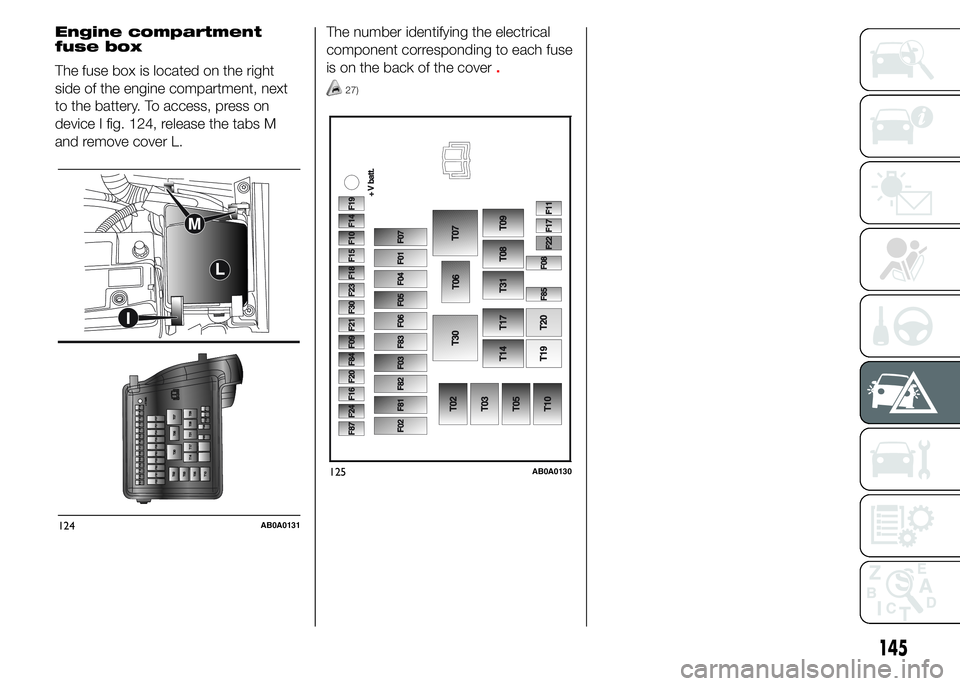
The fuse box is located on the right
side of the engine compartment, next
to the battery. To access, press on
device I fig. 124, release the tabs M
and remove cover L.The number identifying the electrical
component corresponding to each fuse
is on the back of the cover
.
27)
124AB0A0131
125AB0A0130
145
Page 150 of 215
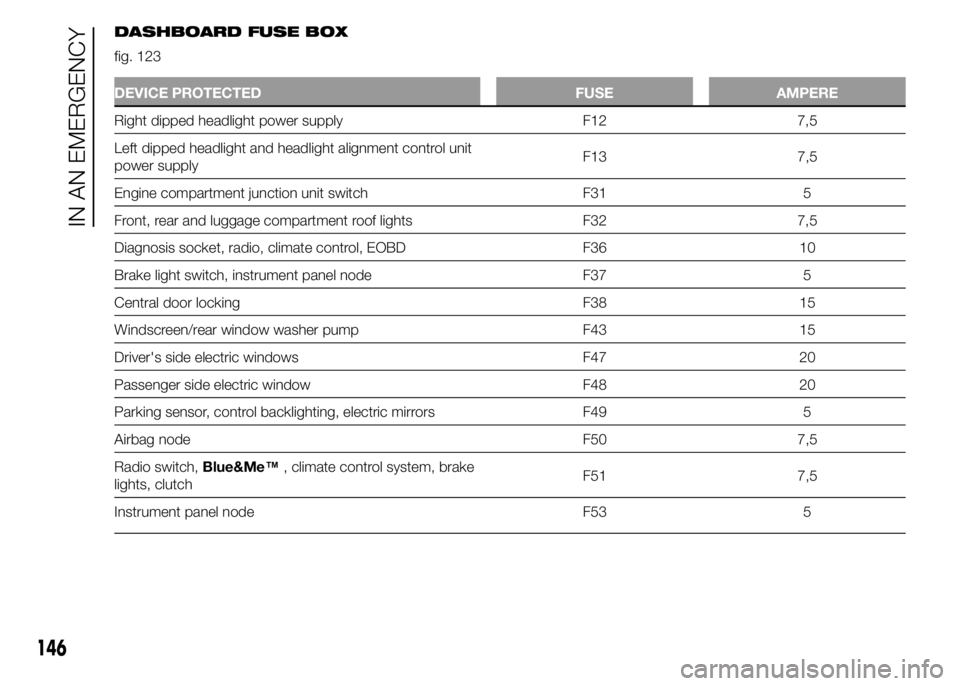
DASHBOARD FUSE BOX
fig. 123
DEVICE PROTECTED FUSE AMPERE
Right dipped headlight power supply F12 7,5
Left dipped headlight and headlight alignment control unit
power supplyF13 7,5
Engine compartment junction unit switch F31 5
Front, rear and luggage compartment roof lights F32 7,5
Diagnosis socket, radio, climate control, EOBD F36 10
Brake light switch, instrument panel node F37 5
Central door locking F38 15
Windscreen/rear window washer pump F43 15
Driver's side electric windows F47 20
Passenger side electric window F48 20
Parking sensor, control backlighting, electric mirrors F49 5
Airbag node F50 7,5
Radio switch,Blue&Me™, climate control system, brake
lights, clutchF51 7,5
Instrument panel node F53 5
146
IN AN EMERGENCY
Page 151 of 215
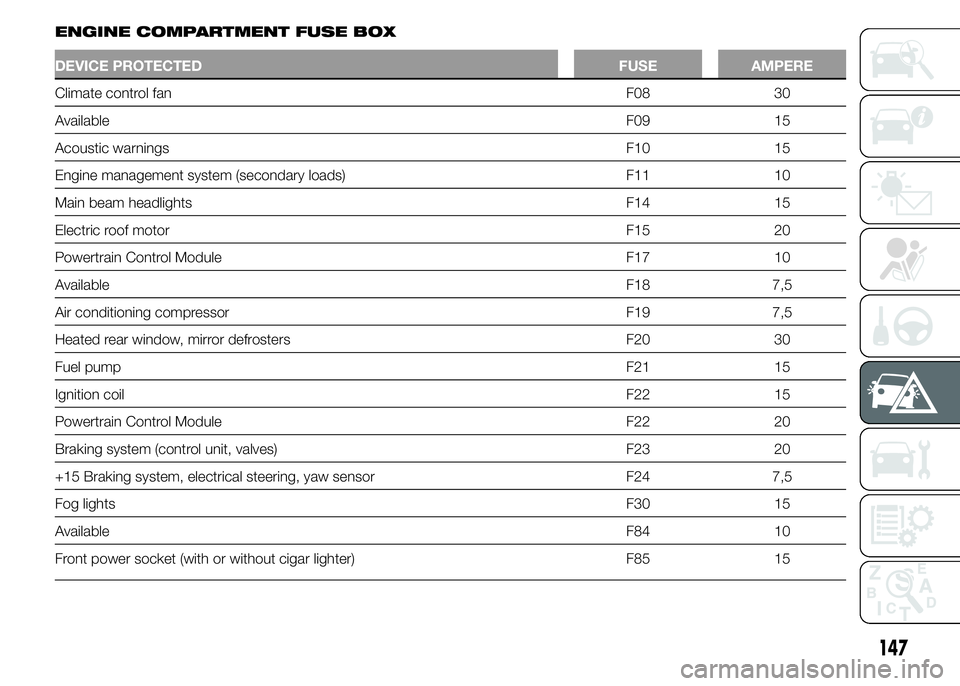
ENGINE COMPARTMENT FUSE BOX
DEVICE PROTECTED FUSE AMPERE
Climate control fan F08 30
AvailableF09 15
Acoustic warnings F10 15
Engine management system (secondary loads) F11 10
Main beam headlights F14 15
Electric roof motor F15 20
Powertrain Control Module F17 10
AvailableF18 7,5
Air conditioning compressor F19 7,5
Heated rear window, mirror defrosters F20 30
Fuel pumpF21 15
Ignition coilF22 15
Powertrain Control Module F22 20
Braking system (control unit, valves) F23 20
+15 Braking system, electrical steering, yaw sensor F24 7,5
Fog lightsF30 15
AvailableF84 10
Front power socket (with or without cigar lighter) F85 15
147