steering Abarth 500 2016 Owner handbook (in English)
[x] Cancel search | Manufacturer: ABARTH, Model Year: 2016, Model line: 500, Model: Abarth 500 2016Pages: 215, PDF Size: 19.08 MB
Page 11 of 215
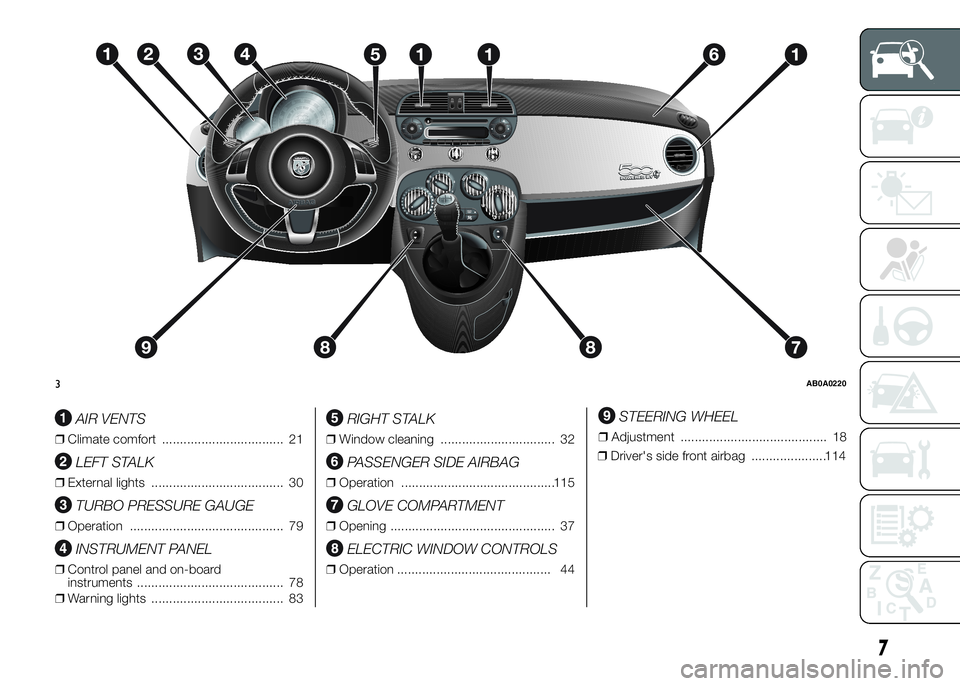
AIR VENTS
ŌØÆClimate comfort .................................. 21
LEFT STALK
ŌØÆExternal lights ..................................... 30
TURBO PRESSURE GAUGE
ŌØÆOperation ........................................... 79
INSTRUMENT PANEL
ŌØÆControl panel and on-board
instruments ......................................... 78
ŌØÆWarning lights ..................................... 83
RIGHT STALK
ŌØÆWindow cleaning ................................ 32
PASSENGER SIDE AIRBAG
ŌØÆOperation ...........................................115
GLOVE COMPARTMENT
ŌØÆOpening .............................................. 37
ELECTRIC WINDOW CONTROLS
ŌØÆOperation ........................................... 44
STEERING WHEEL
ŌØÆAdjustment ......................................... 18
ŌØÆDriver's side front airbag .....................114
3AB0A0220
7
Page 13 of 215
GETTING TO KNOW YOUR CAR
In-depth knowledge of your new vehicle
starts here.
The handbook that you are reading
simply and directly explains how it
is made and how it works.
ThatŌĆÖs why we advise you to read it
seated comfortably on board, so that
you can see what is described here for
yourself.SYMBOLS ...................................... 10
FIAT CODE SYSTEM ....................... 10
THE KEYS....................................... 11
IGNITION SWITCH .......................... 14
SEATS ............................................ 15
HEAD RESTRAINTS ........................ 17
STEERING WHEEL ......................... 18
REAR VIEW MIRRORS .................... 19
CLIMATIC COMFORT ..................... 21
HEATING AND VENTILATION.......... 22
MANUAL CLIMATE CONTROL
SYSTEM ......................................... 24
AUTOMATIC CLIMATE CONTROL
SYSTEM ......................................... 26
EXTERNAL LIGHTS......................... 30
WINDOW CLEANING ...................... 32
ROOF LIGHTS ................................ 33
CONTROLS .................................... 34
INTERIOR FITTINGS ....................... 36
FIXED GLASS ROOF ....................... 40
ELECTRIC SUN ROOF .................... 40
DOORS ........................................... 42
ELECTRIC WINDOWS .................... 44
LUGGAGE COMPARTMENT ........... 45
BONNET ......................................... 48
ROOF RACK/SKI RACK .................. 50
HEADLIGHTS.................................. 51ESC SYSTEM ................................. 52
ITPMS (INDIRECT TYRE
PRESSURE MONITORING
SYSTEM) ........................................ 56
EOBD SYSTEM............................... 59
DUALDRIVE ELECTRIC POWER
STEERING ...................................... 59
RADIO SYSTEM .............................. 60
ACCESSORIES PURCHASED BY
THE OWNER................................... 60
PARKING SENSORS....................... 62
REFUELLING THE CAR .................. 64
PROTECTING THE
ENVIRONMENT .............................. 65
9
Page 18 of 215
IGNITION SWITCH
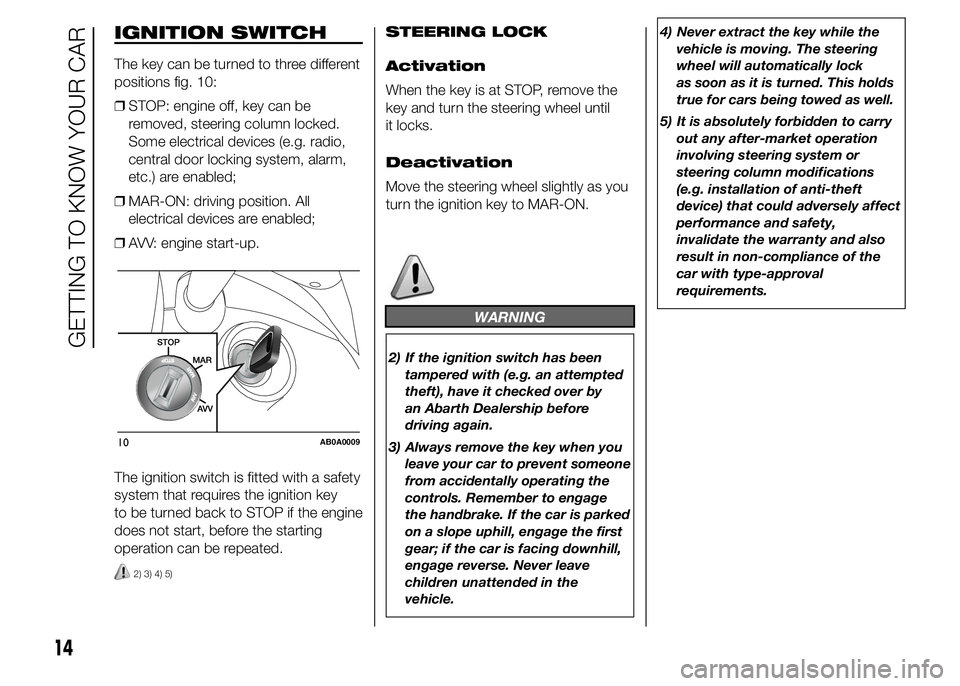
The key can be turned to three different
positions fig. 10:
ŌØÆSTOP: engine off, key can be
removed, steering column locked.
Some electrical devices (e.g. radio,
central door locking system, alarm,
etc.) are enabled;
ŌØÆMAR-ON: driving position. All
electrical devices are enabled;
ŌØÆAVV: engine start-up.
The ignition switch is fitted with a safety
system that requires the ignition key
to be turned back to STOP if the engine
does not start, before the starting
operation can be repeated.
2) 3) 4) 5)
STEERING LOCK
Activation
When the key is at STOP, remove the
key and turn the steering wheel until
it locks.
Deactivation
Move the steering wheel slightly as you
turn the ignition key to MAR-ON.
WARNING
2) If the ignition switch has been
tampered with (e.g. an attempted
theft), have it checked over by
an Abarth Dealership before
driving again.
3) Always remove the key when you
leave your car to prevent someone
from accidentally operating the
controls. Remember to engage
the handbrake. If the car is parked
on a slope uphill, engage the first
gear; if the car is facing downhill,
engage reverse. Never leave
children unattended in the
vehicle.4) Never extract the key while the
vehicle is moving. The steering
wheel will automatically lock
as soon as it is turned. This holds
true for cars being towed as well.
5) It is absolutely forbidden to carry
out any after-market operation
involving steering system or
steering column modifications
(e.g. installation of anti-theft
device) that could adversely affect
performance and safety,
invalidate the warranty and also
result in non-compliance of the
car with type-approval
requirements.
10AB0A0009
14
GETTING TO KNOW YOUR CAR
Page 19 of 215
SEATS
FRONT SEATS
Lengthwise adjustment
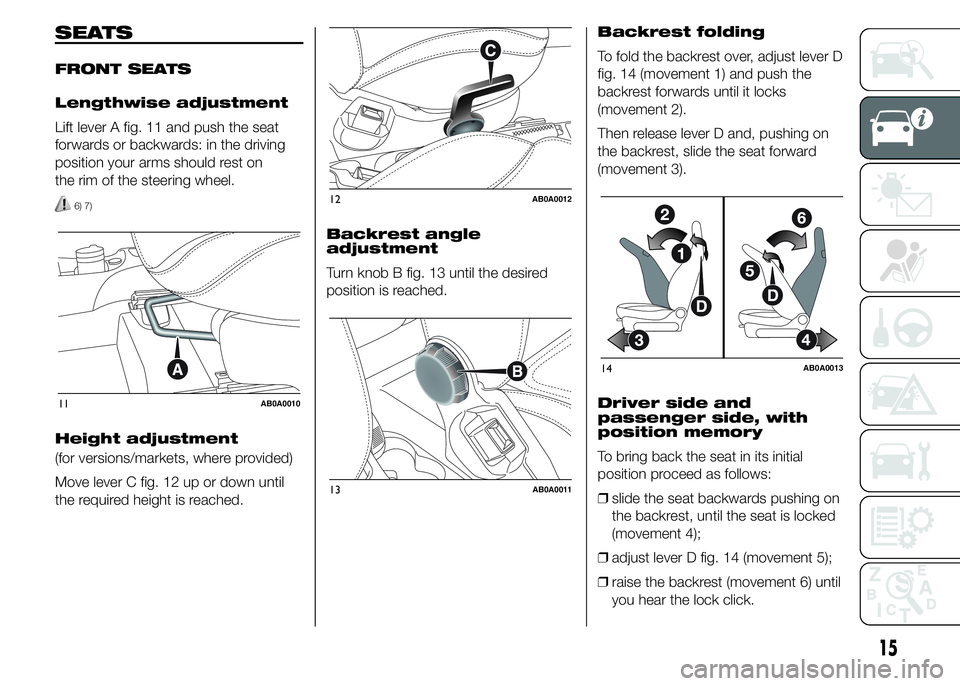
Lift lever A fig. 11 and push the seat
forwards or backwards: in the driving
position your arms should rest on
the rim of the steering wheel.
6) 7)
Height adjustment
(for versions/markets, where provided)
Move lever C fig. 12 up or down until
the required height is reached.Backrest angle
adjustment
Turn knob B fig. 13 until the desired
position is reached.Backrest folding
To fold the backrest over, adjust lever D
fig. 14 (movement 1) and push the
backrest forwards until it locks
(movement 2).
Then release lever D and, pushing on
the backrest, slide the seat forward
(movement 3).
Driver side and
passenger side, with
position memory
To bring back the seat in its initial
position proceed as follows:
ŌØÆslide the seat backwards pushing on
the backrest, until the seat is locked
(movement 4);
ŌØÆadjust lever D fig. 14 (movement 5);
ŌØÆraise the backrest (movement 6) until
you hear the lock click.
11AB0A0010
12AB0A0012
13AB0A0011
14AB0A0013
15
Page 20 of 215
IMPORTANT Using lever D fig. 14
before locking the seat in its initial
position will cause the initial seat
position to be lost. In this case the
position of the seat must be restored
through lengthwise adjustment lever A
fig. 11.
Passenger side without
position memory
To bring back the seat in its initial
position proceed as follows:
ŌØÆslide the seat backwards pushing on
the backrest to the desired position
(movement 4);
ŌØÆadjust lever D fig. 14 (movement 5);
ŌØÆraise the backrest (movement 6) until
you hear the lock click.
6)
The type of reattachment manoeuvre
has been chosen to guarantee the
safety of the occupant.
If an obstacle is present (e.g. a bag)
and the seat cannot be returned to its
original position, the mechanism
reattaches the seat only positioning the
backrest, always ensuring that the
seat is correctly attached to its guides.REAR SEATS
Backrest release
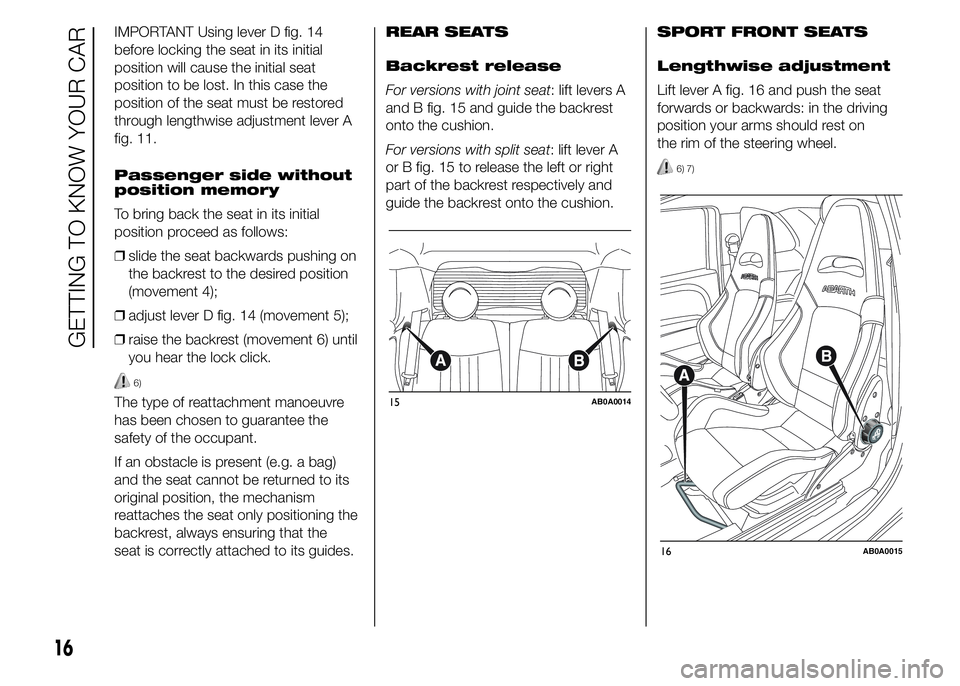
For versions with joint seat: lift levers A
and B fig. 15 and guide the backrest
onto the cushion.
For versions with split seat: lift lever A
or B fig. 15 to release the left or right
part of the backrest respectively and
guide the backrest onto the cushion.SPORT FRONT SEATS
Lengthwise adjustment
Lift lever A fig. 16 and push the seat
forwards or backwards: in the driving
position your arms should rest on
the rim of the steering wheel.
6) 7)
15AB0A0014
16AB0A0015
16
GETTING TO KNOW YOUR CAR
Page 22 of 215
To lower the head restraint, press
button B fig. 18. The particular shape of
the head restraint deliberately interferes
with the correct support of the rear
passengerŌĆÖs back on the backrest in
order to force them to lift the head
restraint for correct use.
IMPORTANT If the rear seats are used,
always set the head restraints in the
"completely raised" position.STEERING WHEEL
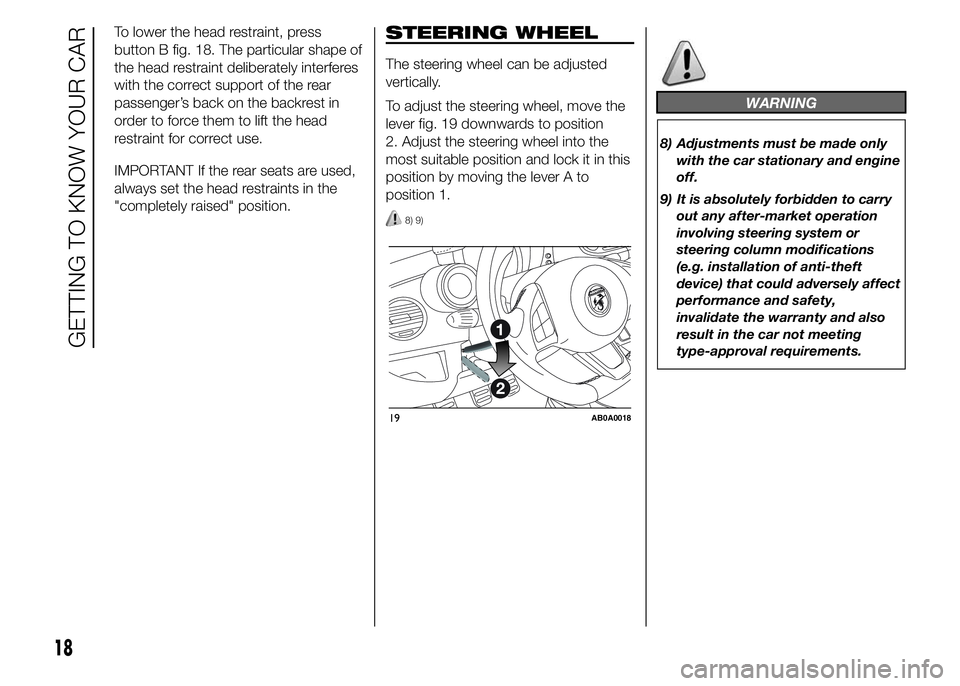
The steering wheel can be adjusted
vertically.
To adjust the steering wheel, move the
lever fig. 19 downwards to position
2. Adjust the steering wheel into the
most suitable position and lock it in this
position by moving the lever A to
position 1.
8) 9)
WARNING
8) Adjustments must be made only
with the car stationary and engine
off.
9) It is absolutely forbidden to carry
out any after-market operation
involving steering system or
steering column modifications
(e.g. installation of anti-theft
device) that could adversely affect
performance and safety,
invalidate the warranty and also
result in the car not meeting
type-approval requirements.
19AB0A0018
18
GETTING TO KNOW YOUR CAR
Page 34 of 215
EXTERNAL LIGHTS
IN BRIEF
The left-hand stalk operates most of
the external lights. The external
lights can only be switched on when
the ignition key is at MAR-ON.
The instrument panel and the
dashboard and central tunnel
controls will light up together with the
external lights.
DAYTIME RUNNING
LIGHTS (DRL)
"Daytime Running Lights"
(for versions/markets, where provided)
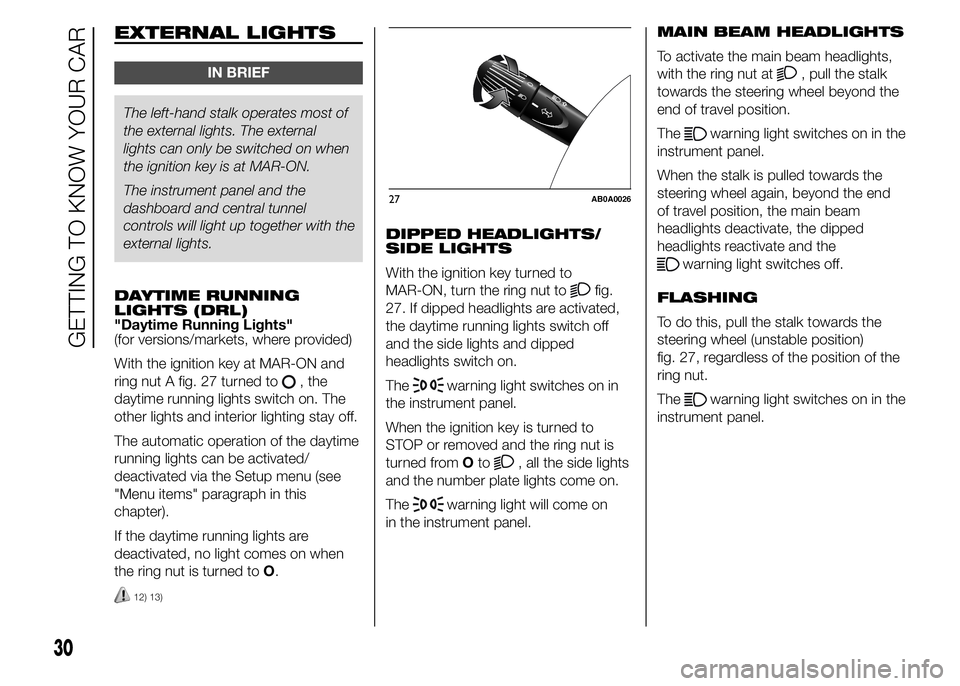
With the ignition key at MAR-ON and
ring nut A fig. 27 turned to
, the
daytime running lights switch on. The
other lights and interior lighting stay off.
The automatic operation of the daytime
running lights can be activated/
deactivated via the Setup menu (see
"Menu items" paragraph in this
chapter).
If the daytime running lights are
deactivated, no light comes on when
the ring nut is turned toO.
12) 13)
DIPPED HEADLIGHTS/
SIDE LIGHTS
With the ignition key turned to
MAR-ON, turn the ring nut to
fig.
27. If dipped headlights are activated,
the daytime running lights switch off
and the side lights and dipped
headlights switch on.
The
warning light switches on in
the instrument panel.
When the ignition key is turned to
STOP or removed and the ring nut is
turned fromOto
, all the side lights
and the number plate lights come on.
The
warning light will come on
in the instrument panel.MAIN BEAM HEADLIGHTS
To activate the main beam headlights,
with the ring nut at
, pull the stalk
towards the steering wheel beyond the
end of travel position.
The
warning light switches on in the
instrument panel.
When the stalk is pulled towards the
steering wheel again, beyond the end
of travel position, the main beam
headlights deactivate, the dipped
headlights reactivate and the
warning light switches off.
FLASHING
To do this, pull the stalk towards the
steering wheel (unstable position)
fig. 27, regardless of the position of the
ring nut.
The
warning light switches on in the
instrument panel.
27AB0A0026
30
GETTING TO KNOW YOUR CAR
Page 35 of 215
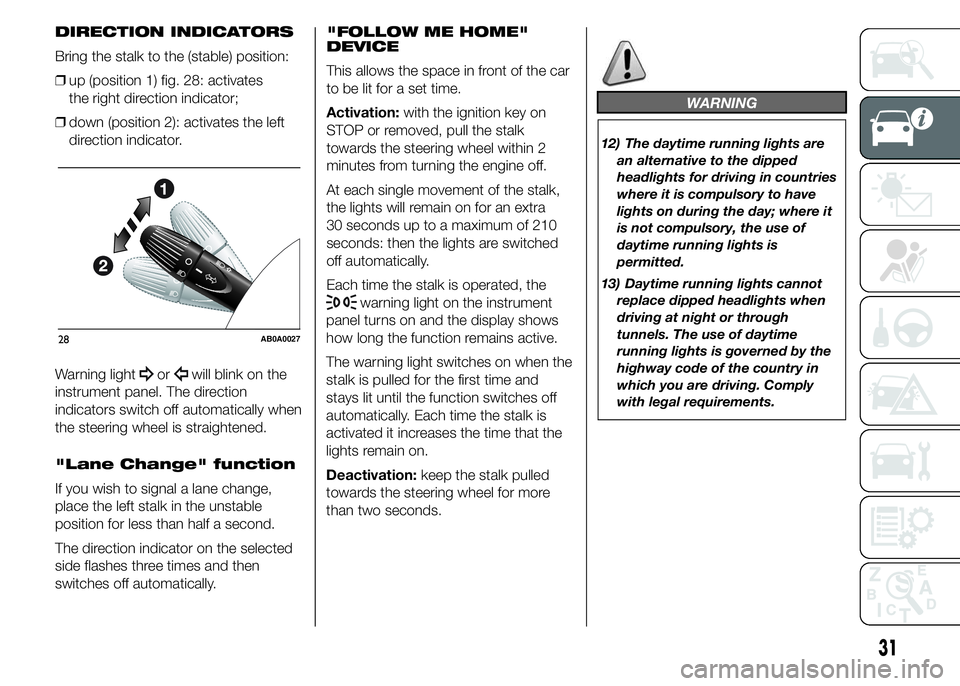
DIRECTION INDICATORS
Bring the stalk to the (stable) position:
ŌØÆup (position 1) fig. 28: activates
the right direction indicator;
ŌØÆdown (position 2): activates the left
direction indicator.
Warning light
orwill blink on the
instrument panel. The direction
indicators switch off automatically when
the steering wheel is straightened.
"Lane Change" function
If you wish to signal a lane change,
place the left stalk in the unstable
position for less than half a second.
The direction indicator on the selected
side flashes three times and then
switches off automatically."FOLLOW ME HOME"
DEVICE
This allows the space in front of the car
to be lit for a set time.
Activation:with the ignition key on
STOP or removed, pull the stalk
towards the steering wheel within 2
minutes from turning the engine off.
At each single movement of the stalk,
the lights will remain on for an extra
30 seconds up to a maximum of 210
seconds: then the lights are switched
off automatically.
Each time the stalk is operated, the
warning light on the instrument
panel turns on and the display shows
how long the function remains active.
The warning light switches on when the
stalk is pulled for the first time and
stays lit until the function switches off
automatically. Each time the stalk is
activated it increases the time that the
lights remain on.
Deactivation:keep the stalk pulled
towards the steering wheel for more
than two seconds.
WARNING
12) The daytime running lights are
an alternative to the dipped
headlights for driving in countries
where it is compulsory to have
lights on during the day; where it
is not compulsory, the use of
daytime running lights is
permitted.
13) Daytime running lights cannot
replace dipped headlights when
driving at night or through
tunnels. The use of daytime
running lights is governed by the
highway code of the country in
which you are driving. Comply
with legal requirements.
28AB0A0027
31
Page 36 of 215
WINDOW CLEANING
IN BRIEF
The right stalk controls screen
wiper/washer operation.
This operates only with the ignition
key turned to MAR-ON.
WINDSCREEN
WIPER/WASHER
Operation
3) 4)
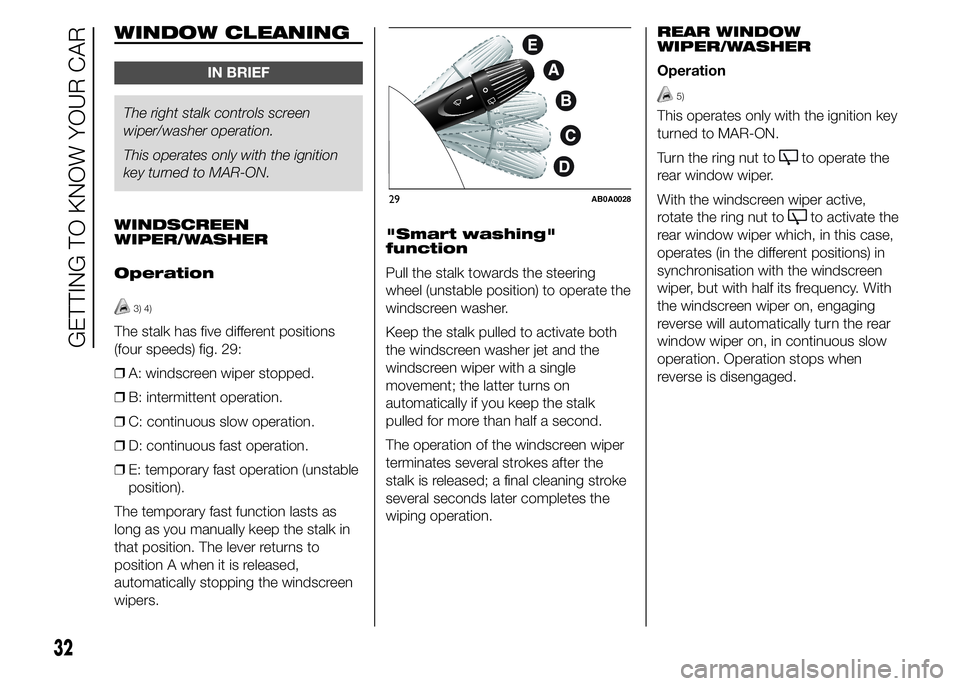
The stalk has five different positions
(four speeds) fig. 29:
ŌØÆA: windscreen wiper stopped.
ŌØÆB: intermittent operation.
ŌØÆC: continuous slow operation.
ŌØÆD: continuous fast operation.
ŌØÆE: temporary fast operation (unstable
position).
The temporary fast function lasts as
long as you manually keep the stalk in
that position. The lever returns to
position A when it is released,
automatically stopping the windscreen
wipers."Smart washing"
function
Pull the stalk towards the steering
wheel (unstable position) to operate the
windscreen washer.
Keep the stalk pulled to activate both
the windscreen washer jet and the
windscreen wiper with a single
movement; the latter turns on
automatically if you keep the stalk
pulled for more than half a second.
The operation of the windscreen wiper
terminates several strokes after the
stalk is released; a final cleaning stroke
several seconds later completes the
wiping operation.REAR WINDOW
WIPER/WASHER
Operation
5)
This operates only with the ignition key
turned to MAR-ON.
Turn the ring nut to
to operate the
rear window wiper.
With the windscreen wiper active,
rotate the ring nut to
to activate the
rear window wiper which, in this case,
operates (in the different positions) in
synchronisation with the windscreen
wiper, but with half its frequency. With
the windscreen wiper on, engaging
reverse will automatically turn the rear
window wiper on, in continuous slow
operation. Operation stops when
reverse is disengaged.
29AB0A0028
32
GETTING TO KNOW YOUR CAR
Page 38 of 215
When the doors are released using the
key with remote control, a timer will
be activated for about 10 seconds.
When the doors are locked using the
key with remote control, the roof light
switches off.
Roof light timing (lens
central position)
Switching on
Three different switching-on modes are
provided:
ŌØÆwhen opening one door a three-
minute timer will start, which restarts
each time a door is opened;
ŌØÆa timer of about 10 seconds will start
when the ignition key is removed
within two minutes from turning the
engine off;
ŌØÆa timer of about 10 seconds will start
when the doors are opened (either by
remote control or key in driverŌĆÖs
door).Switching off
Three modes are provided for switching
off:
ŌØÆwhen all doors are closed, the
three-minute timer will stop and
a ten-second one will start. This timer
will stop when the key is turned to
MAR-ON;
ŌØÆwhen doors are locked (either with
remote control or with key on driver
side door), the roof light switches off.
ŌØÆthe interior lights are switched off
in any case after 15 minutes to
preserve battery charge
LUGGAGE
COMPARTMENT LIGHT
For versions fitted with luggage
compartment light, the light comes on
automatically when the tailgate is
opened and it will switch off when it is
closed.CONTROLS
SPORT FUNCTION
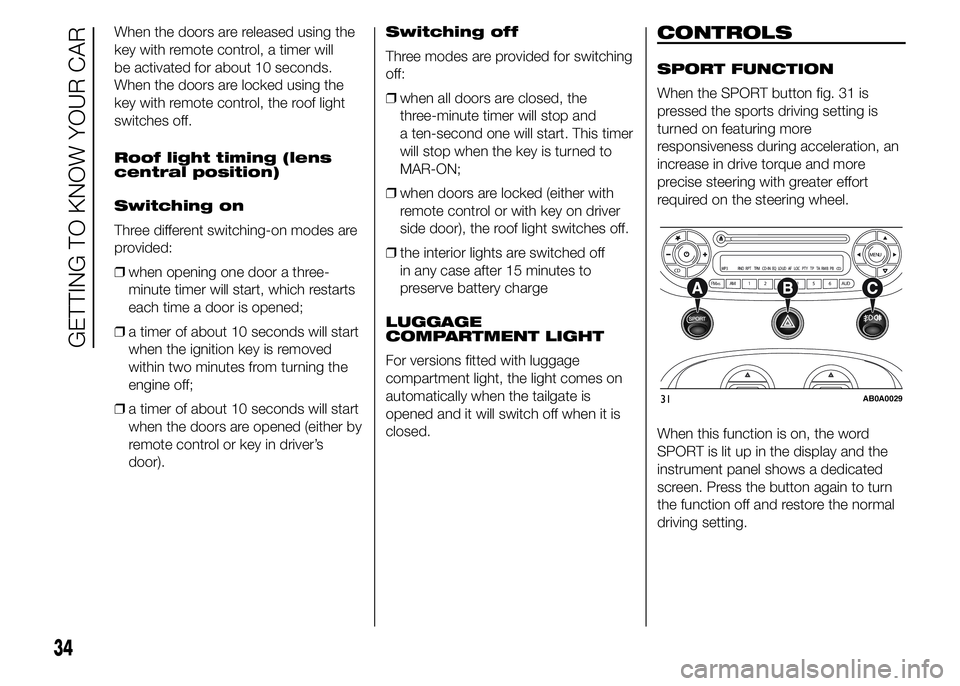
When the SPORT button fig. 31 is
pressed the sports driving setting is
turned on featuring more
responsiveness during acceleration, an
increase in drive torque and more
precise steering with greater effort
required on the steering wheel.
When this function is on, the word
SPORT is lit up in the display and the
instrument panel shows a dedicated
screen. Press the button again to turn
the function off and restore the normal
driving setting.
CDMENU
FM ASAM 1 2 3 4 5 6 AUDMP3 RND RPT TPM CD-IN EQ
LOUD AF LOC PTY TP TA RMB PBCD
31AB0A0029
34
GETTING TO KNOW YOUR CAR