window Abarth 500 2017 Owner handbook (in English)
[x] Cancel search | Manufacturer: ABARTH, Model Year: 2017, Model line: 500, Model: Abarth 500 2017Pages: 192, PDF Size: 6.46 MB
Page 80 of 192
SIDE AIRBAGS (Side bag
- Window bag)
(where provided)
To increase protection of occupants in
the event of side impact, the car is
equipped with side bags for pelvis,
chest and shoulder protection (Side
bags) for the driver and the passenger
and airbags protecting the head.
Non-activation of side bags in other
types of collisions (front collisions, rear
shunts, roll-overs, etc.) is not a system
malfunction.
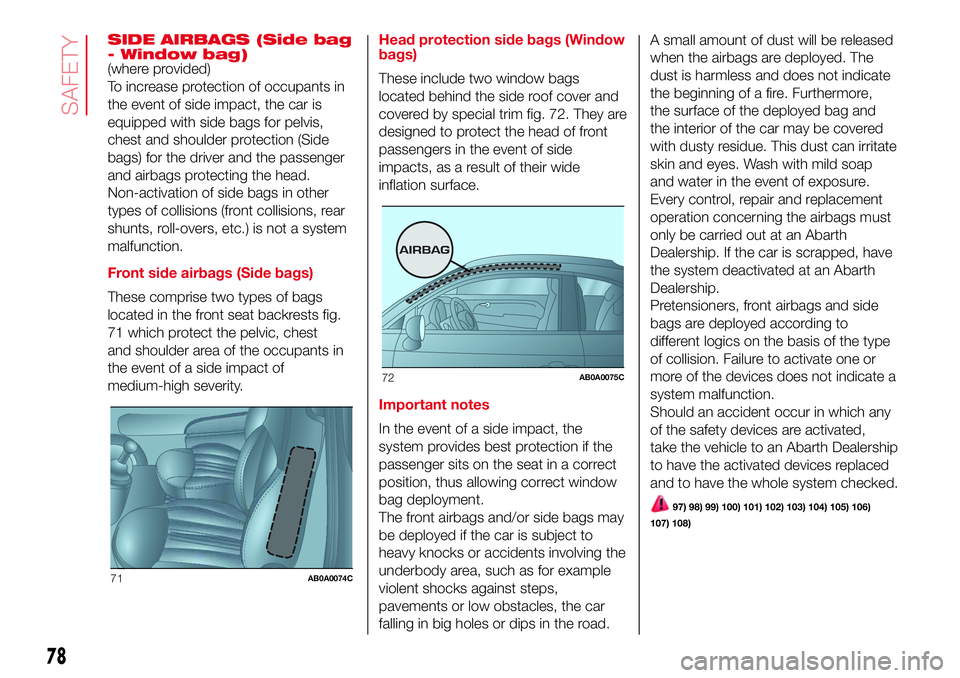
Front side airbags (Side bags)
These comprise two types of bags
located in the front seat backrests fig.
71 which protect the pelvic, chest
and shoulder area of the occupants in
the event of a side impact of
medium-high severity.Head protection side bags (Window
bags)
These include two window bags
located behind the side roof cover and
covered by special trim fig. 72. They are
designed to protect the head of front
passengers in the event of side
impacts, as a result of their wide
inflation surface.
Important notes
In the event of a side impact, the
system provides best protection if the
passenger sits on the seat in a correct
position, thus allowing correct window
bag deployment.
The front airbags and/or side bags may
be deployed if the car is subject to
heavy knocks or accidents involving the
underbody area, such as for example
violent shocks against steps,
pavements or low obstacles, the car
falling in big holes or dips in the road.A small amount of dust will be released
when the airbags are deployed. The
dust is harmless and does not indicate
the beginning of a fire. Furthermore,
the surface of the deployed bag and
the interior of the car may be covered
with dusty residue. This dust can irritate
skin and eyes. Wash with mild soap
and water in the event of exposure.
Every control, repair and replacement
operation concerning the airbags must
only be carried out at an Abarth
Dealership. If the car is scrapped, have
the system deactivated at an Abarth
Dealership.
Pretensioners, front airbags and side
bags are deployed according to
different logics on the basis of the type
of collision. Failure to activate one or
more of the devices does not indicate a
system malfunction.
Should an accident occur in which any
of the safety devices are activated,
take the vehicle to an Abarth Dealership
to have the activated devices replaced
and to have the whole system checked.
97) 98) 99) 100) 101) 102) 103) 104) 105) 106)
107) 108)
71AB0A0074C
72AB0A0075C
78
SAFETY
Page 82 of 192

102)When the ignition key is turned to
MAR, thewarning light switches for few
seconds, then if the passenger airbag
protection is active it should switch off.
103)Do not wash the seats with water or
pressurised steam (wash by hand or at
automatic seat washing stations).
104)The airbag deployment threshold is
higher than that of the pretensioners.
For collisions in the range between the two
thresholds, it is normal for only the
pretensioners to be activated.
105)Do not affix rigid objects to the
garment hooks or support handles.
106)The airbag does not replace seat
belts but increases their efficiency.
Furthermore, since front airbags are not
deployed in low-speed frontal impacts,
side impacts, rear shunts or roll-overs, the
passengers are protected only by the
seat belts which must therefore be
fastened at all times.
107)Do not rest your head, arms or
elbows on the door, on the windows or in
the window bag area to prevent injury
during deployment.
108)Never lean your head, arms or elbows
out of the window.
109)Do not travel carrying objects in your
lap, in front of your chest or between
your lips (pipe, pencils, etc.): they could
cause severe injury if the airbag is
deployed.
80
SAFETY
Page 102 of 192

DASHBOARD FUSE BOX
DEVICE PROTECTED FUSE AMPERE
Headlight alignment corrector F13
5(*)
Diagnosis socket, Uconnect, climate control, EOBD F36 15
Brake light switch, instrument panel node F37 5
Central door locking F38 15
Windscreen/rear window washer pump F43 15
Driver's side electric windows F47 20
(*) (where provided)
96AB0A0106C
100
IN AN EMERGENCY
Page 103 of 192
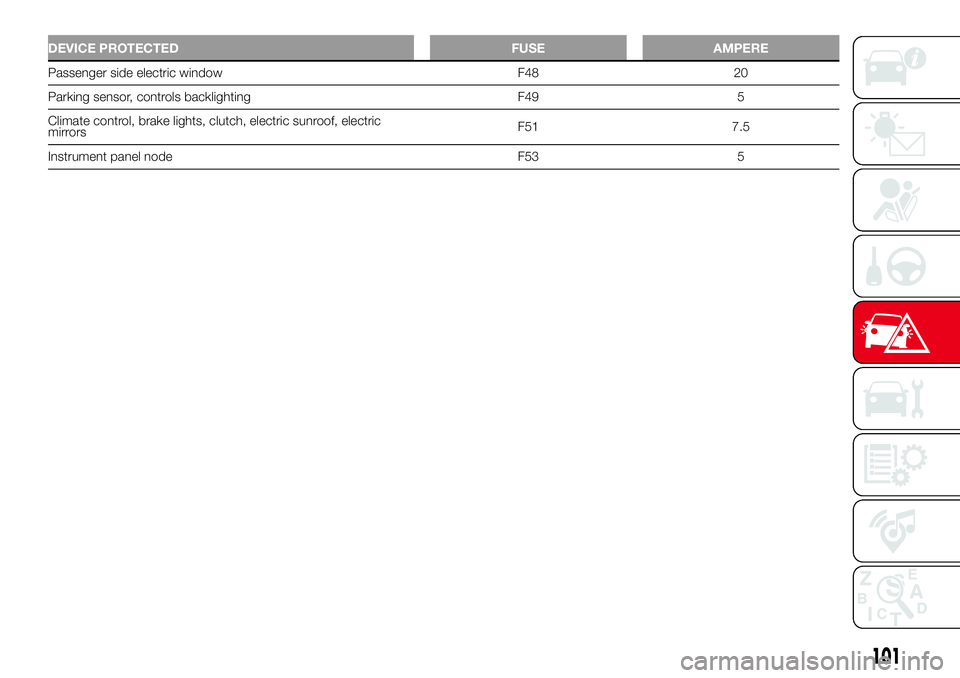
DEVICE PROTECTED FUSE AMPERE
Passenger side electric window F48 20
Parking sensor, controls backlighting F49 5
Climate control, brake lights, clutch, electric sunroof, electric
mirrorsF51 7.5
Instrument panel node F53 5
101
Page 105 of 192
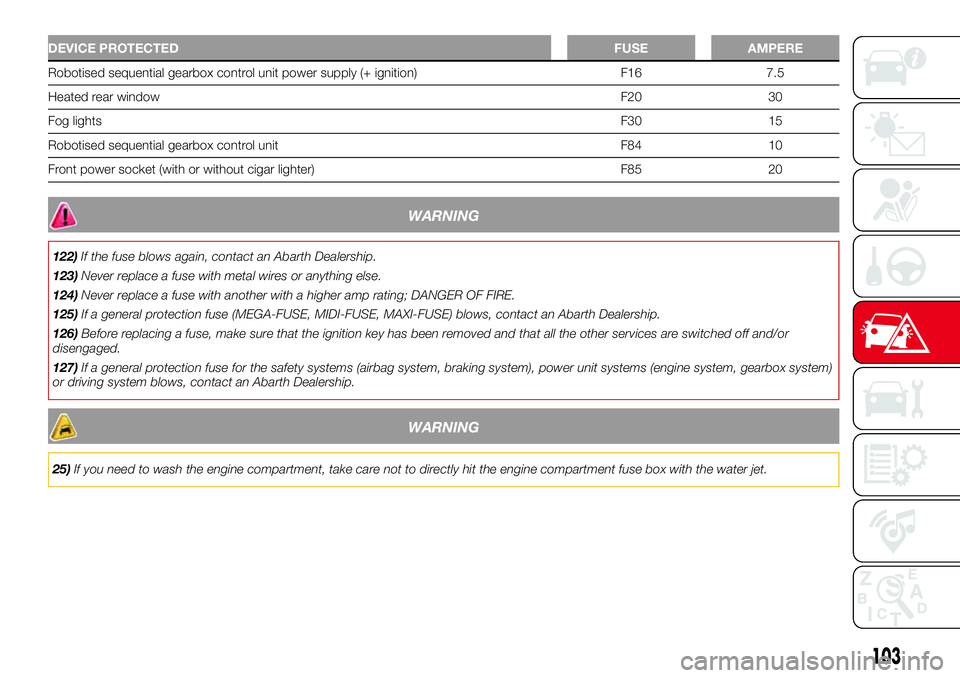
DEVICE PROTECTEDFUSE AMPERE
Robotised sequential gearbox control unit power supply (+ ignition) F16 7.5
Heated rear windowF20 30
Fog lightsF30 15
Robotised sequential gearbox control unit F84 10
Front power socket (with or without cigar lighter) F85 20
WARNING
122)If the fuse blows again, contact an Abarth Dealership.
123)Never replace a fuse with metal wires or anything else.
124)Never replace a fuse with another with a higher amp rating; DANGER OF FIRE.
125)If a general protection fuse (MEGA-FUSE, MIDI-FUSE, MAXI-FUSE) blows, contact an Abarth Dealership.
126)Before replacing a fuse, make sure that the ignition key has been removed and that all the other services are switched off and/or
disengaged.
127)If a general protection fuse for the safety systems (airbag system, braking system), power unit systems (engine system, gearbox system)
or driving system blows, contact an Abarth Dealership.
WARNING
25)If you need to wash the engine compartment, take care not to directly hit the engine compartment fuse box with the water jet.
103
Page 114 of 192
SERVICING AND CARE
Correct servicing permits the
performance of the vehicle to be
maintained over time, as well as limited
running costs and safeguarding the
efficiency of the safety systems.
This chapter explains how.SCHEDULED SERVICING ...............113
SCHEDULED SERVICING PLAN .....114
PERIODIC CHECKS ........................118
DEMANDING USE OF THE CAR .....118
CHECKING LEVELS........................119
BATTERY ........................................123
BATTERY RECHARGING ................124
WINDSCREEN/ REAR WINDOW
WIPER ............................................125
LIFTING THE VEHICLE....................126
WHEELS AND TYRES.....................126
BODYWORK ...................................127
INTERIOR .......................................130
112
SERVICING AND CARE
Page 117 of 192
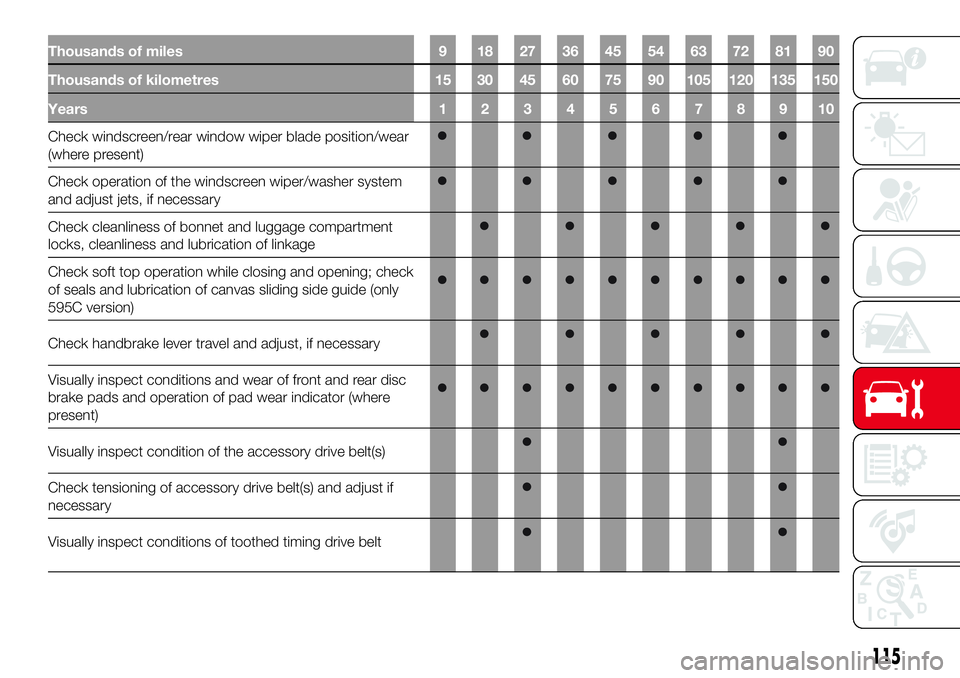
Thousands of miles 9 18 27 36 45 54 63 72 81 90
Thousands of kilometres 15 30 45 60 75 90 105 120 135 150
Years 1 2 3 4 5 6 7 8 9 10
Check windscreen/rear window wiper blade position/wear
(where present)
Check operation of the windscreen wiper/washer system
and adjust jets, if necessary
Check cleanliness of bonnet and luggage compartment
locks, cleanliness and lubrication of linkage
Check soft top operation while closing and opening; check
of seals and lubrication of canvas sliding side guide (only
595C version)
Check handbrake lever travel and adjust, if necessary
Visually inspect conditions and wear of front and rear disc
brake pads and operation of pad wear indicator (where
present)
Visually inspect condition of the accessory drive belt(s)
Check tensioning of accessory drive belt(s) and adjust if
necessary
Visually inspect conditions of toothed timing drive belt
115
Page 120 of 192
PERIODIC CHECKS
Every 1,000 km or before long
journeys, check and, if necessary, top
up the following:
engine coolant level;
brake fluid level;
windscreen washer fluid level;
tyre inflation pressure and condition;
operation of lighting system
(headlights, direction indicators, hazard
warning lights, etc.);
operation of screen washer/wiper
system and positioning/wear of
windscreen/rear window wiper blades.
Every 3,000 km check and top up if
required: engine oil level.
You are advised to use PETRONAS
LUBRICANTS products, which have
been designed and produced
specifically for Abarth cars (see table
"Capacities" in the "Technical
specifications" chapter).
DEMANDING USE OF
THE CAR
If the vehicle is used mainly under one
of the following conditions:
if the car is used under demanding
conditions, e.g. on track;
towing a trailer or caravan;
dusty roads;
short, repeated journeys (less than
7-8 km) at sub-zero outside
temperatures;
engine often idling or driving long
distances at low speeds or long periods
of inactivity;
the following checks must be carried
out more often than indicated in the
Scheduled Servicing Plan:
check front disc brake pad condition
and wear;
check cleanliness of bonnet and
luggage compartment locks,
cleanliness and lubrication of linkage;
visually inspect condition of: engine,
gearbox, transmission, pipes and
hoses (exhaust - fuel system - brakes)
and rubber elements (boots - sleeves
- bushes - etc.);
check battery charge and battery
fluid level (electrolyte);
visually inspect conditions of the
accessory drive belts;
check and, if necessary, change
engine oil and replace oil filter;
check and, if necessary, replace
pollen filter;
check and, if necessary, replace air
cleaner.
118
SERVICING AND CARE
Page 123 of 192
ENGINE OIL
31)
4)
Check the oil level a few minutes (about
five) after the engine has stopped,
with the car parked on level ground.
Take out the engine oil dipstick 2 fig.
109 or fig. 110, clean it with a lint-free
cloth and reinsert it. Extract the engine
oil dipstick again and check that the
level is between the MIN and MAX
marks on the dipstick.
The range between the MIN. and MAX.
marks corresponds to about 1 litre of
oil.
If the level of the oil is close to or below
the MIN mark, add oil via filler 1 fig.
109 or fig. 110 until the MAX mark is
reached.
The oil level must never exceed the
MAX reference.
Engine oil consumption
The maximum engine oil consumption
is usually 400 grams every 1000 km.
When the car is new, the engine needs
to be run in; therefore the engine oil
consumption can only be considered
stabilised after the first 5000 - 6000
km.
IMPORTANT The oil consumption
depends on driving style and the
conditions under which the car is used.IMPORTANT After adding or changing
the oil, let the engine turn over for a few
seconds and wait a few minutes after
turning it off before you check the level.
ENGINE COOLANT FLUID
The coolant level must be checked
when the engine is cold and must
range between the MIN and MAX
marks on the reservoir.
If the level is too low, unscrew the cap 3
fig. 109 or fig. 110 of reservoir and
add the fluid described in the "Technical
Specifications" chapter.
32)
138)
WINDSCREEN/REAR
WINDOW WASHER FLUID
Check fluid level through the reservoir.
If the fluid level is too low, unscrew
the reservoir cap 4 fig. 109 or fig. 110
and add the fluid described in the
"Technical Specifications" chapter.
After topping up, close cap 4, making
sure it is correctly locked.
BRAKE FLUID
Check that the fluid is at the maximum
level (the fluid level in the reservoir
must not exceed the MAX mark).
If the fluid level in the reservoir is too
low, undo the reservoir cap 5 fig. 109 or
fig. 110 and add the fluid described in
the "Technical Specifications" chapter.
140) 141)
33)
IMPORTANT Carefully clean reservoir
cap 5 and the surrounding surface.
Take great care to ensure that
impurities do not enter the reservoir
when the cap is opened.
For topping-up, always use a funnel
with integrated filter with mesh equal to
or lower than 0.12 mm.
IMPORTANT Brake fluid is hygroscopic
(i.e. it absorbs moisture). For this
reason, if the car is mainly used in areas
with a high degree of atmospheric
humidity, the fluid must be replaced at
more frequent intervals than specified in
the "Scheduled Servicing Plan".
WARNING
136)Never smoke while working in the
engine compartment: gas and inflammable
vapours may be present, with the risk of
fire.
137)Be very careful when working in the
engine compartment when the engine
is hot: you may get burned. Remember
that the fan may start up if the engine
is hot: this could injure you. Scarves, ties
and other loose clothing might be pulled by
moving parts.
121
Page 127 of 192

WINDSCREEN/ REAR
WINDOW WIPER
WIPER BLADES
Replace the blades if the rubber edge is
deformed or worn. In any case, it is
advisable to replace them
approximately once a year.
148)A few simple precautions can reduce
the possibility of damage to the blades:
if the temperature falls below zero,
make sure that ice has not frozen
the rubber to the glass. Use a de-icing
product to release it if required;
remove any snow from the glass: in
addition to protecting the blades, this
prevents effort on the motor and
overheating;
do not operate the windscreen and
rear window wipers on dry glass.
REPLACING THE
WINDSCREEN WIPER
BLADES
Proceed as follows:
lift up the windscreen wiper arm 1
fig. 111 and position the blade so that it
forms a 90° angle with the arm;
press the button 1 and extract the
blade 3 from the arm 2;
insert the new blade making sure it
is locked into place.REPLACING THE REAR
WINDOW WIPER BLADE
Proceed as follows:
raise the cover 1 fig. 112 and
remove the arm from the car, undoing
the nut 2 fig. 112 that fixes it to the
pivot pin;
correctly position the new arm and
tighten the nut fully;
lower the cover.NOZZLES
Windscreen washer
If the jet of fluid is inadequate, firstly
check that there is fluid in the reservoir
(see "Checking levels" in this chapter).
Then check that the jet holes are not
clogged; use a needle to unblock them
if necessary.
The windscreen jets are directed by
adjusting the angle.
The jets should be directed at about
1/3 of the height from the top edge of
the windscreen fig. 113.
IMPORTANT In versions with a sun
roof, make sure that the sun roof is
closed before operating the front jets.
2
3
1
111AB0A0112C
12
112AB0A0113C
113AB0A0114C
125