clock Abarth 500 2017 Owner handbook (in English)
[x] Cancel search | Manufacturer: ABARTH, Model Year: 2017, Model line: 500, Model: Abarth 500 2017Pages: 192, PDF Size: 6.46 MB
Page 32 of 192
after full closing, wait for the sun roof
motor to stop.
EMERGENCY OPERATION
If the electrical device for moving the
roof fails, the sun roof can be moved
manually proceeding as described
below:
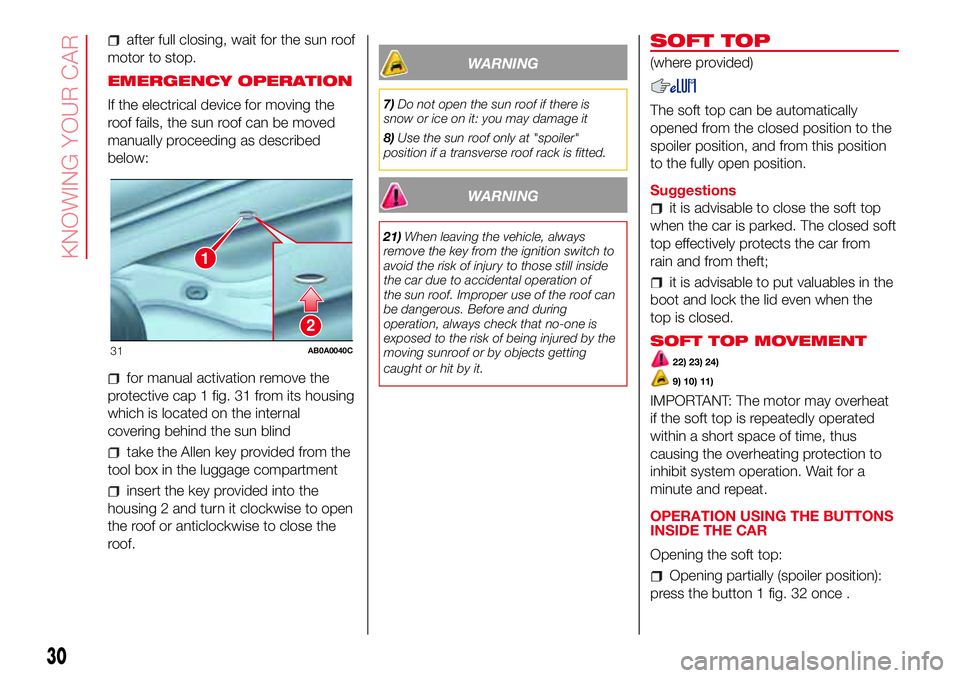
for manual activation remove the
protective cap 1 fig. 31 from its housing
which is located on the internal
covering behind the sun blind
take the Allen key provided from the
tool box in the luggage compartment
insert the key provided into the
housing 2 and turn it clockwise to open
the roof or anticlockwise to close the
roof.
WARNING
7)Do not open the sun roof if there is
snow or ice on it: you may damage it
8)Use the sun roof only at "spoiler"
position if a transverse roof rack is fitted.
WARNING
21)When leaving the vehicle, always
remove the key from the ignition switch to
avoid the risk of injury to those still inside
the car due to accidental operation of
the sun roof. Improper use of the roof can
be dangerous. Before and during
operation, always check that no-one is
exposed to the risk of being injured by the
moving sunroof or by objects getting
caught or hit by it.
SOFT TOP
(where provided)
The soft top can be automatically
opened from the closed position to the
spoiler position, and from this position
to the fully open position.
Suggestions
it is advisable to close the soft top
when the car is parked. The closed soft
top effectively protects the car from
rain and from theft;
it is advisable to put valuables in the
boot and lock the lid even when the
top is closed.
SOFT TOP MOVEMENT
22) 23) 24)
9) 10) 11)
IMPORTANT: The motor may overheat
if the soft top is repeatedly operated
within a short space of time, thus
causing the overheating protection to
inhibit system operation. Wait for a
minute and repeat.
OPERATION USING THE BUTTONS
INSIDE THE CAR
Opening the soft top:
Opening partially (spoiler position):
press the button 1 fig. 32 once .
2
1
31AB0A0040C
30
KNOWING YOUR CAR
Page 34 of 192
If requested by the user, the heated
rear window is only turned on if the
soft top is fully closed. If the soft top is
closed incorrectly, the heated rear
window does not operate and
the relevant warning light does not
come on.
Do not remove ice from the soft top
with a sharp item.
To prevent damage, do not use
scrapers or sprays to remove ice from
the heated rear window.
Do not put objects on the soft top:
they could fall if the it is operated,
causing damage and injury.
It is advisable to cover the soft top
with a protective sheet if the car is
left parked in the open for a long time.
Do not keep the soft top folded for a
long time: this could cause folds and
creases in the fabric.
Before moving the soft top, check
that there is enough room to carry
out the operation and that there are no
hindrances or people close to the
moving parts of the soft top.
The cooled air flow into the
passenger compartment may decrease
if the automatic climate control system
is on and the top is not completely
closed.
With the soft top open and the car
travelling, the voice recognition system
may not recognise voice commands
because of the background noise: with
the soft top closed and at a high speed,
the voice function for number dialling
may not be recognised.
EMERGENCY OPERATION
If the switches fail, the soft top can be
moved manually proceeding as
described below:
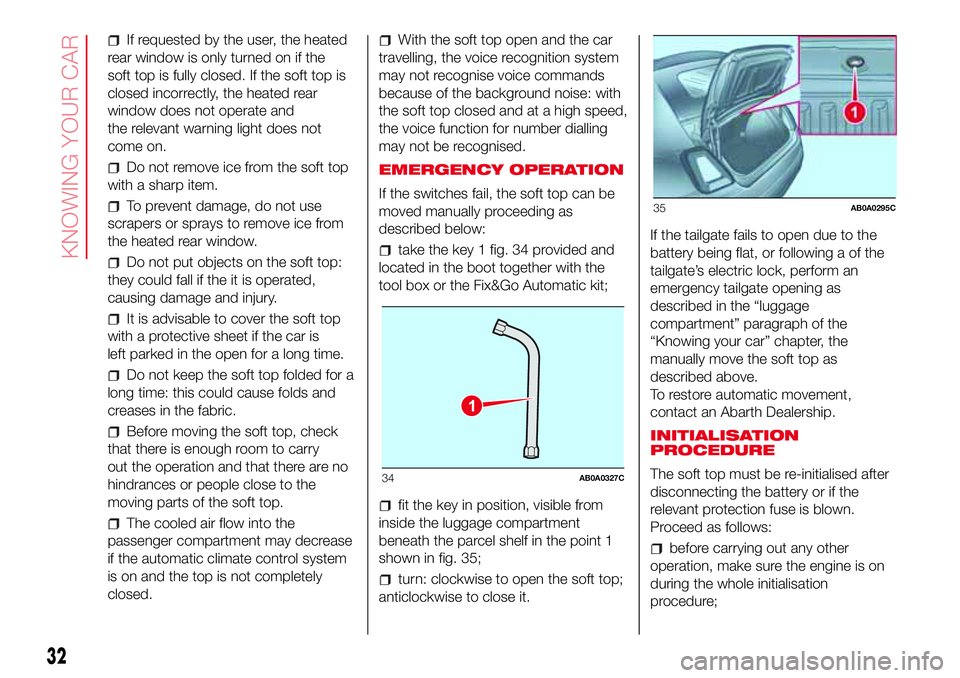
take the key 1 fig. 34 provided and
located in the boot together with the
tool box or the Fix&Go Automatic kit;
fit the key in position, visible from
inside the luggage compartment
beneath the parcel shelf in the point 1
shown in fig. 35;
turn: clockwise to open the soft top;
anticlockwise to close it.If the tailgate fails to open due to the
battery being flat, or following a of the
tailgate’s electric lock, perform an
emergency tailgate opening as
described in the “luggage
compartment” paragraph of the
“Knowing your car” chapter, the
manually move the soft top as
described above.
To restore automatic movement,
contact an Abarth Dealership.
INITIALISATION
PROCEDURE
The soft top must be re-initialised after
disconnecting the battery or if the
relevant protection fuse is blown.
Proceed as follows:
before carrying out any other
operation, make sure the engine is on
during the whole initialisation
procedure;
1
34AB0A0327C
35AB0A0295C
32
KNOWING YOUR CAR
Page 44 of 192
NoteButtons+and–activate different
functions according to the following
situations:
within the menu, they allow you to
scroll up or down through the options;
during setting operations, they
increase or decrease values.
The menu comprises the following
functions:
LIGHTING: adjusts the dashboard
and instrument panel lighting
SPEED BEEP: sets the vehicle
speed limit (km/h or mph). The driver is
alerted when this speed is exceeded.
TRIP B ACTIVATION/DATA: activates
(”On”) and deactivates (”Off”) the Trip
B display (partial trip counter)
SET TIME: set the display clock
SET DATE: sets the display date
AUTOCLOSE: enables or disables
automatic door locking on exceeding a
speed of 20 km/h
MEASUREMENT UNITS: sets the
measurement units for distance and
fuel consumption
LANGUAGE: sets the display
language
WARNING VOLUME: sets the
volume (on 8 levels) of the audible
warning (buzzer) that accompanies the
failure/warning display
SEAT BELT BUZZER: reactivation of
the SBR buzzer (displayed only if the
SBR system was disabled by the
Abarth Dealership)
SERVICE: displays mileage intervals
for scheduled servicing
AIRBAG/PASSENGER BAG:
enables/disables the passenger side
airbag
DAYTIME RUNNING LIGHTS:
enables/disables daytime running lights
ITPMS RESET: resets the iTPMS
system (”self-learning”, see the “iTPMS
System” paragraph)
SEE RADIO (if present): enables/
disables duplicating some of the radio
information shown on theUconnect™
system display on the instrument panel
display.
SEE PHONE (if present): enables/
disables duplicating some of the call
information shown on theUconnect™
system display on the instrument panel
display.
SEE NAVIGATION (if present):
enables/disables duplicating some of
the navigation information shown on
theUconnect™system display on the
instrument panel display.
EXIT MENU
TRIP COMPUTER
The Trip computer is used to display
information on car operation when the
key is turned to MAR.
This function is characterised by two
separate memories, called "Trip A" and
"Trip B", where the car's "complete
missions" (journeys) are recorded in a
reciprocally independent manner, as
well as, for versions where present,
"Instant info" and "Best average
consumption".
Both memories can be reset: i.e. start
of a new journey.
"Trip A" can be used to display the
values relating to:
Range (where present)
Distance travelled A
Average consumption A
Instantaneous fuel consumption
(where present)
Average speed A
Trip time A (driving time)
Reset Trip A.
“Trip B” may be used to display the
figures relating to:
Distance travelled B
Average consumption B
Average speed B
Trip time B (driving time)
Reset Trip B.
42
KNOWING THE INSTRUMENT PANEL
Page 95 of 192
TYPES OF BULBS
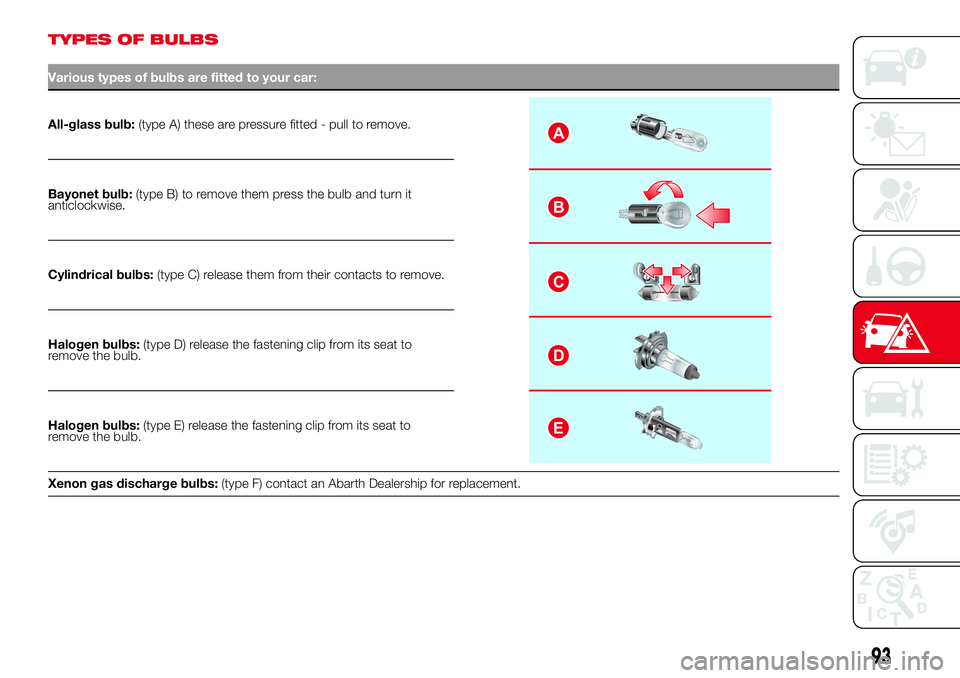
Various types of bulbs are fitted to your car:
All-glass bulb:(type A) these are pressure fitted - pull to remove.A
B
C
D
E
Bayonet bulb:(type B) to remove them press the bulb and turn it
anticlockwise.
Cylindrical bulbs:(type C) release them from their contacts to remove.
Halogen bulbs:(type D) release the fastening clip from its seat to
remove the bulb.
Halogen bulbs:(type E) release the fastening clip from its seat to
remove the bulb.
Xenon gas discharge bulbs:(type F) contact an Abarth Dealership for replacement.
93
Page 98 of 192
REPLACING AN
EXTERIOR BULB
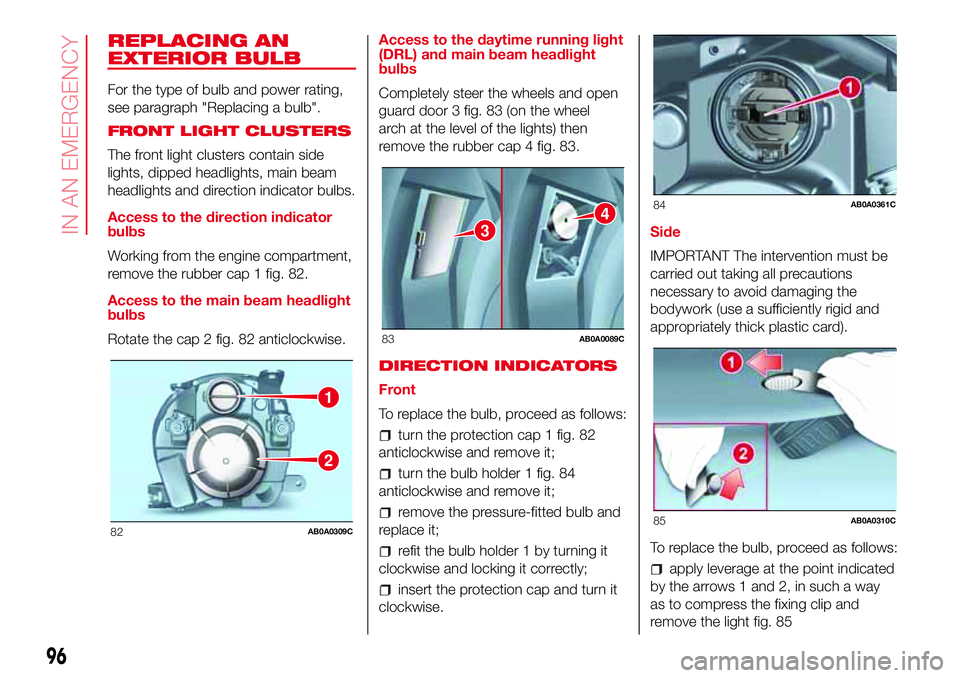
For the type of bulb and power rating,
see paragraph "Replacing a bulb".
FRONT LIGHT CLUSTERS
The front light clusters contain side
lights, dipped headlights, main beam
headlights and direction indicator bulbs.
Access to the direction indicator
bulbs
Working from the engine compartment,
remove the rubber cap 1 fig. 82.
Access to the main beam headlight
bulbs
Rotate the cap 2 fig. 82 anticlockwise.Access to the daytime running light
(DRL) and main beam headlight
bulbs
Completely steer the wheels and open
guard door 3 fig. 83 (on the wheel
arch at the level of the lights) then
remove the rubber cap 4 fig. 83.
DIRECTION INDICATORS
Front
To replace the bulb, proceed as follows:
turn the protection cap 1 fig. 82
anticlockwise and remove it;
turn the bulb holder 1 fig. 84
anticlockwise and remove it;
remove the pressure-fitted bulb and
replace it;
refit the bulb holder 1 by turning it
clockwise and locking it correctly;
insert the protection cap and turn it
clockwise.Side
IMPORTANT The intervention must be
carried out taking all precautions
necessary to avoid damaging the
bodywork (use a sufficiently rigid and
appropriately thick plastic card).
To replace the bulb, proceed as follows:
apply leverage at the point indicated
by the arrows 1 and 2, in such a way
as to compress the fixing clip and
remove the light fig. 85
1
2
82AB0A0309C
3
4
83AB0A0089C
84AB0A0361C
85AB0A0310C
96
IN AN EMERGENCY
Page 99 of 192
turn the bulb holder anticlockwise,
extract the press-fitted bulb and
replace it;
refit the bulb holder in the lens, then
position the light, ensuring that the
fastening clip clicks into place.
DIPPED HEADLIGHTS
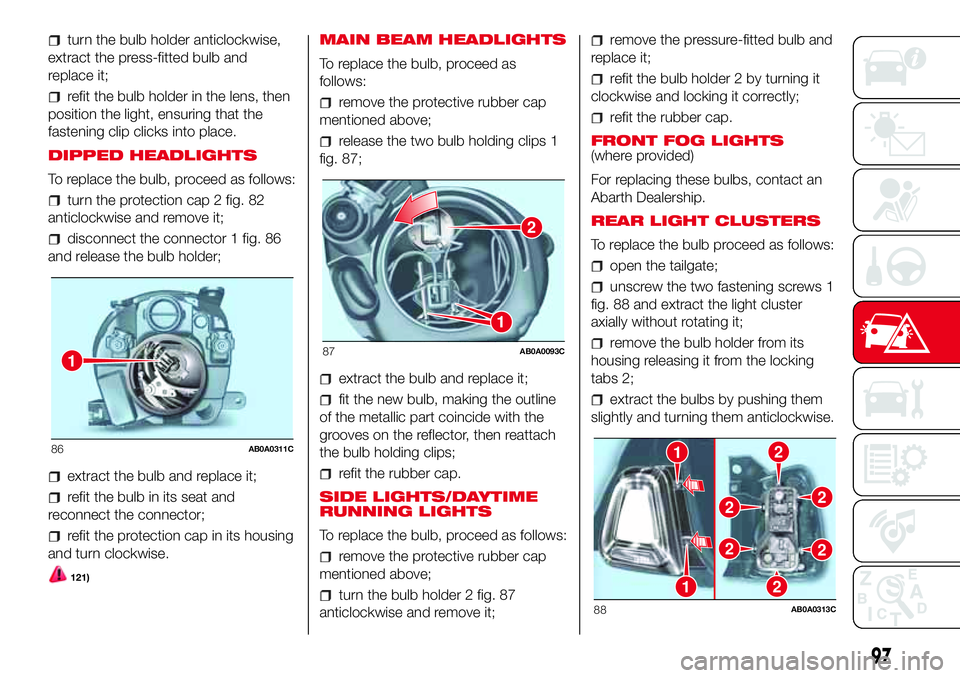
To replace the bulb, proceed as follows:
turn the protection cap 2 fig. 82
anticlockwise and remove it;
disconnect the connector 1 fig. 86
and release the bulb holder;
extract the bulb and replace it;
refit the bulb in its seat and
reconnect the connector;
refit the protection cap in its housing
and turn clockwise.
121)
MAIN BEAM HEADLIGHTS
To replace the bulb, proceed as
follows:
remove the protective rubber cap
mentioned above;
release the two bulb holding clips 1
fig. 87;
extract the bulb and replace it;
fit the new bulb, making the outline
of the metallic part coincide with the
grooves on the reflector, then reattach
the bulb holding clips;
refit the rubber cap.
SIDE LIGHTS/DAYTIME
RUNNING LIGHTS
To replace the bulb, proceed as follows:
remove the protective rubber cap
mentioned above;
turn the bulb holder 2 fig. 87
anticlockwise and remove it;
remove the pressure-fitted bulb and
replace it;
refit the bulb holder 2 by turning it
clockwise and locking it correctly;
refit the rubber cap.
FRONT FOG LIGHTS
(where provided)
For replacing these bulbs, contact an
Abarth Dealership.
REAR LIGHT CLUSTERS
To replace the bulb proceed as follows:
open the tailgate;
unscrew the two fastening screws 1
fig. 88 and extract the light cluster
axially without rotating it;
remove the bulb holder from its
housing releasing it from the locking
tabs 2;
extract the bulbs by pushing them
slightly and turning them anticlockwise.
1
86AB0A0311C
2
1
87AB0A0093C
21
1
22
22
2
88AB0A0313C
97
Page 101 of 192
REPLACING FUSES
GENERAL INFORMATION
Fuses protect the electrical system:
they intervene (blow) in the event of a
failure or improper action on the
system.
122) 123) 124) 125) 126) 127)
To facilitate fuse replacement, use the
pliers hooked inside the fuse box lid on
the dashboard left-hand side.
Refer to the tables on the following
pages to identify the protective fuse.
FUSE LOCATION
Dashboard fuse box
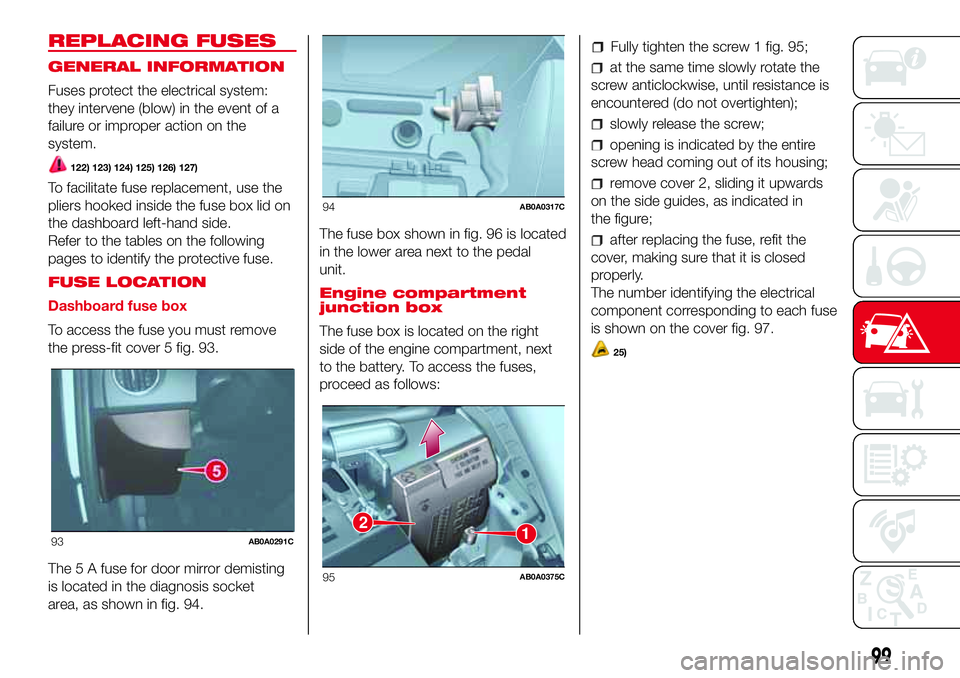
To access the fuse you must remove
the press-fit cover 5 fig. 93.
The 5 A fuse for door mirror demisting
is located in the diagnosis socket
area, as shown in fig. 94.The fuse box shown in fig. 96 is located
in the lower area next to the pedal
unit.
Engine compartment
junction box
The fuse box is located on the right
side of the engine compartment, next
to the battery. To access the fuses,
proceed as follows:
Fully tighten the screw 1 fig. 95;
at the same time slowly rotate the
screw anticlockwise, until resistance is
encountered (do not overtighten);
slowly release the screw;
opening is indicated by the entire
screw head coming out of its housing;
remove cover 2, sliding it upwards
on the side guides, as indicated in
the figure;
after replacing the fuse, refit the
cover, making sure that it is closed
properly.
The number identifying the electrical
component corresponding to each fuse
is shown on the cover fig. 97.
25)
93AB0A0291C
94AB0A0317C
12
95AB0A0375C
99
Page 109 of 192
if the required pressure is reached,
restart driving. Do not exceed 80 km/h.
Avoid sudden acceleration or braking.
After driving for about 8 km / 5 miles,
place the vehicle in a safe and suitable
area, engaging the parking brake.
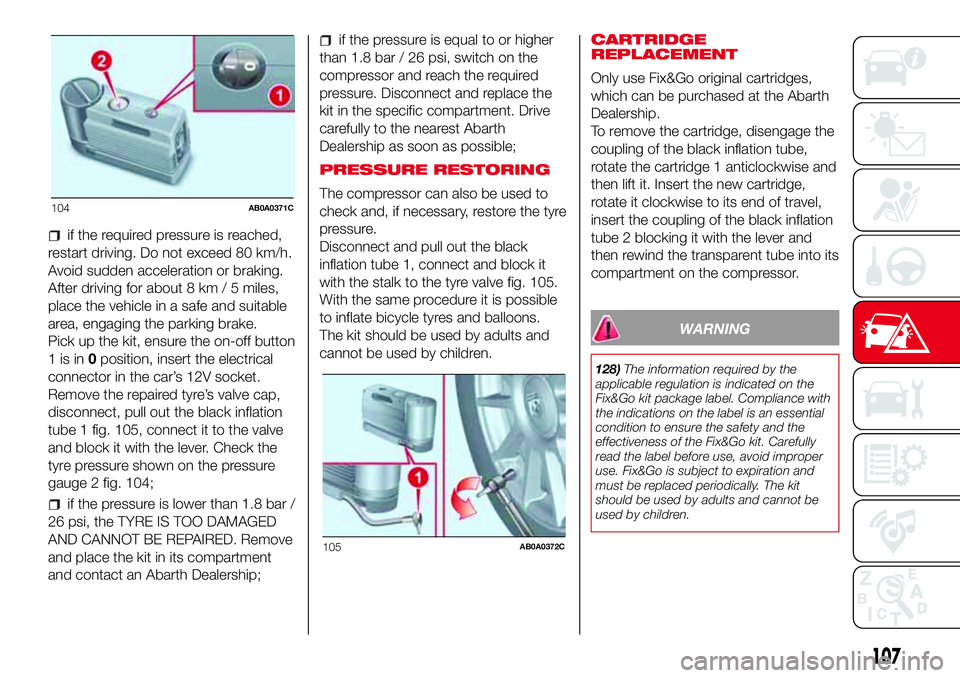
Pick up the kit, ensure the on-off button
1isin0position, insert the electrical
connector in the car’s 12V socket.
Remove the repaired tyre’s valve cap,
disconnect, pull out the black inflation
tube 1 fig. 105, connect it to the valve
and block it with the lever. Check the
tyre pressure shown on the pressure
gauge 2 fig. 104;
if the pressure is lower than 1.8 bar /
26 psi, the TYRE IS TOO DAMAGED
AND CANNOT BE REPAIRED. Remove
and place the kit in its compartment
and contact an Abarth Dealership;
if the pressure is equal to or higher
than 1.8 bar / 26 psi, switch on the
compressor and reach the required
pressure. Disconnect and replace the
kit in the specific compartment. Drive
carefully to the nearest Abarth
Dealership as soon as possible;
PRESSURE RESTORING
The compressor can also be used to
check and, if necessary, restore the tyre
pressure.
Disconnect and pull out the black
inflation tube 1, connect and block it
with the stalk to the tyre valve fig. 105.
With the same procedure it is possible
to inflate bicycle tyres and balloons.
The kit should be used by adults and
cannot be used by children.CARTRIDGE
REPLACEMENT
Only use Fix&Go original cartridges,
which can be purchased at the Abarth
Dealership.
To remove the cartridge, disengage the
coupling of the black inflation tube,
rotate the cartridge 1 anticlockwise and
then lift it. Insert the new cartridge,
rotate it clockwise to its end of travel,
insert the coupling of the black inflation
tube 2 blocking it with the lever and
then rewind the transparent tube into its
compartment on the compressor.
WARNING
128)The information required by the
applicable regulation is indicated on the
Fix&Go kit package label. Compliance with
the indications on the label is an essential
condition to ensure the safety and the
effectiveness of the Fix&Go kit. Carefully
read the label before use, avoid improper
use. Fix&Go is subject to expiration and
must be replaced periodically. The kit
should be used by adults and cannot be
used by children.
104AB0A0371C
105AB0A0372C
107
Page 160 of 192
Switching the system
on/off
The system is switched on/off by
pressing the
(ON/OFF) button/knob.
Turn the button/knob clockwise to
increase the radio volume or
anticlockwise to decrease it.
Radio mode
After the desired radio station is
selected, the following information is
shown on the display:
At the top: the list of radio stations
stored (preset) is displayed; the station
being listened to is highlighted.
In the middle: display of the name of
the current radio station and the
buttons for selecting the previous or
next radio station.
At the bottom: display of the following
buttons:
“Browse”: list of the radio stations
available;
“AM/FM”, “AM/DAB”, “FM/DAB”:
selection of the desired frequency band
(button reconfigurable according to
the band selected: AM, FM or DAB);
“Tune”: manual radio station tuning
(not available for DAB radio)
“Info”: additional information on the
source being listened to;
“Audio”: access to the “Audio
Settings” screen.Audio menu
The following adjustments can be
carried out using the “Audio” menu:
“Equaliser” (where provided);
“Balance/Fader” (left/right and
front/rear audio balance adjustment);
“Speed/Volume” (speed-dependent
automatic volume control);
“Loudness” (where provided);
“Auto-On Radio”;
“Radio Off Delay”.
To exit the “Audio” menu, press the
/
Done button.
Media mode
Audio source selection
Press the "Source" button to select the
desired audio source from those
available. AUX, USB, iPod orBlu-
etooth®.
Applications used on portable devices
may be not compatible with the
Uconnect™system.
Track selection (Browse)
With Media mode active, briefly press
the
/buttons to play the
previous/next track or keep the
/
buttons pressed to fast rewind/
forward the track.For languages not supported by the
system which feature special
characters (e.g. Greek), the keyboard is
not available. In these cases this
function will be limited.
Bluetooth® source
Pairing a Bluetooth® audio device
To pair aBluetooth® audio device,
proceed as follows:
activate theBluetooth® function on
the device;
press the MEDIA button on the front
panel;
if the “Media” source is active, press
the “Source” button;
select theBluetooth® Media
source;
press the “Add Device” button;
search forUconnect®ontheBlu-
etooth® audio device (during the pair-
ing stage a screen is displayed showing
the progress of the operation);
when requested by the audio
device, enter the PIN code shown on
the system display or confirm on the
device the PIN displayed;
158
MULTIMEDIA
Page 162 of 192
Making a phone call
The operations described below can
only be accessed if supported by
the mobile phone in use.
For all functions available, refer to the
mobile phone owner's handbook.
A call can be made by:
selecting theicon (mobile
phone phonebook);
selecting “Recent Calls”;
selecting theicon;
pressing the “Redial” button.
Text message reader
The system can read the messages
received by the mobile phone.
To use this function the mobile phone
must support the SMS exchange
function throughBluetooth®.
If this function is not supported by the
phone, the corresponding
button is
deactivated (greyed out).
When a text message is received, the
display will show a screen where the
options “Listen”, “Call” or “Ignore” can
be selected.
Press the
button to access the list
of SMS messages received by the
mobile phone (the list displays a
maximum of 60 messages received).Browsing SMS messages
(where provided)
Using the steering wheel commands,
you can view and manage the last
10 SMS messages received on the
instrument panel. To use this function
the mobile phone must support the
SMS exchange function throughBlu-
etooth®.
Select “Phone” on the instrument panel
menu and then select “SMS reader”
using the arrow keys on the steering
wheel controls.
The ‘SMS reader’ submenu allows the
last 10 SMS messages to be displayed.
WARNING Some mobile phones may
not take the SMS delivery confirmation
settings into account when interfacing
withUconnect™. If an SMS message
is sent viaUconnect™, the user could
face an additional cost, without any
warning, due to the SMS delivery
confirmation request sent by the phone.
For any problems related to the above,
contact your telephone service provider.
APPS Mode
Press the APPS button on the front
panel to display the following operating
settings:
Outside Temperature
Clock
Compass (NAV versions only)
Trip (where present)
Uconnect™ LIVE
Uconnect™ LIVE
Services
Press the APPS button to access a
radio menu which shows all the
application functions of the system,
such as: Trip computer (where present),
Settings, Compass (where present),
Uconnect™ LIVEApplications.
If there is aUconnect™ LIVEicon, the
system is set up for the connected
services and allows the applications to
be used directly from the radio, for a
more efficient and advanced use of the
vehicle. The application functions are
present according to the vehicle
configuration and to the market.
To use theUconnect™ LIVEservices,
you must:
Download theUconnect™ LIVE
App from the "Apple Store" or "Google
play" on your compatible smartphone,
making sure that the data connection is
enabled.
Use theUconnect™ LIVEApp to
register on www.driveuconnect.eu
or on the www.fiat.it website.
Start theUconnect™ LIVEApp on
the smartphone and enter your details.
For further information about the
services available in your market, visit
the www.DriveUconnect.eu website.
160
MULTIMEDIA