boot Abarth 500 2018 Owner handbook (in English)
[x] Cancel search | Manufacturer: ABARTH, Model Year: 2018, Model line: 500, Model: Abarth 500 2018Pages: 192, PDF Size: 5.86 MB
Page 13 of 192
KEYS
1)
1)
MECHANICAL KEY
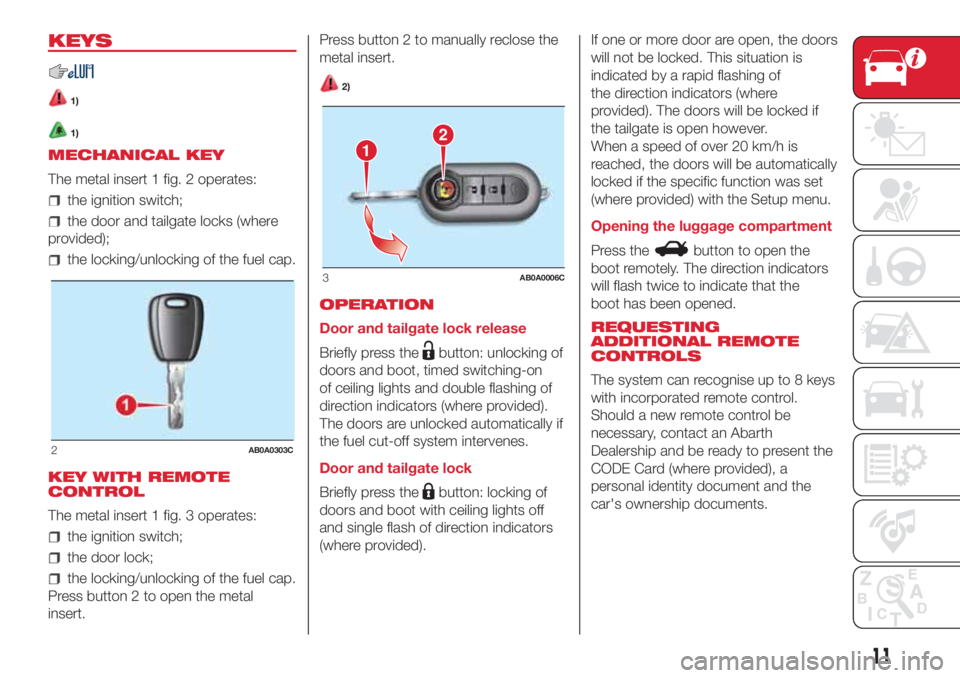
The metal insert 1 fig. 2 operates:
the ignition switch;
the door and tailgate locks (where
provided);
the locking/unlocking of the fuel cap.
KEY WITH REMOTE
CONTROL
The metal insert 1 fig. 3 operates:
the ignition switch;
the door lock;
the locking/unlocking of the fuel cap.
Press button 2 to open the metal
insert.Press button 2 to manually reclose the
metal insert.
2)
OPERATION
Door and tailgate lock release
Briefly press the
button: unlocking of
doors and boot, timed switching-on
of ceiling lights and double flashing of
direction indicators (where provided).
The doors are unlocked automatically if
the fuel cut-off system intervenes.
Door and tailgate lock
Briefly press the
button: locking of
doors and boot with ceiling lights off
and single flash of direction indicators
(where provided).If one or more door are open, the doors
will not be locked. This situation is
indicated by a rapid flashing of
the direction indicators (where
provided). The doors will be locked if
the tailgate is open however.
When a speed of over 20 km/h is
reached, the doors will be automatically
locked if the specific function was set
(where provided) with the Setup menu.
Opening the luggage compartment
Press the
button to open the
boot remotely. The direction indicators
will flash twice to indicate that the
boot has been opened.
REQUESTING
ADDITIONAL REMOTE
CONTROLS
The system can recognise up to 8 keys
with incorporated remote control.
Should a new remote control be
necessary, contact an Abarth
Dealership and be ready to present the
CODE Card (where provided), a
personal identity document and the
car's ownership documents.
2AB0A0303C
12
3AB0A0006C
11
Page 18 of 192
Passenger side without position
memory
To bring back the seat in its initial
position proceed as follows:
slide the seat backwards pushing on
the backrest to the desired position
(movement D);
adjust lever 4 fig. 10 (movement E);
raise the backrest (movement F) until
you hear the lock click.
The type of reattachment manoeuvre
has been chosen to guarantee the
safety of the occupant. In fact, if there
is an obstacle (e.g. a bag) that prevents
the seat from returning to its start
position, just using lever 4, the
mechanism guarantees that the seat is
fastened to its guides.
SPORT FRONT SEATS
Lengthwise adjustment
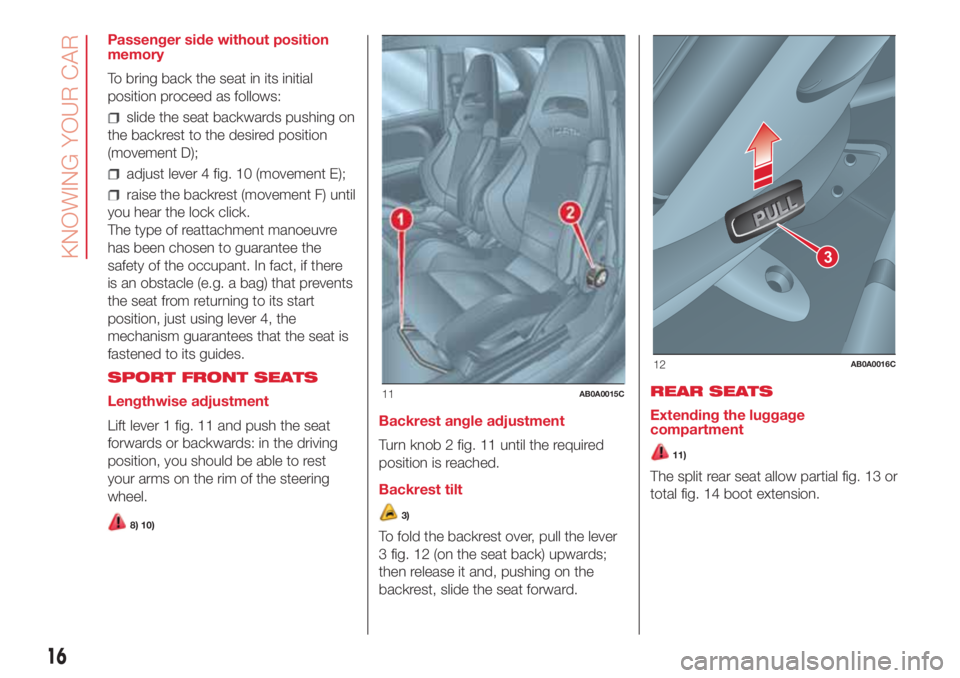
Lift lever 1 fig. 11 and push the seat
forwards or backwards: in the driving
position, you should be able to rest
your arms on the rim of the steering
wheel.
8) 10)
Backrest angle adjustment
Turn knob 2 fig. 11 until the required
position is reached.
Backrest tilt
3)
To fold the backrest over, pull the lever
3 fig. 12 (on the seat back) upwards;
then release it and, pushing on the
backrest, slide the seat forward.REAR SEATS
Extending the luggage
compartment
11)
The split rear seat allow partial fig. 13 or
total fig. 14 boot extension.
11AB0A0015C
3
12AB0A0016C
16
KNOWING YOUR CAR
Page 33 of 192
SOFT TOP
(where provided)
The soft top can be automatically
opened from the closed position to the
spoiler position, and from this position
to the fully open position.
Suggestions
it is advisable to close the soft top
when the car is parked. The closed soft
top effectively protects the car from
bad weather and from theft;
it is advisable to put valuables in the
boot and lock the lid even when the
top is closed.
SOFT TOP MOVEMENT
22) 23) 24)
9) 10) 11)
IMPORTANT NOTE If moved frequently
in a short time, the motor could
overheat causing the thermal protection
to block the system. Wait for a minute
and repeat.
OPERATION USING THE BUTTONS
INSIDE THE CAR
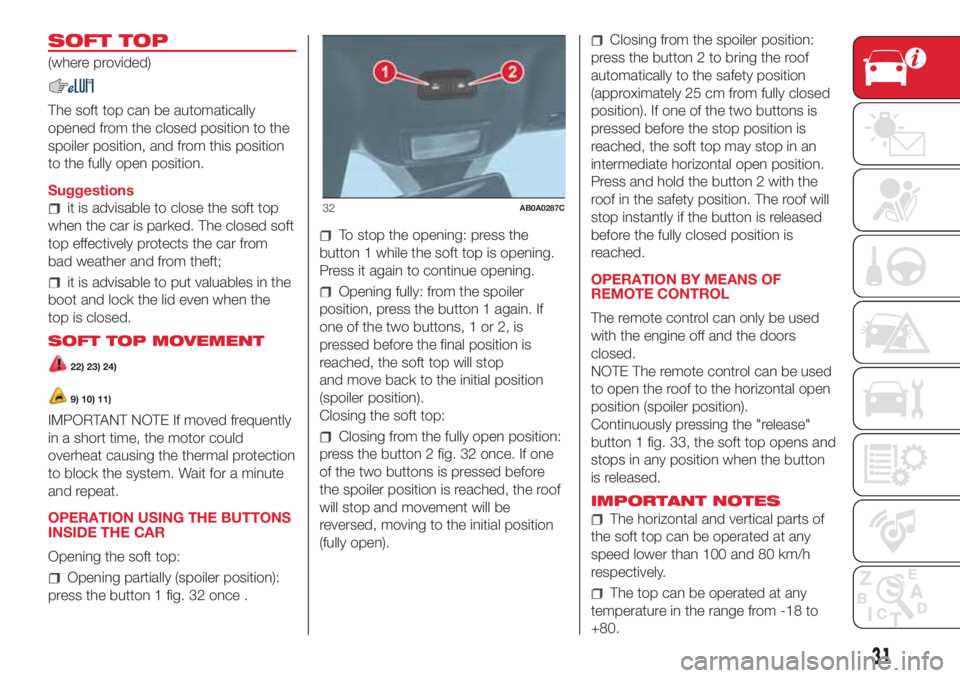
Opening the soft top:
Opening partially (spoiler position):
press the button 1 fig. 32 once .
To stop the opening: press the
button 1 while the soft top is opening.
Press it again to continue opening.
Opening fully: from the spoiler
position, press the button 1 again. If
one of the two buttons, 1 or 2, is
pressed before the final position is
reached, the soft top will stop
and move back to the initial position
(spoiler position).
Closing the soft top:
Closing from the fully open position:
press the button 2 fig. 32 once. If one
of the two buttons is pressed before
the spoiler position is reached, the roof
will stop and movement will be
reversed, moving to the initial position
(fully open).
Closing from the spoiler position:
press the button 2 to bring the roof
automatically to the safety position
(approximately 25 cm from fully closed
position). If one of the two buttons is
pressed before the stop position is
reached, the soft top may stop in an
intermediate horizontal open position.
Press and hold the button 2 with the
roof in the safety position. The roof will
stop instantly if the button is released
before the fully closed position is
reached.
OPERATION BY MEANS OF
REMOTE CONTROL
The remote control can only be used
with the engine off and the doors
closed.
NOTE The remote control can be used
to open the roof to the horizontal open
position (spoiler position).
Continuously pressing the "release"
button 1 fig. 33, the soft top opens and
stops in any position when the button
is released.
IMPORTANT NOTES
The horizontal and vertical parts of
the soft top can be operated at any
speed lower than 100 and 80 km/h
respectively.
The top can be operated at any
temperature in the range from -18 to
+80.
32AB0A0287C
31
Page 34 of 192
It is recommended to have the
engine running always when opening or
closing the soft top.
If required, remove the battery with
open or closed soft top, but NOT when
the soft top is moving.
Do not fix luggage transport devices
to the soft top and do not travel with
objects resting on the open top.
If requested by the user, the heated
rear window is only turned on if the
soft top is fully closed. If the soft top is
closed incorrectly, the heated rear
window will not function and the
corresponding warning light will not turn
on.
Do not remove ice from the soft top
with a sharp item.
To prevent damage, do not use
scrapers or sprays to remove ice from
the heated rear window.
Do not put objects on the soft top:
they could fall if the it is operated,
causing damage and injury.
It is advisable to cover the soft top
with a protective sheet if the car is
left parked in the open for a long time.
Do not keep the soft top folded for a
long time: this could cause folds and
creases in the fabric.
Before moving the soft top, check
that there is enough room to carry
out the operation and that there are no
obstacles or people close to its moving
parts.
The cooled air flow into the
passenger compartment may decrease
if the automatic climate control system
is on and the top is not completely
closed.
With the soft top open and the car
travelling, the voice recognition system
may not recognise voice commands
because of the background noise: with
the soft top closed and at a high speed,
the voice function for number dialling
may not be recognised.EMERGENCY OPERATION
If the buttons fail, the soft top can be
moved manually proceeding as
described below:
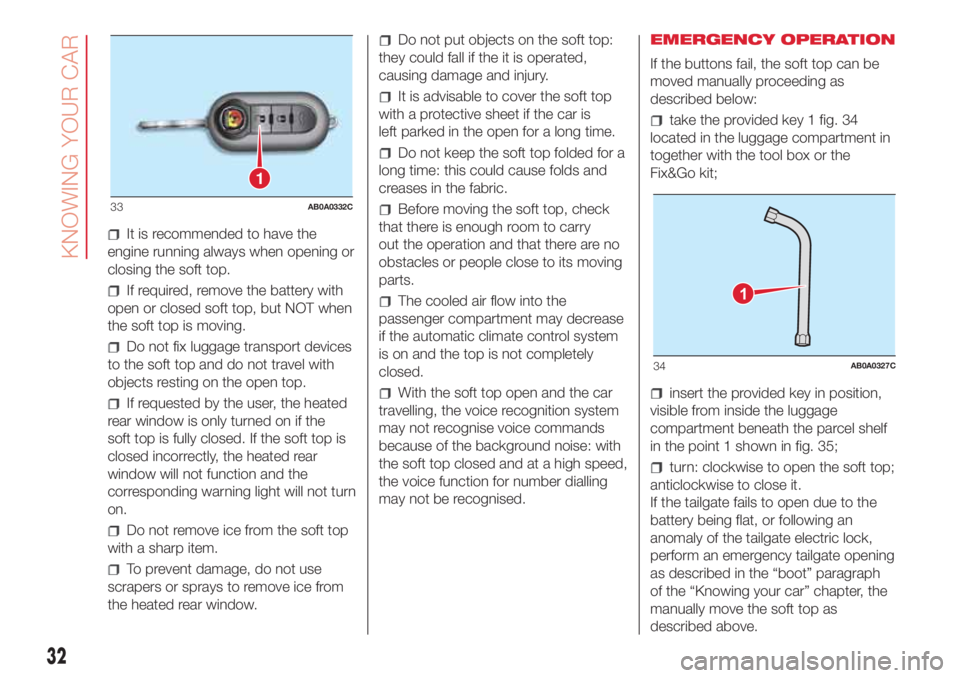
take the provided key 1 fig. 34
located in the luggage compartment in
together with the tool box or the
Fix&Go kit;
insert the provided key in position,
visible from inside the luggage
compartment beneath the parcel shelf
in the point 1 shown in fig. 35;
turn: clockwise to open the soft top;
anticlockwise to close it.
If the tailgate fails to open due to the
battery being flat, or following an
anomaly of the tailgate electric lock,
perform an emergency tailgate opening
as described in the “boot” paragraph
of the “Knowing your car” chapter, the
manually move the soft top as
described above.
1
33AB0A0332C
1
34AB0A0327C
32
KNOWING YOUR CAR
Page 38 of 192
28)For safety reasons, the bonnet must
always be properly closed while the car is
travelling. Therefore, always make sure that
it is closed properly and that the lock is
engaged. If you notice when driving that
the bonnet has not been properly locked,
stop immediately and close the bonnet
correctly.
29)Use both hands to lift the bonnet.
Before lifting, check that the windscreen
wiper arms are not raised from the
windscreen, that the vehicle is stationary
and that the handbrake is engaged.LUGGAGE
COMPARTMENT
30) 31)
OPENING THE TAILGATE
WITH THE REMOTE
CONTROL
Press button
on the key with the
remote control.
The direction indicators will blink twice
when the tailgate is opened.
On some versions, opening the tailgate
will switch the boot ceiling light on:
the light will switch off automatically
when the tailgate is closed.
12)
32)
ELECTRIC HANDLE
(SOFT TOUCH)
The tailgate (if unlocked) can be opened
from the outside by using the electric
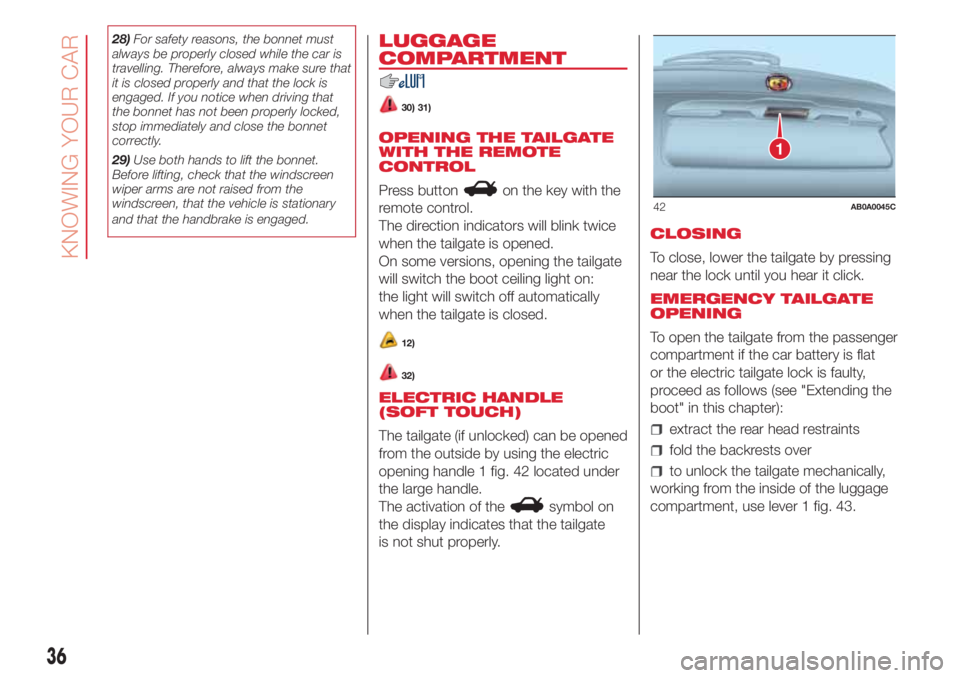
opening handle 1 fig. 42 located under
the large handle.
The activation of the
symbol on
the display indicates that the tailgate
is not shut properly.CLOSING
To close, lower the tailgate by pressing
near the lock until you hear it click.
EMERGENCY TAILGATE
OPENING
To open the tailgate from the passenger
compartment if the car battery is flat
or the electric tailgate lock is faulty,
proceed as follows (see "Extending the
boot" in this chapter):
extract the rear head restraints
fold the backrests over
to unlock the tailgate mechanically,
working from the inside of the luggage
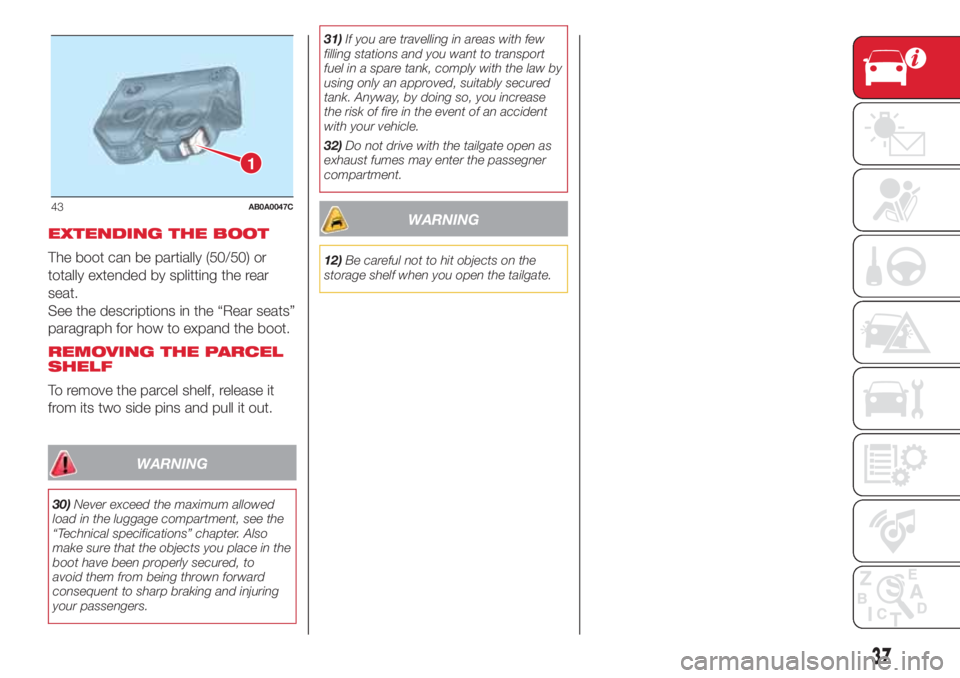
compartment, use lever 1 fig. 43.
1
42AB0A0045C
36
KNOWING YOUR CAR
Page 39 of 192
EXTENDING THE BOOT
The boot can be partially (50/50) or
totally extended by splitting the rear
seat.
See the descriptions in the “Rear seats”
paragraph for how to expand the boot.
REMOVING THE PARCEL
SHELF
To remove the parcel shelf, release it
from its two side pins and pull it out.
WARNING
30)Never exceed the maximum allowed
load in the luggage compartment, see the
“Technical specifications” chapter. Also
make sure that the objects you place in the
boot have been properly secured, to
avoid them from being thrown forward
consequent to sharp braking and injuring
your passengers.31)If you are travelling in areas with few
filling stations and you want to transport
fuel in a spare tank, comply with the law by
using only an approved, suitably secured
tank. Anyway, by doing so, you increase
the risk of fire in the event of an accident
with your vehicle.
32)Do not drive with the tailgate open as
exhaust fumes may enter the passegner
compartment.
WARNING
12)Be careful not to hit objects on the
storage shelf when you open the tailgate.
1
43AB0A0047C
37
Page 96 of 192

Light bulbs
Use Type Power Ref. Figure
Main beam headlights H7 55W D
Dipped beam headlights H7 55W D
Xenon gas discharge dipped beam headlights (where
present)D1S 35W F
Front side lights/day lights LED/W21W 21W A
Front direction indicators PY24W 24W B
Side turn light W5W 5W A
Rear direction indicators PY2IW 2IW B
Rear side lights/Brake lights P21/5W 5/21W B
Reverse gear W16W 16W B
Rear fog light W16W 16W B
Centre ceiling light C5W 5W C
Passenger side ceiling light C5W 5W C
Boot light W5W 5W A
Number plate light C5W 5W C
Fog lights HI 55W E
Third brake lights W5W 5W A
WARNING
115)Modifications or repairs to the electric system that are not carried out properly or do not take the system technical specifications into
account can cause malfunctions leading to the risk of fire.
116)Halogen bulbs contain pressurised gas, in the case of breakage they may burst causing glass fragments to be projected outwards.
94
IN AN EMERGENCY
Page 106 of 192
“Fix&Go” KIT
124) 125)
26)
DESCRIPTION
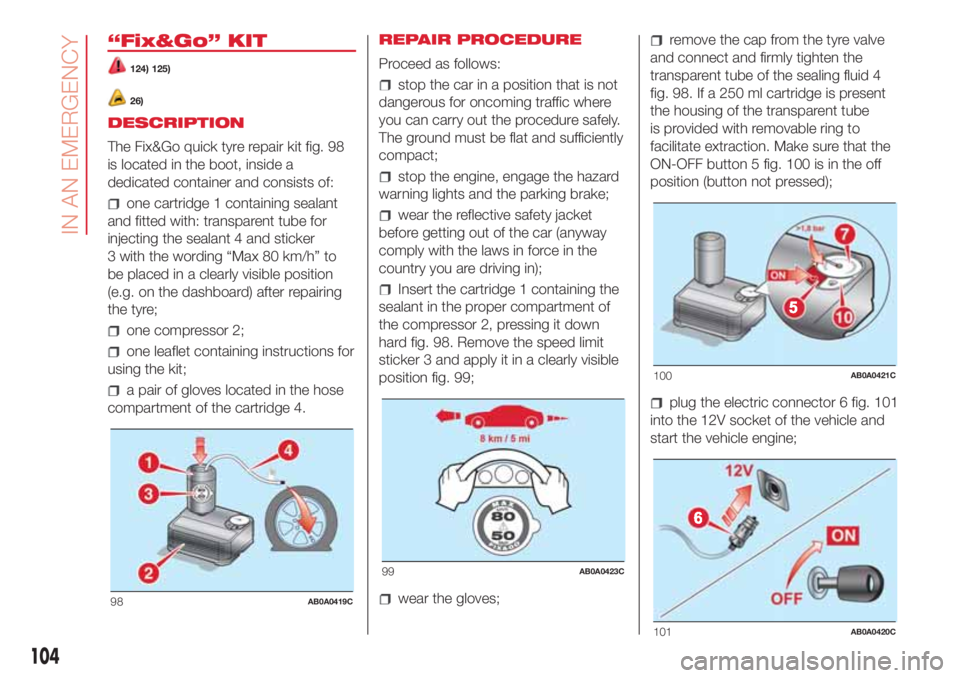
The Fix&Go quick tyre repair kit fig. 98
is located in the boot, inside a
dedicated container and consists of:
one cartridge 1 containing sealant
and fitted with: transparent tube for
injecting the sealant 4 and sticker
3 with the wording “Max 80 km/h” to
be placed in a clearly visible position
(e.g. on the dashboard) after repairing
the tyre;
one compressor 2;
one leaflet containing instructions for
using the kit;
a pair of gloves located in the hose
compartment of the cartridge 4.REPAIR PROCEDURE
Proceed as follows:
stop the car in a position that is not
dangerous for oncoming traffic where
you can carry out the procedure safely.
The ground must be flat and sufficiently
compact;
stop the engine, engage the hazard
warning lights and the parking brake;
wear the reflective safety jacket
before getting out of the car (anyway
comply with the laws in force in the
country you are driving in);
Insert the cartridge 1 containing the
sealant in the proper compartment of
the compressor 2, pressing it down
hard fig. 98. Remove the speed limit
sticker 3 and apply it in a clearly visible
position fig. 99;
wear the gloves;
remove the cap from the tyre valve
and connect and firmly tighten the
transparent tube of the sealing fluid 4
fig. 98. If a 250 ml cartridge is present
the housing of the transparent tube
is provided with removable ring to
facilitate extraction. Make sure that the
ON-OFF button 5 fig. 100 is in the off
position (button not pressed);
plug the electric connector 6 fig. 101
into the 12V socket of the vehicle and
start the vehicle engine;
98AB0A0419C
99AB0A0423C
100AB0A0421C
101AB0A0420C
104
IN AN EMERGENCY
Page 114 of 192

SERVICE SCHEDULE
WARNING: Once you have carried out the last intervention in the table, continue with the scheduled servicing, maintaining the
frequency indicated in the plan by marking each operation with a dot or dedicated note.
Warning: simply restarting the maintenance from the start of the plan may cause the allowed interval to be exceeded for some
operations!
Thousands of miles 9 18 27 36 45 54 63 72 81 90
Thousands of kilometres 15 30 45 60 75 90 105 120 135 150
Years 1 2 3 4 5 6 7 8 9 10
Check the tyre condition/wear and, if necessary, adjust the
pressure. Check the "Fix&Go” kit condition/expiry (where
provided)
Check operation of lighting system (headlights, direction
indicators, hazard warning lights, boot, passenger
compartment, glove compartment, instrument panel
warning lights, etc.)
Check and, if necessary, top up fluid levels (1)
Check exhaust emissions
Use the diagnosis socket to check supply/engine
management system operation, emissions and, where
present, engine oil degradation
(1) Always only use the liquids shown in the handbook for topping up after having checked that the system is not damaged.
112
SERVICING AND CARE
Page 188 of 192
Jump starting.....................106
Lifting the car.....................124
Light bulbs
bulbs (replacement)..............92
Bulbs types.....................93
general instructions..............92
Lubricants (specifications)..........140
Luggage compartment..............36
closing..........................36
extending the boot..............37
Main beam headlights..............20
Main beam headlights (bulb
replacement).....................97
Manual climate control system.......25
controls.........................25
Menu options.......................41
Number plate lights (bulb
replacement).....................98
Occupant protection systems.......63
Official type approvals..............177
Paintwork (maintenance)...........125
Parking sensors.....................88
Parking the vehicle..................83
Passenger side front airbag..........75
Performance.......................142
Pre-tensioners......................65
load limiters.....................65
Radio transmitters and mobile
phones............................4Rear light clusters (bulb
replacement).....................97
Rear seats (backrest release).........16
Rear view mirrors....................19
Rear window washer (jets)..........124
Rear window wiper/washer..........23
Reconfigurable multifunction
display...........................39
Refuelling..........................139
Refuelling the vehicle................89
Replacing an exterior bulb...........96
Right hand drive versions...........178
Rims
dimensions....................134
wheels and tyres...............124
Rims and tyres.....................134
Safety..............................64
seat belts.......................64
SBR system........................65
Screen wiper/washer................23
Seat belts
using the seat belts..............64
Seat belts (maintenance).............66
Seats...............................15
front seats......................15
Sensors
parking.........................88
Service Schedule..................112
Servicing and maintenance.........111Demanding use of the car......116
periodic checks................116
scheduled servicing............111
Service Schedule...............112
Side airbags (Side bag - Window
bag)..............................78
Side bags (front side airbags)........78
Side lights/daytime running lights
(bulb replacement)................97
Snow chains.......................125
Snow tyres........................124
Soft Top............................31
Spark plugs (type)..................132
Sport front seats....................16
SPORT function.....................87
Starting the engine..................82
Steering wheel......................18
Sun roof ............................29
Technical data....................131
The keys............................11
key with remote control..........11
Mechanical key..................11
Third brake light (bulb
replacement).....................98
Towing the vehicle..................108
TRIP button.........................43
Trip computer.......................42
Ty r e s
inflation pressures..............134
INDEX