key Abarth 500 2019 Owner handbook (in English)
[x] Cancel search | Manufacturer: ABARTH, Model Year: 2019, Model line: 500, Model: Abarth 500 2019Pages: 196, PDF Size: 3.53 MB
Page 94 of 196

WARNING
23)For correct operation of the system,
sensors must always be clean from mud,
dirt, snow or ice. Be careful not to scratch
or damage the sensors while cleaning
them. Avoid using dry, rough or hard
cloths. The sensors must be washed using
clean water, with the addition of vehicle
shampoo if necessary. When using special
washing equipment such as high pressure
jets or steam cleaning, clean the sensors
very quickly keeping the jet more than
10 cm away.
24)Have interventions on the bumper in
the area of the sensors carried out only by
an Abarth Dealership. Interventions on
the bumper that are not carried out
properly may compromise the operation of
the parking sensors.
WARNING
114)Parking and other dangerous
manoeuvres are, however, always the
driver’s responsibility. While carrying out
these manoeuvres, always make sure that
no people (especially children) or animals
are in the area concerned. The parking
sensors are an aid for the driver, but the
driver must never allow their attention
to lapse during potentially dangerous
manoeuvres, even those executed at low
speeds.
REFUELLING THE
VEHICLE
Stop the engine before refuelling.
IMPORTANT Never introduce leaded
petrol to the tank, even in small
amounts in an emergency, as this
would damage the catalytic converter
beyond repair.
REFUELLING CAPACITY
To ensure that you fill the tank
completely, top up twice after the first
click of the fuel supply gun. Further
top-ups could cause faults in the fuel
supply system.
FUEL TANK CAP
Plug 2 fig. 82 is fitted with a cable that
secures it to flap 1 so that it cannot
be lost.Unscrew cap 2 using the ignition key.
The sealing may cause a slight pressure
increase in the tank. A little breathing
off, while slackening the cap is
absolutely normal. When refuelling,
fasten the plug to the device inside the
flap as shown in fig. 82.
115)
82AB0A0058C
92
STARTING AND DRIVING
Page 97 of 196
HAZARD WARNING
LIGHTS
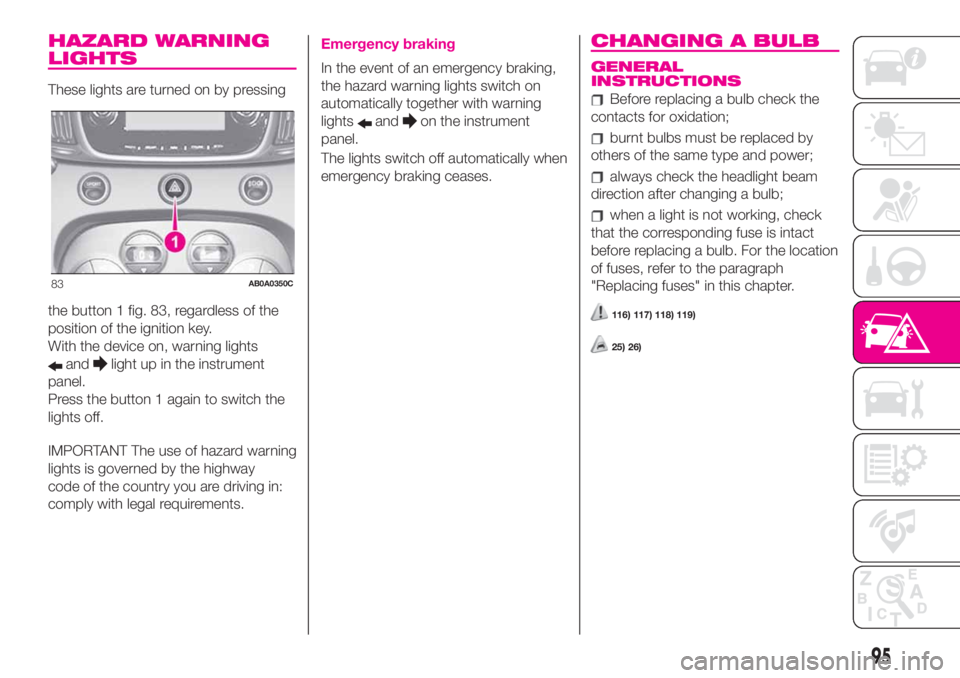
These lights are turned on by pressing
the button 1 fig. 83, regardless of the
position of the ignition key.
With the device on, warning lights
andlight up in the instrument
panel.
Press the button 1 again to switch the
lights off.
IMPORTANT The use of hazard warning
lights is governed by the highway
code of the country you are driving in:
comply with legal requirements.
Emergency braking
In the event of an emergency braking,
the hazard warning lights switch on
automatically together with warning
lights
andon the instrument
panel.
The lights switch off automatically when
emergency braking ceases.
CHANGING A BULB
GENERAL
INSTRUCTIONS
Before replacing a bulb check the
contacts for oxidation;
burnt bulbs must be replaced by
others of the same type and power;
always check the headlight beam
direction after changing a bulb;
when a light is not working, check
that the corresponding fuse is intact
before replacing a bulb. For the location
of fuses, refer to the paragraph
"Replacing fuses" in this chapter.
116) 117) 118) 119)
25) 26)
83AB0A0350C
95
Page 109 of 196

DEVICE PROTECTEDFUSE AMPERE
Robotised sequential gearbox control unit power supply (+ ignition) F16 7.5
Heated rear windowF20 30
Fog lightsF30 15
Robotised sequential gearbox control unit F84 10
Front power socket (with or without cigar lighter) F85 20
WARNING
121)If the fuse blows again, contact an Abarth Dealership.
122)Never replace a fuse with metal wires or anything else.
123)Never replace a fuse with another with a higher amp rating; DANGER OF FIRE.
124)If a general protection fuse (MEGA-FUSE, MIDI-FUSE, MAXI-FUSE) blows, contact an Abarth Dealership.
125)Before replacing a fuse, make sure that the ignition key has been removed and that all the other services are switched off and/or
disengaged.
126)If a general protection fuse for the safety systems (airbag system, braking system), power unit systems (engine system, gearbox system)
or driving system blows, contact an Abarth Dealership.
WARNING
27)If you need to wash the engine compartment, take care not to directly hit the engine compartment fuse box with the water jet.
107
Page 113 of 196

WARNING
29)Never use a fast battery-charger to
start the engine as this could damage the
electronic systems of your vehicle,
particularly the ignition and engine fuel
supply control units.
WARNING
129)This starting procedure must be
performed by expert personnel because
incorrect actions could cause electrical
discharge of considerable intensity.
Furthermore, battery fluid is poisonous and
corrosive: avoid contact with skin and
eyes. Keep naked flames and lighted
cigarettes away from the battery and do
not cause sparks.
FUEL CUT-OFF
SYSTEM
This intervenes in the case of an impact
causing:
the interruption of the fuel supply
with the engine consequently cutting
out
the automatic unlocking of the doors
turning on the lights inside the car.
The intervention of the system is
indicated by a message shown on the
display.
IMPORTANT Carefully check the car for
fuel leaks, for instance in the engine
compartment, under the car or near the
tank area.
130)
After a crash, turn the ignition key to
STOP position to prevent the battery
from running down.
To restore the correct operation of the
car, proceed as follows:
turn the ignition key to the MAR
position
activate the right direction indicator
deactivate the right direction
indicator
activate the left direction indicator
deactivate the left direction indicator
activate the right direction indicator
deactivate the right direction
indicator
activate the left direction indicator
deactivate the left direction indicator
turn the ignition key to the STOP
position
turn the ignition key to the MAR-ON
position.
WARNING
130)If, after an impact, you smell fuel or
notice leaks from the fuel system, do
not reactivate the system to avoid the risk
of fire.
111
Page 114 of 196
TOWING THE
VEHICLE
The tow hook, which is supplied with
the vehicle, is housed in the tool box,
under the carpet in the luggage
compartment.
131) 132) 133) 134) 135)
ATTACHING THE TOW
RING
Proceed as follows:
Front
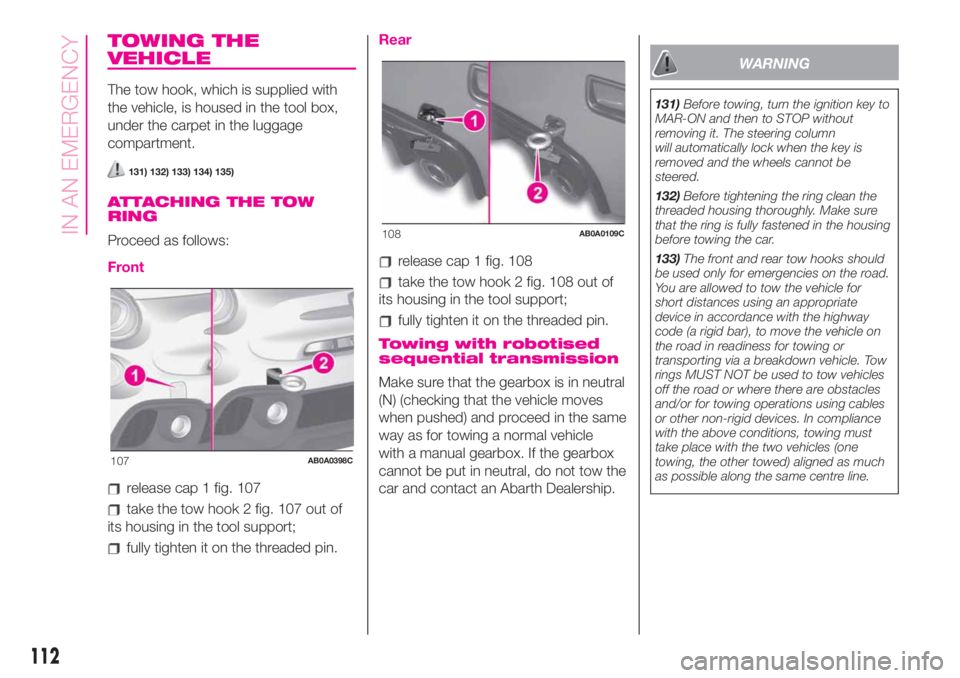
release cap 1 fig. 107
take the tow hook 2 fig. 107 out of
its housing in the tool support;
fully tighten it on the threaded pin.
Rear
release cap 1 fig. 108
take the tow hook 2 fig. 108 out of
its housing in the tool support;
fully tighten it on the threaded pin.
Towing with robotised
sequential transmission
Make sure that the gearbox is in neutral
(N) (checking that the vehicle moves
when pushed) and proceed in the same
way as for towing a normal vehicle
with a manual gearbox. If the gearbox
cannot be put in neutral, do not tow the
car and contact an Abarth Dealership.
WARNING
131)Before towing, turn the ignition key to
MAR-ON and then to STOP without
removing it. The steering column
will automatically lock when the key is
removed and the wheels cannot be
steered.
132)Before tightening the ring clean the
threaded housing thoroughly. Make sure
that the ring is fully fastened in the housing
before towing the car.
133)The front and rear tow hooks should
be used only for emergencies on the road.
You are allowed to tow the vehicle for
short distances using an appropriate
device in accordance with the highway
code (a rigid bar), to move the vehicle on
the road in readiness for towing or
transporting via a breakdown vehicle. Tow
rings MUST NOT be used to tow vehicles
off the road or where there are obstacles
and/or for towing operations using cables
or other non-rigid devices. In compliance
with the above conditions, towing must
take place with the two vehicles (one
towing, the other towed) aligned as much
as possible along the same centre line.
107AB0A0398C
108AB0A0109C
112
IN AN EMERGENCY
Page 132 of 196

Do not wash the car after it has been
left in the sun or with the bonnet hot:
this may alter the shine of the
paintwork.
Exterior plastic parts must be cleaned
in the same way as the rest of the
vehicle.
Where possible, do not park under
trees; the resinous substances that
many species release give the paint a
dull appearance and increase the
possibility of triggering rusting
processes.
IMPORTANT Bird droppings must be
washed off immediately and thoroughly
as the acid they contain is particularly
aggressive.
6)
38)
Versions with matt paintwork
These versions have exclusive matt
paintwork which requires special care
for its preservation. The instructions for
good preservation follow below.
38) 39) 40)
Versions with stickers
Cars that are wholly or partially
covered, decorated and/or customised
with stickers, must only be cleaned
by hand.
The use of solvents, waxes, detergents
or similar products is not recommended
for the care of the car as they could
damage the stickers or cause them to
detach.
The use of such washing or cleaning
instruments and methods will therefore
invalidate the warranty.
NOTE We recommend using mild
products for cleaning the car.
IMPORTANT In case of stains (water
rings) on the wrapping, remove them by
washing the wrapping again and drying
it with a non-abrasive soft cloth.
38) 39) 40) 41)
Windows
To clean glasses, use specific cleaning
products.
Use clean cloths to avoid scratching
the glass or altering the transparency.
IMPORTANT Wipe the rear window
inside gently with a cloth following the
direction of the filaments to avoid
damaging the heating device.
42)
Front headlights
Use a soft cloth soaked in water and
detergent for washing cars.
IMPORTANT Never use aromatic
substances (e.g. petrol) or ketones (e.g.
acetone) for cleaning the plastic lenses
of the headlights.
IMPORTANT When cleaning with a
pressure washer, keep the water jet at
least 20 cm away from the headlights.
Engine compartment
Wash the engine compartment
thoroughly at the end of every winter.
Be careful not to direct the jet of water
onto electronic control units.
Adequately protect the upper air
intakes to prevent damage to the
windscreen wiper motor. Have this
operation performed at a specialised
workshop.
IMPORTANT The washing should take
place with the engine cold and the
ignition key in the STOP position. After
the washing operation, make sure
that the various protections (e.g. rubber
caps and guards) have not been
removed or damaged.
130
SERVICING AND CARE
Page 152 of 196
TIPS, CONTROLS
AND GENERAL
INFORMATION
Road safety
Learn how to use the various system
functions before setting off.
Read the instructions for the system
carefully before setting off.
Reception conditions
Reception conditions change
constantly while driving. Reception may
be interfered with by the presence of
mountains, buildings or bridges,
especially when you are far away from
the broadcaster.
IMPORTANT The volume may be
increased when receiving traffic
bulletins.
Care and maintenance
Observe the following precautions to
ensure the system is fully operational:
the display is sensitive to scratching,
liquids and detergents. Avoid hitting
the display with pointed or hard objects
that could damage its surface. Do not
press on the display when cleaning it.
never use alcohol, petrol or
petroleum-based solvents to clean the
display screen.
Prevent any liquid from entering the
system: this could damage it beyond
repair.
Anti-theft protection
The system is equipped with an
anti-theft protection system based on
the exchange of information with the
electronic control unit (Body Computer)
on the vehicle.
This guarantees maximum safety and
prevents the secret code from being
entered after the power supply has
been disconnected.
If the check has a positive outcome, the
system will start to operate, whereas if
the comparison codes are not the
same or if the electronic control unit
(Body Computer) is replaced, the
system will ask the user to enter the
secret code according to the procedure
described in the paragraph below.
Entering the secret code
When the system is switched on, if the
code is requested, the display will
show “Please enter Anti-Theft Code”
followed by the screen showing a
keypad to enter the secret code.
The secret code is made up of four
digits from 0 to 9.If an incorrect code is entered, the
system displays “Incorrect Code” to
notify the user of the need to enter the
correct code.
After the 3 available attempts to enter
the code, the system displays
“Incorrect Code. Radio locked. Wait for
30 minutes”. After the text has
disappeared it is possible to start the
code entering procedure again.
Vehicle radio passport
This document certifies ownership of
the system. The vehicle radio passport
shows the system model, serial number
and secret code.
IMPORTANT Keep the car radio
passport in a safe place so that you
can give the information to the relevant
authorities if the system is stolen.
In case of loss of the car radio
passport, contact the Abarth
Dealership, taking an ID document and
the car ownership documents.Important notes
In the event of an anomaly, the system
should only be checked and repaired at
an Abarth Dealership.
If the temperature is particularly low, the
display may take a while to reach
optimum brightness.
150
MULTIMEDIA
Page 158 of 196
Switching the system
on/off
The system is switched on/off by
pressing the
(ON/OFF) button/knob.
Turn the button/knob clockwise to
increase the radio volume or
anticlockwise to decrease it.
Radio mode
After the desired radio station is
selected, the following information is
shown on the display:
At the top: the list of radio stations
stored (preset) is displayed; the station
currently playing is highlighted.
In the middle: display of the name of
the current radio station and the
buttons for selecting the previous or
next radio station.
At the bottom: display of the following
buttons:
“Browse”: list of the radio stations
available;
“AM/FM”, “AM/DAB”, “FM/DAB”:
selection of the desired frequency band
(button reconfigurable according to
the band selected: AM, FM or DAB);
“Tune”: manual radio station tuning
(not available for DAB radio)
“Info”: additional information on the
source being listened to;
“Audio”: access to the “Audio
Settings” screen.
Audio menu
The following adjustments can be
carried out using the “Audio” menu:
“Equaliser” (where provided);
“Balance/Fader” (left/right and
front/rear audio balance adjustment);
“Speed/Volume” (speed-dependent
automatic volume control);
“Loudness” (where provided);
“Auto-On Radio”;
“Radio Off Delay”.
To exit the “Audio” menu, press the
/
Done button.
Media mode
Audio source selection
Press the "Source" button to select the
desired audio source among those
available: AUX, USB orBluetooth®.
Applications used on portable devices
may be not compatible with the
Uconnect™system.
Track selection (Browse)
With Media mode active, briefly press
buttons
/to play the
previous/next track or keep buttons
/pressed to fast rewind/
forward the track.For languages not supported by the
system which feature special
characters (e.g. Greek), the keyboard is
not available. In these cases this
function will be limited.
Bluetooth® source
Pairing a Bluetooth® audio device
To pair aBluetooth® audio device,
proceed as follows:
activate theBluetooth® function on
the device;
press the MEDIA button on the front
panel;
if the “Media” source is active, press
the “Source” button;
select theBluetooth® Media
source;
press the “Add Device” button;
search forUconnect™on theBlu-
etooth® audio device (during the pair-
ing stage a screen is displayed showing
the progress of the operation);
when requested by the audio
device, enter the PIN code shown on
the system display or confirm on the
device the PIN displayed;
156
MULTIMEDIA
Page 159 of 196
if the pairing procedure is completed
successfully, a screen is displayed.
Answer “Yes” to the question to pair the
Bluetooth® audio device as favourite
(the device will have priority over all
other devices to be paired subse-
quently). If “No” is selected, the priority
is determined according to the order of
connection. The last device connected
will have the highest priority;
an audio device can also be paired
by pressing the PHONE button on
the front panel and by selecting
“Settings” or, from the “Settings” menu,
selecting “Phone/Bluetooth”.
If theBluetooth® connection between
mobile phone and system is lost, con-
sult the mobile phone handbook.
The Radio may change the track being
played by modifying the name-device
in theBluetooth® settings of the tele-
phone (where provided), if the device is
connected via USB after theBlu-
etooth® connection.
Phone mode
Phone mode activation
Press the PHONE button on the front
panel to activate the Phone mode.
Use the buttons on the display to:
dial the phone number (using the
graphic keypad on the display);
display and call the contacts in the
mobile phone phonebook;
display and call contacts from the
registers of previous calls;
pair up to 10 phones/audio device
to make access and connection easier
and quicker;
transfer calls from the system to the
mobile phone and vice versa and
deactivate the microphone audio for
private conversations.
The mobile phone audio is transmitted
through the vehicle’s audio system;
the system automatically mutes the
radio when the Phone function is used.
To consult the list of mobile phones
and supported functions, visit the
www.driveuconnect.eu website
Pairing a mobile phone
To pair the mobile phone, proceed as
follows:
activate theBluetooth® function on
the mobile phone;
press the PHONE button on the
front panel;
if no phone is paired with the system
yet, the display shows a dedicated
screen;
select “Yes” to start the pairing
procedure, then search for the
Uconnect™device on the mobile
phone (if "No" is selected, the Phone
main screen is displayed);
when prompted by the mobile
phone, use its keypad to enter the PIN
code shown on the system display
or confirm on the mobile phone the PIN
displayed;
from the “Phone” screen you can
always pair a mobile phone by pressing
the “Settings” button: press the “Add
Device” button and proceed as
described above;
during the pairing stage a screen is
displayed showing the progress of
the operation;
when the pairing procedure is
completed successfully, a screen is
displayed: answer “Yes” to the question
to pair the mobile phone as favourite
(the mobile phone will have priority over
all other mobile phones to be paired
subsequently). If no other devices are
paired, the system will consider the first
associated device as favourite.
NOTE After updating the phone
software, for proper operation, it is
recommended to remove the phone
from the list of devices linked to the
radio, delete the previous system
pairing also from the list ofBluetooth®
devices on the phone and make a new
pairing.
157
Page 160 of 196
Making a phone call
The operations described below can
only be accessed if supported by
the mobile phone in use.
For all functions available, refer to the
mobile phone owner's handbook.
A call can be made by:
selecting theicon (mobile
phone phonebook);
selecting “Recent Calls”;
selecting theicon;
pressing the “Redial” button.
Text message reader
The system can read the messages
received by the mobile phone.
To use this function the mobile phone
must support the SMS exchange
function throughBluetooth®.
Where operation is not supported by
the phone, the relative graphic
button is deactivated (goes grey).
When a text message is received,
the display will show a screen where
the options “Listen”, “Call” or “Ignore”
can be selected.
Press the
button to access the list
of SMS messages received by the
mobile phone (the list displays a
maximum of 60 messages received).
Browsing SMS messages
(where provided)
Using the steering wheel commands,
you can view and manage the last
10 SMS messages received on the
instrument panel. To use this function
the mobile phone must support the
SMS exchange function throughBlu-
etooth®.
Select “Phone” on the instrument panel
menu and then select “SMS reader”
using the arrow keys on the steering
wheel controls.
The ‘SMS reader’ submenu allows the
last 10 SMS messages to be displayed.
WARNING Some mobile phones may
not take the SMS delivery confirmation
settings into account when interfacing
withUconnect™. If an SMS message
is sent viaUconnect™, the user could
face an additional cost, without any
warning, due to the SMS delivery
confirmation request sent by the phone.
For any problems related to the above,
contact your telephone service provider.
SMS message options
Default text messages are stored in the
system memory and can be sent to
answer a received message or as
a new message:
Yes.
No.
Okay.
I can't talk right now.
Call me.
I'll call you later.
I'm on my way.
Thanks.
I will be late.
Stuck in traffic.
Start without me.
Where are you?
Are you there yet?
I need directions.
I'm lost.
See you later.
I will be 5 (or 10, 15, 20, 25, 30, 45,
60)* minutes late.
See you in 5 (or 10, 15, 20, 25, 30,
45, 60)* minutes.
* Only use the numbers listed,
otherwise the system will not take the
message.
NOTE See the dedicated section for
details on how to send a text message
using the voice commands.
158
MULTIMEDIA