oil Abarth 500 2020 Owner handbook (in English)
[x] Cancel search | Manufacturer: ABARTH, Model Year: 2020, Model line: 500, Model: Abarth 500 2020Pages: 196, PDF Size: 3.53 MB
Page 6 of 196
VEHICLE CHANGES/ALTERATIONS
WARNING
Any change or alteration of the vehicle might seriously affect its safety and road holding, thus causing accidents, in which the
occupants could even be fatally injured
ACCESSORIES PURCHASED BY THE OWNER
If after buying the vehicle, you decide to install electrical accessories that require a permanent electrical supply (e.g. radio,
satellite anti-theft system, etc.) or accessories that in any case burden the electrical supply, contact an Abarth Dealership,
whose personnel will check whether the vehicle’s electrical system is able to withstand the load required, or whether it needs to
be integrated with a more powerful battery.
IMPORTANT Take care when fitting additional spoilers, alloy wheel rims or non-standard wheel hubs: they could reduce the
ventilation of the brakes and affect efficiency under sharp, repeated braking or on long descents. Make sure that nothing
obstructs the pedal stroke (mats, etc.).
INSTALLING ELECTRICAL/ELECTRONIC DEVICES
Electrical and electronic devices installed after buying the car in the context of after-sales service must carry the following label
.
FCA Italy S.p.A. authorises the installation of transceivers provided that installation is carried out at a specialised centre, in a
workmanlike fashion and in compliance with manufacturer's specifications.
IMPORTANT Traffic police may not allow the vehicle on the road if devices have been installed which modify the features of the
vehicle. This may also cause invalidation of warranty in relation to faults caused by the change either directly or indirectly related
to it.
FCA Italy S.p.A. shall not be liable for damage caused by the installation of accessories either not supplied or recommended by
FCA Italy S.p.A. and/or not installed in compliance with the provided instructions.
RADIO TRANSMITTERS AND MOBILE PHONES
Radio transmitter equipment (vehicle mobile phones, CB radios, amateur radio etc.) cannot be used inside the vehicle unless a
separate aerial is mounted externally.
Page 34 of 196
Opening and closing the roof
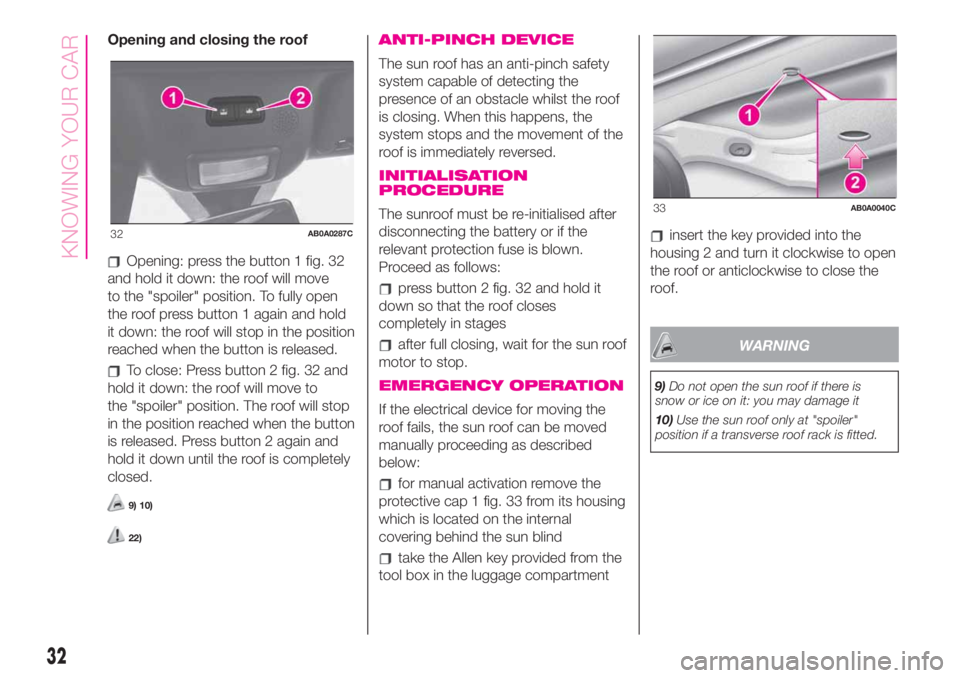
Opening: press the button 1 fig. 32
and hold it down: the roof will move
to the "spoiler" position. To fully open
the roof press button 1 again and hold
it down: the roof will stop in the position
reached when the button is released.
To close: Press button 2 fig. 32 and
hold it down: the roof will move to
the "spoiler" position. The roof will stop
in the position reached when the button
is released. Press button 2 again and
hold it down until the roof is completely
closed.
9) 10)
22)
ANTI-PINCH DEVICE
The sun roof has an anti-pinch safety
system capable of detecting the
presence of an obstacle whilst the roof
is closing. When this happens, the
system stops and the movement of the
roof is immediately reversed.
INITIALISATION
PROCEDURE
The sunroof must be re-initialised after
disconnecting the battery or if the
relevant protection fuse is blown.
Proceed as follows:
press button 2 fig. 32 and hold it
down so that the roof closes
completely in stages
after full closing, wait for the sun roof
motor to stop.
EMERGENCY OPERATION
If the electrical device for moving the
roof fails, the sun roof can be moved
manually proceeding as described
below:
for manual activation remove the
protective cap 1 fig. 33 from its housing
which is located on the internal
covering behind the sun blind
take the Allen key provided from the
tool box in the luggage compartment
insert the key provided into the
housing 2 and turn it clockwise to open
the roof or anticlockwise to close the
roof.
WARNING
9)Do not open the sun roof if there is
snow or ice on it: you may damage it
10)Use the sun roof only at "spoiler"
position if a transverse roof rack is fitted.
32AB0A0287C
33AB0A0040C
32
KNOWING YOUR CAR
Page 35 of 196
WARNING
22)When leaving the vehicle, always
remove the key from the ignition switch to
avoid the risk of injury to those still inside
the car due to accidental operation of
the sun roof. Improper use of the roof can
be dangerous. Before and during
operation, always check that no-one is
exposed to the risk of being injured by the
moving sunroof or by objects getting
caught or hit by it.
SOFT TOP
(where provided)
The soft top can be automatically
opened from the closed position to the
spoiler position, and from this position
to the fully open position.
Suggestions
it is advisable to close the soft top
when the car is parked. The closed soft
top effectively protects the car from
bad weather and from theft;
it is advisable to put valuables in the
boot and lock the lid even when the
top is closed.
SOFT TOP MOVEMENT
23) 24) 25)
11) 12) 13)
IMPORTANT NOTE If moved frequently
in a short time, the motor could
overheat causing the thermal protection
to block the system. Wait for a minute
and repeat.
OPERATION USING THE BUTTONS
INSIDE THE CAR
Opening the soft top:
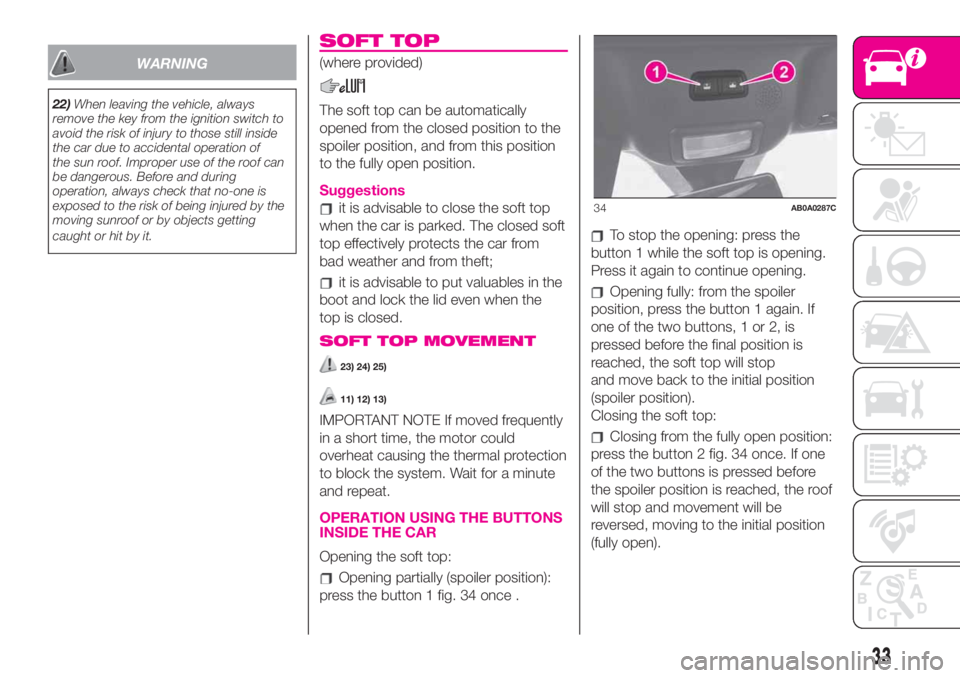
Opening partially (spoiler position):
press the button 1 fig. 34 once .
To stop the opening: press the
button 1 while the soft top is opening.
Press it again to continue opening.
Opening fully: from the spoiler
position, press the button 1 again. If
one of the two buttons, 1 or 2, is
pressed before the final position is
reached, the soft top will stop
and move back to the initial position
(spoiler position).
Closing the soft top:
Closing from the fully open position:
press the button 2 fig. 34 once. If one
of the two buttons is pressed before
the spoiler position is reached, the roof
will stop and movement will be
reversed, moving to the initial position
(fully open).
34AB0A0287C
33
Page 36 of 196
Closing from the spoiler position:
press the button 2 to bring the roof
automatically to the safety position
(approximately 25 cm from fully closed
position). If one of the two buttons is
pressed before the stop position is
reached, the soft top may stop in an
intermediate horizontal open position.
Press and hold the button 2 with the
roof in the safety position. The roof will
stop instantly if the button is released
before the fully closed position is
reached.
OPERATION BY MEANS OF
REMOTE CONTROL
The remote control can only be used
with the engine off and the doors
closed.
NOTE The remote control can be used
to open the roof to the horizontal open
position (spoiler position).
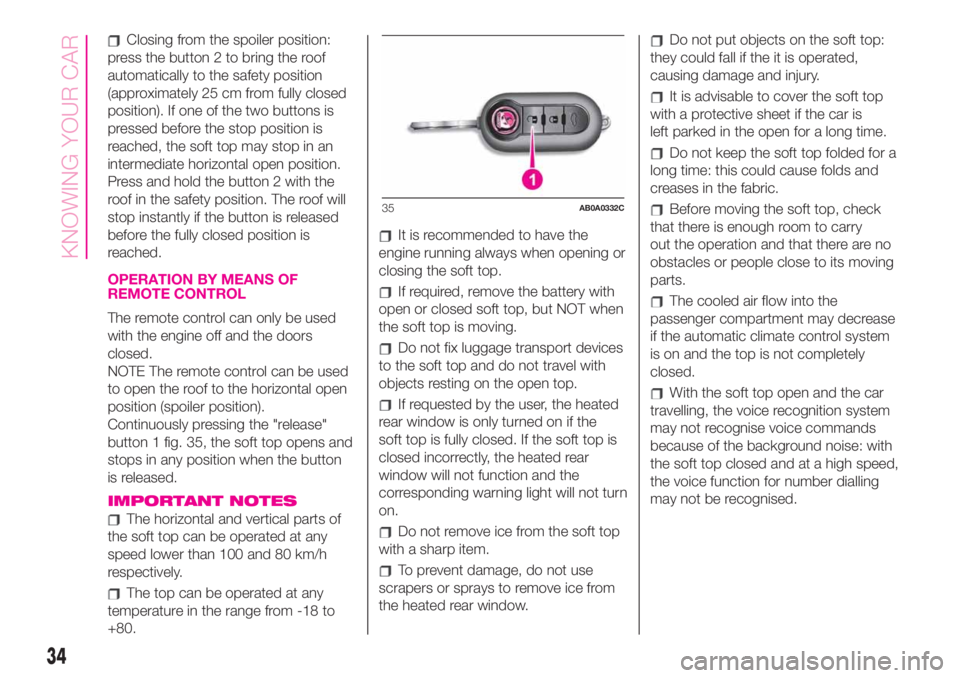
Continuously pressing the "release"
button 1 fig. 35, the soft top opens and
stops in any position when the button
is released.
IMPORTANT NOTES
The horizontal and vertical parts of
the soft top can be operated at any
speed lower than 100 and 80 km/h
respectively.
The top can be operated at any
temperature in the range from -18 to
+80.
It is recommended to have the
engine running always when opening or
closing the soft top.
If required, remove the battery with
open or closed soft top, but NOT when
the soft top is moving.
Do not fix luggage transport devices
to the soft top and do not travel with
objects resting on the open top.
If requested by the user, the heated
rear window is only turned on if the
soft top is fully closed. If the soft top is
closed incorrectly, the heated rear
window will not function and the
corresponding warning light will not turn
on.
Do not remove ice from the soft top
with a sharp item.
To prevent damage, do not use
scrapers or sprays to remove ice from
the heated rear window.
Do not put objects on the soft top:
they could fall if the it is operated,
causing damage and injury.
It is advisable to cover the soft top
with a protective sheet if the car is
left parked in the open for a long time.
Do not keep the soft top folded for a
long time: this could cause folds and
creases in the fabric.
Before moving the soft top, check
that there is enough room to carry
out the operation and that there are no
obstacles or people close to its moving
parts.
The cooled air flow into the
passenger compartment may decrease
if the automatic climate control system
is on and the top is not completely
closed.
With the soft top open and the car
travelling, the voice recognition system
may not recognise voice commands
because of the background noise: with
the soft top closed and at a high speed,
the voice function for number dialling
may not be recognised.
35AB0A0332C
34
KNOWING YOUR CAR
Page 38 of 196
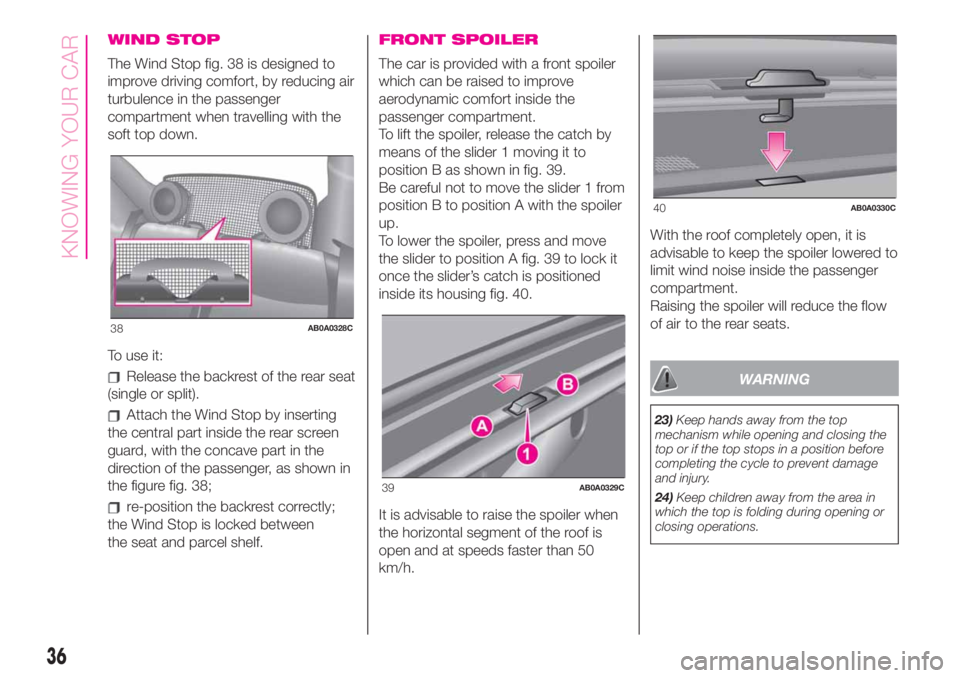
WIND STOP
The Wind Stop fig. 38 is designed to
improve driving comfort, by reducing air
turbulence in the passenger
compartment when travelling with the
soft top down.
To use it:
Release the backrest of the rear seat
(single or split).
Attach the Wind Stop by inserting
the central part inside the rear screen
guard, with the concave part in the
direction of the passenger, as shown in
the figure fig. 38;
re-position the backrest correctly;
the Wind Stop is locked between
the seat and parcel shelf.
FRONT SPOILER
The car is provided with a front spoiler
which can be raised to improve
aerodynamic comfort inside the
passenger compartment.
To lift the spoiler, release the catch by
means of the slider 1 moving it to
position B as shown in fig. 39.
Be careful not to move the slider 1 from
position B to position A with the spoiler
up.
To lower the spoiler, press and move
the slider to position A fig. 39 to lock it
once the slider’s catch is positioned
inside its housing fig. 40.
It is advisable to raise the spoiler when
the horizontal segment of the roof is
open and at speeds faster than 50
km/h.With the roof completely open, it is
advisable to keep the spoiler lowered to
limit wind noise inside the passenger
compartment.
Raising the spoiler will reduce the flow
of air to the rear seats.
WARNING
23)Keep hands away from the top
mechanism while opening and closing the
top or if the top stops in a position before
completing the cycle to prevent damage
and injury.
24)Keep children away from the area in
which the top is folding during opening or
closing operations.
38AB0A0328C
39AB0A0329C
40AB0A0330C
36
KNOWING YOUR CAR
Page 42 of 196
KNOWING THE INSTRUMENT PANEL
This section of the handbook gives you
all the information you need to
understand, interpret and use the
instrument panel correctly.CONTROL PANEL AND
ON-BOARD INSTRUMENTS ........... 41
MENU OPTIONS ............................. 43
TRIP COMPUTER ........................... 44
WARNING LIGHTS AND
MESSAGES .................................... 47
-SEAT BELTS REMINDER.................... 47
-EBD FAILURE .................................... 48
-AIR BAG FAILURE .............................. 48
-LOW BRAKE FLUID/HANDBRAKE
ENGAGED........................................... 49
-“DUALDRIVE” ELECTRIC POWER
STEERING FAILURE ............................ 49
-BRAKE PAD WEAR ............................ 50
-ESC SYSTEM .................................... 50
-INJECTION / EOBD SYSTEM
FAILURE .............................................. 51
-REAR FOG LIGHT .............................. 51
-ABS FAILURE..................................... 51
-iTPMS ................................................ 52
-SIDE LIGHTS AND DIPPED BEAM
HEADLIGHTS/FOLLOW ME HOME ..... 52
-FOG LIGHTS ...................................... 53
-LEFT DIRECTION INDICATOR ............ 53
-RIGHT DIRECTION INDICATOR ......... 53
-MAIN BEAM HEADLIGHTS ................ 53
-DOORS/BONNET/LUGGAGE
COMPARTMENT OPEN ...................... 54
-LOW BATTERY CHARGE ................... 54
-INSUFFICIENT ENGINE OIL
PRESSURE/ENGINE OIL
DETERIORATED .................................. 54
-ENGINE COOLANT TEMPERATURE
TOO HIGH........................................... 55
-ROBOTISED SEQUENTIAL
GEARBOX FAILURE ............................ 55
-SPEED LIMIT EXCEEDED .................. 55-POSSIBLE ICE ON ROAD .................. 56
-PARKING SENSOR FAILURE ............. 56
-SERVICE (SCHEDULED SERVICING)
EXPIRED ............................................. 56
-ASR SYSTEM .................................... 56
-HILL HOLDER FAILURE ..................... 56
-FUEL CUT-OFF SYSTEM.................... 56
-FUEL CUT-OFF SYSTEM FAILURE ..... 57
-EXTERIOR LIGHTS FAILURE .............. 57
-BRAKE LIGHT FAILURE ..................... 57
-FIAT CODE SYSTEM FAILURE ........... 57
-FUEL RESERVE - LIMITED RANGE .... 58
-ENGINE OIL PRESSURE SENSOR
FAILURE INDICATOR........................... 58
-OIL CHANGE ..................................... 58
-PRESS THE CLUTCH PEDAL TO
START ................................................. 58
-FUEL LEVEL SENSOR FAILURE......... 58
-RAIN SENSOR FAILURE .................... 58
-DUSK SENSOR FAILURE ................... 58
-HEADLIGHT ALIGNMENT
CORRECTOR ...................................... 59
40
KNOWING THE INSTRUMENT PANEL
Page 56 of 196
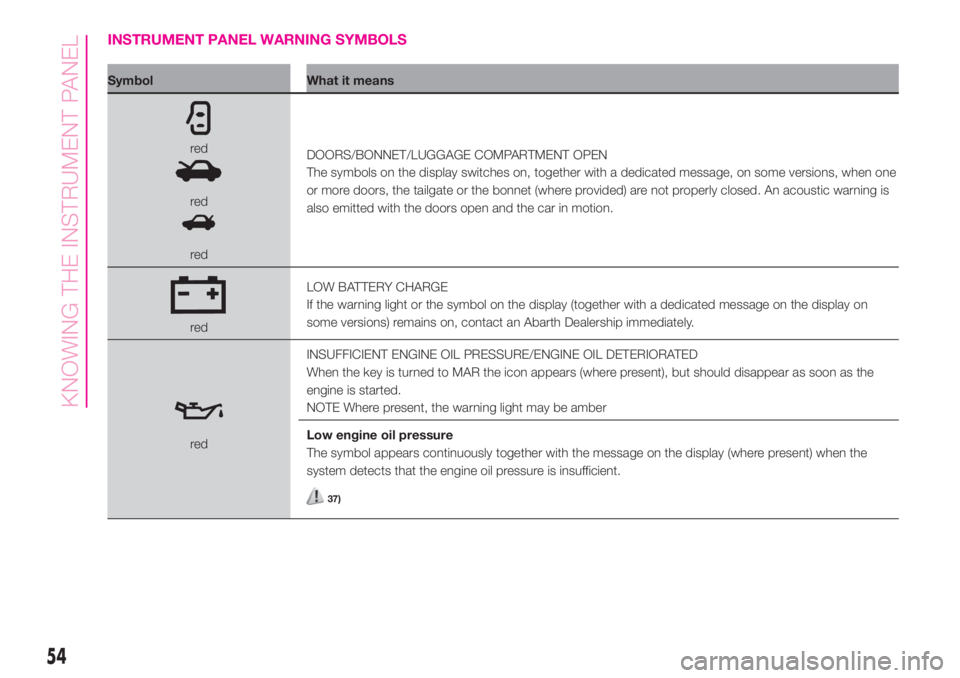
INSTRUMENT PANEL WARNING SYMBOLS
Symbol What it means
red
red
redDOORS/BONNET/LUGGAGE COMPARTMENT OPEN
The symbols on the display switches on, together with a dedicated message, on some versions, when one
or more doors, the tailgate or the bonnet (where provided) are not properly closed. An acoustic warning is
also emitted with the doors open and the car in motion.
redLOW BATTERY CHARGE
If the warning light or the symbol on the display (together with a dedicated message on the display on
some versions) remains on, contact an Abarth Dealership immediately.
redINSUFFICIENT ENGINE OIL PRESSURE/ENGINE OIL DETERIORATED
When the key is turned to MAR the icon appears (where present), but should disappear as soon as the
engine is started.
NOTE Where present, the warning light may be amber
Low engine oil pressure
The symbol appears continuously together with the message on the display (where present) when the
system detects that the engine oil pressure is insufficient.
37)
54
KNOWING THE INSTRUMENT PANEL
Page 60 of 196
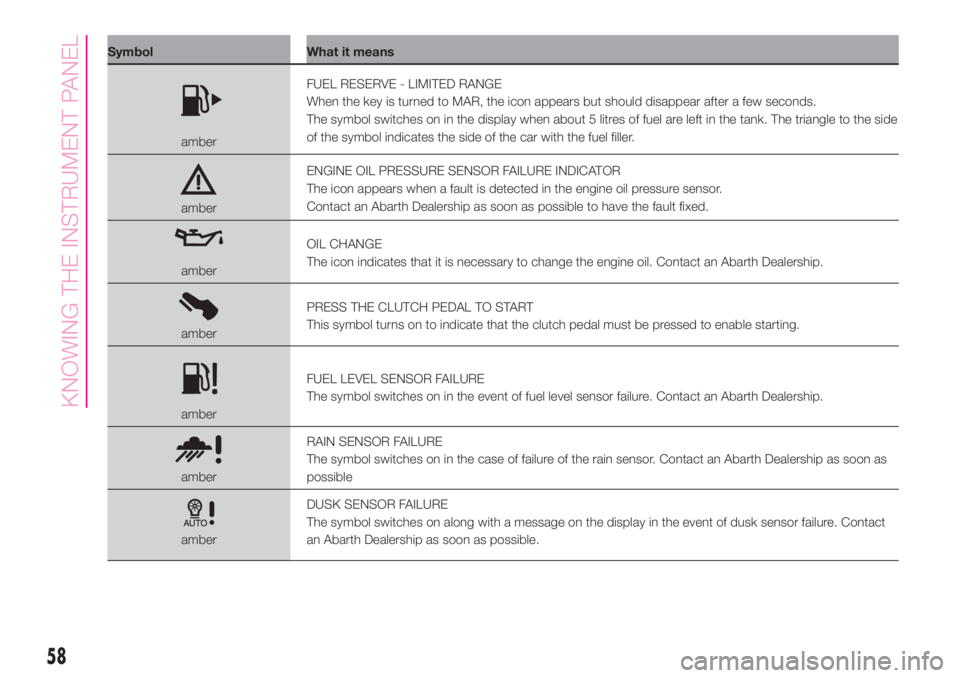
Symbol What it means
amberFUEL RESERVE - LIMITED RANGE
When the key is turned to MAR, the icon appears but should disappear after a few seconds.
The symbol switches on in the display when about 5 litres of fuel are left in the tank. The triangle to the side
of the symbol indicates the side of the car with the fuel filler.
amberENGINE OIL PRESSURE SENSOR FAILURE INDICATOR
The icon appears when a fault is detected in the engine oil pressure sensor.
Contact an Abarth Dealership as soon as possible to have the fault fixed.
amberOIL CHANGE
The icon indicates that it is necessary to change the engine oil. Contact an Abarth Dealership.
amberPRESS THE CLUTCH PEDAL TO START
This symbol turns on to indicate that the clutch pedal must be pressed to enable starting.
amberFUEL LEVEL SENSOR FAILURE
The symbol switches on in the event of fuel level sensor failure. Contact an Abarth Dealership.
amberRAIN SENSOR FAILURE
The symbol switches on in the case of failure of the rain sensor. Contact an Abarth Dealership as soon as
possible
amberDUSK SENSOR FAILURE
The symbol switches on along with a message on the display in the event of dusk sensor failure. Contact
an Abarth Dealership as soon as possible.
58
KNOWING THE INSTRUMENT PANEL
Page 118 of 196
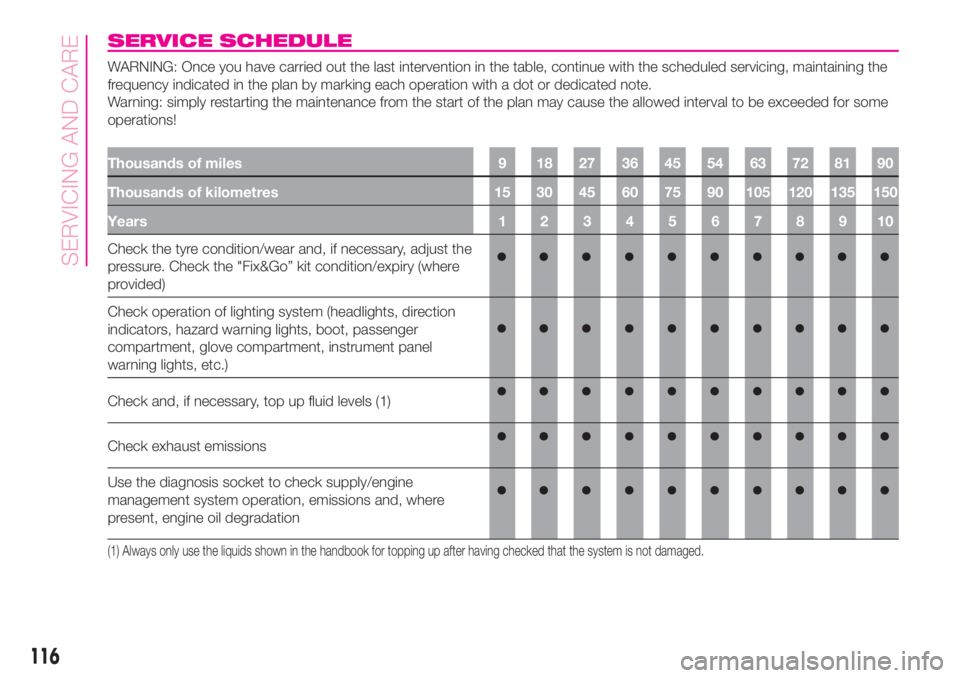
SERVICE SCHEDULE
WARNING: Once you have carried out the last intervention in the table, continue with the scheduled servicing, maintaining the
frequency indicated in the plan by marking each operation with a dot or dedicated note.
Warning: simply restarting the maintenance from the start of the plan may cause the allowed interval to be exceeded for some
operations!
Thousands of miles 9 18 27 36 45 54 63 72 81 90
Thousands of kilometres 15 30 45 60 75 90 105 120 135 150
Years 1 2 3 4 5 6 7 8 9 10
Check the tyre condition/wear and, if necessary, adjust the
pressure. Check the "Fix&Go” kit condition/expiry (where
provided)
Check operation of lighting system (headlights, direction
indicators, hazard warning lights, boot, passenger
compartment, glove compartment, instrument panel
warning lights, etc.)
Check and, if necessary, top up fluid levels (1)
Check exhaust emissions
Use the diagnosis socket to check supply/engine
management system operation, emissions and, where
present, engine oil degradation
(1) Always only use the liquids shown in the handbook for topping up after having checked that the system is not damaged.
116
SERVICING AND CARE
Page 120 of 196
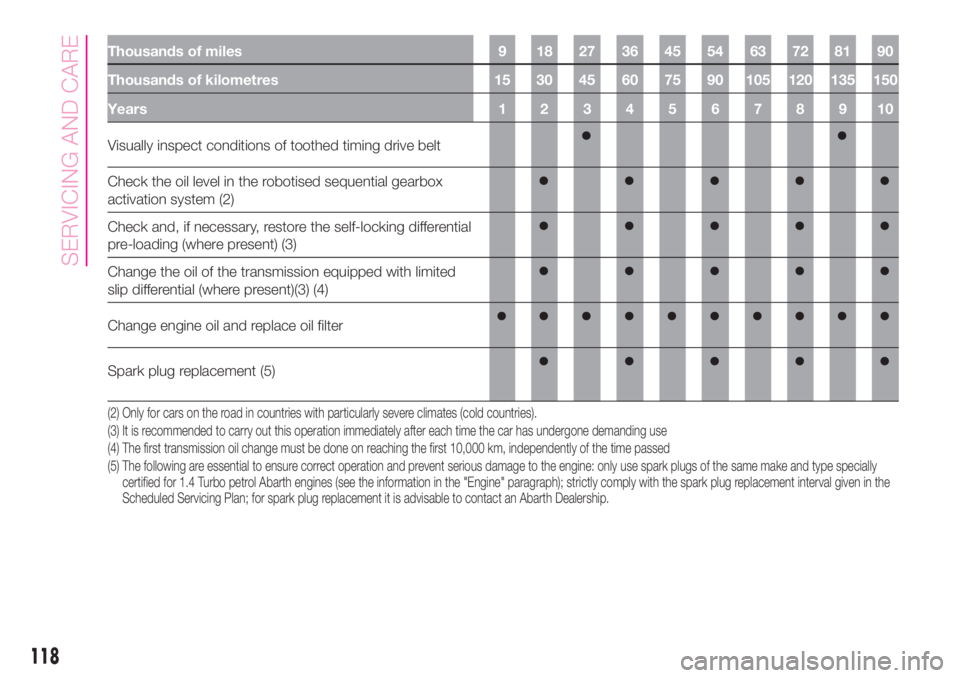
Thousands of miles 9 18 27 36 45 54 63 72 81 90
Thousands of kilometres 15 30 45 60 75 90 105 120 135 150
Years 1 2 3 4 5 6 7 8 9 10
Visually inspect conditions of toothed timing drive belt
Check the oil level in the robotised sequential gearbox
activation system (2)
Check and, if necessary, restore the self-locking differential
pre-loading (where present) (3)
Change the oil of the transmission equipped with limited
slip differential (where present)(3) (4)
Change engine oil and replace oil filter
Spark plug replacement (5)
(2) Only for cars on the road in countries with particularly severe climates (cold countries).
(3) It is recommended to carry out this operation immediately after each time the car has undergone demanding use
(4) The first transmission oil change must be done on reaching the first 10,000 km, independently of the time passed
(5) The following are essential to ensure correct operation and prevent serious damage to the engine: only use spark plugs of the same make and type specially
certified for 1.4 Turbo petrol Abarth engines (see the information in the "Engine" paragraph); strictly comply with the spark plug replacement interval given in the
Scheduled Servicing Plan; for spark plug replacement it is advisable to contact an Abarth Dealership.
118
SERVICING AND CARE