lights Acura CSX 2011 Navigation Manual
[x] Cancel search | Manufacturer: ACURA, Model Year: 2011, Model line: CSX, Model: Acura CSX 2011Pages: 145, PDF Size: 4.11 MB
Page 12 of 145

12
Navigation System
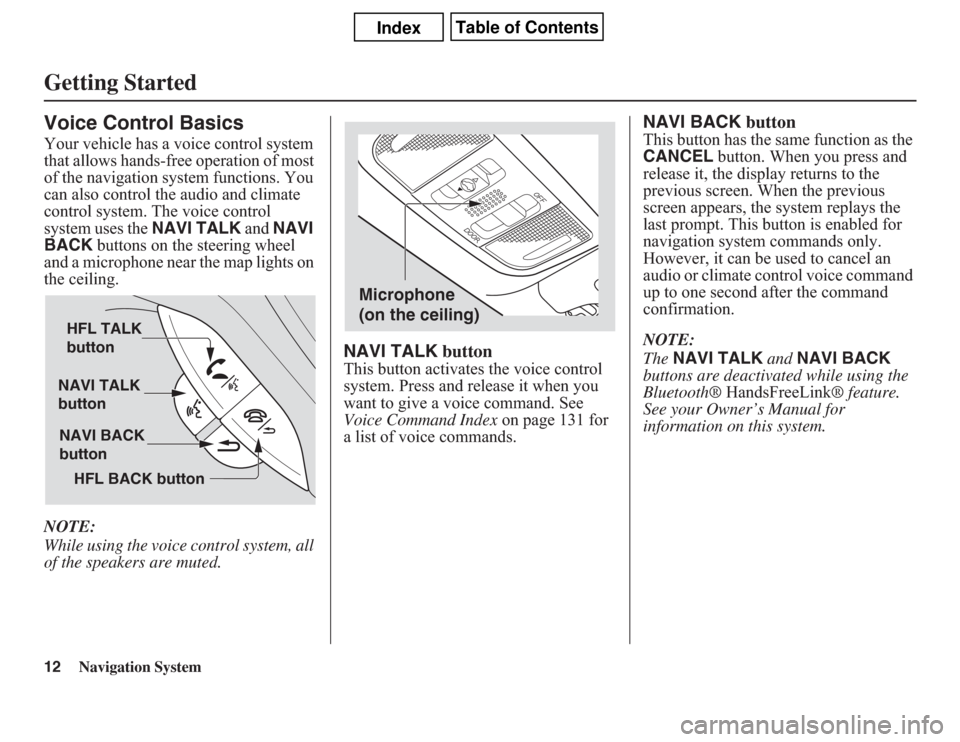
Getting StartedVoice Control BasicsYour vehicle has a voice control system
that allows hands-free operation of most
of the navigation system functions. You
can also control the audio and climate
control system. The voice control
system uses the NAVI TALK and NAVI
BACK buttons on the steering wheel
and a microphone near the map lights on
the ceiling.
NOTE:
While using the voice control system, all
of the speakers are muted.
NAVI TALK buttonThis button activates the voice control
system. Press and release it when you
want to give a voice command. See
Voice Command Index on page 131 for
a list of voice commands.
NAVI BACK buttonThis button has the same function as the
CANCEL button. When you press and
release it, the display returns to the
previous screen. When the previous
screen appears, the system replays the
last prompt. This button is enabled for
navigation system commands only.
However, it can be used to cancel an
audio or climate control voice command
up to one second after the command
confirmation.
NOTE:
The NAVI TALK and NAVI BACK
buttons are deactivated while using the
Bluetooth® HandsFreeLink® feature.
See your Owner’s Manual for
information on this system.
NAVI TALK
button
NAVI BACK
button HFL TALK
button
HFL BACK button
Microphone
(on the ceiling)
Page 74 of 145

74
Navigation System
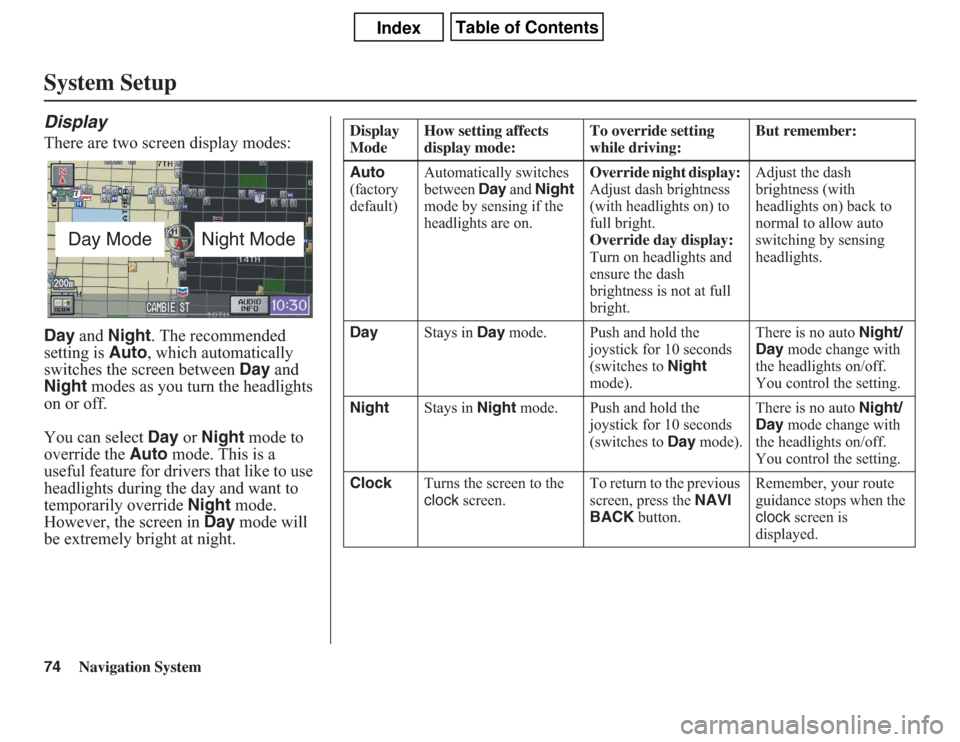
System SetupDisplayThere are two screen display modes:
Day and Night. The recommended
setting is Auto, which automatically
switches the screen between Day and
Night modes as you turn the headlights
on or off.
You can select Day or Night mode to
override the Auto mode. This is a
useful feature for drivers that like to use
headlights during the day and want to
temporarily override Night mode.
However, the screen in Day mode will
be extremely bright at night.
Day Mode
Night Mode
Display
ModeHow setting affects
display mode:To override setting
while driving:But remember:
Auto
(factory
default)Automatically switches
between Day and Night
mode by sensing if the
headlights are on.Override night display:
Adjust dash brightness
(with headlights on) to
full bright.
Override day display:
Turn on headlights and
ensure the dash
brightness is not at full
bright.Adjust the dash
brightness (with
headlights on) back to
normal to allow auto
switching by sensing
headlights.
DayStays in Day mode. Push and hold the
joystick for 10 seconds
(switches to Night
mode).There is no auto Night/
Day mode change with
the headlights on/off.
You control the setting.
NightStays in Night mode. Push and hold the
joystick for 10 seconds
(switches to Day mode).There is no auto Night/
Day mode change with
the headlights on/off.
You control the setting.
ClockTurns the screen to the
clock screen.To return to the previous
screen, press the NAVI
BACK button.Remember, your route
guidance stops when the
clock screen is
displayed.
Page 83 of 145

Navigation System83
System Setup
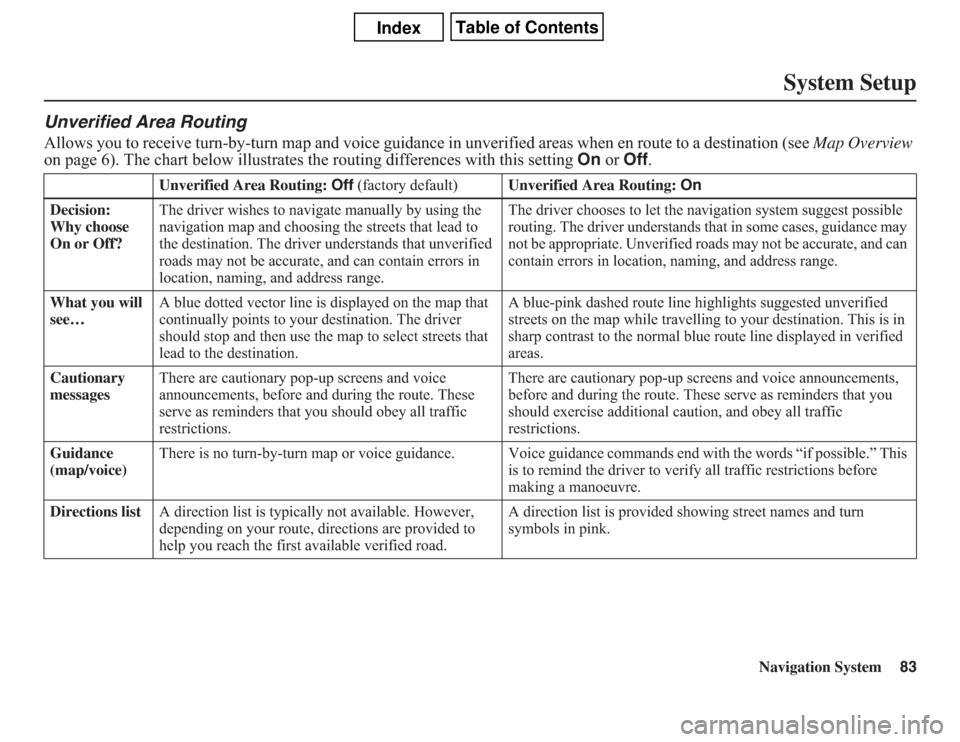
Unverified Area RoutingAllows you to receive turn-by-turn map and voice guidance in unverified areas when en route to a destination (see Map Overview
on page 6). The chart below illustrates the routing differences with this setting On or Off.
Unverified Area Routing: Off (factory default)Unverified Area Routing: On
Decision:
Why choose
On or Off?The driver wishes to navigate manually by using the
navigation map and choosing the streets that lead to
the destination. The driver understands that unverified
roads may not be accurate, and can contain errors in
location, naming, and address range.The driver chooses to let the navigation system suggest possible
routing. The driver understands that in some cases, guidance may
not be appropriate. Unverified roads may not be accurate, and can
contain errors in location, naming, and address range.
What you will
see…A blue dotted vector line is displayed on the map that
continually points to your destination. The driver
should stop and then use the map to select streets that
lead to the destination.A blue-pink dashed route line highlights suggested unverified
streets on the map while travelling to your destination. This is in
sharp contrast to the normal blue route line displayed in verified
areas.
Cautionary
messagesThere are cautionary pop-up screens and voice
announcements, before and during the route. These
serve as reminders that you should obey all traffic
restrictions.There are cautionary pop-up screens and voice announcements,
before and during the route. These serve as reminders that you
should exercise additional caution, and obey all traffic
restrictions.
Guidance
(map/voice)There is no turn-by-turn map or voice guidance. Voice guidance commands end with the words “if possible.” This
is to remind the driver to verify all traffic restrictions before
making a manoeuvre.
Directions listA direction list is typically not available. However,
depending on your route, directions are provided to
help you reach the first available verified road.A direction list is provided showing street names and turn
symbols in pink.
Page 118 of 145

118
Navigation System
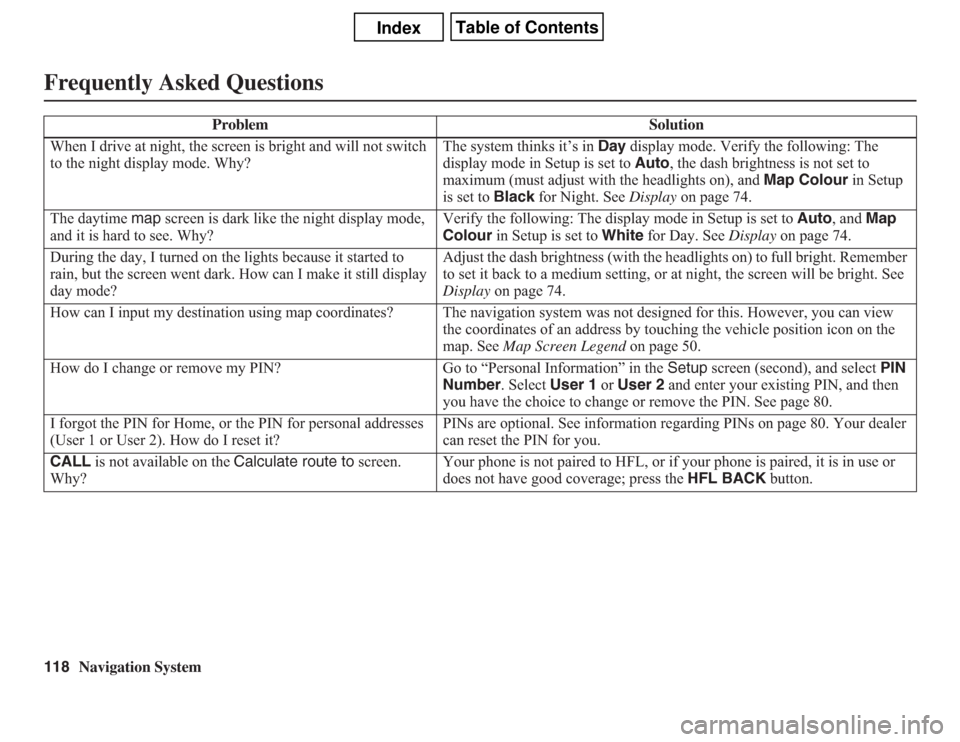
Frequently Asked QuestionsWhen I drive at night, the screen is bright and will not switch
to the night display mode. Why?The system thinks it’s in Day display mode. Verify the following: The
display mode in Setup is set to Auto, the dash brightness is not set to
maximum (must adjust with the headlights on), and Map Colour in Setup
is set to Black for Night. See Display on page 74.
The daytime map screen is dark like the night display mode,
and it is hard to see. Why?Verify the following: The display mode in Setup is set to Auto, and Map
Colour in Setup is set to White for Day. See Display on page 74.
During the day, I turned on the lights because it started to
rain, but the screen went dark. How can I make it still display
day mode?Adjust the dash brightness (with the headlights on) to full bright. Remember
to set it back to a medium setting, or at night, the screen will be bright. See
Display on page 74.
How can I input my destination using map coordinates? The navigation system was not designed for this. However, you can view
the coordinates of an address by touching the vehicle position icon on the
map. See Map Screen Legend on page 50.
How do I change or remove my PIN? Go to “Personal Information” in the Setup screen (second), and select PIN
Number. Select User 1 or User 2 and enter your existing PIN, and then
you have the choice to change or remove the PIN. See page 80.
I forgot the PIN for Home, or the PIN for personal addresses
(User 1 or User 2). How do I reset it?PINs are optional. See information regarding PINs on page 80. Your dealer
can reset the PIN for you.
CALL is not available on the Calculate route to screen.
Why?Your phone is not paired to HFL, or if your phone is paired, it is in use or
does not have good coverage; press the HFL BACK button. Problem Solution