S mode Acura ILX 2014 Owner's Manual
[x] Cancel search | Manufacturer: ACURA, Model Year: 2014, Model line: ILX, Model: Acura ILX 2014Pages: 351, PDF Size: 7.94 MB
Page 264 of 351
263
uuMaintenance Under the HooduOil Check
Maintenance
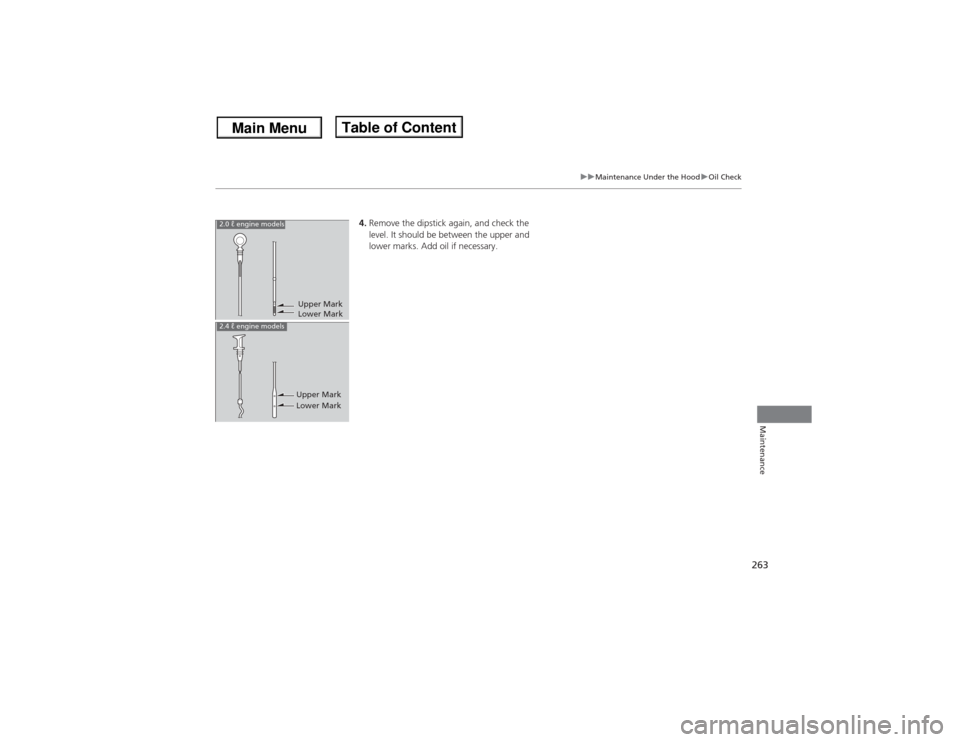
4.Remove the dipstick again, and check the
level. It should be between the upper and
lower marks. Add oil if necessary.
Upper Mark
Lower Mark
2.0 ℓ engine models
Upper Mark
Lower Mark
2.4 ℓ engine models
Page 265 of 351

264
uuMaintenance Under the HooduAdding Engine Oil
Maintenance
Adding Engine Oil
1.Unscrew and remove the engine oil fill cap.
2.Add oil slowly.
3.Reinstall the engine oil fill cap, and tighten
it securely.
4.Wait for three minutes and recheck the
engine oil dipstick.
1Adding Engine Oil
If any oil spills, wipe it up immediately. Spilled oil may
damage the engine compartment components.NOTICEDo not fill the engine oil above the upper mark.
Overfilling the engine oil can result in leaks and
engine damage.
2.0 ℓ engine models
Engine Oil Fill Cap
2.4 ℓ engine models
Engine Oil Fill Cap
Page 266 of 351
265
uuMaintenance Under the HooduChanging the Engine Oil and Oil Filter
Continued
Maintenance
Changing the Engine Oil and Oil FilterYou must change the engine oil and oil filter regularly in order to maintain the
engine's lubrication. The engine may be damaged if they are not changed regularly.
Change the oil and filter in accordance with the maintenance message on the multi-
information display.
1.Run the engine until it reaches normal
operating temperature, and then turn the
engine off.
2.Open the hood and remove the engine oil
fill cap.
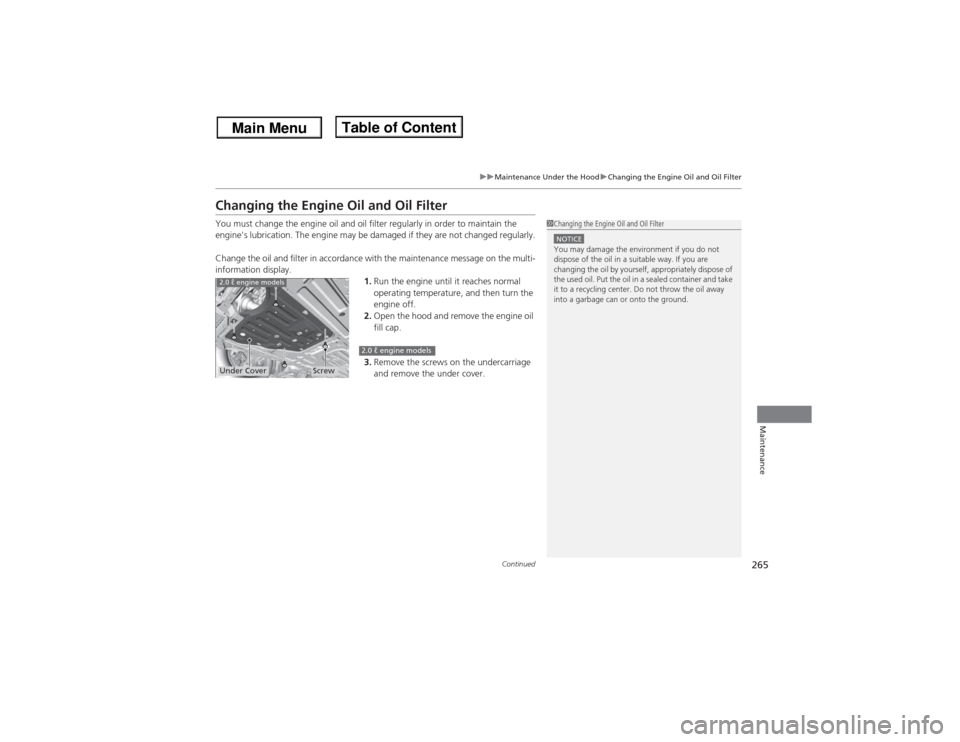
3.Remove the screws on the undercarriage
and remove the under cover.
1Changing the Engine Oil and Oil FilterNOTICEYou may damage the environment if you do not
dispose of the oil in a suitable way. If you are
changing the oil by yourself, appropriately dispose of
the used oil. Put the oil in a sealed container and take
it to a recycling center. Do not throw the oil away
into a garbage can or onto the ground.
2.0 ℓ engine modelsUnder Cover
Screw
2.0 ℓ engine models
Page 267 of 351
266
uuMaintenance Under the HooduChanging the Engine Oil and Oil Filter
Maintenance
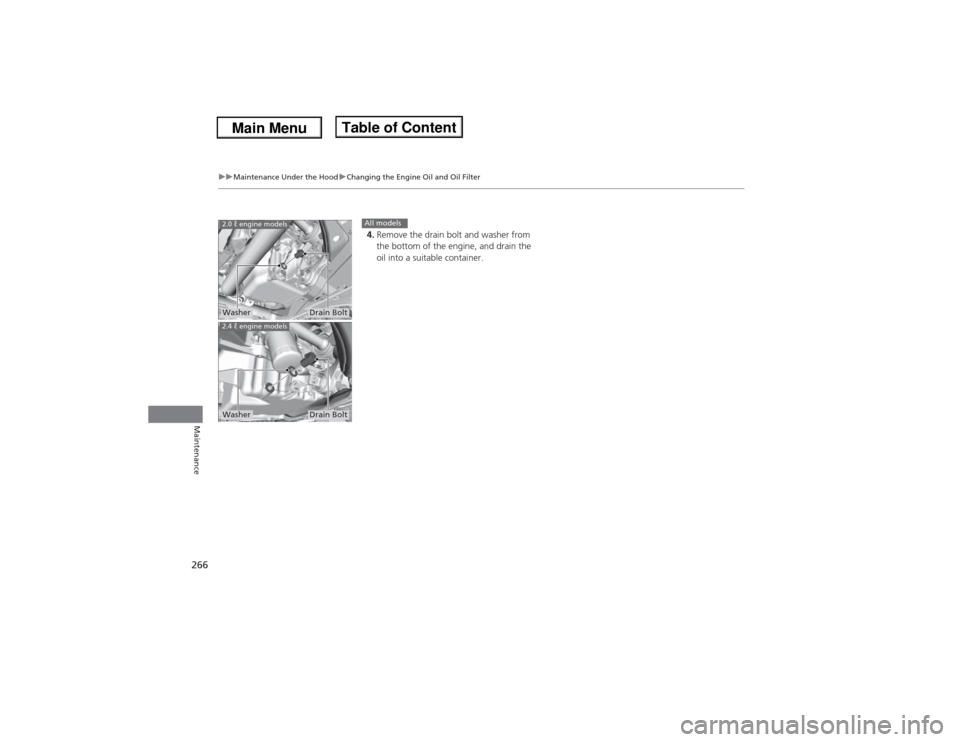
4.Remove the drain bolt and washer from
the bottom of the engine, and drain the
oil into a suitable container.
2.0 ℓ engine models
Drain Bolt
Washer
All models
2.4 ℓ engine models
Drain Bolt
Washer
Page 268 of 351
267
uuMaintenance Under the HooduChanging the Engine Oil and Oil Filter
Maintenance
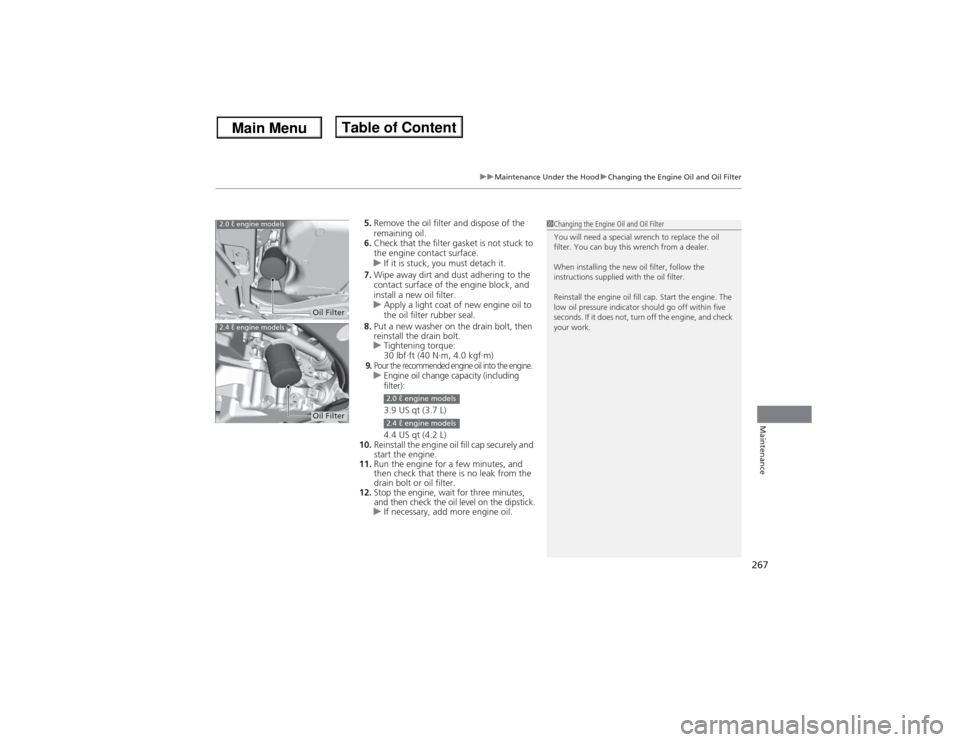
5.Remove the oil filter and dispose of the
remaining oil.
6.Check that the filter gasket is not stuck to
the engine contact surface.
uIf it is stuck, you must detach it.
7.Wipe away dirt and dust adhering to the
contact surface of the engine block, and
install a new oil filter.
uApply a light coat of new engine oil to
the oil filter rubber seal.
8.Put a new washer on the drain bolt, then
reinstall the drain bolt.
uTightening torque:
30 lbf∙ft (40 N∙m, 4.0 kgf∙m)9.Pour the recommended engine oil into the engine.uEngine oil change capacity (including
filter):
3.9 US qt (3.7 L)
4.4 US qt (4.2 L)
10.Reinstall the engine oil fill cap securely and
start the engine.
11.Run the engine for a few minutes, and
then check that there is no leak from the
drain bolt or oil filter.
12.Stop the engine, wait for three minutes,
and then check the oil level on the dipstick.
uIf necessary, add more engine oil.
1Changing the Engine Oil and Oil Filter
You will need a special wrench to replace the oil
filter. You can buy this wrench from a dealer.
When installing the new oil filter, follow the
instructions supplied with the oil filter.
Reinstall the engine oil fill cap. Start the engine. The
low oil pressure indicator should go off within five
seconds. If it does not, turn off the engine, and check
your work.
2.0 ℓ engine models
Oil Filter
2.4 ℓ engine models
Oil Filter
2.0 ℓ engine models2.4 ℓ engine models
Page 270 of 351
269
uuMaintenance Under the HooduEngine Coolant
Maintenance
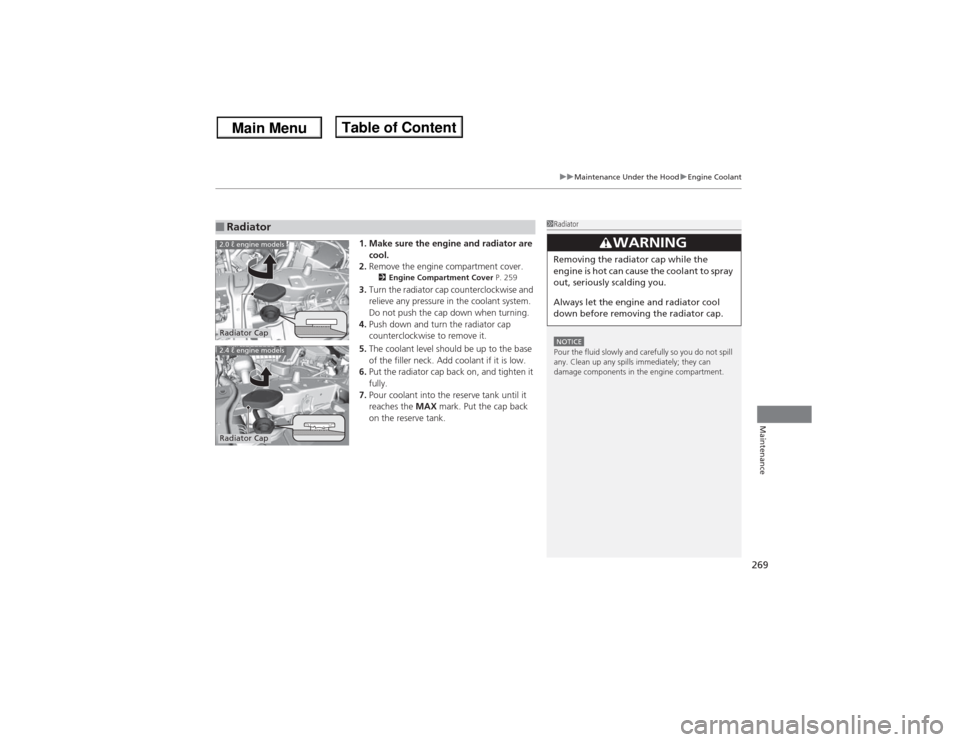
1. Make sure the engine and radiator are
cool.
2.Remove the engine compartment cover.
2Engine Compartment Cover P. 259
3.Turn the radiator cap counterclockwise and
relieve any pressure in the coolant system.
Do not push the cap down when turning.
4.Push down and turn the radiator cap
counterclockwise to remove it.
5.The coolant level should be up to the base
of the filler neck. Add coolant if it is low.
6.Put the radiator cap back on, and tighten it
fully.
7.Pour coolant into the reserve tank until it
reaches the MAX mark. Put the cap back
on the reserve tank.
■Radiator
1RadiatorNOTICEPour the fluid slowly and carefully so you do not spill
any. Clean up any spills immediately; they can
damage components in the engine compartment.
3
WARNING
Removing the radiator cap while the
engine is hot can cause the coolant to spray
out, seriously scalding you.
Always let the engine and radiator cool
down before removing the radiator cap.
2.0 ℓ engine modelsRadiator Cap2.4 ℓ engine modelsRadiator Cap
Page 275 of 351
274Maintenance
Replacing Light BulbsHeadlight BulbsWhen replacing, use the following bulbs.
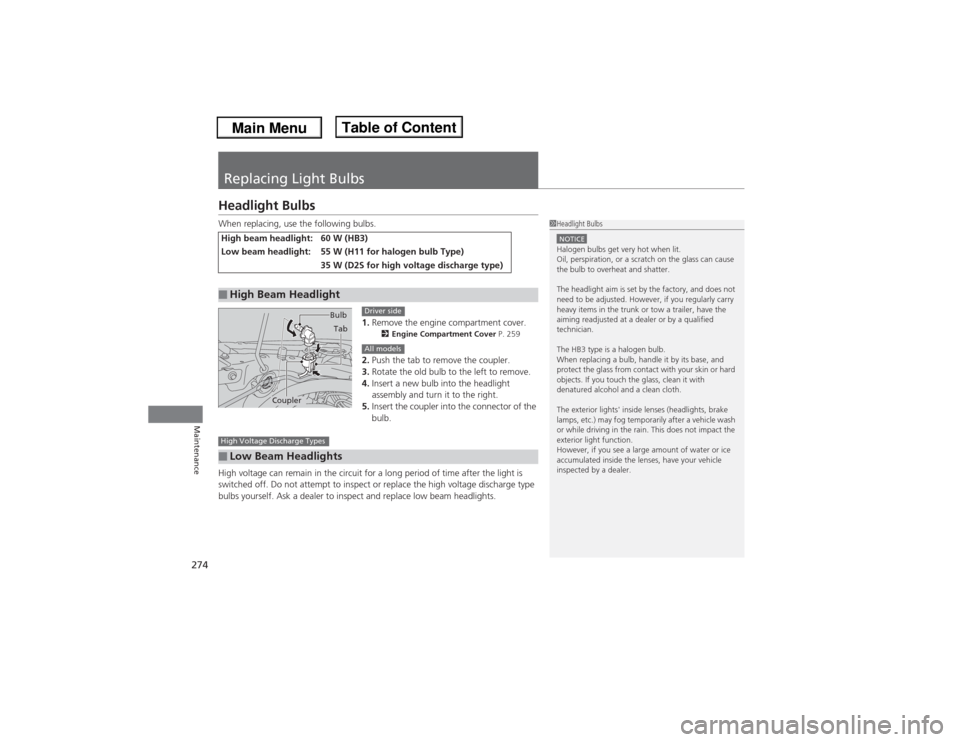
1.Remove the engine compartment cover.
2Engine Compartment Cover P. 259
2.Push the tab to remove the coupler.
3.Rotate the old bulb to the left to remove.
4.Insert a new bulb into the headlight
assembly and turn it to the right.
5.Insert the coupler into the connector of the
bulb.
High voltage can remain in the circuit for a long period of time after the light is
switched off. Do not attempt to inspect or replace the high voltage discharge type
bulbs yourself. Ask a dealer to inspect and replace low beam headlights.
High beam headlight:
60 W (HB3)
Low beam headlight:
55 W (H11 for halogen bulb Type)35 W (D2S for high voltage discharge type)
■High Beam Headlight
1Headlight BulbsNOTICEHalogen bulbs get very hot when lit.
Oil, perspiration, or a scratch on the glass can cause
the bulb to overheat and shatter.
The headlight aim is set by the factory, and does not
need to be adjusted. However, if you regularly carry
heavy items in the trunk or tow a trailer, have the
aiming readjusted at a dealer or by a qualified
technician.
The HB3 type is a halogen bulb.
When replacing a bulb, handle it by its base, and
protect the glass from contact with your skin or hard
objects. If you touch the glass, clean it with
denatured alcohol and a clean cloth.
The exterior lights' inside lenses (headlights, brake
lamps, etc.) may fog temporarily after a vehicle wash
or while driving in the rain. This does not impact the
exterior light function.
However, if you see a large amount of water or ice
accumulated inside the lenses, have your vehicle
inspected by a dealer.
BulbTab
Coupler
Driver sideAll models
■Low Beam HeadlightsHigh Voltage Discharge Types
Page 276 of 351
Continued
275
uuReplacing Light BulbsuHeadlight Bulbs
Maintenance
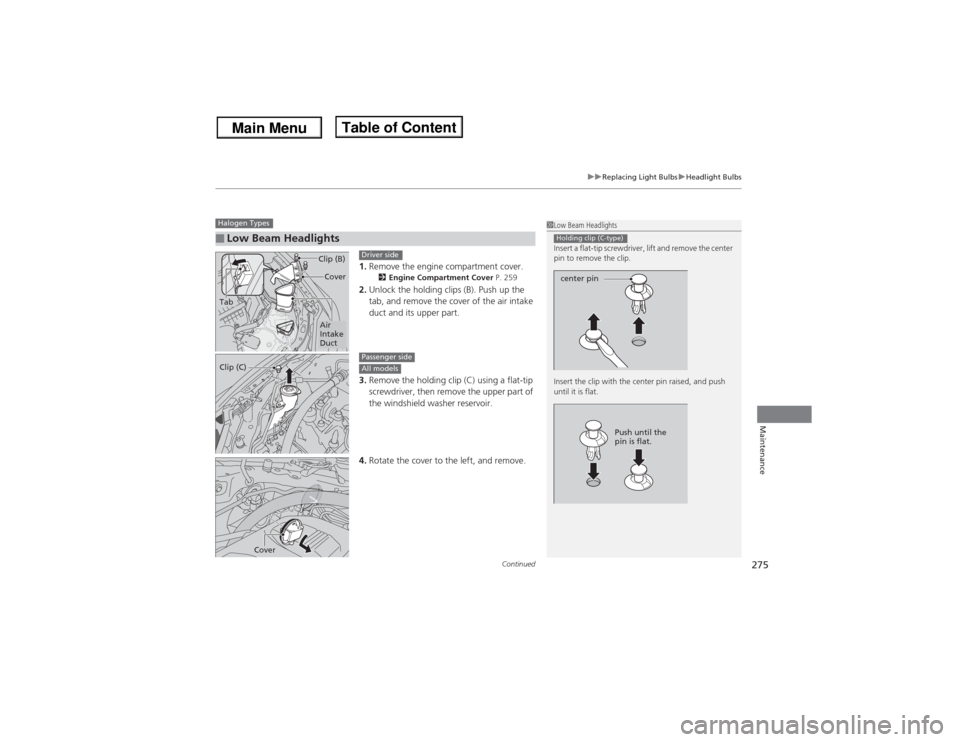
1.Remove the engine compartment cover.
2Engine Compartment Cover P. 259
2.Unlock the holding clips (B). Push up the
tab, and remove the cover of the air intake
duct and its upper part.
3.Remove the holding clip (C) using a flat-tip
screwdriver, then remove the upper part of
the windshield washer reservoir.
4.Rotate the cover to the left, and remove.
■Low Beam HeadlightsHalogen Types
Cover Clip (B)Air
Intake
Duct
Tab
Driver side
1Low Beam Headlights
Insert a flat-tip screwdriver, lift and remove the center
pin to remove the clip.
Insert the clip with the center pin raised, and push
until it is flat.Holding clip (C-type)center pin
Push until the
pin is flat.
Clip (C)
Passenger sideAll models
Cover
Page 277 of 351
uuReplacing Light BulbsuFog Light Bulbs
*
276Maintenance
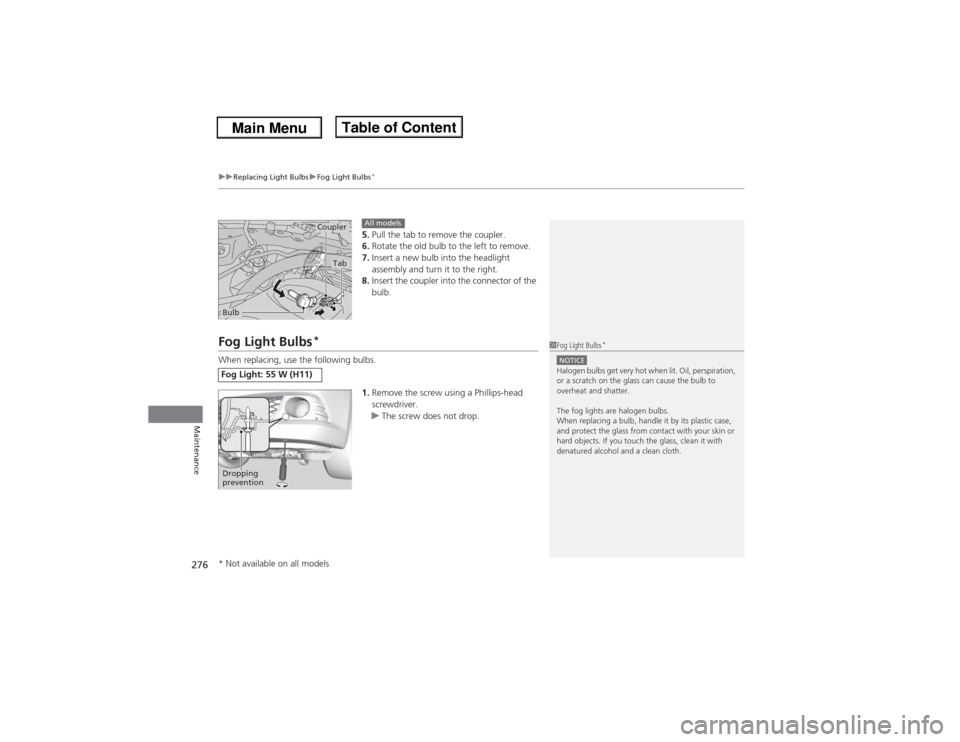
5.Pull the tab to remove the coupler.
6.Rotate the old bulb to the left to remove.
7.Insert a new bulb into the headlight
assembly and turn it to the right.
8.Insert the coupler into the connector of the
bulb.
Fog Light Bulbs
*
When replacing, use the following bulbs.
1.Remove the screw using a Phillips-head
screwdriver.
uThe screw does not drop.
Coupler
Bulb
Tab
All models
Fog Light: 55 W (H11)
1Fog Light Bulbs
*
NOTICEHalogen bulbs get very hot when lit. Oil, perspiration,
or a scratch on the glass can cause the bulb to
overheat and shatter.
The fog lights are halogen bulbs.
When replacing a bulb, handle it by its plastic case,
and protect the glass from contact with your skin or
hard objects. If you touch the glass, clean it with
denatured alcohol and a clean cloth.
Dropping
prevention* Not available on all models
Page 293 of 351

292
uuChecking and Maintaining TiresuTire and Wheel Replacement
Maintenance
Tire and Wheel ReplacementReplace your tires with radials of the same size, load range, speed rating, and
maximum cold tire pressure rating (as shown on the tire’s sidewall). Using tires of a
different size or construction can cause the ABS and VSA® (vehicle stability assist)
system to work incorrectly.
It is best to replace all four tires at the same time. If that isn’t possible, replace the
front or rear tires in pairs.
Make sure that the wheel’s specifications match those of the original wheels.
If you replace a wheel, only use TPMS specified wheels approved for your vehicle.
1Tire and Wheel Replacement
3
WARNING
Installing improper tires on your vehicle can
affect handling and stability. This can cause
a crash in which you can be seriously hurt or
killed.
Always use the size and type of tires
recommended in this owner’s manual.
U.S. models only