Body Acura ILX 2014 Owner's Manual
[x] Cancel search | Manufacturer: ACURA, Model Year: 2014, Model line: ILX, Model: Acura ILX 2014Pages: 351, PDF Size: 7.94 MB
Page 27 of 351
26Safe Driving
Seat BeltsAbout Your Seat BeltsSeat belts are the single most effective safety device because they keep you
connected to the vehicle so that you can take advantage of many built-in safety
features. They also help keep you from being thrown against the inside of the
vehicle, against other passengers, or out of the vehicle. When worn properly, seat
belts also keep your body properly positioned in a crash so that you can take full
advantage of the additional protection provided by the airbags.
In addition, seat belts help protect you in almost every type of crash, including:
-frontal impacts
-side impacts
-rear impacts
-rollovers■Lap/shoulder seat belts
All five seating positions are equipped with lap/shoulder seat belts with emergency
locking retractors. In normal driving the retractor lets you move freely while keeping
some tension on the belt. During a collision or sudden stop the retractor locks to
restrain your body. The front passenger's and rear seat belts also have a lockable
retractor for use with child seats.2Installing a Child Seat with a Lap/Shoulder Seat Belt P. 55
1About Your Seat Belts
Seat belts cannot completely protect you in every
crash. But in most cases, seat belts can reduce your
risk of serious injury.
Most states and all Canadian provinces and territories
require you to wear seat belts.
3
WARNING
Not wearing a seat belt properly increases
the chance of serious injury or death in a
crash, even though your vehicle has
airbags.
Be sure you and your passengers always
wear seat belts and wear them properly.
Page 31 of 351
uuSeat BeltsuFastening a Seat Belt
30Safe Driving
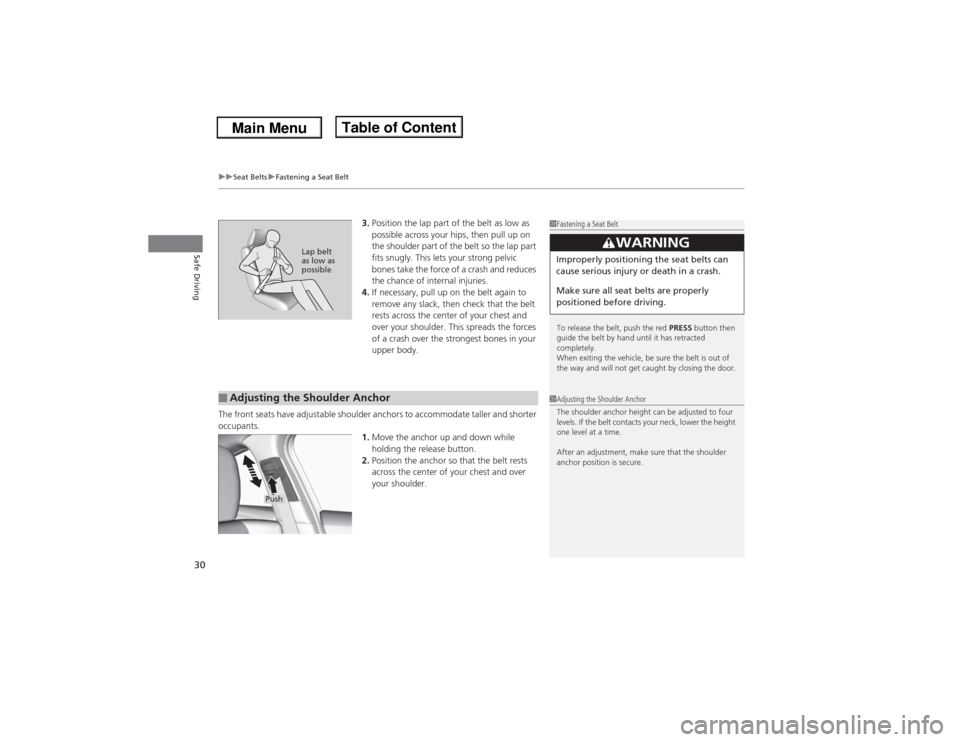
3.Position the lap part of the belt as low as
possible across your hips, then pull up on
the shoulder part of the belt so the lap part
fits snugly. This lets your strong pelvic
bones take the force of a crash and reduces
the chance of internal injuries.
4.If necessary, pull up on the belt again to
remove any slack, then check that the belt
rests across the center of your chest and
over your shoulder. This spreads the forces
of a crash over the strongest bones in your
upper body.
The front seats have adjustable shoulder anchors to accommodate taller and shorter
occupants.
1.Move the anchor up and down while
holding the release button.
2.Position the anchor so that the belt rests
across the center of your chest and over
your shoulder.
1Fastening a Seat Belt
To release the belt, push the red PRESS button then
guide the belt by hand until it has retracted
completely.
When exiting the vehicle, be sure the belt is out of
the way and will not get caught by closing the door.
3
WARNING
Improperly positioning the seat belts can
cause serious injury or death in a crash.
Make sure all seat belts are properly
positioned before driving.
Lap belt
as low as
possible
■Adjusting the Shoulder Anchor
1Adjusting the Shoulder Anchor
The shoulder anchor height can be adjusted to four
levels. If the belt contacts your neck, lower the height
one level at a time.
After an adjustment, make sure that the shoulder
anchor position is secure.
Push
Page 39 of 351
38
uuAirbagsuFront Airbags (SRS)
Safe Driving
■When front airbags should not deploy
Minor frontal crashes: Front airbags were designed to supplement seat belts and
help save lives, not to prevent minor scrapes, or even broken bones that might occur
during a less than moderate-to-severe frontal crash.
Side impacts: Front airbags can provide protection when a sudden deceleration
causes a driver or front passenger to move towards the front of the vehicle. Side
airbags and side curtain airbags have been specifically designed to help reduce the
severity of injuries that can occur during a moderate-to-severe side impact which
can cause the driver or passenger to move towards the side of the vehicle.
Rear impacts: Head restraints and seat belts are your best protection during a rear
impact. Front airbags cannot provide any significant protection and are not designed
to deploy in such collisions.
Rollovers: Seat belts and, in vehicles equipped with a rollover sensor, side airbags
and side curtain airbags offer the best protection in a rollover. Because front airbags
could provide little if any protection, they are not designed to deploy during a
rollover.■When front airbags deploy with little or no visible damage
Because the airbag system senses sudden deceleration, a strong impact to the
vehicle framework or suspension might cause one or more of the airbags to deploy.
Examples include running into a curb, the edge of a hole, or other low fixed object
that causes a sudden deceleration in the vehicle chassis. Since the impact is
underneath the vehicle, damage may not be readily apparent.■When front airbags may not deploy, even though exterior damage
appears severe
Since crushable body parts absorb crash energy during an impact, the amount of
visible damage does not always indicate proper airbag operation. In fact, some
collisions can result in severe damage but no airbag deployment because the airbags
would not have been needed or would not have provided protection even if they
had deployed.
Page 42 of 351
41
uuAirbagsuSide Airbags
Continued
Safe Driving
■When a side airbag deploys with little or no visible damage
Because the airbag system senses sudden acceleration, a strong impact to the side
of the vehicle's framework can cause a side airbag to deploy. In such cases, there
may be little or no damage, but the side impact sensors detected a severe enough
impact to deploy the airbag.■When a side airbag may not deploy, even though visible damage appears
severe
It is possible for a side airbag to not deploy during an impact that results in
apparently severe damage. This can occur when the point of impact was towards
the far front or rear of the vehicle, or when the vehicle's crushable body parts
absorbed most of the crash energy. In either case, the side airbag would not have
been needed nor provided protection even if it had deployed.
Page 43 of 351
uuAirbagsuSide Airbags
42Safe Driving
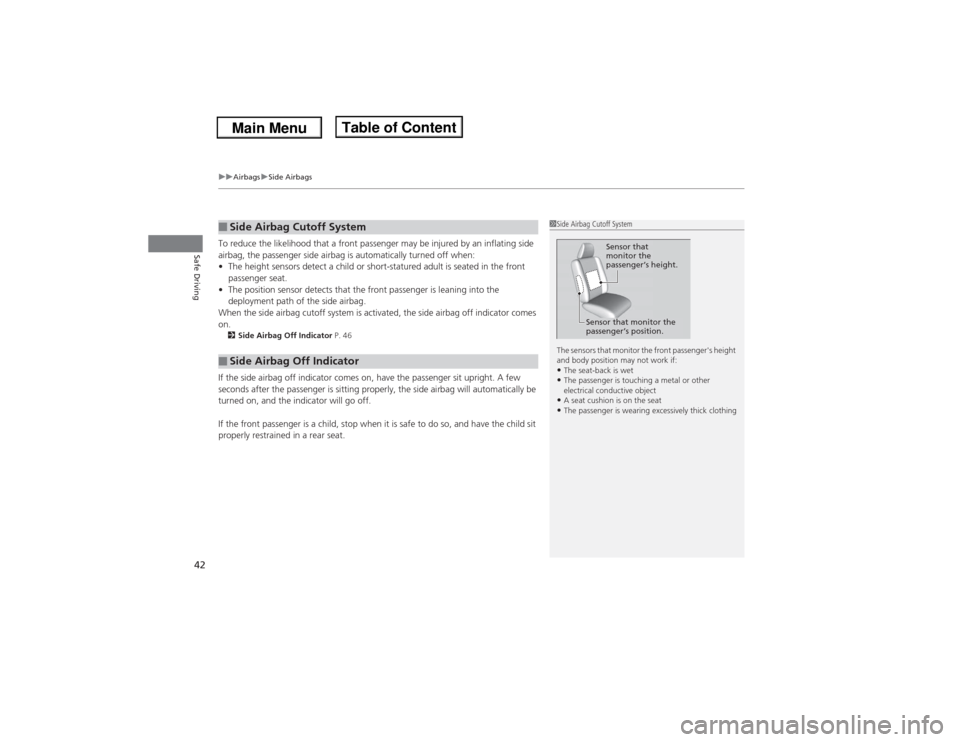
To reduce the likelihood that a front passenger may be injured by an inflating side
airbag, the passenger side airbag is automatically turned off when:
•The height sensors detect a child or short-statured adult is seated in the front
passenger seat.
•The position sensor detects that the front passenger is leaning into the
deployment path of the side airbag.
When the side airbag cutoff system is activated, the side airbag off indicator comes
on.2Side Airbag Off Indicator P. 46If the side airbag off indicator comes on, have the passenger sit upright. A few
seconds after the passenger is sitting properly, the side airbag will automatically be
turned on, and the indicator will go off.
If the front passenger is a child, stop when it is safe to do so, and have the child sit
properly restrained in a rear seat.■Side Airbag Cutoff System■Side Airbag Off Indicator
1Side Airbag Cutoff System
The sensors that monitor the front passenger's height
and body position may not work if:•The seat-back is wet•The passenger is touching a metal or other
electrical conductive object•A seat cushion is on the seat•The passenger is wearing excessively thick clothing
Sensor that
monitor the
passenger’s height.
Sensor that monitor the
passenger’s position.
Page 72 of 351

71
uuIndicatorsu
Continued
Instrument Panel
Indicator
Name
On/Blinking
Explanation
Message
Side Airbag Off
Indicator
●Comes on for a few seconds when
you set the power mode to ON, then
goes off.●Comes on when the passenger side
airbag system is automatically shut
off.
●It does not mean there is a problem with
your side airbags.●Comes on when nobody is sitting in the
passenger seat - Have the vehicle checked
by a dealer.●Comes on when someone is sitting in
the seat - Have the passenger sit properly.
Immobilizer
System Indicator
●Comes on briefly when you set the
power mode to ON, then goes off.●Comes on if the immobilizer system
cannot recognize the key
information.
●Blinks - You cannot start the engine. Set
the power mode to VEHICLE OFF (LOCK),
then select the ON mode again.●Repeatedly blinks - The system may be
malfunctioning. Have the vehicle checked
by a dealer.●Do not attempt to alter this system or add
other devices to it. Electrical problems can
occur.
—
U.S.Canada
U.S.Canada
Page 121 of 351
120
uuOperating the Switches Around the Steering WheeluRear Defogger/Heated Door Mirror Button
Controls
Rear Defogger/Heated Door Mirror Button
Press the rear defogger and heated door
mirror button to defog the rear window and
mirrors when the power mode is in ON.
The rear defogger and heated door mirrors
automatically switch off after 10-30 minutes
depending on the outside temperature.
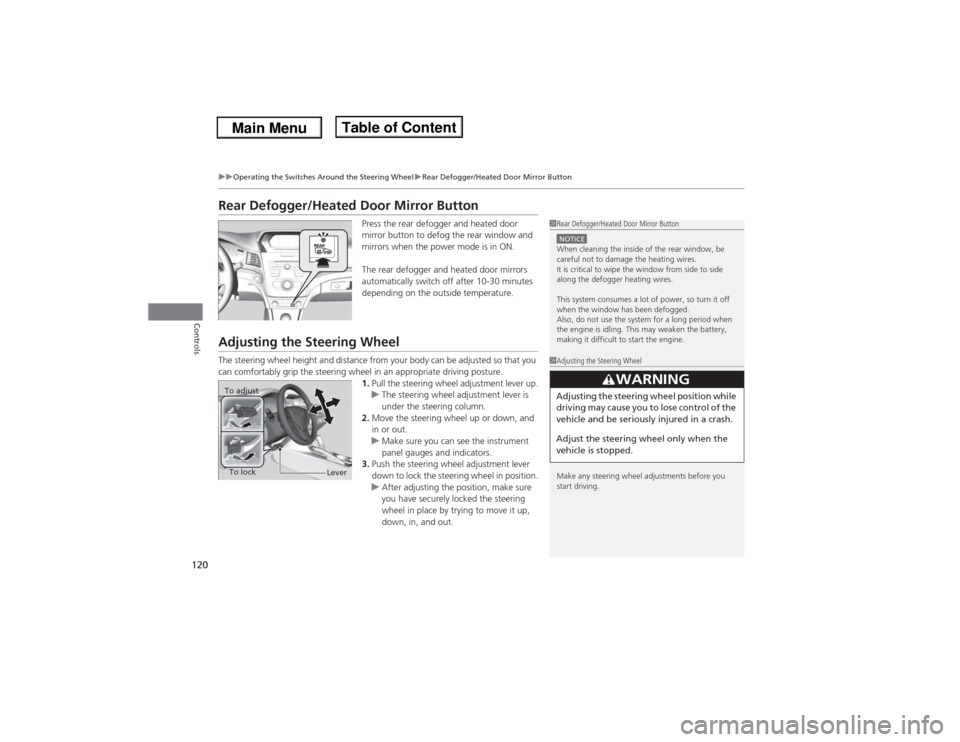
Adjusting the Steering WheelThe steering wheel height and distance from your body can be adjusted so that you
can comfortably grip the steering wheel in an appropriate driving posture.
1.Pull the steering wheel adjustment lever up.
uThe steering wheel adjustment lever is
under the steering column.
2.Move the steering wheel up or down, and
in or out.
uMake sure you can see the instrument
panel gauges and indicators.
3.Push the steering wheel adjustment lever
down to lock the steering wheel in position.
uAfter adjusting the position, make sure
you have securely locked the steering
wheel in place by trying to move it up,
down, in, and out.
1Rear Defogger/Heated Door Mirror ButtonNOTICEWhen cleaning the inside of the rear window, be
careful not to damage the heating wires.
It is critical to wipe the window from side to side
along the defogger heating wires.
This system consumes a lot of power, so turn it off
when the window has been defogged.
Also, do not use the system for a long period when
the engine is idling. This may weaken the battery,
making it difficult to start the engine.1Adjusting the Steering Wheel
Make any steering wheel adjustments before you
start driving.
33
WARNING
Adjusting the steering wheel position while
driving may cause you to lose control of the
vehicle and be seriously injured in a crash.
Adjust the steering wheel only when the
vehicle is stopped.
To adjust
To lock
Lever
Page 282 of 351
281
uuReplacing Light BulbsuBrake Light, Taillight, Rear Turn Signal Light and Rear Side Marker Light Bulbs
Maintenance
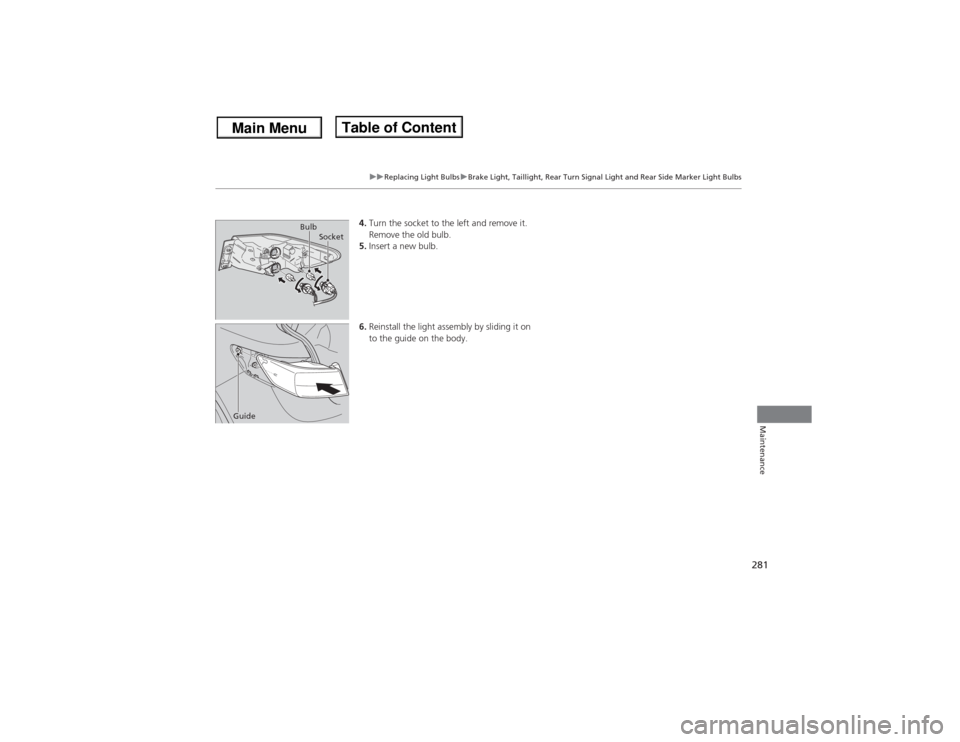
4.Turn the socket to the left and remove it.
Remove the old bulb.
5.Insert a new bulb.
6.Reinstall the light assembly by sliding it on
to the guide on the body.
Socket Bulb
Guide
Page 295 of 351
294
uuChecking and Maintaining TiresuWinter Tires
Maintenance
Winter TiresIf driving on snowy or frozen roads, mount all season marked M+S tires, snow tires,
or tire chains; reduce speed; and maintain sufficient distance between vehicles when
driving.
Be particularly careful when operating the steering wheel or brakes to prevent
skidding.
Use tire chains, snow tires, or all season tires when necessary or according to the law.
When mounting, refer to the following points.
For winter tires:
•Select the size and load ranges that are the same as the original tires.
•Mount the tires to all four wheels.
For tire chains:
•Install them on the front tires only.
•Because your vehicle has limited tire clearance, we strongly recommend using the
chains listed below:
•Follow the chain manufacturer's instruction when installing. Mount them as
tightly as you can.
•Check that the chains do not touch the brake lines or suspension.
•Drive slowly.Cable-type: SCC Radial Chain SC1032
1Winter TiresNOTICETraction devices that are the wrong size or improperly
installed can damage your vehicle's brake lines,
suspension, body, and wheels. Stop driving if they are
hitting any part of the vehicle.
When tire chains are mounted, follow the chain
manufacturer's instructions regarding vehicle
operational limits.
If your vehicle is equipped with summer tires, be
aware that these tires are not designed for winter
driving conditions. For more information, contact a
dealer.
3
WARNING
Using the wrong chains, or not properly
installing chains, can damage the brake
lines and cause a crash in which you can be
seriously injured or killed.
Follow all instructions in this owner's
manual regarding the selection and use of
tire chains.
Page 301 of 351

300
uuCleaninguExterior Care
Maintenance
Exterior CareDust off the vehicle body after you drive.
Regularly inspect your vehicle for scratches on painted surfaces. A scratch on a
painted surface can result in body rust. If you find a scratch, promptly repair it.
Wash the vehicle regularly. Wash more frequently when driving in the following
conditions:
•If driving on roads with road salt.
•If driving in coastal areas.
•If tar, soot, bird droppings, insects, or tree sap are stuck to painted surfaces.
Fold in the door mirrors. Make sure to follow the instructions indicated on the
automated vehicle wash.
•Keep sufficient distance between the cleaning nozzle and the vehicle body.
•Take particular care around the windows. Standing too close may cause water to
enter the vehicle interior. Do not spray water into the engine compartment.■Washing the Vehicle■Using an Automated Vehicle Wash■Using High Pressure Cleaners
1Washing the Vehicle
Do not spray water into the air intake vents or engine
compartment. It can cause a malfunction.Air Intake Vents