ACURA INTEGRA 1994 Service Repair Manual
Manufacturer: ACURA, Model Year: 1994, Model line: INTEGRA, Model: ACURA INTEGRA 1994Pages: 1413, PDF Size: 37.94 MB
Page 961 of 1413
lnterior Trim
Replacement (cont'd)
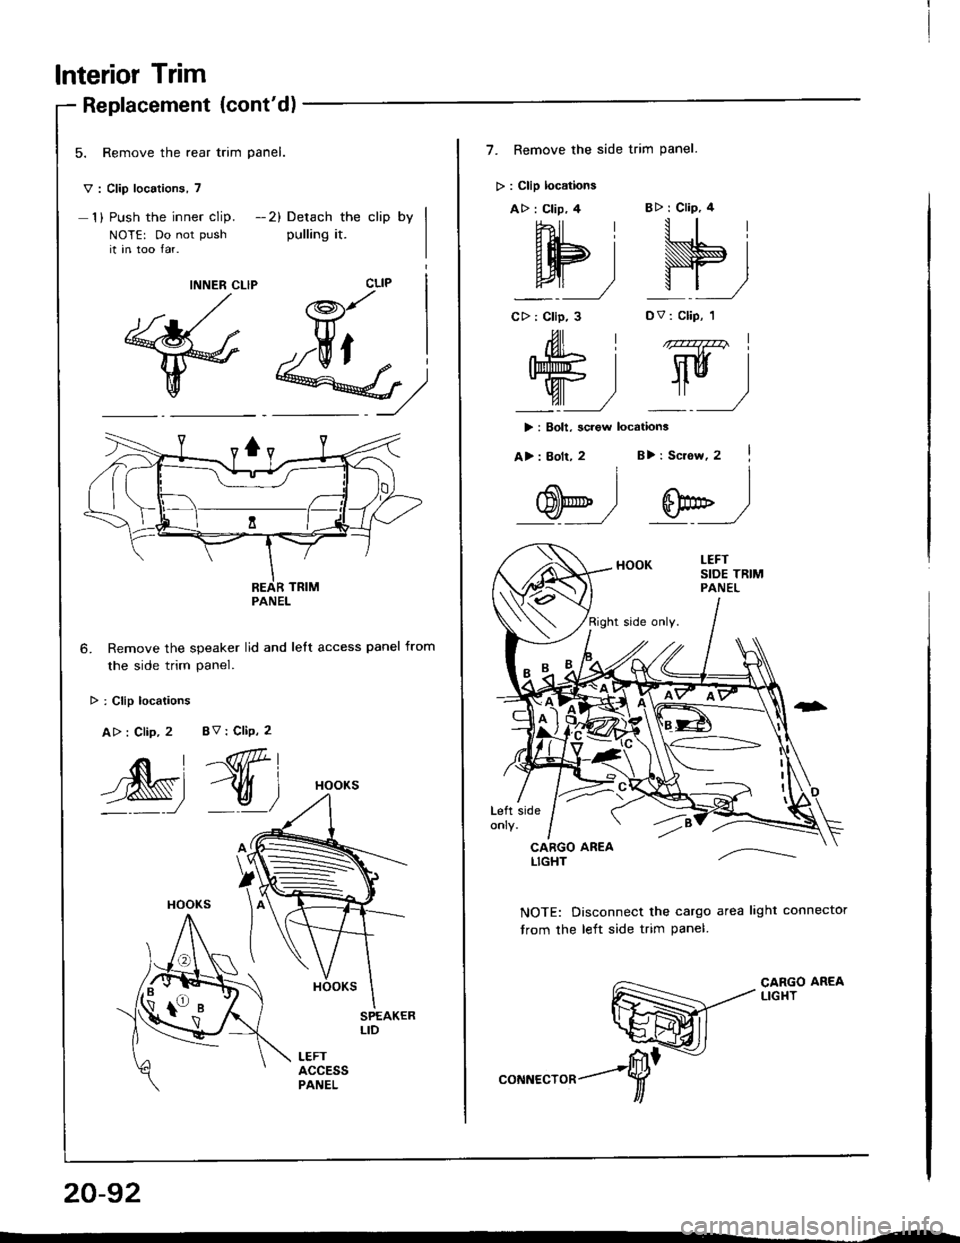
5. Remove the rear trim panel.
v : Clip locations, 7
1) Push the inner clip. -2) Detach the clip by
NOTE: Do not push pulling it.it in too lar.
M)
Remove the speaker lid and left access panel from
the side trim panel.
SPEAKERLID
LEFTaccEssPANEL
INNER CLIP
@
PANEL
> : Clip locaiions
A> : Clip, 2 8V : CliP, 2
,e-, ff)
ffi
,Kl^\
B
\fo
7. Remove the side trim Panel.
> : Clip locations
A> : Clip. 4
W-t Nj
BD : Clip, 4
DV : Clip, 1CD : Clip, 3
> : Boll, screw locations
,Ull | ,,zqzz4 |
w) !)
A> : Bolt, 2B>: Sciow, 2
@-,
i,Gffi'^*^
NOTE: Disconnect the cargo area light connector
trom the left side trim Panel.
CARGO AREALIG}IT
Page 962 of 1413
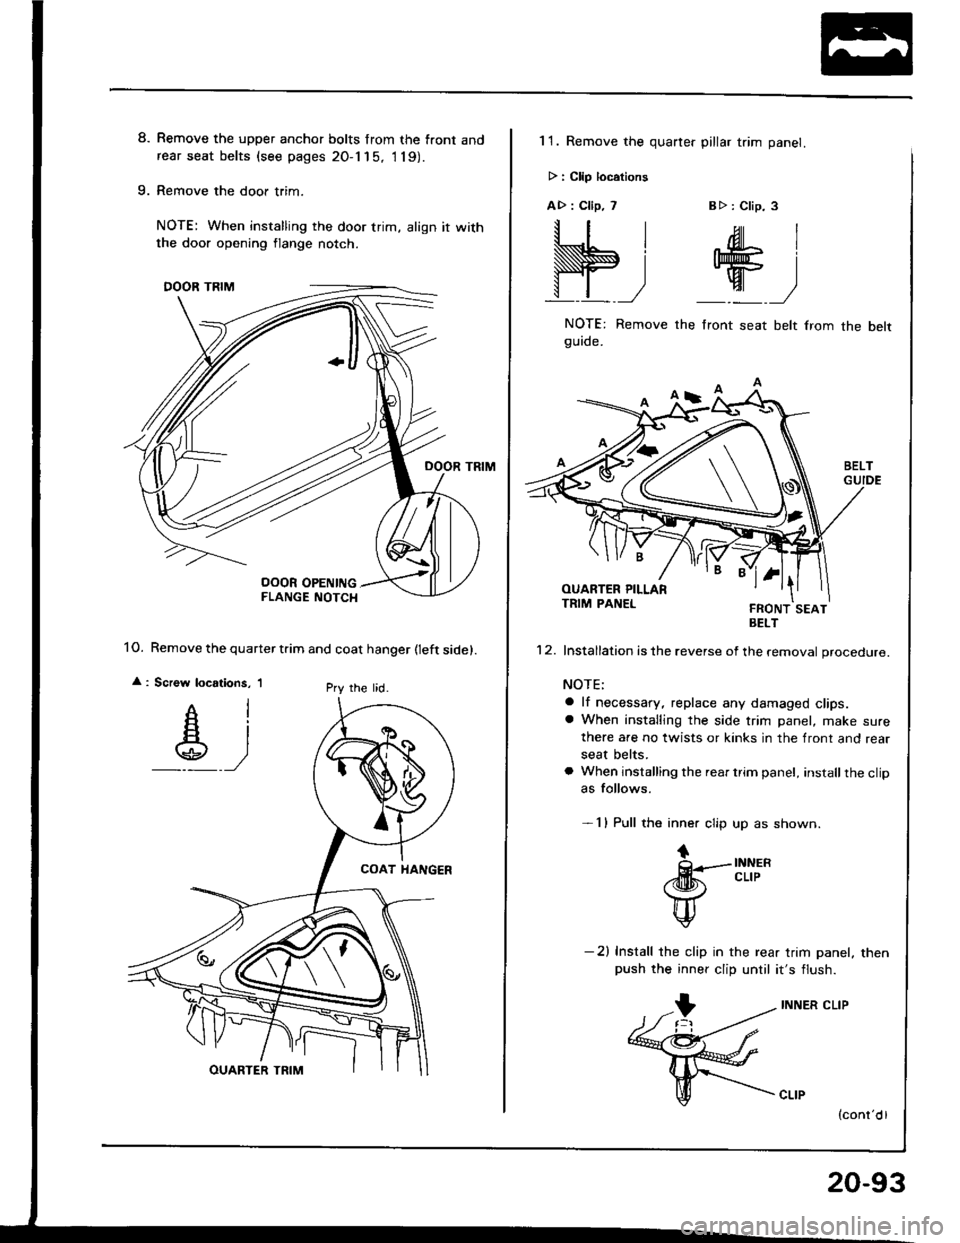
8. Remove the upper anchor bolts from the front andrear seat belts (see pages 20-1 15, 1 19).
9. Remove the door trim.
NOTE: When installing the door trim, align it with
1O. Remove the quarter tiim and coat hanger fleft sidel.
: Screw locstions, 'lPry lhe lid.
the door opening flange notch.
11. Remove the quarter pillar trim panel.
> : Clip locations
A>: Clip, 7 Btr: Clip. 3
S;+)
NOTE: Remove the front seat belt lrom
9UrOe.
the belt
BELT
'12. Installation is the reverse of the removal procedure.
NOTE:
a lf necessary, .eplace any damaged clips.a When installing the side trim panel, make sure
there are no twists or kinks in the front and rear
seat belts.
a When installing the rear trim panel, installthe clipas follows.
- 1 I Pull the inner clip up as shown.
tQ-.-INNER./ilk cLrP( \c4z )\/
tl\#
-2) Install the clip in the rear trim panel. thenpush the inner clip until it's flush.
INNER CLIP
20-93
Page 963 of 1413
lnterior Trim
Replacement lcont'dl
Sodan
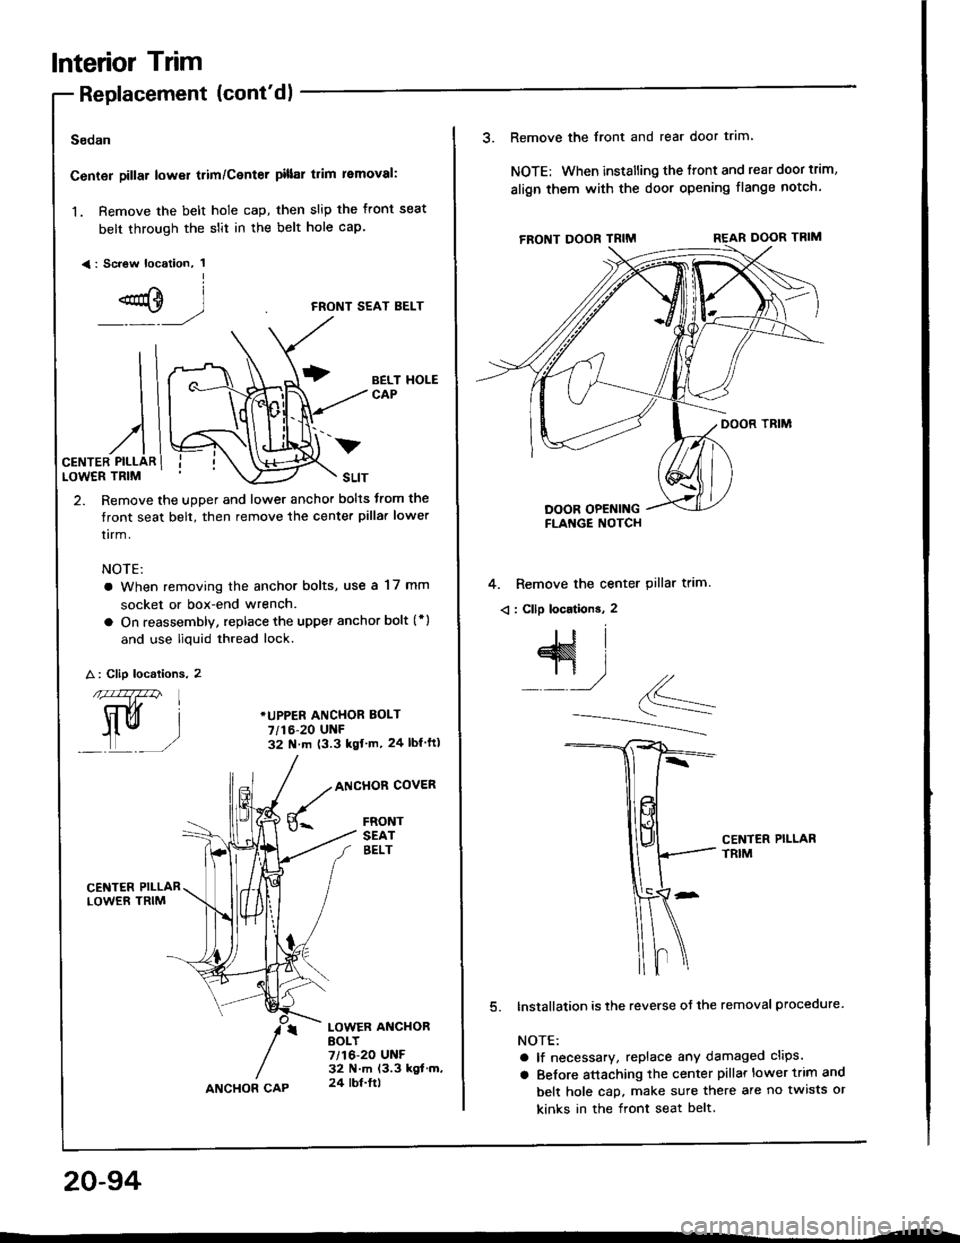
Center pillar lower trim/Center pillal trim removal:
1. Remove the belt hole cap, then slip the front seat
belt through the slit in the belt hole cap.
<: Sc.ew location, 1I
e)
)
2. Remove the upper and lower anchor bolts trom the
tront seat belt, then remove the center pilla. lower
tirm.
NOTE:
a When removing the anchor bolts, use a 17 mm
socket or box-end wrench.
a On reassembly, replace the upper anchor bolt (* )
and use liquid thread lock.
CENTER PILLARLOWER TRIM
FRONT SEAT BELT
BELT HOLECAP
*UPPER ANCHOR EOLT
7/t6-20 UNF32 N m (3.3 kgf'm, 24 lbl ft)
A : Clip localions. 2
nfa147zzn
trui
L_,)
ANCHOR COVER
FRONTSEATEELT
CENTER PILLARLOWER TRIM
LOWER ANCHORBOLY7/16-20 UNF32 N.m 13.3 kgt.m,24 lbt.ltlANCHOR CAP
20-94
v
3. Remove the front and rear door trim
NOTE: When installing the ffont and rear door trim,
align them with the door opening flange notch.
4. Remove the center pillar trim.
< : Cllp locations. 2
CENTER PILLARTRIM
lnstallation is the reverse oJ the removal procedure.
NOTE:
a lf necessary, replace any damaged clips.
a Belore attaching the center pillar lower trim and
belt hole cap. make sure there are no twists or
kinks in the front seat belt.
Page 964 of 1413
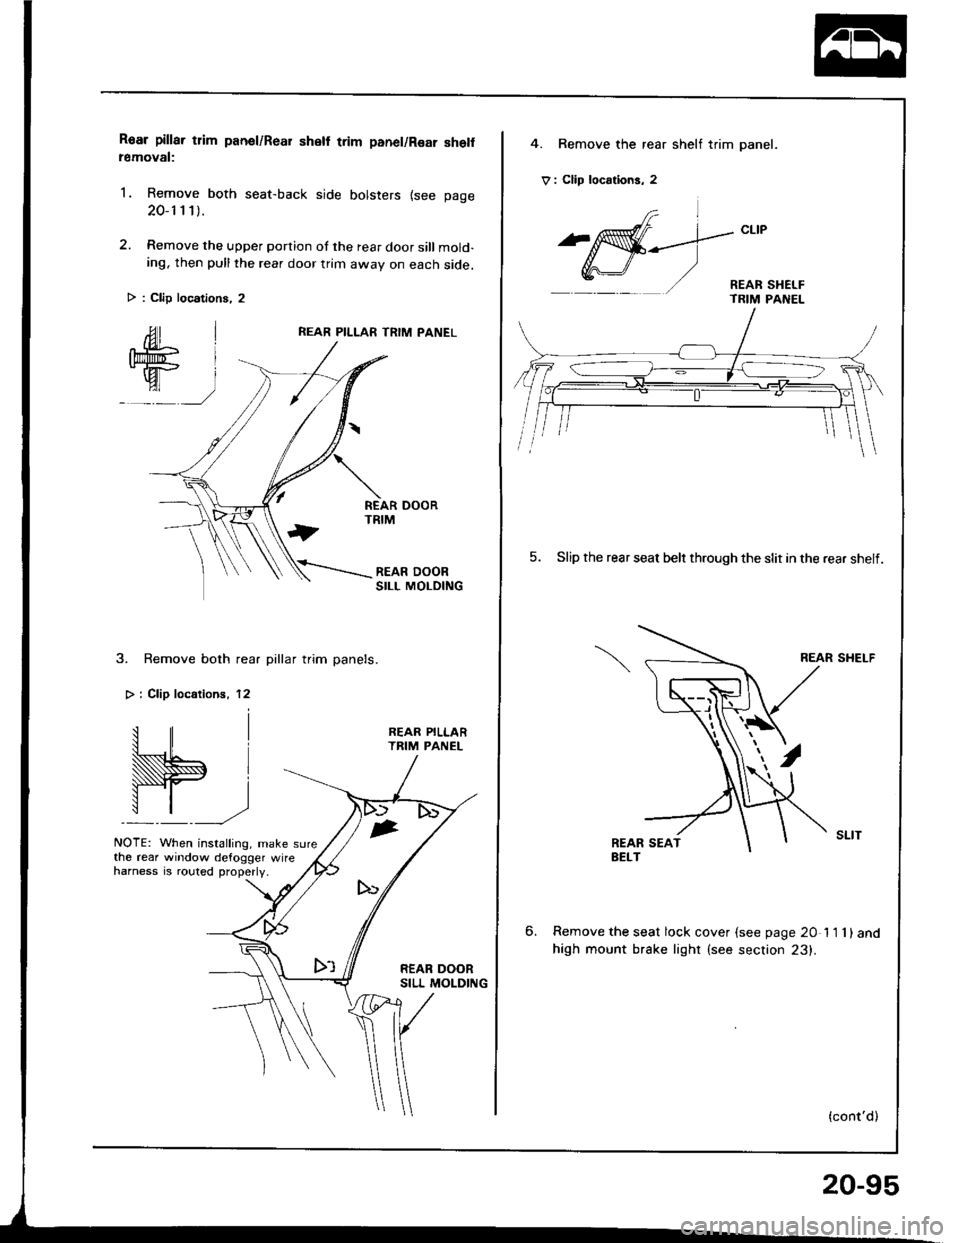
Roar pillar tlim panel/Rear shell trim panel/Rsar she removal:
1. Remove both seat-back side bolsters {see page
20-1 1 1).
2. Remove the upper portion of the rear door sill mold-ing, then pull the rear door trim awav on each side.
REAR PILLAR TRIM PANEL
3. Remove both rear pillar trim panels.
> i Clip localionr, 12
W.,
NOTE: When installing, make sure
REAR PILLARTRIM PANEL
the rear window defogger wireharness is .outed properly.
> : Clip locations, 2
4. Bemove the rear shelf trim panel.
V : Clip locrtions, 2
frl
^affi-_--.]-"t't
Y,r\-J/ '/ - REAR sHEr-F- TRIM PANEL
5. Slip the rear seat belr through the slit in the rear shelf.
REAR SHELF
6.Remove the seat lock cover {see page 20 11 1)and
high mount brake lighr (see section 23).
(cont'd)
20-95
Page 965 of 1413
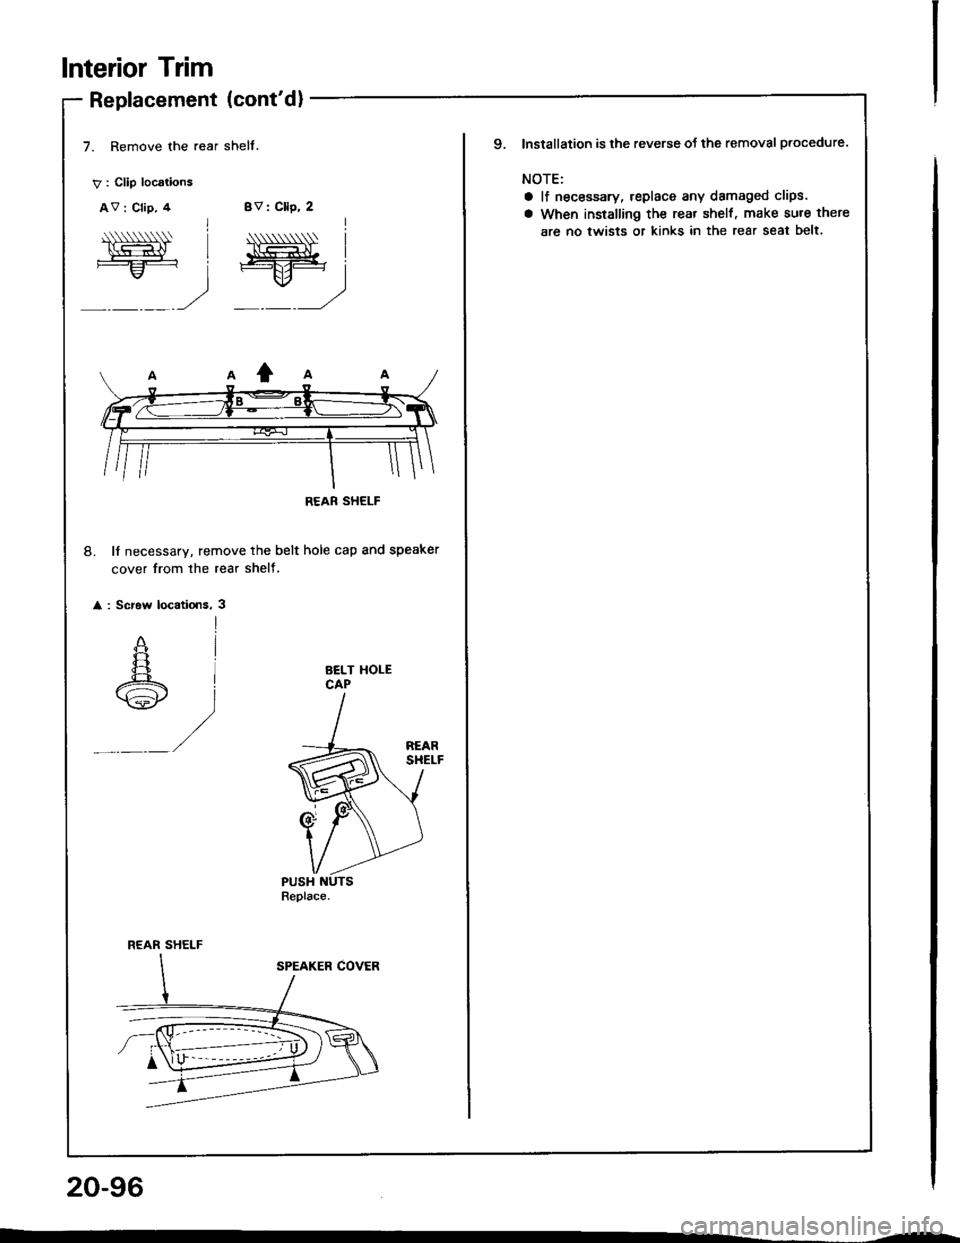
Replacement (cont'd)
7. Remove the rear shelf.
V : Clip locations
AV : Clip, 4BV: Cllp, 2
20-96
lnterior Trim
Niwt==:
;
"ff=
_) =)
8. lf necessary, remove the belt hole cap and speaker
cover from the rear shelf,
: Screw locatlons, 3
AELT HOLECAP
REAR SHELF
lnstallation is lhe reverse of the removal plocedure.
NOTE:
a lf necessary, replace any damaged clips.
a When installing the rear shelf, make sure there
are no twists or kinks in the rear seat belt'
q
Page 966 of 1413
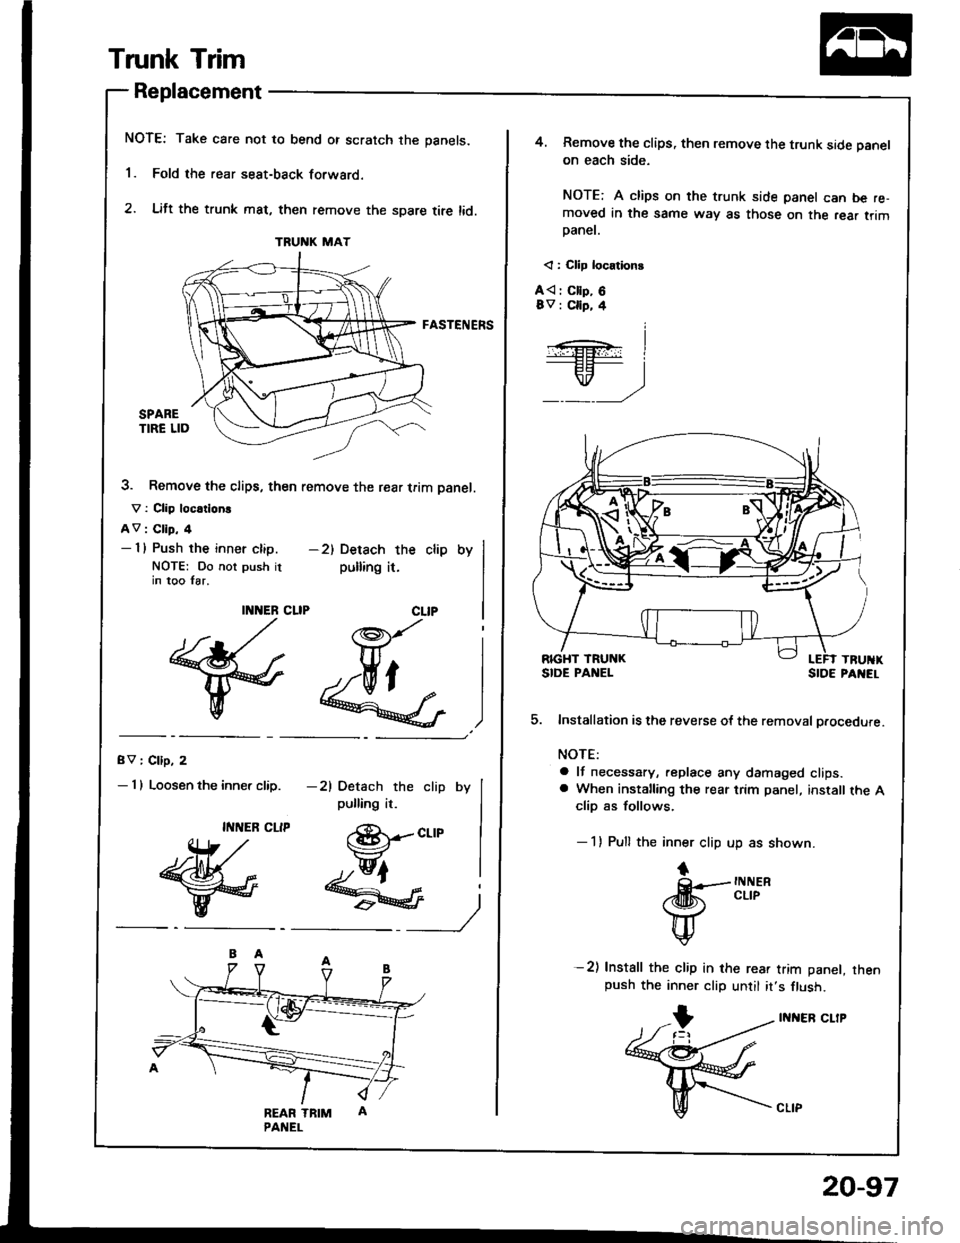
Trunk Trim
Replacement
NOTE: Take care not to bend or scratch the panels.
'1. Fold the rear seat-back forwaro.
2. Lift the trunk mat, then remove the spare tire lid.
FASTENERS
3. Remove the clips, then remove the rear trim Danel.
V : Clip loc.tlorE
AV : Clip, 4- I l Push the inner clip.
NOTE: Do not push itin too Iar.
gV I Cllp, 2
- I I Loosen the inner clip.
TRUNK MAT
-2) Detach the clip by
pulling it.
Y_)
(8r-ct-tp
hfr
)J"'J..&G 4
eEdf,
II{NER
{* ,/
w
II{NEB CLIP
ffi
-21 Detach the clip by
pulling it.
@lqFl
-- t"
4. Remove the clips, then remove the trunk side panel
on each side.
NOTE: A clips on the trunk side panel can be re-moved in the same way as those on the rea. trimpaner.
< : Cllp locationt
A{ : Cllp, 68v : Cllp, 4
Installation is the reverse ot the removal procedure.
NOTE:
a lf necessary, replace any damaged clips.a When installing the rear trim panel, install the Aclip as follows.
- 1) Pull the inner clip up as shown.
tF tNt{ER
rd[h cLrP
H
v
-2) Install the clip in rhe rear trim panel, rhenpush the inner clip until it,s flush.
INI{ER CLIP
5.
20-97
Page 967 of 1413
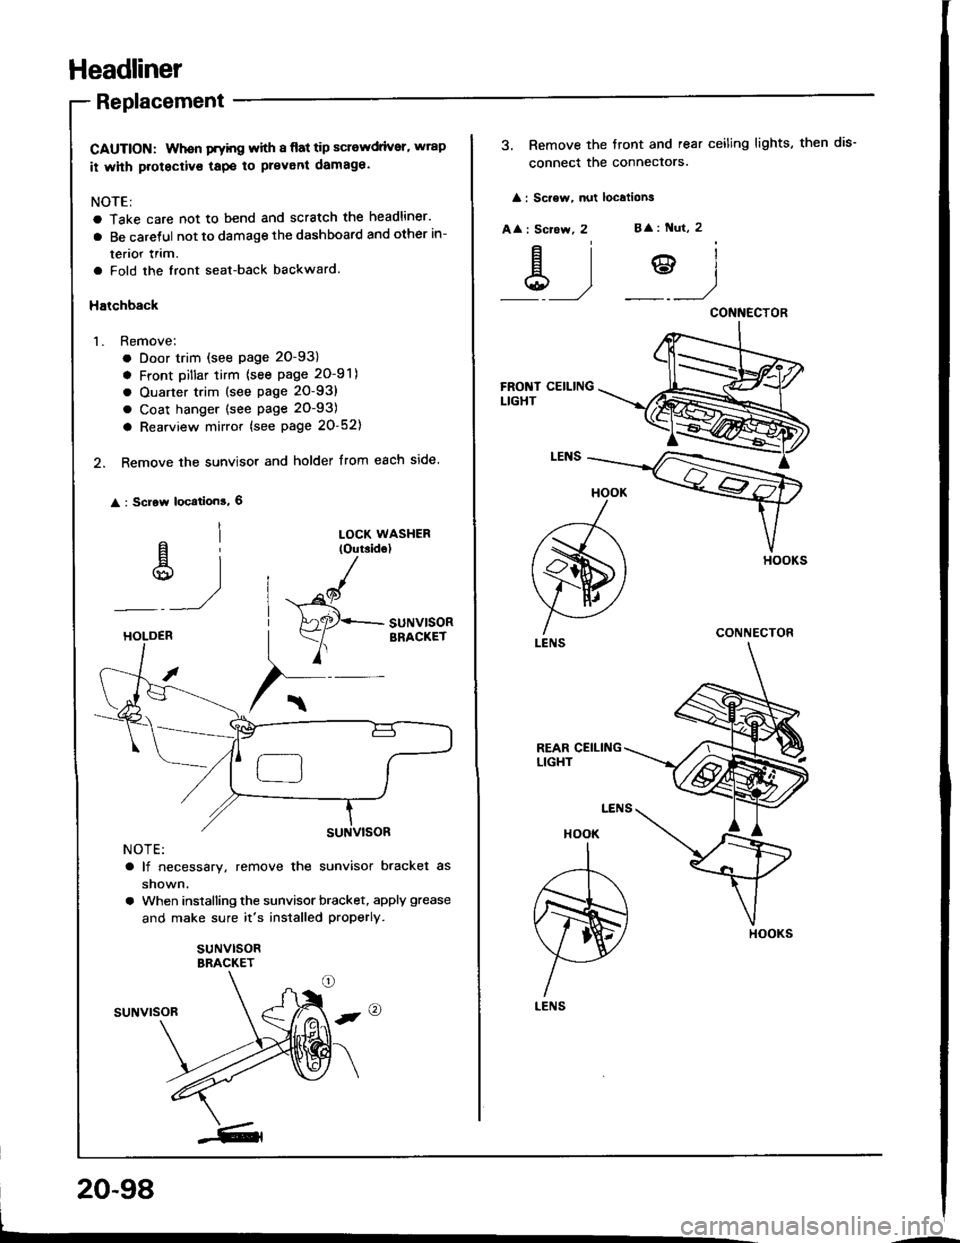
Headliner
Replacement
CAUTION: Whon Fyhg with I flat tip sclewdrivsr, wrap
it whh protectivs tapo to prevent damaga.
NOTE:
a Take care not to bend and scratch the headliner.
a Be caretul not to damage the dashboard and other in-
terior lrim.
a Fold the front seat-back backward.
Halchback
1. Remove;
. Door trim (see page 20-93)
a Front Dillar tirm {see page 20-91)
a Ouarter trim (see page 20-93)
a Coat hanger (see page 20-93)
a Rearview mirror {see page 20-52)
2. Remove the sunvisor and holder from each side.
: Scrow location!, 6
al
u)
LOCK WASHER(Outside)
"^/
HAaqr+- SUNV|SOR
Y
BRACKETHOLDEB
NOTE:
a lf necessary, remove the sunvisor bracket as
shown.
a When installing the sunvisor bracket, apply grease
and make sure it's installed properly.
suNvlsoRBRACKET
suNvrsoR
20-98
3. Remove the tront and rear ceiling lights, then dis-
connect the conneclors.
: Sc.ew, nut localions
A
: Scrcw, 2B
: Nut, 2
&)?)
HOOK
A
ffi)
LENS
HOOK
I
,r--T-\
m)
H
LENS
CONNECTOR
CONNECTOR
HOOKS
Page 968 of 1413
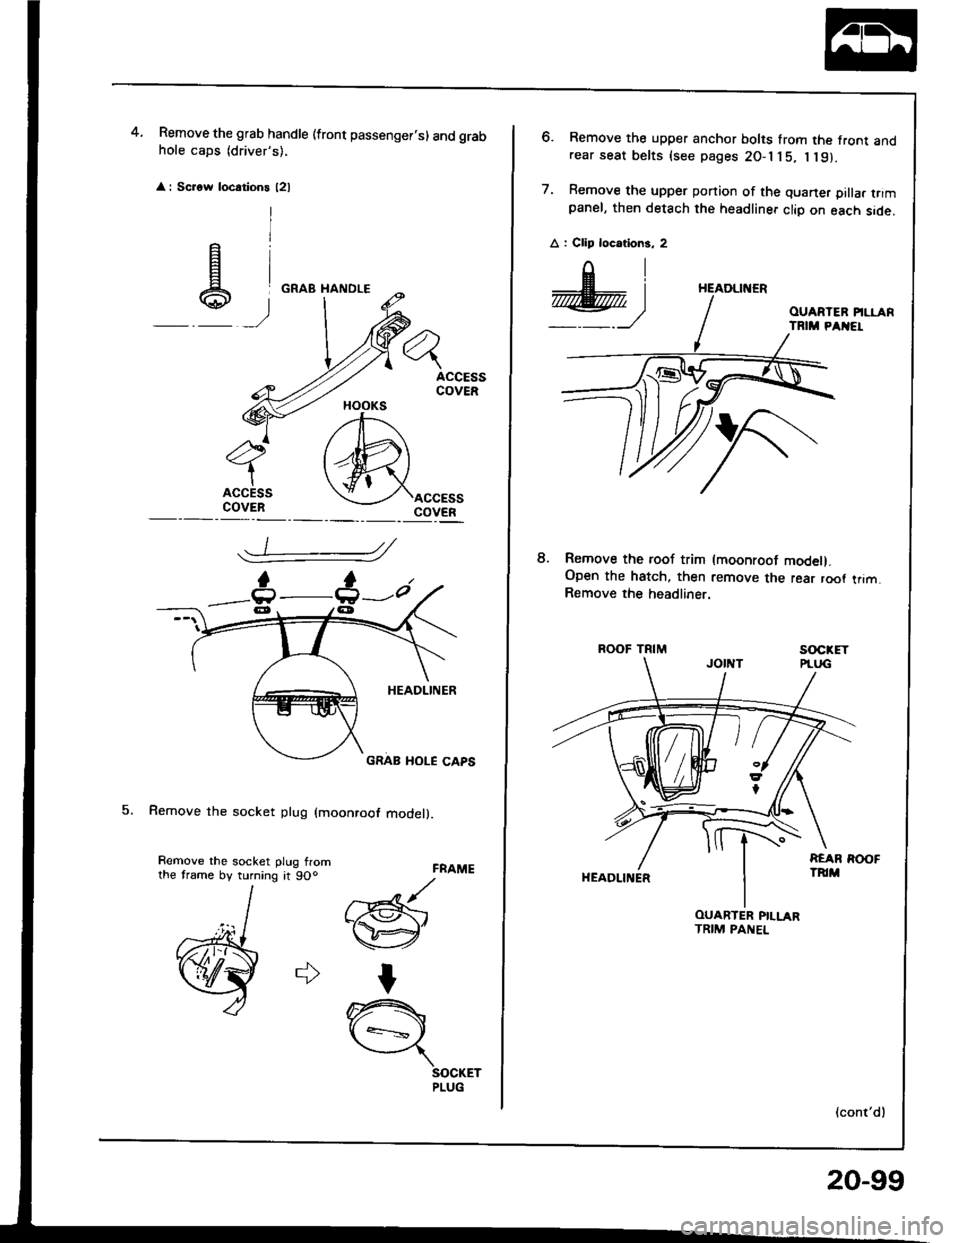
Remove the grab handle (front passenger.s) and grabhole caps (driver's),
: Scrow locations l2l
5. Remove the socket plug (moonroof model).
4.
FRAME
//Gr-@'
I
n{ +=s ,
SOCKETPLUG
HOOKS
_t :
e)
Remove the roof trim (moonroot model).Open the hatch, then remove the rear root trim.Remove the headliner.
ROOF TRIMsocxET
HEADLII{ER
(cont'dl
6. Remove the upper anchor bolts from the front andrear seat belts (see pages 2O-l j 5, I l9).
7. Remove the upper ponion of the quaner pilla. trimpanel, then detach the headliner clio on each side.
A : Clip locotions, 2
8.
HEADLINER
OUARTER PILLARTRIM PANEL
20-99
Page 969 of 1413
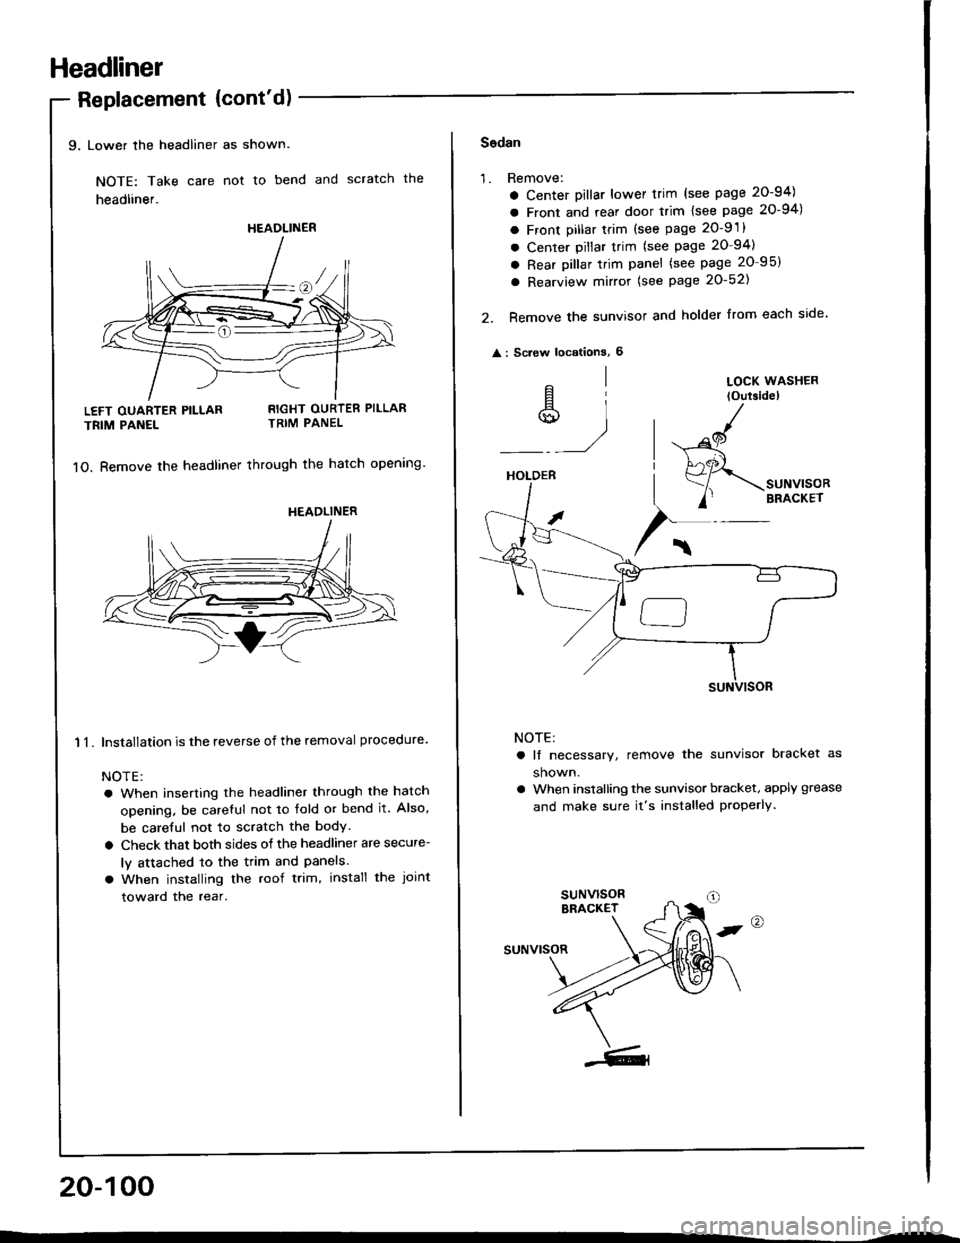
Headliner
9, Lower the headliner as shown.
NOTE: Take care not to bend and scratch the
headliner.
Replacement {cont'd)
LEFT OUARTER PILLAR
TRIM PANEL
11.
RIGHT OURTER PILLARTRIM PANEL
1O. Bemove the headliner through the hatch opening'
Installation is the reverse of the removal procedure.
NOTE:
a When inserting the headliner through the hatch
opening, be careful not to fold or bend it. Also,
be careful not to scratch the bodY.
a Check that both sides of the headliner are secure-
ly attached to the trim and Panels.
a When installing the roof trim, install the Joint
toward the rear.
20-100
HEADLINER
HEADLINER
Sodan
'1.Remove:
a Center Dillar lower trim (see page 20-94)
a Front and rear door trim lsee page 20-94)
a Front pillar trim (see page 2O-9 .
a Center pillar trim (see page 20-94)
a Rear pillar trim panel (see page 20 95)
a Rearview mirror (see Page 20-521
Remove the sunvisor and holder from each side
: Screw locationS, 6
2.
^l
s,1
LOCK WASHER
loutsidel
HOLDER
/
$-.unu,"o"
/' BRACKET
NOTE:
a lf necessary, remove the sunvisor bracket as
shown.
a When installing the sunvisor bracket, apply grease
and make sure it's installed properly.
,@
suNvrsoR
Page 970 of 1413
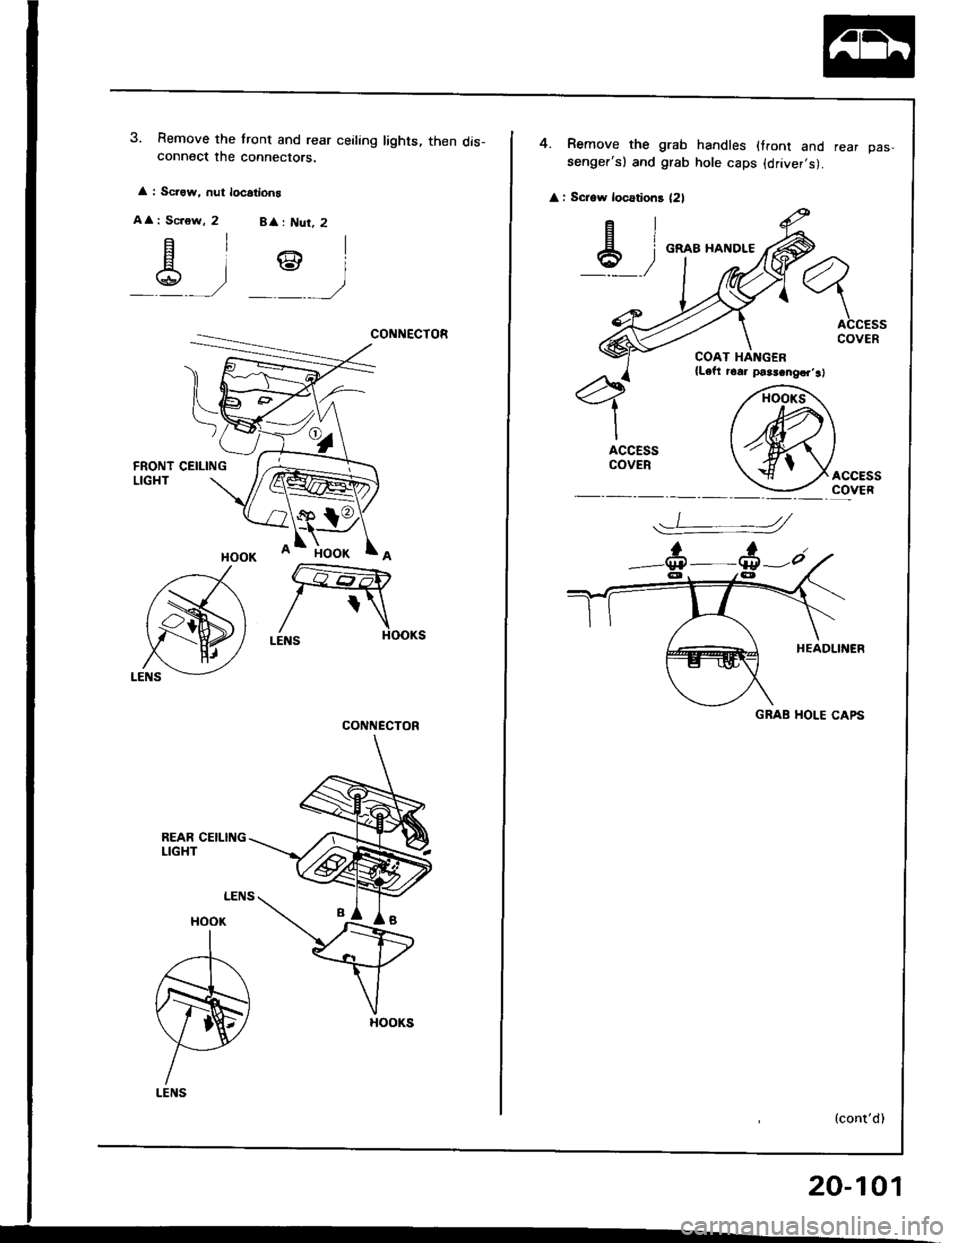
3. Remove the tront and rear ceiling lights, then dis-connect the connectors.
A : Screw, nut locations
AA: Sc.6w, 2 B : Nur, 2
CONNECTOR
CEILING
REAR CEILINGLIGHT
CONNECTOR
HOOKS
4. Remove the grab handles (tront andsenger'sl and grab hole caps (driver,s).
: Sc.sw locatioh! l2l
rear pas'
-A-i
orlx
.-L----- ----z
GRAB HOLE CAPS
20-101