tow ACURA INTEGRA 1994 Service Repair Manual
[x] Cancel search | Manufacturer: ACURA, Model Year: 1994, Model line: INTEGRA, Model: ACURA INTEGRA 1994Pages: 1413, PDF Size: 37.94 MB
Page 5 of 1413
General Information
Chassis and Paint Codes
ldentification Number Locations1-4
Warning/Caution Label Locations1-5
Lift and Support Points
1-9
1-10
Lift
Safety Stands
Towing
1-2
Floor Jack
1-1 1
1-12
Page 16 of 1413
Towing
rl
It the car needs to be towed, call a professional towingservice. Never tow the car behind another car with just
a rope or chain. lt is very dange.ous.
Emergency Towing
There are three popular methods of towing a car:
Flat-bed Equipmont-The operator loads the car on theback of a truck. This is the best way of transporting thecar.
Whsol Lift Equipment-The tow truck uses two oivot-ing arms that go under the tires (front or rear) and liftsthem otf the ground. The other two wheels remain onthe ground.
Sling-type Equipmont-The tow truck uses metal cableswith hooks on the ends. These hooks go around partsof the frame or suspension and the cables lift that endof the car off the ground. The car's suspension and bodvcan be seriously damaged if this method of towing is at-tempted.
It the car cannot be transponed by flat-bed, it should betowed with the tfont wheels oft the ground. lf due todamage. the car must be towed with the front wheelson the ground, do the tollowing:
Manual Transmission
a Release the parking brake,a Shift the transmission to Neutral.
Automatic Transmission
a Release the parking brake.a Start the engine.
a Shift to @ oosition, then to S position.
a Turn off the engine.
NOTICE: lmproper towing preparation will damage thetransmission. Follow the above procedure exactly. lf you
cannot shift the transmission or stan the engine (auto-
matic transmission), your car must be transDorted on aflat-bed.
a lt is best to tow the car no tarther than SO miles lgokm). and keep the speed below 3b mph (bE km/h).
NOTICE: Trying to litt or tow your car by the bumperswill cause serious damage. The bumpers are not designedto support the car's weight.
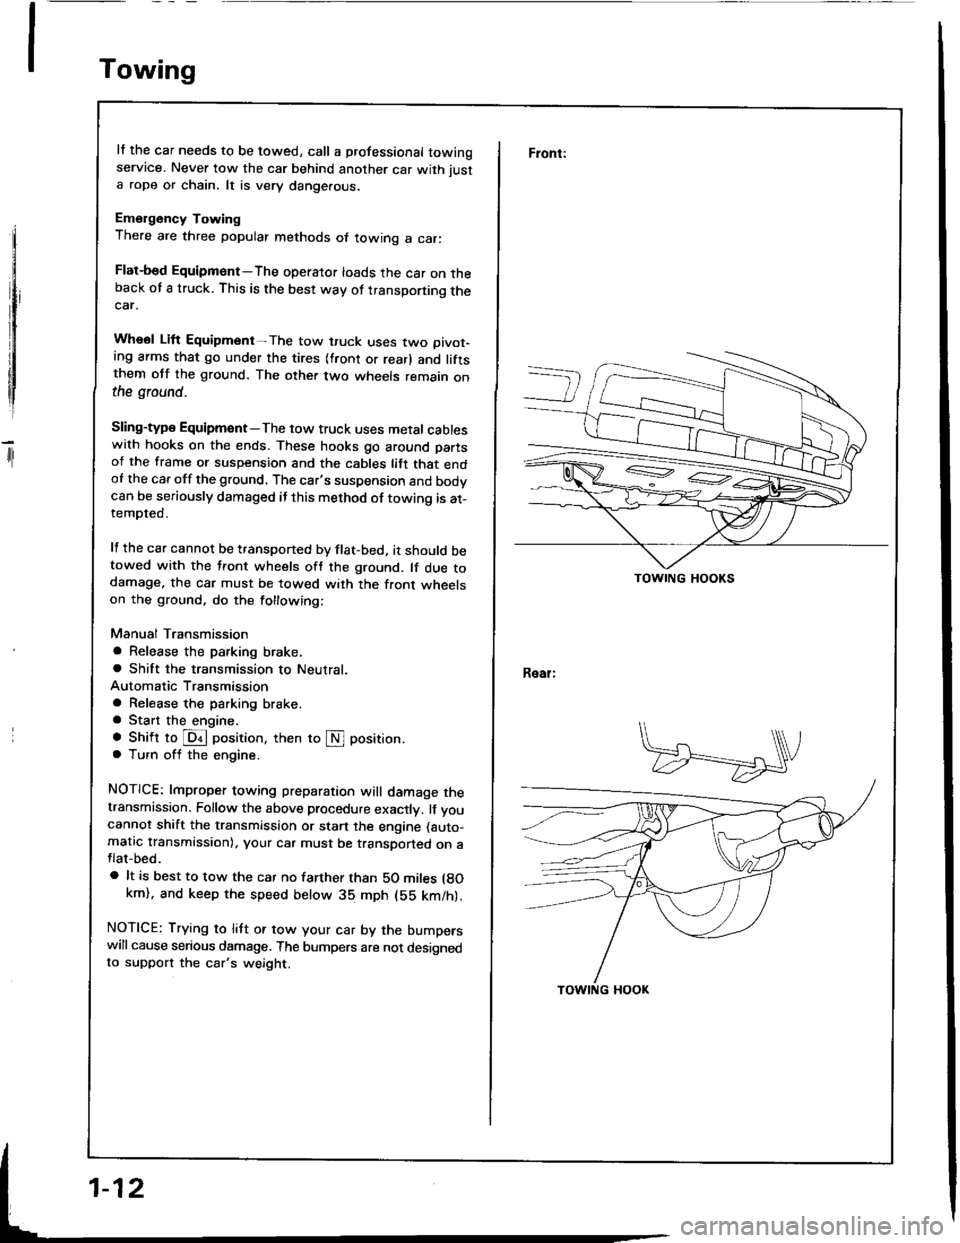
Front:
Real:
TOWING HOOKS
Page 49 of 1413
Engine Removal/lnstallation
m
(cont'd)
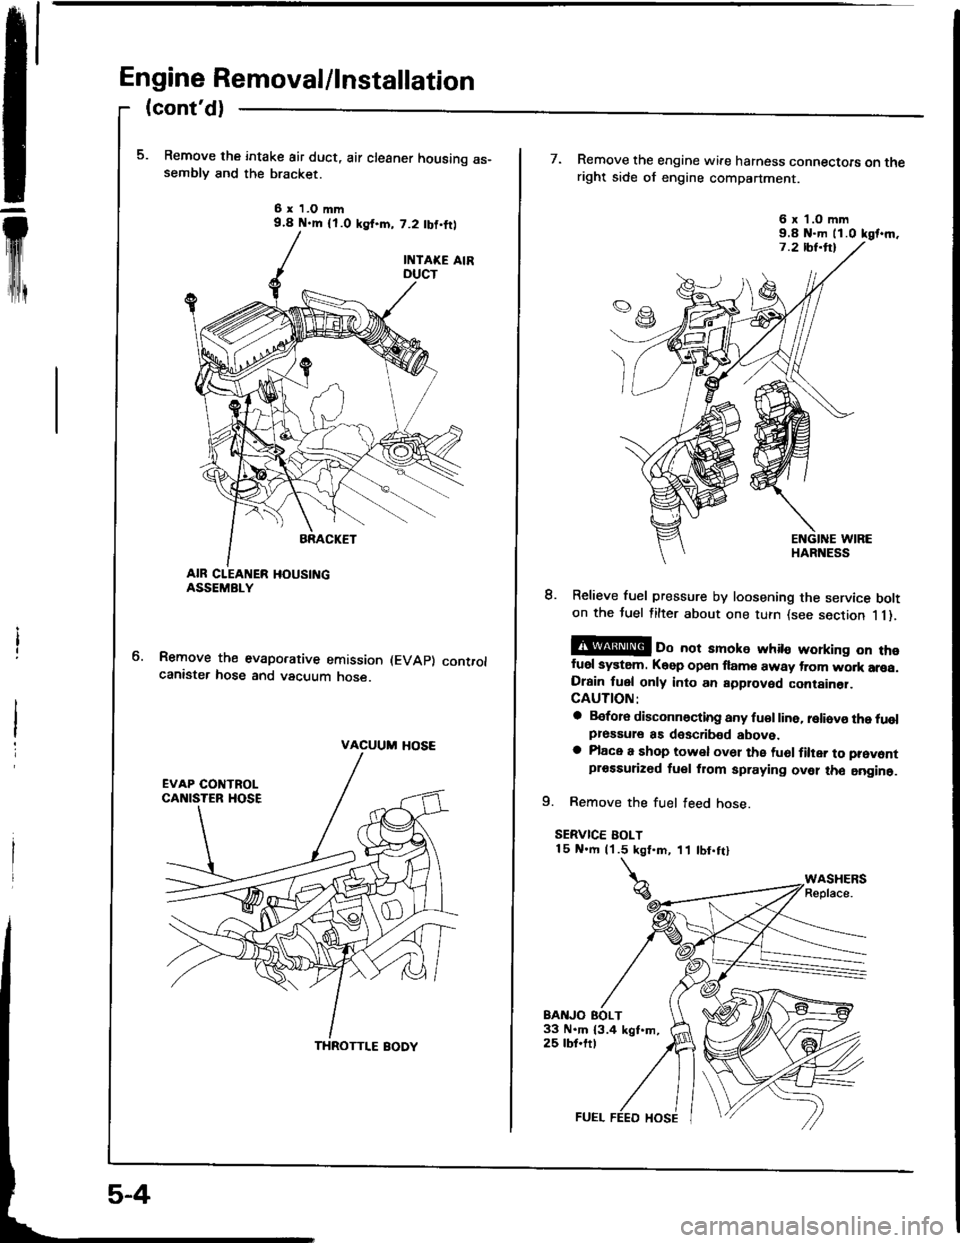
Remove the intake air duct, air cleaner housing as-semblv and the bracket.
6 x 1.O mm9.4 N.m {l.O ksf.m, 7.2 tbf,ftl
Remove the evaporative emission (EVAp) controlcanister hose and vacuum hose.
VACUUM HOSE
THROTTI.E BODY
7. Remove the engine wire harness connectoE on theright side of engine compartment.
8. Relieve fuel pressure by loosening the service bolton the tuel filter about one turn {see section 1 1).
@ oo not amoke whito working on thofuel system. Keep open flame away trom wo.k arsa.Drain fuel only into an approved container.CAUTION:
a Before disconnocting any fu€l line. reliovo the tuolpressule as doscribed above.a Place a shop towel ov61 the fu6l filter to prevontprossurized tuel from spraying ovel tho aogine.
9. Remove the fuel feed hose.
SERVICE BOLT15 N.m (1.5 kgt.m, 11 tbt.ftl
BAITJO EOLT33 N.m 13.4 kgt.m,25 tbt.ftt
6 x'l.O mm9.8 N-m ll.0 kgt.m.
Page 66 of 1413
6-3
Valve Clearance
Adjustment
NOTE:
. Valves should be adjusted cold; at a cylinder head
temperature of less than 100'F (38"C).
Adjustment is the same for both intake and exhaust
valves.
. After adjusting, retorque the crankshaft pulley bolt to
177 N.m (18.0 kgim, 130 lbf.ft).
1. Remove cylinder head cover.
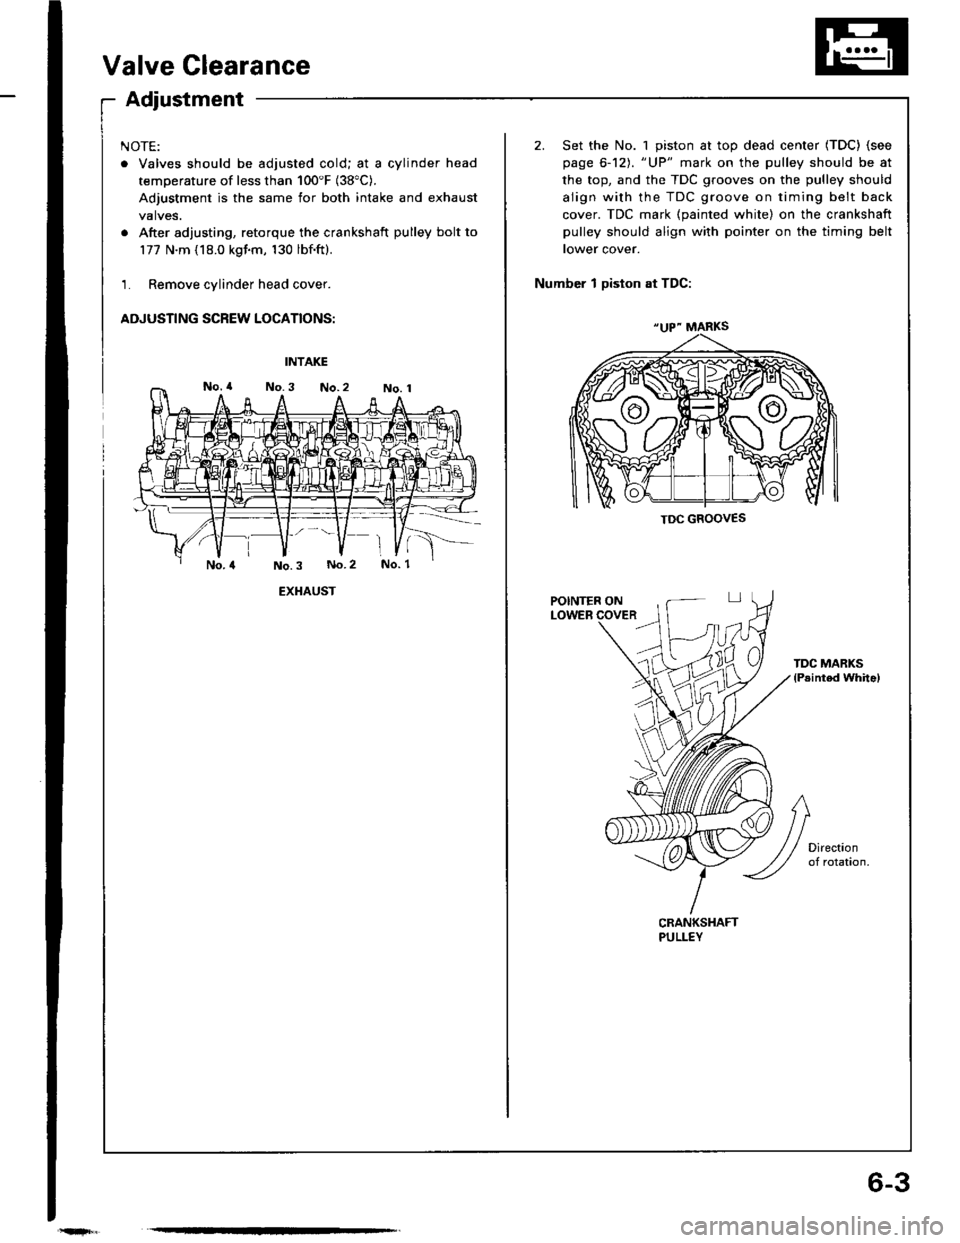
ADJUSTING SCREW LOCATIONS:
2. Set the No. 1 piston at top dead center (TDC) (see
page 6-12). "UP" mark on the pulley should be at
the top, and the TDC grooves on the pulley should
align with the TDC groove on timing belt back
cover. TDC mark (painted white) on the crankshaft
pulley should align with pointer on the timing belt
tower cover.
Number 1 Diston at TDC:
INTAKE
EXHAUST
TDC MARKSlPeinted whitel
CRANKSHAFTPULLEY
"UP" MARKS
TDC GROOVES
Page 68 of 1413
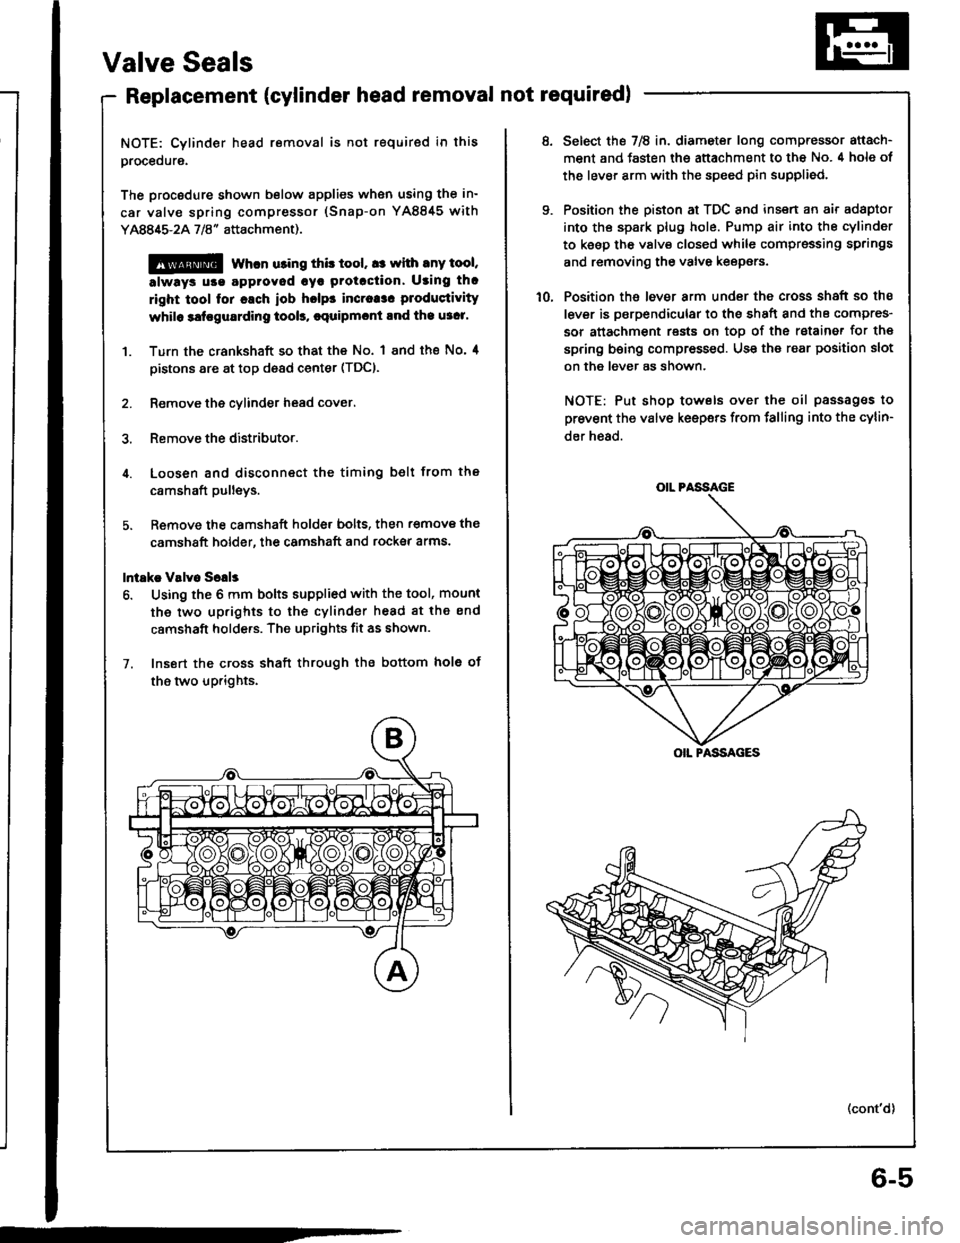
Valve Seals
Replacement (cylinder head removal not requiredl
NOTE: Cylinder head removal is not required in this
procedure.
The procodure shown below applies when using the in-
car valve spring compressor (Snap-on YA8845 with
Y AAA$-2A 718" attachment).
@@ whcn u3ing this tool, a: with any tool,
always u!€ agproved cyr Protcction. Using th.
right tool for cach iob hclps incraa3. produstivity
whilo 3ltrgu8rding tool!, cquipmcnt lnd the u3c1'
1. Turn the crankshaft so that the No. I and the No' 4
pistons are at top d€ad center (TDC).
2. Remove the cylinder head cover.
3. Remove the distributor.
4. Loosen and disconnect the timing belt from the
c8mshaft pulleys.
5. Remove the camshaft holde, bolts, then r€move the
camshaft holder, the camshaft and rocksr arms.
lntakc V!lv6 Sclls
6. Using the 6 mm bolts supplied with the tool, mount
the two up.ights to the cylinder head 8t the end
camshaft holde.s. The uprights fit as shown.
7. Insort the cross shaft through the bottom hole ot
the two up.ights.
6-5
OIL PASSAGE
OIL PASSAGES
Select the 7E in. diameter long compressor attach-
ment and fasten the attachment to the No. 4 hole of
the lever arm with the speed pin supplied.
Position the piston at TDC and insert an air adaptor
into th€ spark plug hole. Pump air into the cylinder
to keep the valv€ closed while cgmpressing springs
and removing the valve keepers.
Position the lever arm under the cross shaft so the
lever is psrpendicular to the shEft and ths compres-
sor attachment rests on toD of the rstainer for th€
spring being compressed. Use the rear position slot
on the lever as shown.
NOTE: Put shop towels over the oil passag€s to
prevent the valve keepers from falling into the cylin-
der h€ad.
(cont'd)
Page 69 of 1413
-
'14.
Valve Seals
Replacement (cylinder head removal not required) (cont'dl
'11.Using a downward motion on the lever arm. com-press the valve spring and remove the keepers from
the valve stem. Slowly release pressure on the
spring.
Repeat step l1 for the other valve in that cylinder.
Remove the valve seals (see page 6-22).
Installthe valve seals (see page 6-23).
Install the springs, the retainers and the keepers in
reverse order of removal.
16. Repeat steps 9 to l5 for the other three cylinders.
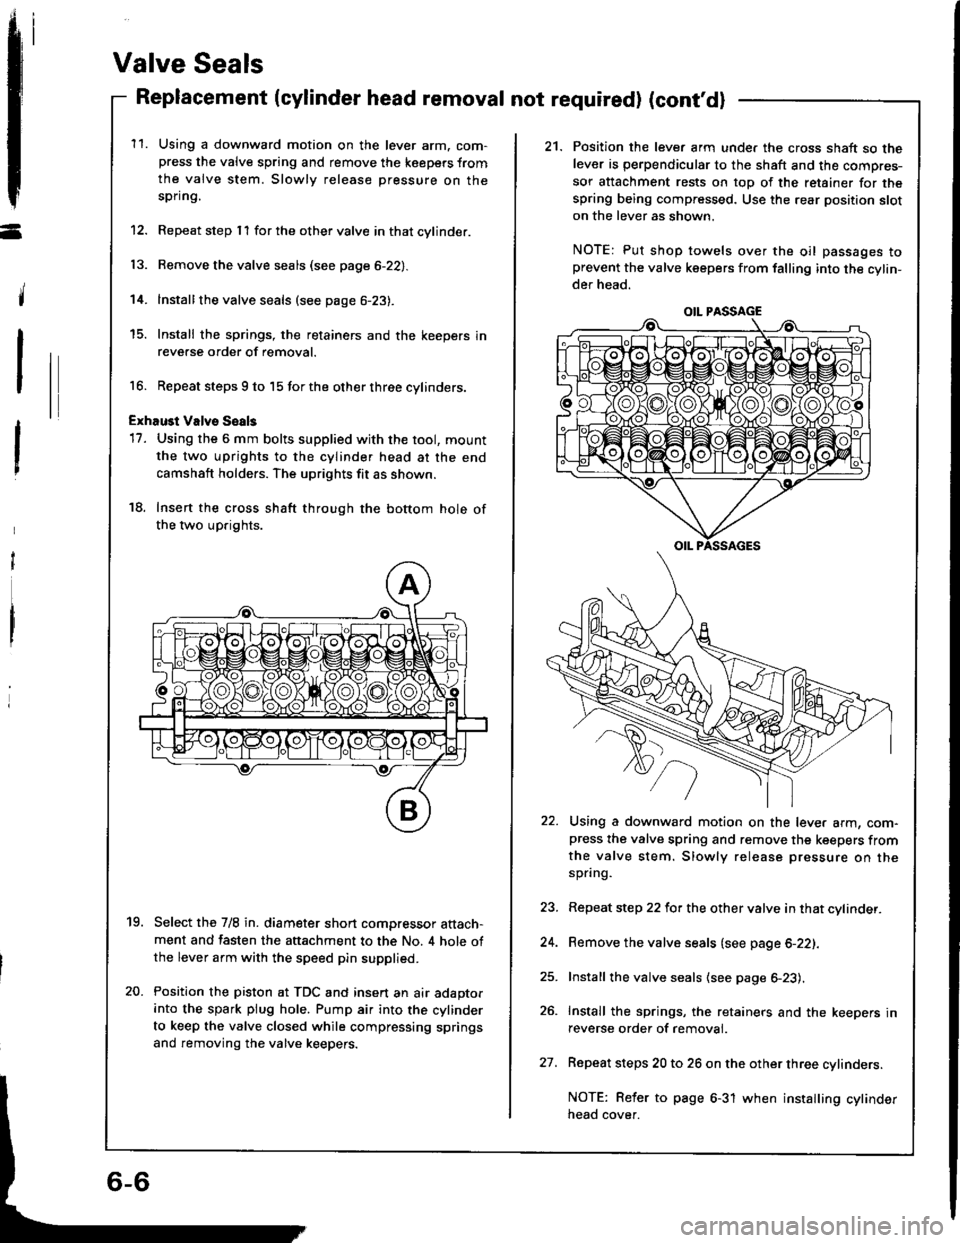
ExhaGt Valvs Soals
17. Using the 6 mm bolts supplied with the tool, mount
the two uprights to the cylinder head at the end
camshaft holders. The uprights fit as shown.
18. Insert the cross shaft through the bottom hole of
the two uprights.
Select the 7/8 in. diameter short compressor attach-ment and fasten the attachment to the No. 4 hole ofthe lever arm with the speed pin supplied.
Position the piston at TDC and insert an air adaptorinto the spark plug hole. Pump air into the cylinder
to keep the valve closed while compressing springs
and removing the valve keepers.
19.
20.
21. Position the lever arm unde. the cross shaft so thelever is perpendicular to the shaft and the compres-
sor attachment rests on top of the retainer for thespring being compressed. Use the rear position sloton the lever as shown.
NOTE: Put shop towels over the oil passages toprevent the valve keepers from falling into the cylin-der head.
Using a downward motion on the lever arm, com-press the valve spring and remove the keepers fromthe valve stem. Slowly release pressure on thespring.
Repeat step 22 for the other valve in that cylinder.
Remove the valve seals (see page 6-22).
Install the valve seals (see page 6-23).
Install the springs, the retainers and the keepers inreverse order of removal.
Repeat steps 20 to 26 on the other three cylinders.
NOTE: Reler to page 6-31 when installing cylinderneao cover.
OIL PASSAGE
27.
Page 83 of 1413
!
1.
2.
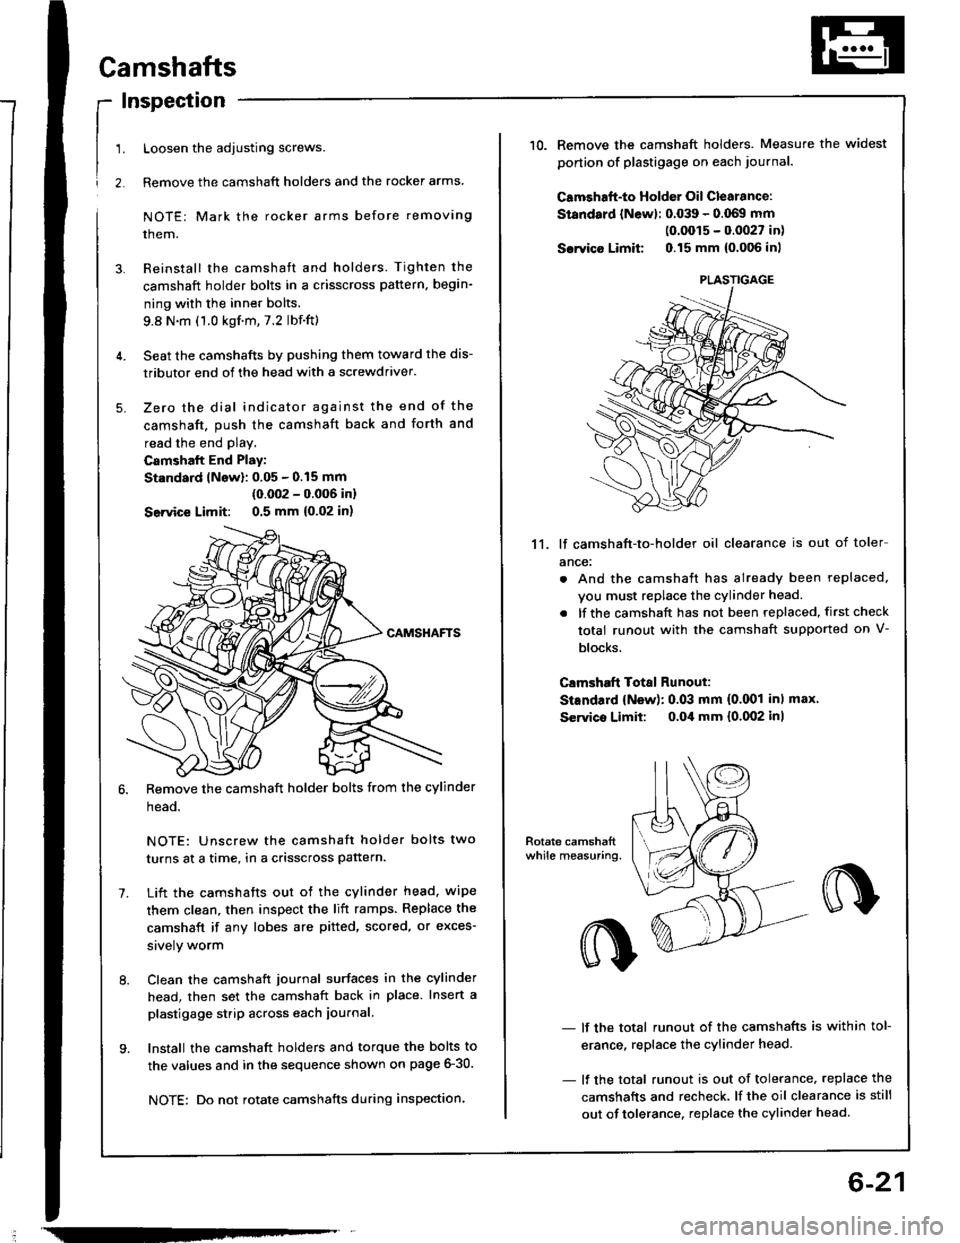
Camshafts
Inspection
Loosen the adjusting screws.
Remove the camshaft holders and the rocker arms
NOTE: Mark the rocker arms before removing
them.
Reinstall the camshaft and holders. Tighten the
camshaft holder bolts in a crisscross pattern, begin-
ning with the inner bolts.
9.8 N.m (1.0 kgf.m,7.2 lbf.ft)
Seat the camshafts by pushing them toward the dis-
tributor end of the head with a screwdriver.
Zero the dial indicator against the end of the
camshaft. push the camshaft back and forth and
read the end play.
Camshalt End Play:
St.ndard lNow): 0.05 - 0.15 mm
(0.002 - 0.006 inl
Seivice Limit: 0.5 mm {0,02 in)
Remove the camshaft holder bolts from the cylinder
head.
NOTE: Unscrew the camshaft holder bolts two
turns at a time, in a crisscross pattern.
Lift the camshafts out ot the cylinder head. wipe
them clean, then inspect the lift ramps. Replace the
camshaft if any lobes are pitted, scored, or exces-
srvely worm
Clean the camshaft journal surfaces in the cylinder
head, then set the camshaft back in place. Insert a
plastigage strip across each iournal.
Install the camshaft holders and torque the bolts to
the values and in the sequence shown on page 6-30.
NOTE: Do not rotate camshafts during inspection.
-
6-21
10.Remove the camshaft holders. Measure the widest
ponion of plastigage on each journa..
Camshaft-to Holder Oil Clearance:
Standard lNewl: 0.039 - 0.069 mm(0.0015 - 0.0027 in)
Sarvico Limit 0.15 mm {0.006 inl
11. lf camshaft-to-holder oil clearance is out of toler
ance:
. And the camshaft has already been replaced,
vou must replace the cylinder head.
. lf the camshaft has not been replaced, first check
total runout with the camshaft supported on V-
blocks.
Clmshaft Total Runout:
StEndard {New): 0.03 mm (0.001 inl max'
Servico Limit: o.Oil mm {0.002 inl
- lf the total runout of the camshafts is within tol-
erance, replace the cylinder head.
- lf the total runout is out of tolerance, replace the
camshafts and recheck. lf the oil clearance is still
out of tolerance. replace the cylinder head.
PLASTIGAGE
Page 85 of 1413
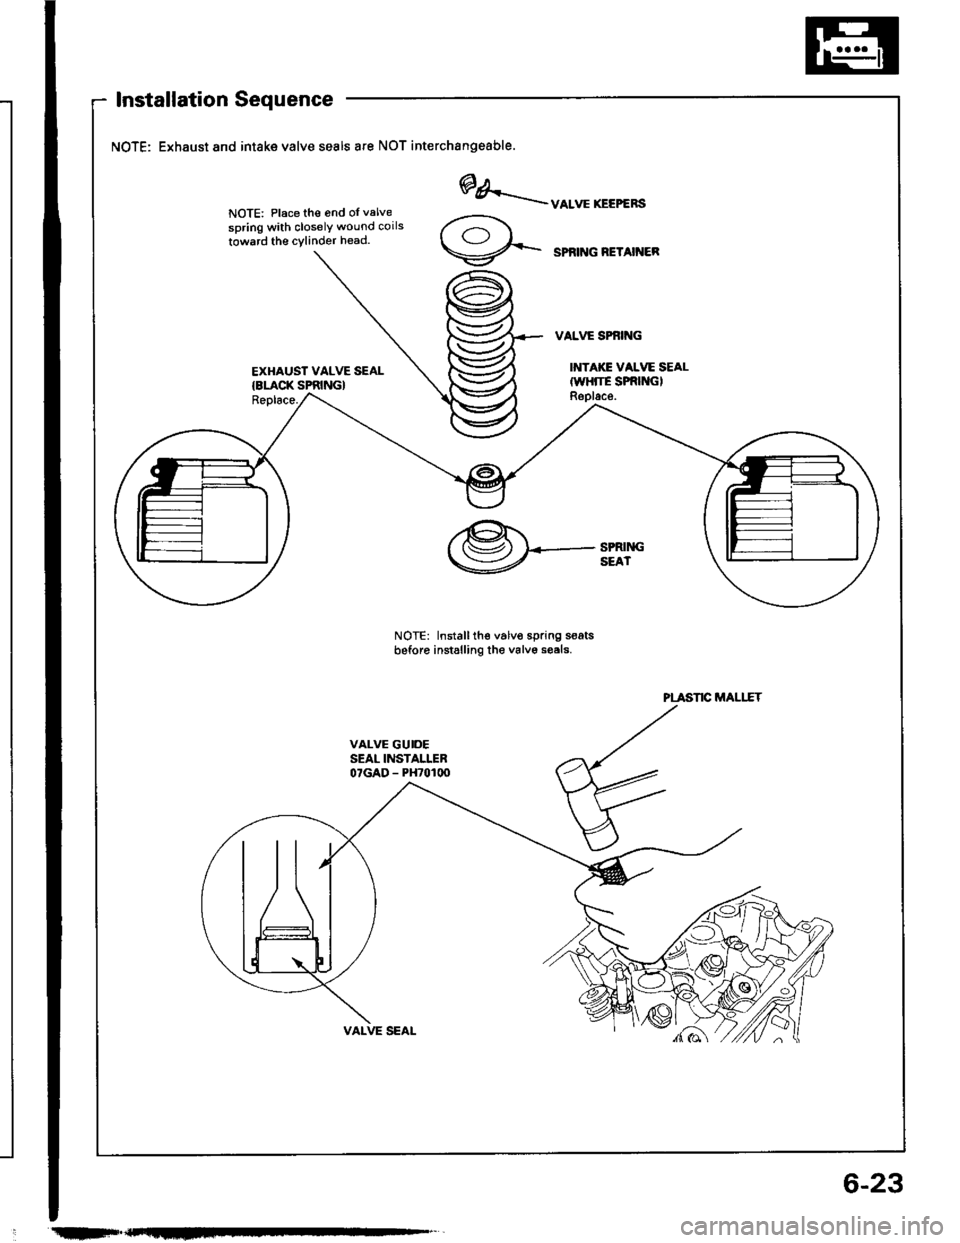
Installation Sequence
NOTE: Exhaust and intake valve seals ate NOT interchangeable.
NOTE: Place th€ 6nd oI valve
spring with closelY wound coils
towrrd th€ cylinder head.
EXHAUST VALVE SEAL{8LACK SPRING}Replace.
NOTE: Installth€ v6lvo spring s€atsbeforo instslling the valv6 sesls.
@/.-uo.**.r..",
SPRNG NETAINER
@*_-.tt*
PLASTIC MALIIT
.tIF"F-
6-23
Page 87 of 1413
I
Replacement
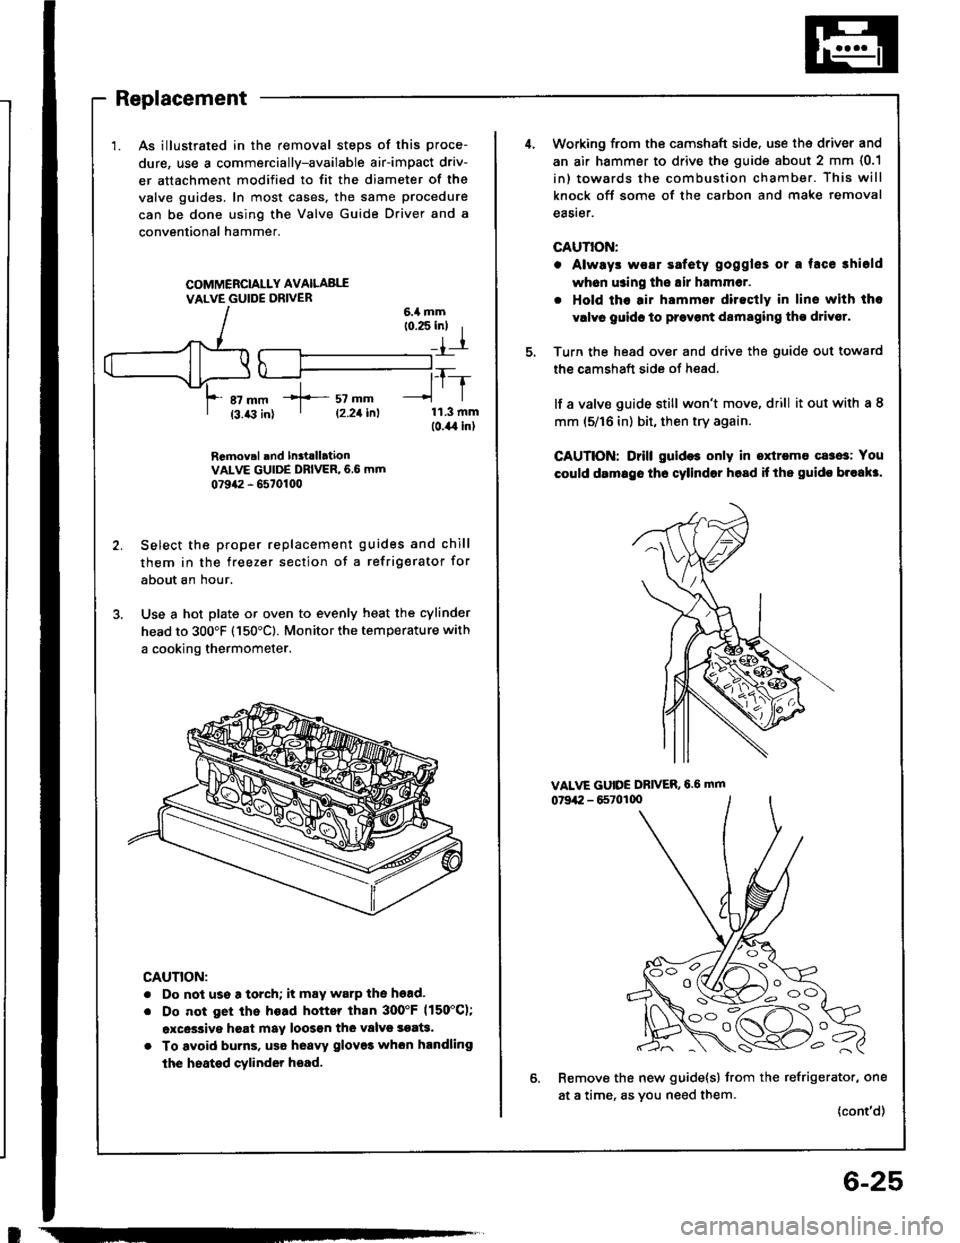
1. As illustrated in the removal steps of this proce-
dure, use a commercially-available air-impact driv-
er attachment modified to fit the diameter of the
valve guides. In most cases. tho same procedure
can be done using the Valve Guide Driver and a
conventional hammer.
COMMERCIALLY AVAILABI,I
VALVE GUIDE DRIVER
RGmov.l rnd In3tlllationVALVE GUIDE DRIVER, 6.6 mm
0?942 - 6570100
Select the proper replacement guides and chill
them in the freezer section of a refrigerator for
about an hour.
Use a hot plate or oven to evenly heat the cylinder
head to 300'F (150'Cl. Monitor the temperature with
a cooking thermometer.
CAUTION:
. Do not use a torch; it may warP the hgad.
. Do not get ths head hottq than 3OO'F 1150"C);
excessive hgat may loos€n thG valvs soat3.
. To avoid burns, usa hoavy glov93 whon handling
the heated cylinder hoad.
-----T_-
lrl
11.3 mmlo.il,l in)
f sz --| 12.21i^l
6-25
4.Working from the camshaft side. use the driver and
an air hammer to drive the guide about 2 mm {0.1
in) towards the combustion chamber. This will
knock oft some of the carbon and make removal
eaSrer.
GAUTIOiI:
o Alwrys woar safety goggles or a face shiold
wh6n using tho Eir hammer.
. Hold ths air hammsr directly in lins with the
vrlvr guidc to prsvont damaging tho drivor.
Turn the head over and drive the guide out towatd
the camshaft side of head.
lf a valve guide still won't move, drill it out with a 8
mm (5/16 in) bit, then try again.
CAUTION: Drill guid$ only in oxtremo cases: You
could drmrgo tho cylinder hosd if ths guido br"akr.
VALVE GUIDE DRIVER,6.6 mm
07942 - 65701q)
Remove the new guide{s} from the refrigerator, one
at a time, as you need them.
{cont'd)
OO ",
O (V /rl -1-- ) o
Page 94 of 1413
Gylinder Head
lnstallation (cont'dl
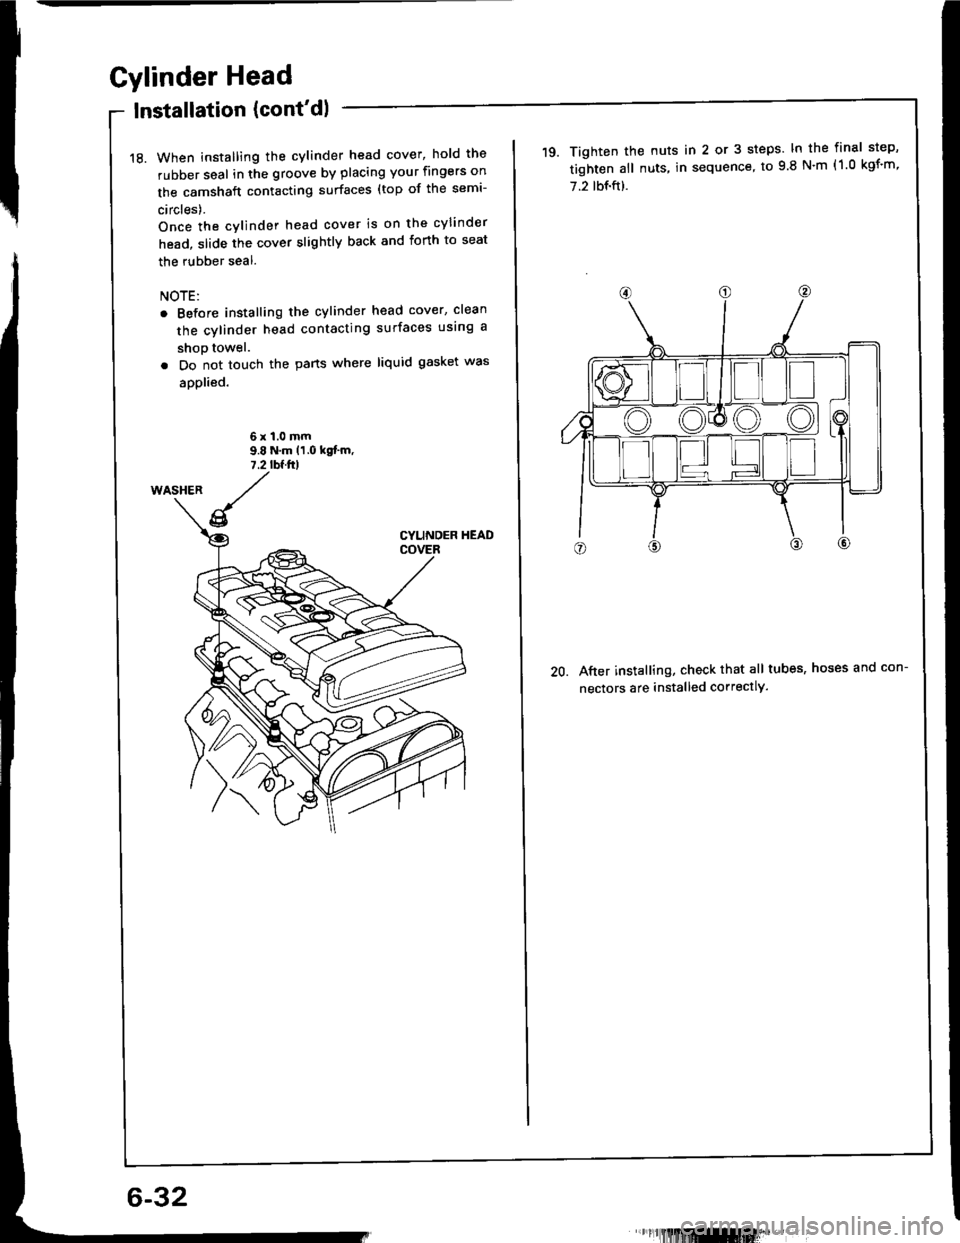
18. When installing the cylinder head cover, hold the
rubber seal in the groove by placing your fingers on
the camshaft contacting surfaces (top of the semi-
circles).
Once the cvlinder head cover is on the cylinder
head, slide the cover slightly back and forth to seat
the rubber seal.
NOTE:
. Before installing the cylinder head cover, clean
the cylinder head contacting surfaces using a
shop towel.
. Do not touch the pans where liquid gasket was
aDplied.
6x1.0mm9.8 N.m 11.0 kgt'm,7.2 tbf.trl
6-32
'lllllllllmlmti'""
Tighten the nuts in 2 or 3 steps. In the final step,
tighten all nuts, in sequence, to 9.8 N'm (1 0 kgf'm,
7.2 tbf.ft).
20. After installing, check that all tubes, hoses and con-
nectors are installed correctlY.