steering wheel Acura Integra 2000 Hatchback User Guide
[x] Cancel search | Manufacturer: ACURA, Model Year: 2000, Model line: Integra, Model: Acura Integra 2000Pages: 279, PDF Size: 3.57 MB
Page 54 of 279

Instrument
s an d Control s
This section gives information about the controls and displays thatcontribute to the daily operation of
your Acura. All the essential controls
are within easy reach.
Control Locations............................ 52
Indicator Lights................................ 53
Gauges.............................................. 58
Speedometer................................ 58
Tachometer.................................. 58
Odometer...................................... 58
Trip Meter.................................... 58
Fuel Gauge................................... 59
Temperature Gauge.................... 59 Maintenance Required
Indicator.................................... 60
Controls Near the Steering Wheel....................................... 61
Headlights.................................... 62
Daytime Running Lights............. 62 Instrument Panel Brightness..... 63
Turn Signals................................. 63
Windshield Wipers...................... 64
Windshield Washers................... 64
Rear Window Wiper and
Washer...................................... 65
Hazard Warning .......................... 65
Rear Window Defogger
.............. 65
Steering Wheel Adjustment ...... 66
Steering Wheel Controls................ 67
Cruise Control.............................. 67
Keys and Locks................................
71
Keys...............................................
71
Immobilizer System....................
. 72
Ignition Switch............................. 73
Door Locks................................... 75
Power Door/Hatch Locks.......... 75
Hatch............................................. 76
Glove Box..................................... 78
Seat Adjustments............................ 79
Front Seat Adjustments.............. 79
Driver's Seat Height
Adjustment
.............................. 80
Driver's Lumbar Support............ 80
Rear Seat Access........................ 81
Head Restraints...........................
82
Folding Rear Seat .......................... 83 Cargo Area Cover............................ 83
Power Windows............................... 84
Moonroof.......................................... 85
Mirrors.............................................. 86
Adjusting the Power Mirrors .....
86
Parking Brake..................................
87
Digital Clock .................................... 88
Beverage Holder.............................. 89
Console Compartment.................... 90
Cigarette Lighter............................. 90
Ashtrays............................................ 91 Interior Lights.................................. 92
Instrument s an d Control s
Page 64 of 279
Control
s Nea r th e Steerin g Whee l
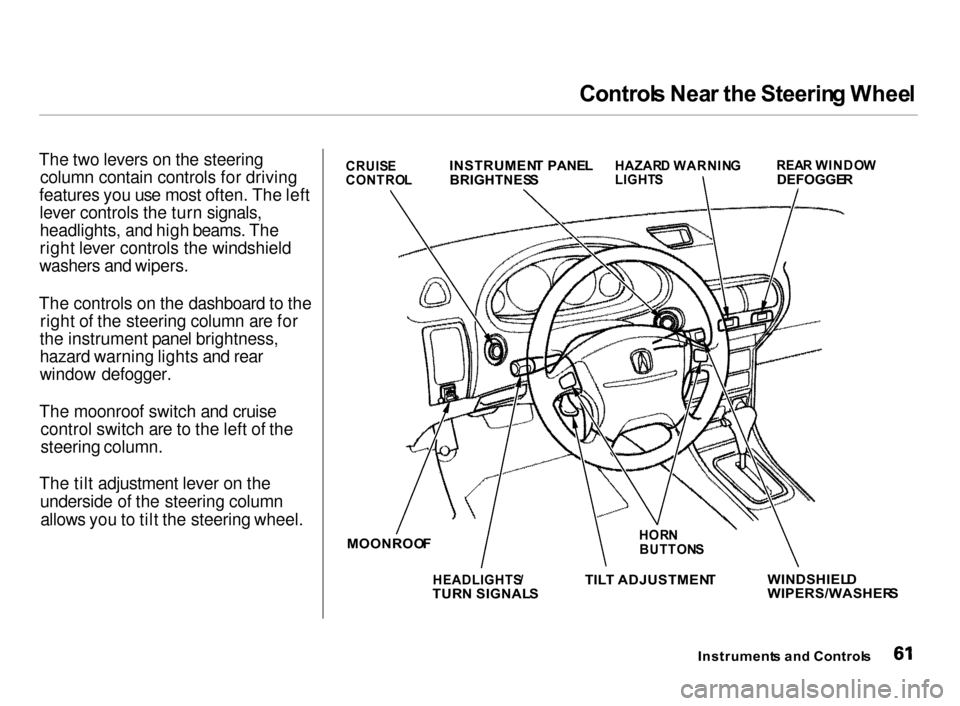
The two levers on the steering column contain controls for driving
features you use most often. The left lever controls the turn signals,
headlights, and high beams. The
right lever controls the windshield
washers and wipers.
The controls on the dashboard to the right of the steering column are for
the instrument panel brightness,
hazard warning lights and rear
window defogger.
The moonroof switch and cruise control switch are to the left of the
steering column.
The tilt adjustment lever on the underside of the steering columnallows you to tilt the steering wheel.
Instruments an d Control s
WINDSHIEL
D
WIPERS/WASHER S
HOR
N
BUTTON S
TIL T ADJUSTMEN T
HEADLIGHTS /
TUR N SIGNAL S
MOONROO
F
HAZAR
D WARNIN G
LIGHT S REA
R WINDO W
DEFOGGE R
INSTRUMEN
T PANE L
BRIGHTNES S
CRUIS
E
CONTRO L
Page 69 of 279
Control
s Nea r th e Steerin g Whee l
Make sure the rear window is clear
and you have good visibility before
starting to drive.
The defogger wires on the inside of the rear window can be accidentallydamaged. When cleaning the glass,
always wipe side to side.
Steerin
g Wheel Adjustmen t
See page 17 for important safety
information about how to properly
position the steering wheel.
Make any steering wheel adjustment
before you start driving.
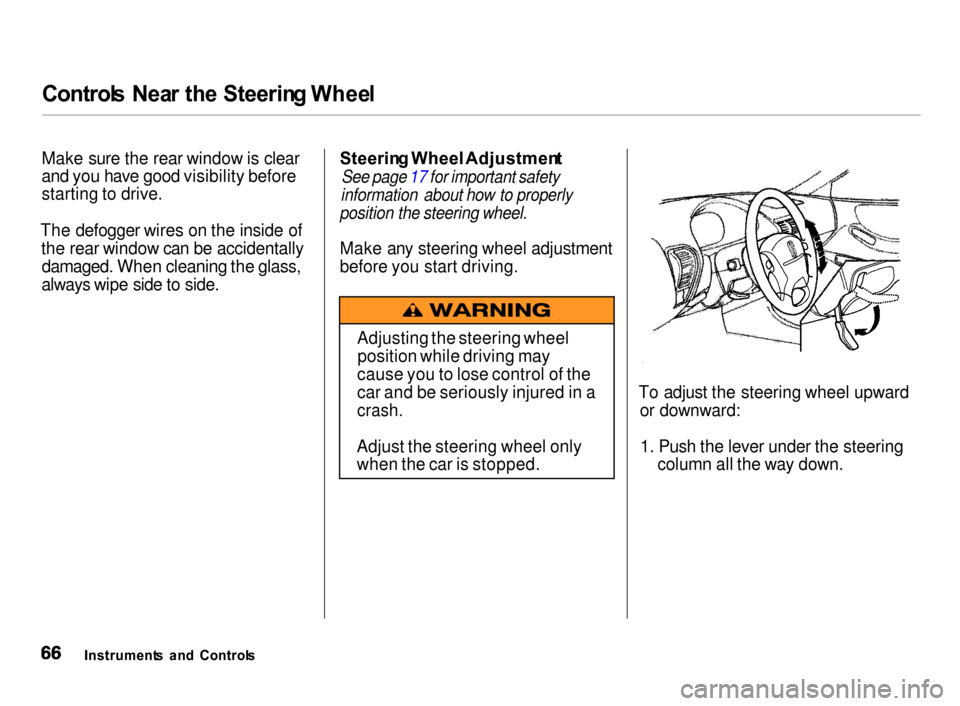
To adjust the steering wheel upwardor downward:
1. Push the lever under the steering column all the way down.
Instrument s an d Control s Adjusting the steering wheel
position while driving may
cause you to lose control of the
car and be seriously injured in a
crash.
Adjust the steering wheel only
when the car is stopped.
Page 70 of 279
Control
s Nea r th e Steerin g Wheel , Steerin g Whee l Control s
2. Move the steering wheel to the desired position, making sure the
wheel points toward your chest, not toward your face. Make sure
you can see the instrument panel gauges and the indicator lights.
3. Push the lever up to lock the
steering wheel in that position.
4. Make sure you have securely locked the steering wheel in place
by trying to move it up and down. Cruis
e Contro l
LS, GS and GS-R models
Cruise control allows you to maintain
a set speed above 25 mph (40 km/h)
without keeping your foot on the accelerator pedal. It should be used
for cruising on straight, open
highways. It is not recommended for conditions such as city driving,
winding roads, slippery roads, heavy rain, or bad weather. You should
have full control of the car under
those conditions.
The cruise control, as it operates,
moves the accelerator pedal. You can damage your car's accelerator
mechanism by resting your foot under the pedal and blocking the movement.
CONTINUED
Instrument s an d Control s
Improper use of the cruise
control can lead to a crash.
Use the cruise control only
when traveling on open highways in good weather.
NOTIC
E
Page 71 of 279
Steerin
g Whee l Control s
Using the Cruise Control
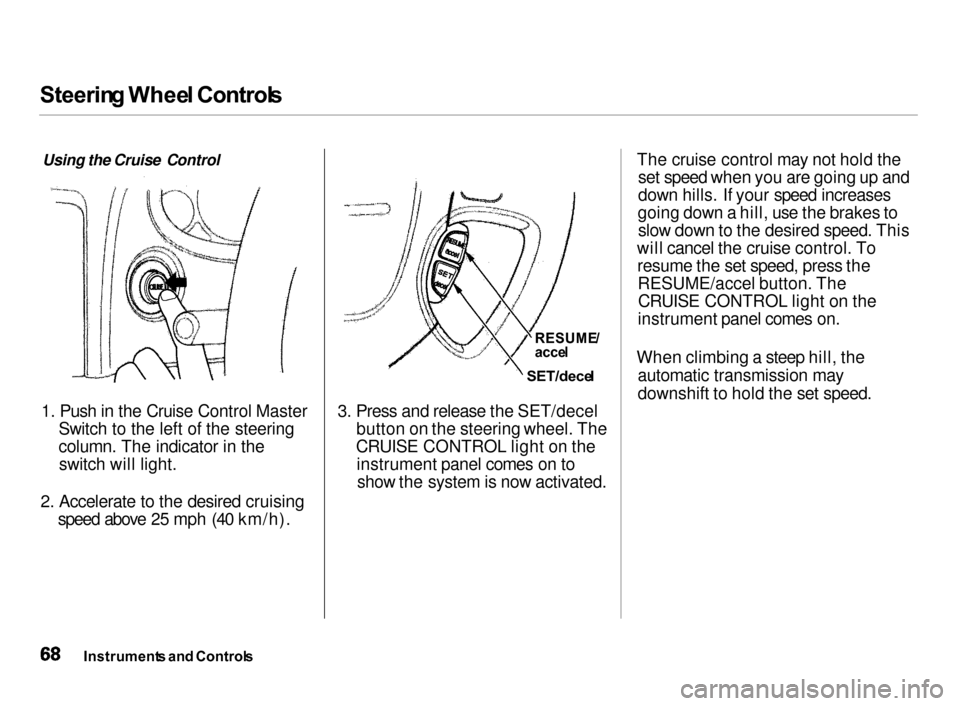
1. Push in the Cruise Control Master
Switch to the left of the steering
column. The indicator in the switch will light.
2. Accelerate to the desired cruising
speed above 25 mph (40 km/h). 3. Press and release the SET/decel
button on the steering wheel. The
CRUISE CONTROL light on the instrument panel comes on toshow the system is now activated.
The cruise control may not hold the
set speed when you are going up and
down hills. If your speed increases
going down a hill, use the brakes to slow down to the desired speed. This
will cancel the cruise control. To resume the set speed, press theRESUME/accel button. TheCRUISE CONTROL light on the
instrument panel comes on.
When climbing a steep hill, the automatic transmission may
downshift to hold the set speed.
Instrument s an d Control s
RESUME
/
acce l
SET/dece l
Page 77 of 279
Key
s an d Lock s
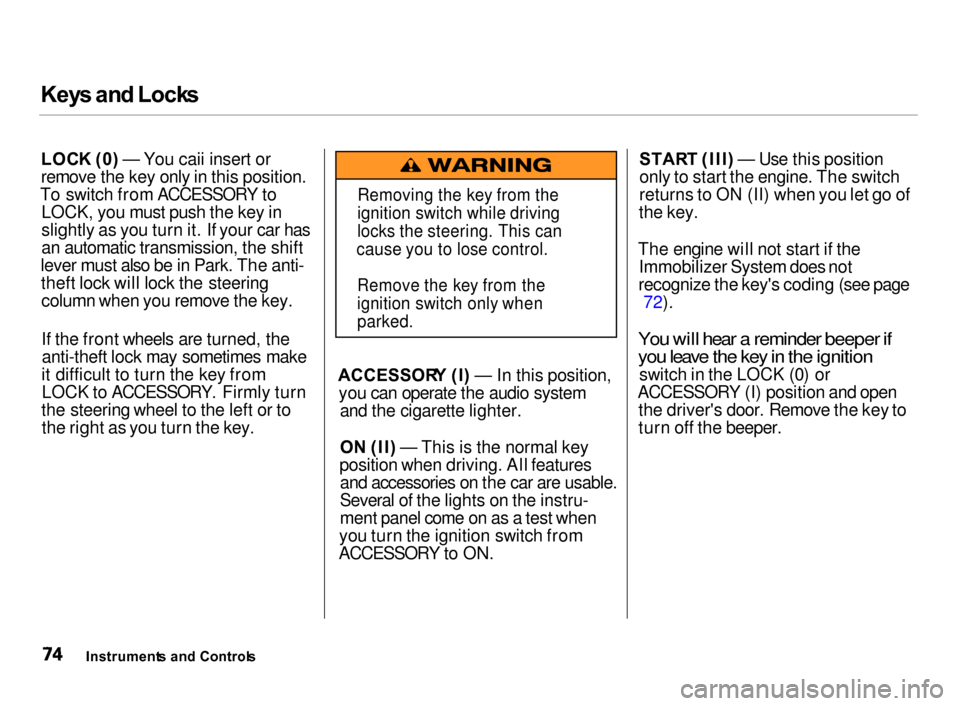
LOC K (0 ) — You caii insert or
remove the key only in this position.
To switch from ACCESSORY to LOCK, you must push the key in
slightly as you turn it. If your car has
an automatic transmission, the shift
lever must also be in Park. The anti- theft lock will lock the steeringcolumn when you remove the key.
If the front wheels are turned, theanti-theft lock may sometimes make
it difficult to turn the key from LOCK to ACCESSORY. Firmly turn
the steering wheel to the left or to the right as you turn the key. ACCESSOR
Y (I ) — In this position,
you can operate the audio system and the cigarette lighter.
O N (II ) — This is the normal key
position when driving. All features and accessories on the car are usable.
Several of the lights on the instru-
ment panel come on as a test when
you turn the ignition switch from
ACCESSORY to ON. STAR
T (III ) — Use this position
only to start the engine. The switch
returns to ON (II) when you let go of
the key.
The engine will not start if the Immobilizer System does not
recognize the key's coding (see page 72).
You will hear a reminder beeper if
you leave the key in the ignition
switch in the LOCK (0) or
ACCESSORY (I) position and open the driver's door. Remove the key to
turn off the beeper.
Instrument s an d Control s
Removing the key from the
ignition switch while driving
locks the steering. This can
cause you to lose control.
Remove the key from the
ignition switch only when
parked.
Page 134 of 279

Accessorie
s an d Modification s
Modification s
Do not remove any original
equipment or modify your car in any
way that would alter its design or operation. This could make your car
unsafe and illegal to drive.
For example, do not make any
modifications that would change the
ride height of your car, or install
wheels and tires with a different overall diameter.
Such modifications can adversely
affect handling, and interfere with
the operation of the car's anti-lock
brakes and other systems. In addition, any modifications that
decrease ground clearance increase
the chance of undercarriage parts striking a curb, speed bump, or other
raised object, which could cause
your airbags to deploy.
Do not modify your steering wheel
or any other part of your
Supplemental Restraint System.
Modifications could make the
system ineffective. Additiona
l Safet y Precautio n
Do not attach or place objects on the airbag covers. Any object attached to
or placed on the covers marked "SRS
AIRBAG," in the center of the steering wheel and on top of the
dashboard, could interfere with the
proper operation of the airbags. Or, if the airbags inflate, the objects
could be propelled inside the car and
hurt someone.
Before Drivin g
Page 139 of 279
Preparin
g to Driv e
You should do the following checks and adjustments every day before
you drive your car.
1. Make sure all windows, mirrors,
and outside lights are clean and
unobstructed. Remove frost, snow, or ice.
2. Check that the hood and hatch are
fully closed.
3. Visually check the tires. If a tire
looks low, use a gauge to check its
pressure.
4. Check that any items you may be
carrying with you inside are stored
properly or fastened down
securely.
5. Check the adjustment of the seat
(see page 79 ).
6. Check the adjustment of the
inside and outside mirrors (see
page 86 ).
7. Check the adjustment of the
steering wheel (see page 66).
8. Make sure the doors are securely
closed and locked.
9. Fasten your seat belt. Check that
your passengers have fastened
their seat belts (see page 16).
10.Turn the ignition switch ON (II).
Check the indicator lights in the
instrument panel.
11.Start the engine (see page 137).
12.Check the gauges and indicator
lights in the instrument panel (see
page 53).
Drivin g
Page 149 of 279
Th
e Brakin g Syste m
Brak e Syste m Desig n
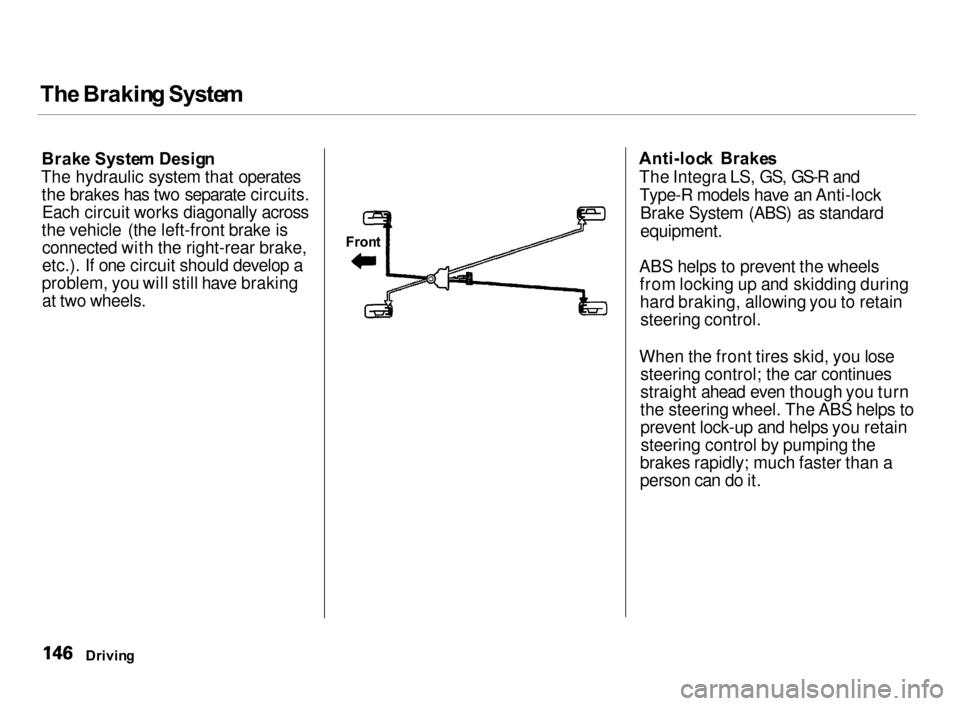
The hydraulic system that operates the brakes has two separate circuits.Each circuit works diagonally across
the vehicle (the left-front brake is connected with the right-rear brake,
etc.). If one circuit should develop a
problem, you will still have braking at two wheels.
Fron
t
Anti-loc
k Brake s
The Integra LS, GS, GS-R and Type-R models have an Anti-lock Brake System (ABS) as standard
equipment.
ABS helps to prevent the wheels from locking up and skidding duringhard braking, allowing you to retainsteering control.
When the front tires skid, you lose steering control; the car continues
straight ahead even though you turn
the steering wheel. The ABS helps to
prevent lock-up and helps you retainsteering control by pumping the
brakes rapidly; much faster than a
person can do it.
Drivin g
Page 150 of 279

Th
e Brakin g Syste m
Yo u shoul d neve r pum p th e
brak e pedal , this defeats the
purpose of the ABS. Let the ABS
work for you by always keeping firm, steady pressure on the brake pedal
as you steer away from the hazard.
This is sometimes referred to as
"stomp and steer."
You will feel a pulsation in the brake pedal when the ABS activates, and
you may hear some noise. This is normal, it is the ABS rapidly
pumping the brakes.
Activation varies with the amount of traction your tires have. On dry
pavement, you will need to press on
the brake pedal very hard before you activate the ABS. However, you may
feel the ABS activate immediately if
you are trying to stop on snow or ice.
Important Safety Reminders
AB S doe s no t reduc e th e tim e o r
distanc e i t take s t o sto p th e car , it
only helps with steering control
during braking. You should always
maintain a safe following distance
from other vehicles.
AB S wil l no t preven t a ski d tha t
result s fro m changin g directio n
abruptly , such as trying to take a
corner too fast or making a sudden
lane change. Always drive at a safe,
prudent speed for the road and
weather conditions.
AB S canno t preven t a los s o f
stability . Always steer moderately
when you are braking hard. Severe or sharp steering wheel movement
can still cause your car to veer into
oncoming traffic or off the road. A
vehicl e wit h AB S ma y requir e a
longe r distanc e t o sto p on loose or
uneven surfaces, such as gravel or snow, than a vehicle without anti-
lock. Slow down and allow a greater distance between vehicles under
those conditions.
CONTINUED
Drivin g