ignition Acura Integra 2000 Hatchback Owner's Guide
[x] Cancel search | Manufacturer: ACURA, Model Year: 2000, Model line: Integra, Model: Acura Integra 2000Pages: 279, PDF Size: 3.57 MB
Page 219 of 279

Exterio
r Car e
Washin g
Frequent washing helps preserve
your car's beauty. Dirt and grit can scratch the paint, while tree sap and
bird droppings can permanently ruin
the finish.
Wash your car in a shady area, not in direct sunlight. If the car is parked in
the sun, move it into the shade and
let the exterior cool down before you
start.
Only use the solvents and cleaners
recommended in this Owner's Manual.
Chemical solvents and strong cleaners
can damage the paint, metal, and
plastic on your car.
Rinse the car thoroughly with cool
water to remove loose dirt. Fill a bucket with cool water. Mix
in a mild detergent, such as
dishwashing liquid or a product
made especially for car washing.
Wash the car using the water and detergent solution and a soft-
bristle brush, sponge, or soft cloth. Start at the top and work your waydown. Rinse frequently.
Check the body for road tar, tree
sap, etc. Remove these stains with
tar remover or turpentine. Rinse it off immediately so it does not
harm the finish. Remember to re-
wax these areas, even if the rest of the car does not need waxing. When you have washed and rinsed
the whole exterior, dry it with achamois or soft towel. Letting itair-dry will cause dulling and water
spots.
As you dry the car, inspect it for
chips and scratches that could allow
corrosion to start. Repair them with
touch-up paint (see page 217).
Powe r Antenn a Cleanin g
Twice a year, clean the antenna mast with a dry cloth and mild detergent. Scrub the antenna in upward strokes
to avoid bending it. Rinse with water.
Make sure the antenna works
smoothly by turning the stereo off
and on several times with the
ignition switch ON (II). The antenna does not need lubricating.
If you use a "drive-through" car wash,
make sure you turn the stereo off
first. This retracts the antenna to prevent damage from the car wash
brushes.
Appearanc e Car e
NOTIC
E
Page 228 of 279
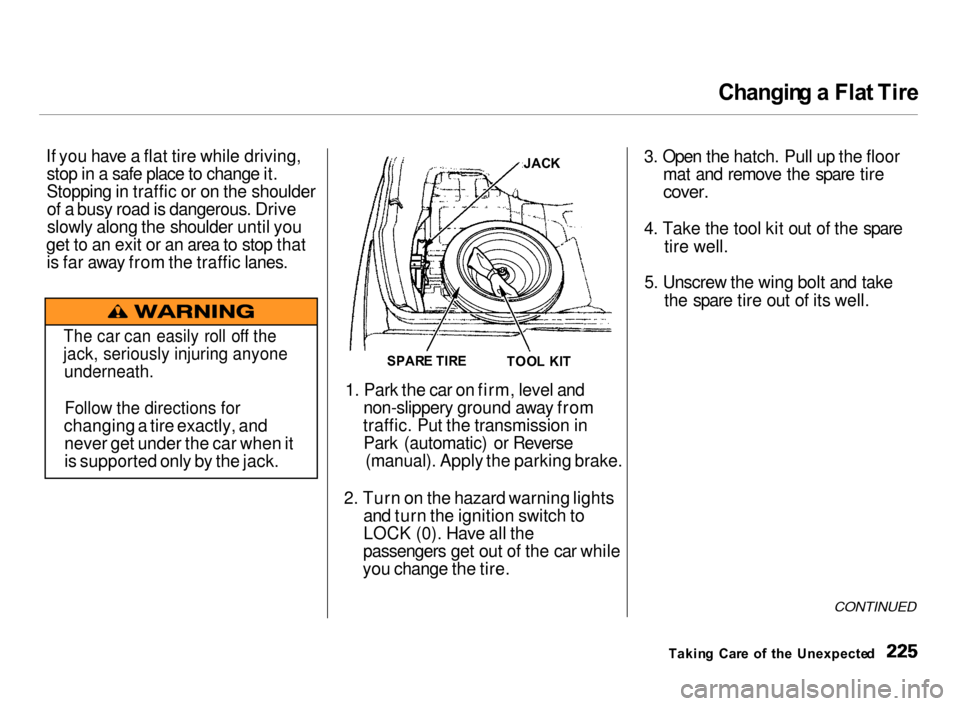
Changin
g a Fla t Tir e
If you have a flat tire while driving, stop in a safe place to change it.
Stopping in traffic or on the shoulderof a busy road is dangerous. Drive
slowly along the shoulder until you
get to an exit or an area to stop that is far away from the traffic lanes.
1. Park the car on firm, level and
non-slippery ground away from
traffic. Put the transmission in Park (automatic) or Reverse (manual). Apply the parking brake.
2. Turn on the hazard warning lights
and turn the ignition switch to
LOCK (0). Have all the
passengers get out of the car while
you change the tire.
3. Open the hatch. Pull up the floor
mat and remove the spare tire
cover.
4. Take the tool kit out of the spare
tire well.
5. Unscrew the wing bolt and take
the spare tire out of its well.
CONTINUED
Takin g Car e o f th e Unexpecte d
The car can easily roll off the
jack, seriously injuring anyone
underneath.
Follow the directions for
changing a tire exactly, and never get under the car when it
is supported only by the jack. JAC
K
SPAR E TIR E
TOOL KI T
Page 233 of 279
I
f You r Engin e Won' t Star t
Nothin g Happen s o r th e Starte r
Moto r Operate s Ver y Slowl y
When you turn the ignition switch to START (III), you do not hear the
normal noise of the engine trying tostart. You may hear a clicking sound
or series of clicks, or nothing at all.Check these things: Your car has the Immobilizer
System. You should use a
properly-coded master or valet key
to start the engine (see page 72 ).
A key that is not properly coded will cause the immobilizer systemindicator in the dash panel to blink
rapidly. Check the transmission interlock.
If you have a manual transmission,
the clutch pedal must be pushed all the way to the floor or thestarter will not operate. With an
automatic transmission, it must be
in Park or Neutral. Turn the ignition switch to ON (II).
Turn on the headlights and check
their brightness. If the headlightsare very dim or don't light at all,
the battery is discharged. See
Jum p Startin g on page 231. Turn the ignition switch to START
(III). If the headlights do not dim,
check the condition of the fuses. If
the fuses are OK, there is proba-
bly something wrong with the electrical circuit for the ignition
switch or starter motor. You will
need a qualified technician to determine the problem. (See
Emergenc y Towin g on page 245.)
If the headlights dim noticeably or
go out when you try to start the
engine, either the battery is dis-
charged or the connections are
corroded. Check the condition of
the battery and terminal connec-
tions (see page 189). You can
then try jump starting the car from a booster battery (see page
231).
Takin g Car e o f th e Unexpecte d
Page 234 of 279
I
f You r Engin e Won' t Start , Jum p Startin g
Th e Starte r Operate s Normall y
In this case, the starter motor's speed sounds normal, or even faster
than normal, when you turn the ignition switch to START (III), but
the engine does not run. Are you using the proper starting
procedure? Refer to Startin g th e
Engin e on page 137. Do you have fuel? Turn the
ignition switch to ON (II) for a
minute and watch the fuel gauge.
The low fuel level warning light may not be working, so you were
not reminded to fill the tank. There may be an electrical
problem, such as no power to the
fuel pump. Check all the fuses (see page 240).
If you find nothing wrong, you will
need a qualified technician to find
the problem. See Emergenc y
Towin g on page 245 . Jum
p Startin g
If your car's battery has run down,
you may be able to start the engine
by using a booster battery. Although this seems like a simple procedure,
you should take several precautions.
You cannot start an Acura with an automatic transmission by pushing
or pulling it. To jump start your car, follow these
directions closely:
1. Open the hood and check the
physical condition of the battery(see page 189). In very cold
weather, check the condition of
the electrolyte. If it seems slushy or like ice, do not try jump starting
until it thaws.
If a battery sits in extreme cold, the
electrolyte inside can freeze.
Attempting to jump start with a frozen battery can cause it to rupture.
2. Turn off all the electrical acces-
sories: heater, A/C, stereo system,
lights, etc.
Put the transmission in Neutral or
Park and set the parking brake.
CONTINUED
Takin g Car e o f th e Unexpecte d
NOTIC
E
A battery can explode if you do
not follow the correct procedure,
seriously injuring anyone
nearby.
Keep all sparks, open flames,
and smoking materials away
from the battery.
Page 238 of 279
Lo
w Oi l Pressur e Indicato r
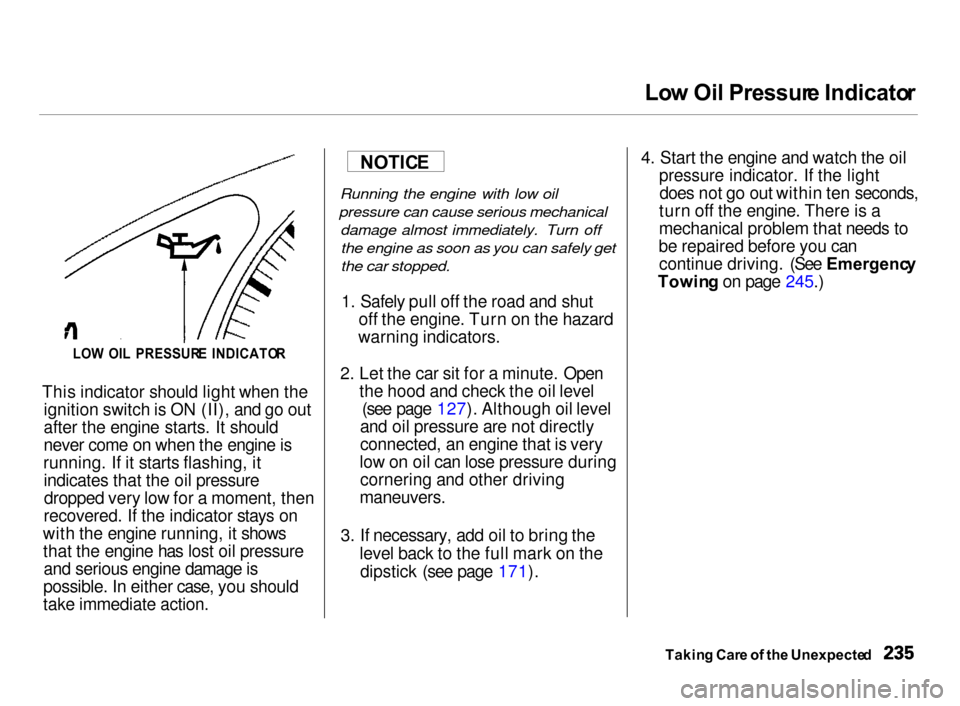
This indicator should light when the ignition switch is ON (II), and go out
after the engine starts. It should
never come on when the engine is
running. If it starts flashing, it indicates that the oil pressuredropped very low for a moment, then
recovered. If the indicator stays on
with the engine running, it shows that the engine has lost oil pressureand serious engine damage is
possible. In either case, you should
take immediate action.
Running the engine with low oil
pressure can cause serious mechanical damage almost immediately. Turn offthe engine as soon as you can safely get
the car stopped.
1. Safely pull off the road and shut
off the engine. Turn on the hazard
warning indicators.
2. Let the car sit for a minute. Open
the hood and check the oil level (see page 127). Although oil level
and oil pressure are not directly
connected, an engine that is very
low on oil can lose pressure during cornering and other driving
maneuvers.
3. If necessary, add oil to bring the
level back to the full mark on the
dipstick (see page 171).
4. Start the engine and watch the oil
pressure indicator. If the lightdoes not go out within ten seconds,
turn off the engine. There is a
mechanical problem that needs to
be repaired before you can continue driving. (See Emergenc y
Towin g on page 245.)
Takin g Car e o f th e Unexpecte d
NOTIC
E
LO W OI L PRESSUR E INDICATO R
Page 239 of 279

Chargin
g Syste m Indicato r
This indicator should come on when the ignition switch is ON (II), and goout after the engine starts. If it
comes on brightly when the engine
is running, it indicates that the charging system has stopped
charging the battery. Immediately turn off all electrical
accessories: radio, heater, A/C, rear
defogger, cruise control, etc. Try not
to use other electrically-operated controls such as the power windows.
Keep the engine running and take
extra care not to stall it. Starting the
engine will discharge the battery
rapidly. By eliminating as much of the
electrical load as possible, you can
drive several miles (kilometers)
before the battery is too discharged
to keep the engine running. Drive to a service station or garage where
you can get technical assistance.
Takin g Car e o f th e Unexpecte d
CHARGIN
G SYSTE M INDICATO R
Page 240 of 279

Malfunctio
n Indicato r Lam p
MALFUNCTIO N INDICATO R LAM P
This indicator comes on for a few seconds when you turn the ignition
switch ON (II). If it comes on at any
other time, it indicates one of the
engine's emissions control systems
may have a problem. Even though
you may feel no difference in your car's performance, it can reduce
your fuel economy and cause your car to put out excessive emissions.Continued operation may cause
serious damage. If you have recently refueled your
car, the cause of this indicator
coming on could be a loose or
missing fuel fill cap. Check the cap
and tighten it until it clicks several
times. Replace the fuel fill cap if it is
missing. Tightening the cap will not
make the indicator turn off
immediately; it takes three driving
trips.
If the indicator remains on past three
driving trips, or the fuel cap was not
loose or missing, have the car checked by the dealer as soon as
possible. Drive moderately until the dealer has inspected the problem.
Avoid full-throttle acceleration and driving at high speed. You should also have the dealer
inspect your car if this indicator
comes on repeatedly, even though it
may turn off as you continue driving.
If you keep driving with the malfunction indicator lamp on, you can
damage your car's emissions controls
and engine. Those repairs may not be
covered by your car's warranties.
Takin g Car e o f th e Unexpecte d
NOTIC
E
Page 244 of 279
Fuse
s
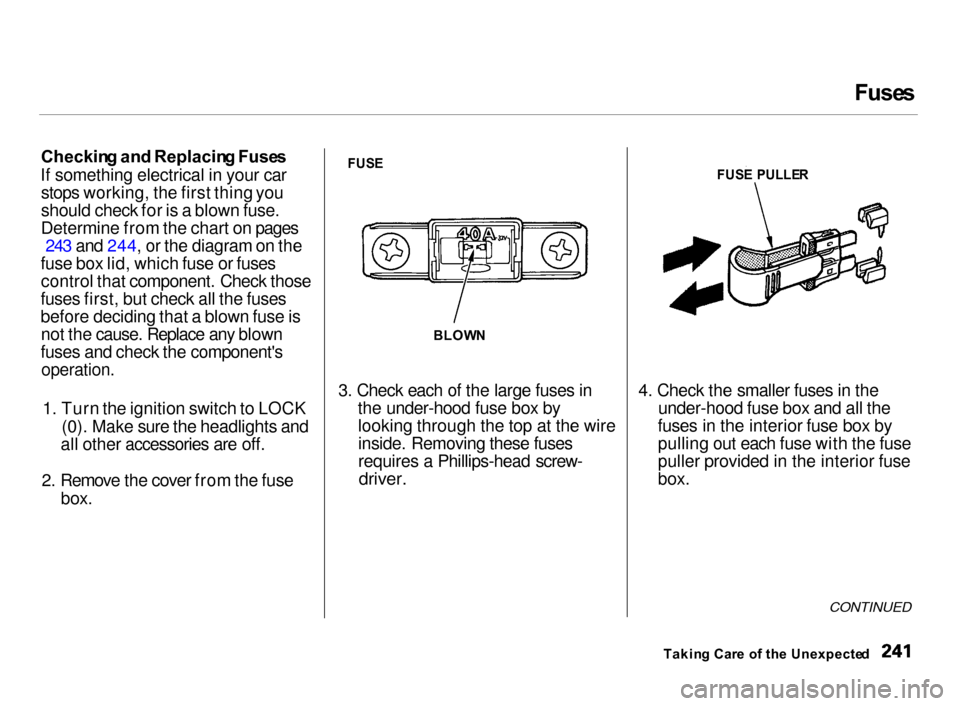
Checkin g an d Replacin g Fuse s
If something electrical in your car stops working, the first thing you
should check for is a blown fuse.
Determine from the chart on pages 243 and 244, or the diagram on the
fuse box lid, which fuse or fuses control that component. Check those
fuses first, but check all the fuses
before deciding that a blown fuse is not the cause. Replace any blown
fuses and check the component's
operation.
1. Turn the ignition switch to LOCK(0). Make sure the headlights and
all other accessories are off.
2. Remove the cover from the fuse
box.
FUS E
3. Check each of the large fuses in
the under-hood fuse box by
looking through the top at the wire inside. Removing these fuses
requires a Phillips-head screw-
driver.
4. Check the smaller fuses in the
under-hood fuse box and all the
fuses in the interior fuse box by
pulling out each fuse with the fuse
puller provided in the interior fuse
box.
CONTINUED
Takin g Car e o f th e Unexpecte d
BLOW
N
FUS
E PULLE R
Page 249 of 279
Emergenc
y Towin g
If you decide to tow your vehicle
with all four wheels on the ground, make sure you use a properly-designed and attached tow bar.
Prepare the vehicle for towing as described above, and leave the
ignition switch in Accessory (I) so
the steering wheel does not lock. Make sure the radio and any items
plugged into the accessory power socket are turned off so they do not
run down the battery.
The steering wheel system can be
damaged if the steering wheel is locked.
Leave the ignition switch in Accessory (I), and make sure the steering wheel
turns freely before you begin towing. Trying to lift or tow your vehicle by the
bumpers will cause serious damage.
The bumpers are not designed to support the vehicle's weight.
Takin g Car e o f th e Unexpecte d
NOTIC
E
NOTIC E
Page 250 of 279
Technica
l Informatio n
The diagrams in this section give you the dimensions and capacities of
your Acura, and the locations of the identification numbers. The explana-tions of several electronic and
mechanical systems on your Acura
are for the more technically-oriented
owner.
Identification Numbers................. 248
Specifications................................. 250
DOT Tire Quality Grading
(U.S. Cars).............................. 252
Treadwear.................................. 252
Traction....................................... 252
Temperature.............................. 253
Oxygenated Fuels.......................... 254
Driving in Foreign Countries....... 255 Emissions Controls........................ 256
The Clean Air Act...................... 256
Crankcase Emissions Control
System..................................... 256
Evaporative Emissions Control
System..................................... 256
Onboard Refueling Vapor Recovery................................. 257
Exhaust Emissions Controls.... 257 PGM-FI System..................... 257
Ignition Timing Control
System................................. 257
Three Way Catalytic Converter............................ 257
Replacement Parts..................... 257
Three Way Catalytic Converter... 258
Technical Informatio n