CD player Acura Integra 2000 Hatchback Owner's Manual
[x] Cancel search | Manufacturer: ACURA, Model Year: 2000, Model line: Integra, Model: Acura Integra 2000Pages: 279, PDF Size: 3.57 MB
Page 96 of 279
Comfor
t an d Convenienc e Feature s
The heating and air conditioning* systems in your Acura provide a com-
fortable driving environment in all
weather conditions.
The standard audio system has
many features. This section de-
scribes those features and how to
use them. (If you selected an optional audio system, refer to the
operating instructions that came
with it.)
Your Acura has an anti-theft audio system that requires a code number
to enable it.
* Air conditioning is optional on the
Type-R model.
Heating and Cooling........................ 94What Each Control Does............ 94
How to Use the System............... 96
To Turn Everything Off........... 101
Audio System................................. 102
Operating the Radio..................
103
Adjusting the Sound.................. 106
Radio Frequencies..................... 107
Radio Reception......................... 107Operating the CD Player..........
109
Operating the CD Changer...... 111
Protecting Compact Discs........ 112
CD Player Error Indications..... 113
CD Changer Error Indications.............................. 114
Operating the Cassette
Player...................................... 115
Tape Search Functions............. 116
Caring for the Cassette
Player...................................... 118
Theft Protection........................ 119
Comfor t an d Convenienc e Feature s
Page 112 of 279
Audi
o Syste m
Operatin g th e C D Playe r
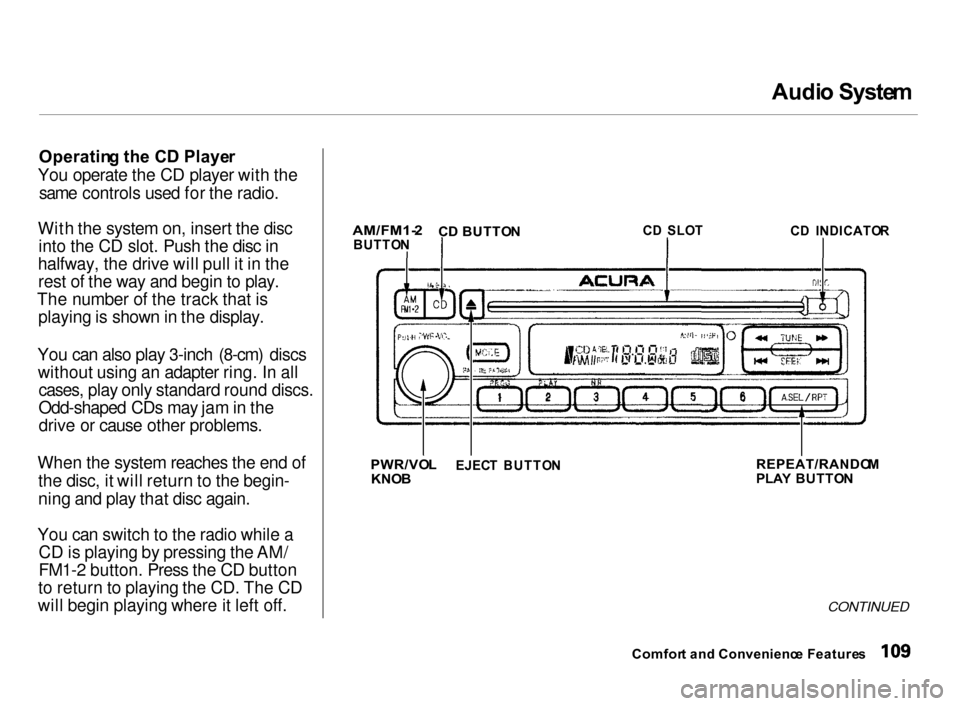
You operate the CD player with the same controls used for the radio.
With the system on, insert the disc into the CD slot. Push the disc in
halfway, the drive will pull it in the rest of the way and begin to play.
The number of the track that is playing is shown in the display.
You can also play 3-inch (8-cm) discs without using an adapter ring. In all cases, play only standard round discs.
Odd-shaped CDs may jam in the
drive or cause other problems.
When the system reaches the end of the disc, it will return to the begin-
ning and play that disc again.
You can switch to the radio while a CD is playing by pressing the AM/
FM1-2 button. Press the CD button
to return to playing the CD. The CD
will begin playing where it left off. C
D SLO T
CD INDICATO R
CONTINUED
Comfor t an d Convenienc e Feature s
AM/FM1-
2
BUTTO N
REPEAT/RANDOM
PLA Y BUTTO N
EJEC
T BUTTO N
PWR/VO
L
KNO B
C
D BUTTO N
Page 113 of 279
Audi
o Syste m
If you turn the system off while a CD
is playing, either with the PWR/VOL
knob or by turning off the ignition,
the disc will stay in the drive. When
you turn the system back on, the CD
will begin playing where it left off.
Press the eject button to remove the
disc from the drive.
If you eject the disc, but do not
remove it from the slot, the system
will automatically reload the disc
after 15 seconds and put the CD
player in pause mode. To begin
playing the disc, press the CD button.
You can use the TUNE and SEEK
bars while a disc is playing to select
passages and change tracks.
To move rapidly within a track, press
and hold the TUNE bar. Press the
side to move forward, or the
side to move backward.
Release the bar when the system
reaches the point you want.
Each time you press the side of
the SEEK bar, the system skips
forward to the beginning of the next track. Press the side to skip
backward to the beginning of thecurrent track. Press it again to skip
to the beginning of the previous
track.
REPEA T — To activate the Repeat
feature, press and release the Repeat
button. You will see RPT in the display. The system continuously
replays the current track. Press the
Repeat button again to turn it off. RANDOM
PLAY — This feature,
when activated, plays the tracks on the CD in random order, rather than
in the order they are recorded on theCD. To activate Random Play, press
and hold the A. SEL/RPT button
until you see A. SEL in the display.
The system will then select and play tracks randomly. This continues
until you deactivate Random Play by
pressing A. SEL/RPT again.
If the system is in Repeat mode, you
must turn it off by pressing A. SEL/ RPT before you can select Random
Play. Then press and hold the button
again until you see A. SEL displayed.
Comfor t an d Convenienc e Feature s
Page 114 of 279
Audi
o Syste m
Operatin g th e C D Change r
(Optional )
A Compact Disc changer is available for your car. It holds up to six discs,providing several hours ofcontinuous entertainment. You
operate this CD changer with thesame controls used for the in-dash
CD player.
Load the desired CDs in the
magazine and load the magazine in
the changer according to the instructions that came with the unit.Play only standard round discs. Odd-
shaped CDs may jam in the drive or
cause other problems.
To select the CD changer, press the CD button. The disc and track
numbers will be displayed. A "0" will
flash for the track number as the CD is loaded, then it will change to a
non-flashing "1".
To select a different disc, press the
appropriate preset button (1 — 6). If
you select an empty slot in the magazine, the changer will, after
finding that slot empty, try to load
the CD in the next slot. This continues until it finds a CD to load
and play.
If you load a CD in the in-dash player
while the changer is playing a CD, the system will stop the changer and
begin playing the in-dash CD. To select the changer again, press the
CD button. Play will begin where it
left off. Use the CD button to switch
between the player and the changer.
If you eject the in-dash CD while it is
playing, the system will automatically switch to the CD changer and begin
play where it left off. If there are no CDs in the changer, the display will
flash. You will have to select another mode (AM or FM) with the button. When you switch back to CD mode,
the system selects the same unit (in-dash or changer) that was playing
when you switched out of CD mode.
To use the SKIP, REPEAT, and RANDOM functions, refer to the in-
dash player operating instructions.
Comfor t and Convenienc e Feature s
Page 115 of 279

Audi
o Syste m
Protectin g Compac t Disc s
Handle a CD by its edges; never
touch either surface. Contamination
from fingerprints, liquids, felt-tip pens, and labels can cause the CD to
not play properly, or possibly jam in
the drive.
When a CD is not being played, store it in its case to protect it from dustand other contamination. To prevent
warpage, keep CDs out of direct sunlight and extreme heat. To clean a disc, use a clean soft cloth.
Wipe across the disc from the centerto the outside edge. A new CD may be rough on the
inner and outer edges. The small
plastic pieces causing this roughness can flake off and fall on the re-
cording surface of the disc, causing
skipping or other problems. Remove
these pieces by rubbing the inner and outer edges with the side of a
pencil or pen.
Never try to insert foreign objects in
the CD player or the magazine.
Comfor t an d Convenienc e Feature s
Page 116 of 279
Audi
o Syste m
C D Playe r Erro r Indication s
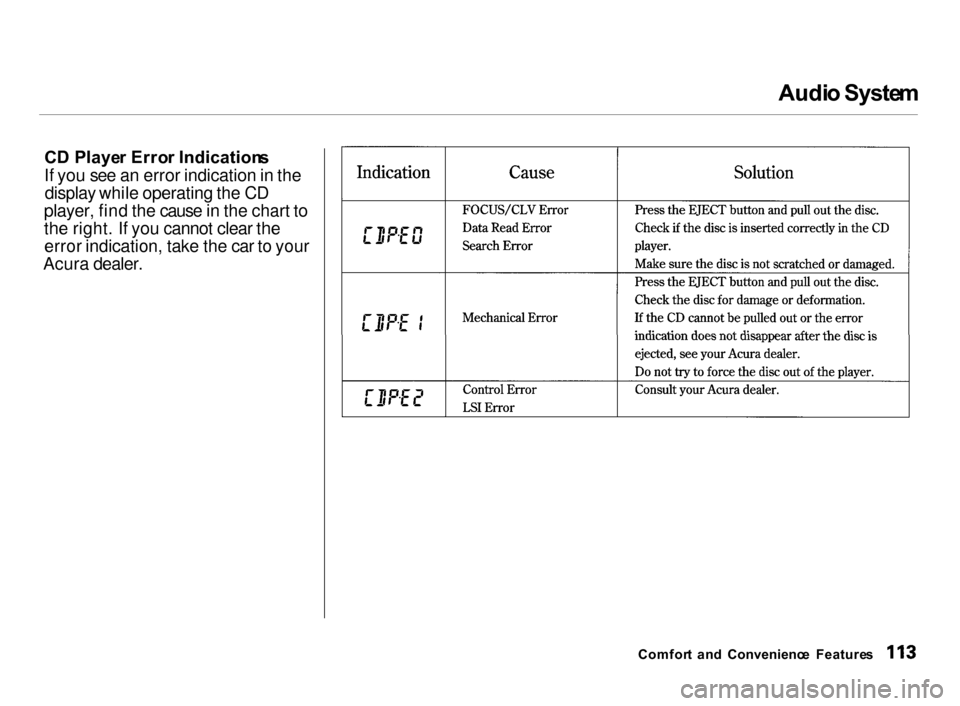
If you see an error indication in the display while operating the CD
player, find the cause in the chart to
the right. If you cannot clear the error indication, take the car to your
Acura dealer.
Comfort an d Convenienc e Feature s
Page 118 of 279

Audi
o Syste m
Operatin g th e Cassett e Playe r
(Optional )
The cassette system features Dolby B* noise reduction, automaticsensing of chromium-dioxide (CrO2)
tape, and autoreverse for continuous
play.
Make sure the tape opening on the
cassette is facing to the right, then
insert the cassette most of the way
into the slot. The system will pull it
in the rest of the way, and begin to
play.
* Dolby noise reduction manufactured under
license from Dolby Laboratories Licensing Corpo-
ration. "DOLBY" and the double-D symbol are trademarks of Dolby Laboratories
Licensing Corporation. The tape direction indicator will light
to show you which side of the cassette is playing. The indicates
the side you inserted facing upward is now playing. If you want to play
the other side, press the PROG
button.
Dolby B noise reduction turns on
when you insert a cassette. If the tape was not recorded with Dolby Bnoise reduction, turn it off by
pressing the NR button.
When the system reaches the end of the tape, it will automatically reverse direction and play the other side. If
you want to remove the cassette from the drive, press the EJECTbutton on the cassette player. If you turn the system off while a
tape is playing, either with the PWR/
VOL knob or by turning off the ignition, the cassette will remain in
the drive. When you turn the system
back on, the tape will begin playing
where it left off.
To switch to the radio or CD player while a tape is playing, press the
AM/FM1-2 or CD button. To change back to the cassette player, push theCD button.
Comfor t an d Convenienc e Feature s
Page 121 of 279

Audi
o Syste m
Carin g fo r th e Cassett e Playe r
The cassette player picks up dirt and oxides from the tape. This contami-
nation builds up over time and
causes the sound quality to degrade.
To prevent this, you should clean the player after every 30 hours of use.
Your dealer has a cleaning kit
available.
If you do not clean the cassette
player regularly, it may eventually
become impossible to remove the contamination with a normal
cleaning kit.
The player automatically ejects cassettes that do not play properly. If
it ejects a cassette before it begins to
play, it is probably defective and should not be inserted again. You
may have a cassette suddenly stop
playing, reverse directions once or
twice and then eject. This is normally an indication the tape is wound
unevenly. It should play after the tape is manually rewound.
Use 100-minute or shorter cassettes.
Cassettes longer than that use
thinner tape that may break or jam the drive.
Look at the cassette before you
insert it. If the tape is loose, tighten
it by turning a hub with a pencil or
your finger.
If the label is peeling off, remove it
from the cassette or it could cause
the cassette to jam in the player. Never try to insert a warped or
damaged cassette in the player.
When they are not in use, store cassettes in their cases to protect
them from dust and moisture. Never
place cassettes where they will be
exposed to direct sunlight, high heat,or high humidity. If a cassette is
exposed to extreme heat or cold, let
it reach a moderate temperature before inserting it in the player. Never try to insert foreign objects
into the cassette player.
Comfor t an d Convenienc e Feature s
Page 271 of 279
Inde
x
Brakes Anti-lock System (ABS)............ 146Break-in, New Linings.............. 123
Fluid............................................ 183
Light, Burned-out...................... 210
Parking.......................................... 87
System Indicator.................. 54, 238
Wear Indicators......................... 145
Brakes, ABS Operation.................................... 146
System Indicator.................. 55, 148
Braking System.............................. 145
Break-in, New Car......................... 123
Brightness Control, Instruments... 63 Brights, Headlights......................... 62
Bulb Replacement Back-up Lights........................... 210
Brake Lights............................... 210
Cargo Area Light....................... 212
Ceiling Lights............................. 212
Front Parking Lights................. 208
Front Side Marker Lights......... 208
Headlights.................................. 207
High-mount Brake Light.......... 209
License Plate Light.................... 212
Rear Side Marker Lights.......... 210 Specifications............................. 251
Spotlights.................................... 212
Turn Signal Lights..................... 208
Bulbs, Halogen............................... 207
Cables, Jump Starting With.......... 231
Capacities Chart.................... 250, 251
Carbon Monoxide Hazard.............. 49
Cargo Area Cover............................ 83
Carrying Cargo.............................. 132
Cassette Player Care............................................. 118
Operation.................................... 115
CAUTION, Explanation of............... ii
CD Changer.................................... 111
CD Player........................................ 109
Certification Label......................... 248
Chains............................................. 202
Change Oil
How to......................................... 173
When to....................................... 162
Changing a Flat Tire..................... 225
Changing Engine Coolant............. 178
Charging System Indicator.... 54, 236 Checking
Automatic Transmission
Fluid........................................ 182
Battery Condition...................... 189
Brake Fluid................................. 184
Clutch Fluid................................ 184
Drive Belts.................................. 195
Engine Coolant........................... 128
Engine Oil................................... 127
Fuses........................................... 241
Manual Transmission Fluid..... 183
Power Steering Fluid................. 185
Checklist, Before Driving............. 136
Child Safety...................................... 21 Cleaner Element, Air..................... 186
Cleaning
Aluminum Wheels..................... 217
Antenna...................................... 216
Carpeting.................................... 218
Exterior....................................... 216
Fabric.......................................... 218
Interior........................................ 218
Leather........................................ 218
Seat Belts.................................... 218
Vinyl............................................ 218
Windows..................................... 219
Page 277 of 279
Inde
x
Shifting The Automatic Transmission.. 140
The 5-speed Manual Transmission.......................... 138
Shift Lever Position Indicator...... 140
Shift Lock Release......................... 143 Side Marker Lights, Bulb
Replacement in.......................... 208
Signaling Turns................................ 63
Snow Tires...................................... 202
Solvent-type Cleaners.................... 216
Sound System................................. 102
Spare Tire Inflating....................................... 224
Specifications............................. 251
Spark Plugs, Replacing................. 187
Specifications Charts..................... 250
Speed Control................................... 67
Speedometer.................................... 58
Spotlights.......................................... 92
SRS, Additional Information........... 45
Additional Safety Precautions.... 48
How Your Airbags Work............ 45
How the SRS Indicator Light
Works........................................ 47
SRS Components......................... 45
SRS Service................................... 47
SRS Indicator.............................. 47, 54
START (Ignition Key Position)..... 74
Starting the Engine........................ 137
In Cold Weather at HighAltitude................................... 137
With a Dead Battery................. 231
Steam Coming from Engine......... 233
Steering Wheel
Adjustment................................... 66
Anti-theft Column Lock.............. 74
Stereo Sound System.................... 102
Storing Your Car............................ 214
Supplemental Restraint System...................................
9, 45
Servicing....................................... 47
SRS Indicator.......................... 47, 54
Synthetic Oil................................... 173
Tachometer...................................... 58
Tafflights, Changing Bulbs in....... 210 Taking Care of the Unexpected................................ 213
Tape Player..................................... 115 Technical Descriptions................. 247
Driving in Foreign Countries... 255
Emissions Control Systems...... 256
Oxygenated Fuels...................... 254
Three Way Catalytic
Converter................................ 258
Temperature Gauge........................ 59
Tether Attachment Points.............. 40
Three Way Catalytic Converter... 258
Time, Setting the............................. 88
Timing Belt..................................... 195
Tire Chains..................................... 202
Tire, How to Change a Flat.......... 225
Tires................................................ 196 Air Pressure............................... 196Checking Wear.......................... 197
Compact Spare........................... 224
DOT Tire Quality Grading....... 252
Inflation....................................... 196
Inspection................................... 197
Maintenance............................... 198
Replacing.................................... 200
Rotating....................................... 199
Snow............................................ 202
Specifications............................. 251
Tire Chains................................. 202