height adjustment Acura Integra 2001 Owner's Manual
[x] Cancel search | Manufacturer: ACURA, Model Year: 2001, Model line: Integra, Model: Acura Integra 2001Pages: 285, PDF Size: 3.79 MB
Page 54 of 285

Instrument
s an d Control s
This section gives information about the controls and displays that
contribute to the daily operation of
your Acura. All the essential controls
are within easy reach.
Control Locations............................ 52
Indicator Lights................................ 53
Gauges.............................................. 58
Speedometer................................ 58
Tachometer.................................. 58
Odometer...................................... 58
Trip Meter.................................... 58
Fuel Gauge................................... 59
Temperature Gauge.................... 59 Maintenance Required
Indicator.................................... 60
Controls Near the Steering Wheel........................................ 61
Headlights....................................
62
Daytime Runnin
g Lights............. 62
Instrument Panel Brightness..... 63
Turn Signals................................. 63
Windshield Wipers...................... 64
Windshield Washers................... 64
Rear Window Wiper and
Washer...................................... 65
Hazard Warning........................... 65
Rear Window Defogger..............
65
Steering Whee
l Adjustment....... 66
Steering Wheel Controls................
67
Cruise Control.............................
.
67
Keys
an
d Locks................................
71
Keys...............................................
7
1Immobilizer System..................... 72
Ignition Switch............................. 73
Door Locks................................... 75
Power Door/Hatch Locks.......... 75
Hatch............................................. 76
Glove Box..................................... 78
Seat Adjustments............................. 79
Front Seat Adjustments.............. 79
Driver's Seat Height
Adjustment............................... 80
Driver's Lumbar Support............ 80
Rear Seat Access......................... 81
Head Restraints........................... 82
Folding Rear Seat............................ 83
Cargo Area Cover............................ 83
Power Windows............................... 84
Moonroof.......................................... 85
Mirrors.............................................. 86
Adjusting the Power Mirrors..... 86
Parking Brake..................................
87
Digital Clock....................................
. 88
Beverage Holder.............................. 89
Console Compartment.................... 90
Cigarette Lighter............................. 90
Ashtrays............................................ 91
Interior Lights.................................. 92
Instrument s an d Control s
Page 83 of 285

Sea
t Adjustment s
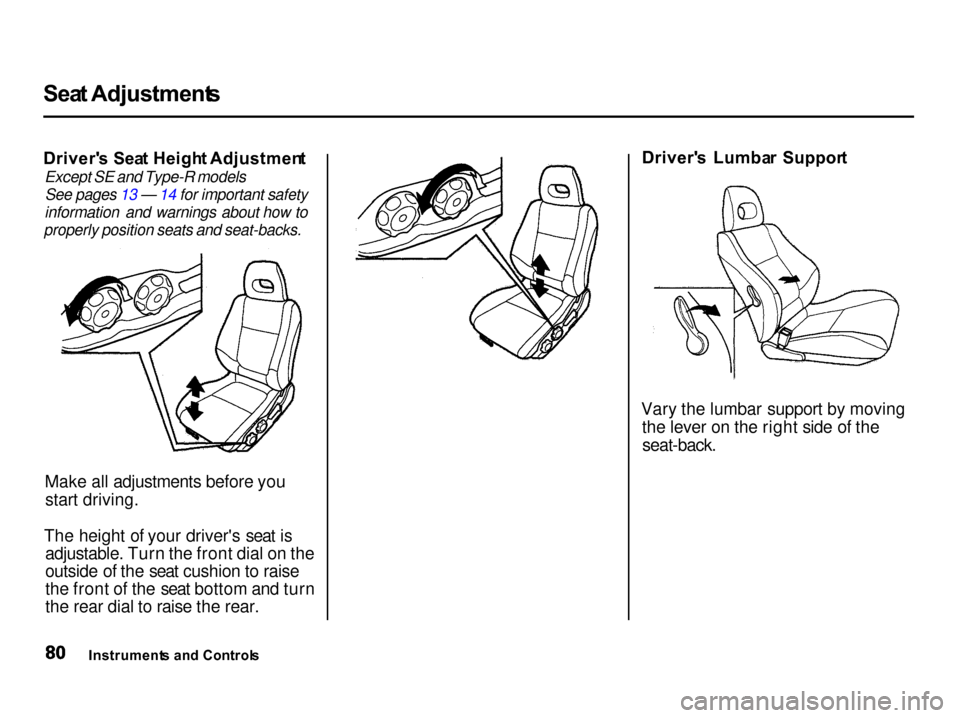
Driver' s Sea t Heigh t Adjustmen t
Except SE and Type-R models
See pages 13 — 14 for important safety
information and warnings about how to
properly position seats and seat-backs.
Make all adjustments before youstart driving.
The height of your driver's seat is adjustable. Turn the front dial on the
outside of the seat cushion to raise
the front of the seat bottom and turn
the rear dial to raise the rear. Driver'
s Lumba r Suppor t
Vary the lumbar support by moving the lever on the right side of the
seat-back.
Instrument s an d Control s
Page 85 of 285

Sea
t Adjustment s
Hea d Restraint s
See page 15 for important safety
information and a warning about how to
properly position the head restraints.
The front head restraints helpprotect you and your passenger from
whiplash and other injuries. They are most effective when you adjust themso the back of the occupant's head
rests against the center of the
restraint. A taller person should adjust the restraint as high as
possible.
The front head restraints adjust for
height. You need both hands toadjust the restraint. Do not attempt
to adjust it while driving. To raise it,
pull upward. To lower the restraint,
push the release button sideways and push the restraint down.
To remove a head restraint for cleaning or repair, pull it up as far as
it will go. Push the release button
and pull the restraint out of the seat-
back.
Instrument s an d Control s
RELEAS
E
BUTTO N