warning ACURA INTEGRA 2023 User Guide
[x] Cancel search | Manufacturer: ACURA, Model Year: 2023, Model line: INTEGRA, Model: ACURA INTEGRA 2023Pages: 740, PDF Size: 22.94 MB
Page 73 of 740
Continued71
uuChild Safety uSafety of Infants and Small Children
Safe DrivingIf a child has exceeded the weight and height limitations of a rear-facing child seat,
the child should be properly re strained in a firmly secured forward-facing child seat
until they exceed the weight and height limitations for the forward-facing child seat.
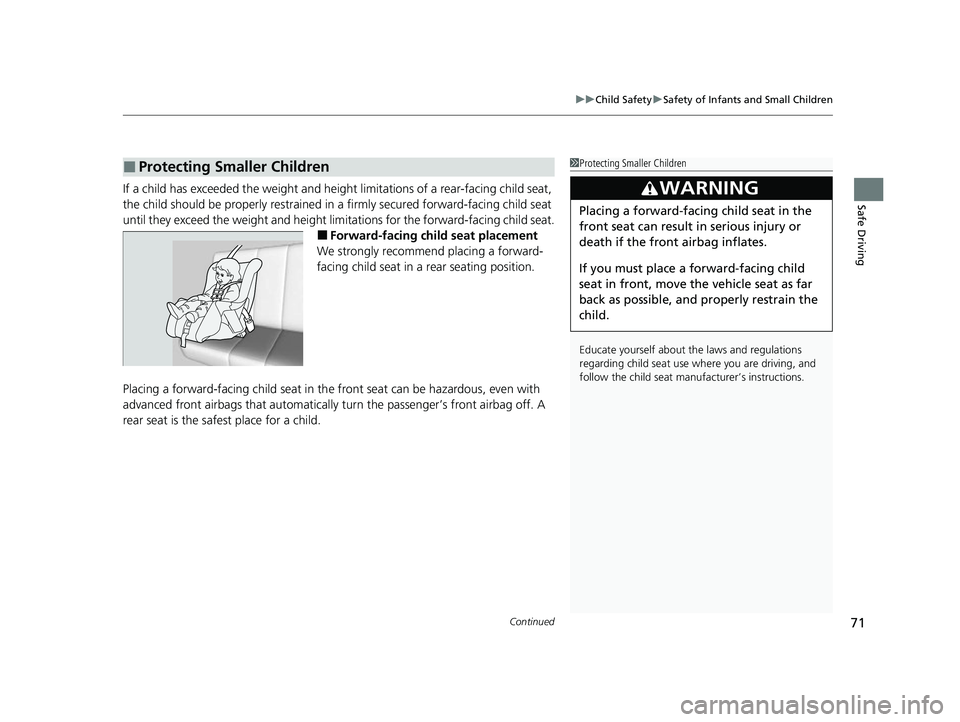
■Forward-facing child seat placement
We strongly recommend placing a forward-
facing child seat in a rear seating position.
Placing a forward-facing child seat in th e front seat can be hazardous, even with
advanced front airbags that automatically turn the passeng er’s front airbag off. A
rear seat is the safest place for a child.
■Protecting Smaller Children1 Protecting Smaller Children
Educate yourself about th e laws and regulations
regarding child seat use wh ere you are driving, and
follow the child seat manufacturer’s instructions.
3WARNING
Placing a forward-facing child seat in the
front seat can result in serious injury or
death if the front airbag inflates.
If you must place a forward-facing child
seat in front, move the vehicle seat as far
back as possible, and properly restrain the
child.
23 ACURA INTEGRA-313S56000_03.book 71 ページ 2022年3月18日 金曜日 午前11 時47分
Page 75 of 740

Continued73
uuChild Safety uSafety of Infants and Small Children
Safe DrivingA LATCH-compatible child seat can be installe d in either of the two outer rear seats.
A child seat is attached to th e lower anchors with either th e rigid or flexible type of
connectors. 1.Locate the anchor marks affixed to the base
of the seat cushion.
2. Pull out the anchor covers under the marks
to expose the lower anchors.
3. Place the child seat on the vehicle seat, then
attach the child seat to the lower anchors
according to the ins tructions that came
with the child seat.
u When installing the child seat, make sure
that the lower anchors are not
obstructed by the seat belt or any other
object.
■Installing a LATCH-Compatible Child Seat1 Installing a LATCH-Compatible Child Seat
For your child’s safety, when using a child seat
installed using the LATCH system, make sure that the
child seat is properly secured to the vehicle.
A child seat that is not properly secured will not
adequately protect a child in a crash and may cause
injury to the child or other vehicle occupants.
3WARNING
Never attach two child seats to the same
anchor. In a collision, one anchor may not
be strong enough to hold two child seat
attachments and may break, causing
serious injury or death.
Marks
Cover
Rigid Type
Lower Anchors
23 ACURA INTEGRA-313S56000_03.book 73 ページ 2022年3月18日 金曜日 午前11 時47分
Page 76 of 740
uuChild Safety uSafety of Infants and Small Children
74
Safe Driving
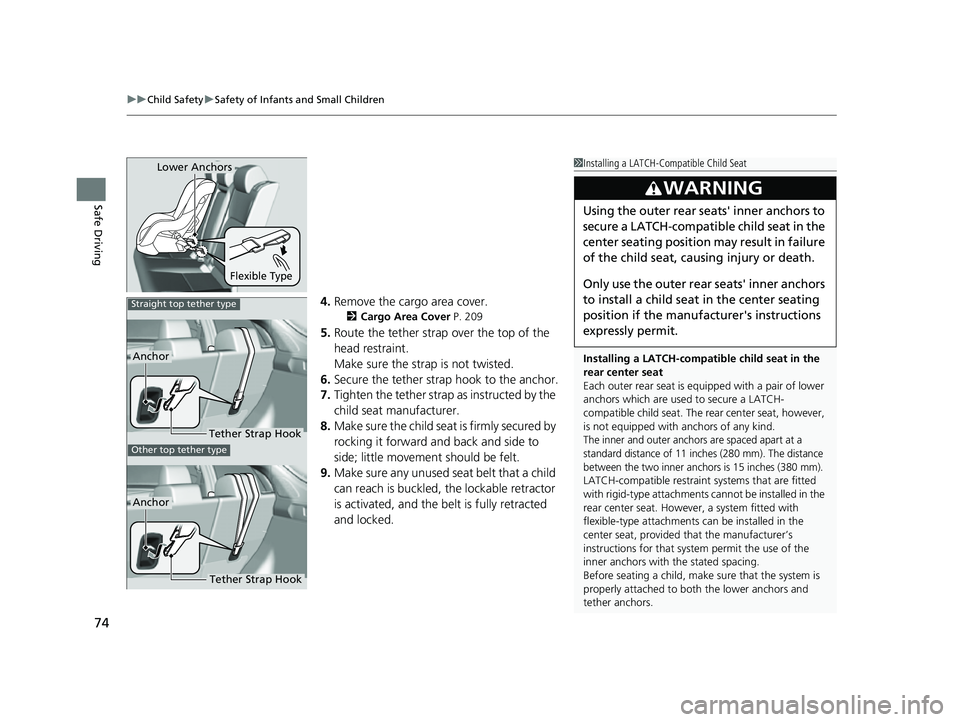
4. Remove the cargo area cover.
2 Cargo Area Cover P. 209
5.Route the tether strap over the top of the
head restraint.
Make sure the strap is not twisted.
6. Secure the tether strap hook to the anchor.
7. Tighten the tether strap as instructed by the
child seat manufacturer.
8. Make sure the child seat is firmly secured by
rocking it forward and back and side to
side; little movement should be felt.
9. Make sure any unused seat belt that a child
can reach is buckled, the lockable retractor
is activated, and the be lt is fully retracted
and locked.
1 Installing a LATCH-Compatible Child Seat
Installing a LATCH-compatible child seat in the
rear center seat
Each outer rear seat is equi pped with a pair of lower
anchors which are used to secure a LATCH-
compatible child seat. The rear center seat, however,
is not equipped with anchors of any kind.
The inner and outer anchors are spaced apart at a
standard distance of 11 inches (280 mm). The distance
between the two inner anchors is 15 inches (380 mm).
LATCH-compatible restraint systems that are fitted
with rigid-type attachments cannot be installed in the
rear center seat. However, a system fitted with
flexible-type attachments can be installed in the
center seat, provided that the manufacturer’s
instructions for that system permit the use of the
inner anchors with the stated spacing.
Before seating a child, make sure that the system is
properly attached to both the lower anchors and
tether anchors.
3WARNING
Using the outer rear seats' inner anchors to
secure a LATCH-compatible child seat in the
center seating position may result in failure
of the child seat, causing injury or death.
Only use the outer rear seats' inner anchors
to install a child seat in the center seating
position if the manufa cturer's instructions
expressly permit.
Flexible Type
Lower Anchors
Straight top tether type
Anchor
Tether Strap Hook
Tether Strap Hook
Anchor
Other top tether type
23 ACURA INTEGRA-313S56000_03.book 74 ページ 2022年3月18日 金曜日 午前11 時47分
Page 81 of 740

79
uuChild Safety uSafety of Larger Children
Continued
Safe Driving
Safety of Larger Children
The following pages give instructions on how to check proper seat belt fit, what kind
of booster seat to use if one is needed, and important precautions for a child who
must sit in front.
When a child is too big for a child seat, secure the child in a rear seat using the lap/
shoulder seat belt. Have the child sit upri ght and all the way back, then answer the
following questions.
■Checklist
• Do the child’s knees bend comfortably over
the edge of the seat?
• Does the shoulder belt cross between the
child’s neck and arm?
• Is the lap part of the seat belt as low as
possible, touching the child’s thighs?
• Will the child be able to stay seated like this
for the whole trip?
If you answer yes to all these questions, th e child is ready to wear the lap/shoulder
seat belt correctly. If you answer no to any question, the child needs to ride on a
booster seat until the seat belt fits properly without a booster seat.
■Protecting Larger Children
■Checking Seat Belt Fit
1 Safety of Larger Children
3WARNING
Allowing a child age 12 or under to sit in
front can result in injury or death if the
passenger’s front airbag inflates.
If a larger child must ride in front, move the
vehicle seat as far to the rear as possible,
have the child sit up properly and wear the
seat belt properly, us ing a booster seat if
needed.
23 ACURA INTEGRA-313S56000_03.book 79 ページ 2022年3月18日 金曜日 午前11 時47分
Page 83 of 740

81
Safe Driving
Exhaust Gas Hazard
Carbon Monoxide Gas
The engine exhaust from this vehicle contains carbon monoxide, a colorless,
odorless, and highly toxic gas. As long as you properly maintain your vehicle, carbon
monoxide gas will not get into the interior.
■Have the exhaust system in spected for leaks whenever
• The exhaust system is ma king an unusual noise.
• The exhaust system may have been damaged.
• The vehicle is raised for an oil change.
When you operate a vehicle with the hatch open, airflow can pull exhaust gas into
the interior and create a hazardous conditi on. If you must drive with the hatch open,
open all the windows and set the climate control system as shown below.
1. Select the fresh air mode.
2. Select the mode.
3. Set the fan speed to high.
4. Set the temperature control to a comfortable setting.
Adjust the climate control system in the same manner if you sit in your parked
vehicle with the engine running.
1 Carbon Monoxide Gas
An enclosed area such as a garage can quickly fill up
with carbon monoxide gas.
Do not run the engine with the garage door closed.
Even when the garage door is open, drive out of the
garage immediately afte r starting the engine.
3WARNING
Carbon monoxide gas is toxic.
Breathing it can cause unconsciousness and
even kill you.
Avoid any enclosed areas or activities that
expose you to carbon monoxide.
23 ACURA INTEGRA-313S56000_03.book 81 ページ 2022年3月18日 金曜日 午前11 時47分
Page 87 of 740
85
uuIndicators u
Continued
Instrument Panel
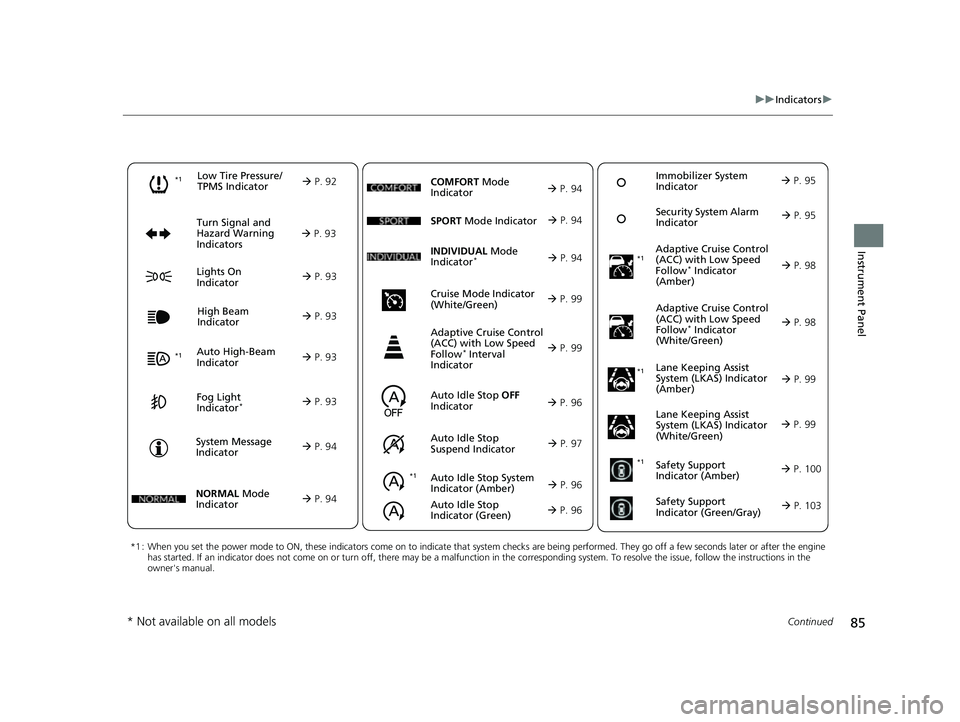
*1 : When you set the power mode to ON, these indicators come on to indicate that system checks are being perf ormed. They go off a few seconds later or after the engine
has started. If an indicator does not come on or turn off, th ere may be a malfunction in the corresponding system. To resolve the issue, follow the instructions in the
owner's manual.
Auto High-Beam
Indicator
Low Tire Pressure/
TPMS Indicator
Turn Signal and
Hazard Warning
Indicators
Lights On
Indicator High Beam
Indicator
Fog Light
Indicator*
System Message
Indicator Adaptive Cruise Control
(ACC) with Low Speed
Follow
* Indicator
(Amber)
Lane Keeping Assist
System (LKAS) Indicator
(Amber)
Safety Support
Indicator (Green/Gray)
P. 92
Aut
o Idle Stop System
Indicato
r (Amber)
P. 96
P. 93
P. 93
P. 98
*1
P. 93
P. 93
P. 93 Immobilizer System
Indicator
P. 95
S
ec
urity System Alarm
Indicator
P. 95
P. 94
P. 99
P. 103
*1
Adaptive Cruise Control
(ACC) with Low Speed
Follow
* Indicator
(White/Green) P. 98
*1
Lane Keeping Assist
System (LKAS) Indicator
(White/Green)
P. 99
*1 *1Safety Support
Indicator (Amber)
P. 100
*1
NORMAL Mode
Indicator
P. 94
Auto Idle Stop OFF
Indicator
P. 96
Auto
Idle Stop
Suspend
Indicator P. 97
SPORT
Mode Indi
cator
P. 94
Cruise Mode Indicator
(White/Green)
P. 99
Adaptive Cruise Control
(ACC) with Low Speed
Follow
* Interval
Indicator
P. 99
Auto Idle Stop
Indicator (Green)
P. 96
COMFORT Mode
Indicator
P. 94
INDIVIDUAL Mode
Indica
tor* P. 94
* Not available on all models
23 ACURA INTEGRA-313S56000_03.book 85 ページ 2022年3月18日 金曜日 午前11 時47分
Page 95 of 740
93
uuIndicators u
Continued
Instrument Panel
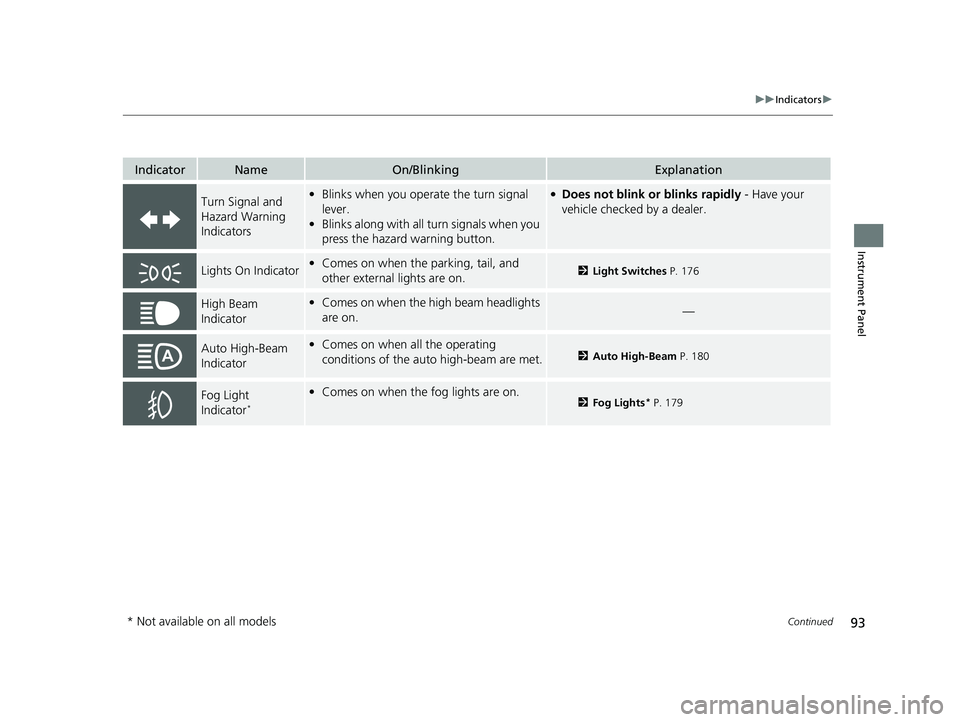
IndicatorNameOn/BlinkingExplanation
Turn Signal and
Hazard Warning
Indicators•Blinks when you operate the turn signal
lever.
• Blinks along with all turn signals when you
press the hazard warning button.●Does not blink or blinks rapidly - Have your
vehicle checked by a dealer.
Lights On Indicator• Comes on when the parking, tail, and
other external lights are on.2 Light Switches P. 176
High Beam
Indicator•Comes on when the high beam headlights
are on.—
Auto High-Beam
Indicator•Comes on when all the operating
conditions of the auto high-beam are met.2 Auto High-Beam P. 180
Fog Light
Indicator*
•Comes on when the fog lights are on.2 Fog Lights* P. 179
* Not available on all models
23 ACURA INTEGRA-313S56000_03.book 93 ページ 2022年3月18日 金曜日 午前11 時47分
Page 96 of 740
94
uuIndicators u
Instrument Panel
IndicatorNameOn/BlinkingExplanation
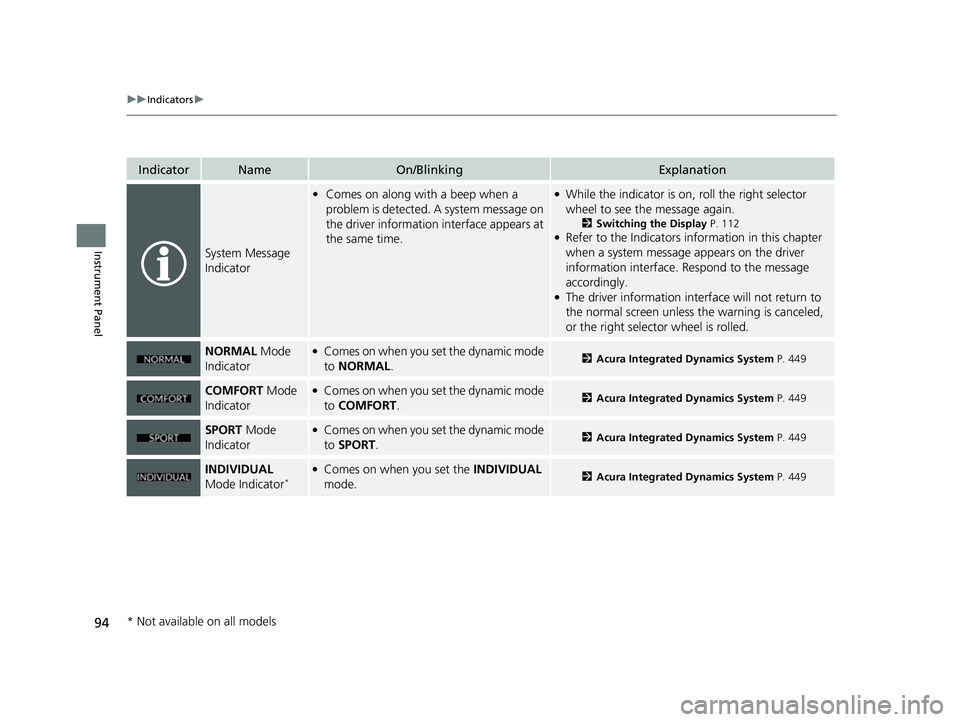
System Message
Indicator
•Comes on along with a beep when a
problem is detected. A system message on
the driver information interface appears at
the same time.●While the indicator is on, roll the right selector
wheel to see the message again.
2 Switching the Display P. 112●Refer to the Indicators in formation in this chapter
when a system message appears on the driver
information interface. Respond to the message
accordingly.
●The driver information interface will not return to
the normal screen unless the warning is canceled,
or the right selector wheel is rolled.
NORMAL Mode
Indicator●Comes on when you set the dynamic mode
to NORMAL .2Acura Integrated Dynamics System P. 449
COMFORT Mode
Indicator●Comes on when you set the dynamic mode
to COMFORT .2Acura Integrated Dynamics System P. 449
SPORT Mode
Indicator●Comes on when you set the dynamic mode
to SPORT.2 Acura Integrated Dynamics System P. 449
INDIVIDUAL
Mode Indicator*●Comes on when you set the INDIVIDUAL
mode.2 Acura Integrated Dynamics System P. 449
* Not available on all models
23 ACURA INTEGRA-313S56000_03.book 94 ページ 2022年3月18日 金曜日 午前11 時47分
Page 113 of 740

111
uuGauges and Displays uDriver Information Interface (Right Side Area)
Continued
Instrument Panel
Driver Information Interfa ce (Right Side Area)
The driver information interface shows info rmation such as the estimated travelable
distance and fuel economy of the vehicle. It also displays messages such as warnings
and other helpful information.
When a warning message displays, please check the message and contact a dealer
and have the vehicle inspected if necessary . Please refer to the pages below if the
Engine oil pressure low or Engine temperature too hot message is displayed.
2If the Engine oil pressure low Warning Appears P. 699
2 Overheating P. 697
23 ACURA INTEGRA-313S56000_03.book 111 ページ 2022年3月18日 金曜日 午前11時47分
Page 114 of 740
112
uuGauges and Displays uDriver Information Interface (Right Side Area)
Instrument Panel
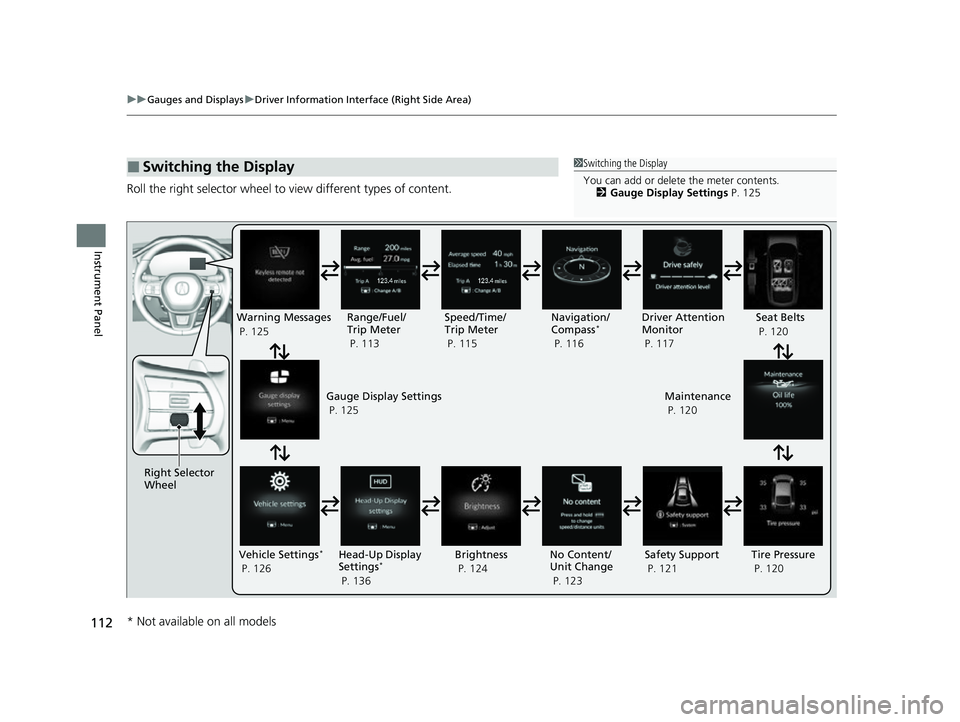
Roll the right selector wheel to view different types of content.
■Switching the Display1Switching the Display
You can add or delete the meter contents.
2 Gauge Display Settings P. 125
Right Selector
WheelWarning Messages
P. 125
Range/Fuel/
Trip Meter
P. 113
No Content/
Unit Change
P. 123Driver Attention
Monitor
P. 117
Navigation/
Compass
*
P. 116
Speed/Time/
Trip Meter
P. 115
Gauge Display Settings
P. 125 Maintenance
P. 120
Safety Support
P. 121 Seat Belts
P. 120
Vehicle Settings
*
P. 126 Head-Up Display
Settings*
P. 136 Brightness
P. 124
Tire Pressure
P. 120
* Not available on all models
23 ACURA INTEGRA-313S56000_03.book 112 ページ 2022年3月18日 金曜日 午前11時47分