tailgate Acura MDX 2002 User Guide
[x] Cancel search | Manufacturer: ACURA, Model Year: 2002, Model line: MDX, Model: Acura MDX 2002Pages: 372, PDF Size: 5.48 MB
Page 92 of 372

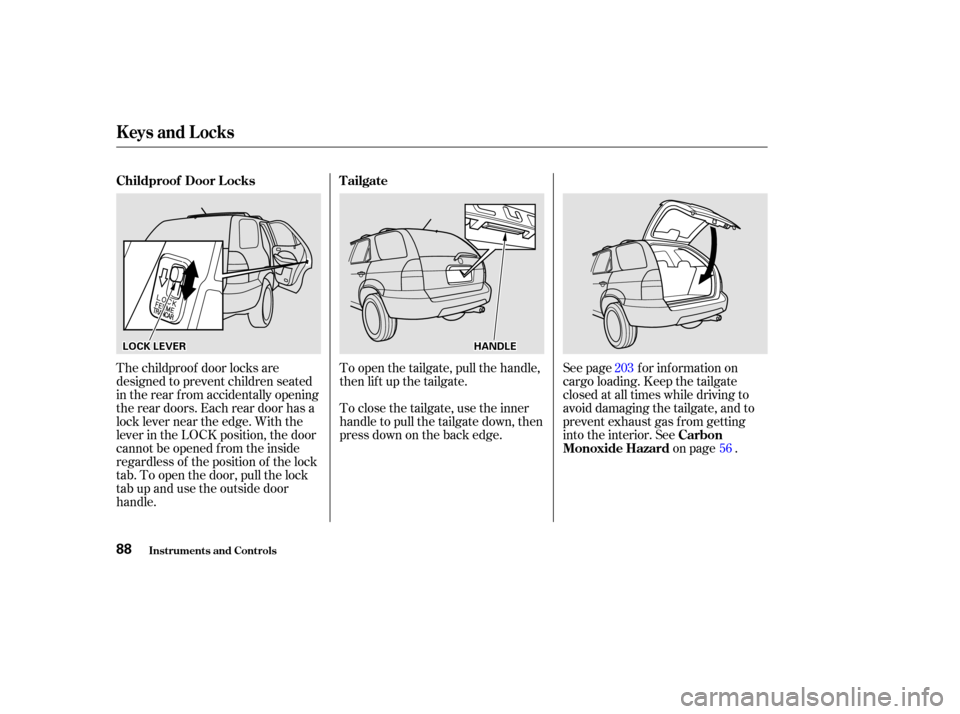
See page for information on
cargo loading. Keep the tailgate
closed at all times while driving to
avoid damaging the tailgate, and to
prevent exhaust gas f rom getting
into the interior. Seeon page .
To open the tailgate, pull the handle,
then lif t up the tailgate.
The childproof door locks are
designed to prevent children seated
in the rear f rom accidentally opening
the rear doors. Each rear door has a
lock lever near the edge. With the
lever in the LOCK position, the door
cannot be opened f rom the inside
regardless of the position of the lock
tab. To open the door, pull the lock
tab up and use the outside door
handle. To close the tailgate, use the inner
handle to pull the tailgate down, then
press down on the back edge.
203
56
Carbon
Monoxide Hazard
Childproof Door L ocks T ailgate
Keys and Locks
Inst rument s and Cont rols88
L LO
OC CKK L
LEE V
V E
ER
R H
HA
AN
ND DL
LEE
01/09/07 12:09:50 31S3V610_093
Page 121 of 372

When this switch is in the OFF
position:None of the lights come on when a
door or the tailgate is opened.
The individual map lights in the
f ront can be turned on and of f with
the switches next to the lights. The individual map lights in the
f ront come on when any door or
thetailgateisopened.Whenthe
doors and the tailgate are closed,
eachlightcanbeturnedonandoff
with the switch next to the light.
When the switch is in the Door
Activated position:
The cargo area light (3rd row)
cannot be turned on. The individual map lights in the
secondrowcomeonwhenany
door or the tailgate is opened.
When the doors and the tailgate
are closed, each light can be
turned on and off with the switch
next to the light.
The light control switch controls the
interior lights: the individual map
lights by the sun visors, the
individual map lights above the
second row passengers, and the
cargo area light. This switch has
three positions: OFF, Door Activated,
and ON. The individual map lights in the
second row cannot be turned on.
CONT INUED
Inst rument s and Cont rols
Interior Lights
L ight Control Switch
117
O ON
N
D
D O
OO ORR
A
A C
CTTI
IVV A
AT
TE
ED
D
P
P O
OS SIITT I
IOON N
O
OFFFF
01/09/07 12:14:19 31S3V610_122
Page 122 of 372

The cargo area (3rd row) light
comes on when any door or the
tailgate is opened if the switch in
the light is in the door activated
(center) position. When the doors
and the tailgate are closed, it can
be turned on with the switch in the
light.The lights go out about six seconds
after all the doors and the tailgate
are closed.
When the switch is in the ON
position:
With the light control switch in the
Door Activated position, all the
individual map lights and the cargo
area light (with the switch in the
center position) come on when you
unlock the door with the remote
transmitter (see page ).
Withanydoororthetailgateleft
open, the lights stay on about three
minutes, then go out. All the individual map lights come
onandstayonaslongasthe
switch remains in the ON position.
The cargo (3rd row) area light
comesonandstaysonif the
switch in the light is in the door
activated (center) position.
84
Interior Lights
Inst rument s and Cont rols118
01/09/07 12:14:27 31S3V610_123
Page 123 of 372

This light also works with the light
control switch (see page ). The cargo area light has a three-
position switch. In the OFF position,
the light does not come on. In the
center position, it comes on when
you open the tailgate or doors. In the
ON position, it stays on continuously.
Turn on the f ront and second row
individual map lights by pushing the
button next to each light. Push the
button again to turn it off. You can
also operate these lights with the
light control switch (see page ).
117
117
Inst rument s and Cont rols
Interior Lights
Individual Map L ights Cargo A rea L ight
119
F FRRO ON NTT S
SEEC
CO ON NDD R
ROOW W
01/09/07 12:14:36 31S3V610_124
Page 124 of 372

The ignition switch light comes on
when you open the driver’s door, and
stays on several seconds after you
close the door.
The light in the tailgate has an on-of f
switch to control if the light comes
on when the tailgate is opened.
Interior Lights
Inst rument s and Cont rols
Ignition Switch L ight
Tailgate Light
120
01/09/07 12:14:42 31S3V610_125
Page 175 of 372

Once the security system is set,
opening any door (without using the
key or the remote transmitter), or
the hood, will cause it to alarm. It
also alarms if the radio is removed
f rom the dashboard or the wiring is
cut.
The security system sets auto-
matically fifteen seconds after you
lock the doors, hood, and trunk. For
the system to activate, you must lock
the doors f rom the outside with the
key, lock tab, door lock switch, or
remote transmitter. The security
system light next to the driver’s door
lock starts blinking immediately to
show you the system is setting itself . The security system helps to protect
your vehicle and valuables f rom thef t.
The horn sounds and a combination
of headlights, parking lights, side
marker lights and taillights f lashes if
someone attempts to break into your
vehicleorremovetheradio.This
alarm continues f or two minutes,
then the system resets. To reset an
alarming system before the two
minutes have elapsed, unlock the
driver’s f ront door with the key or
the remote transmitter.
Do not attempt to alter this system
or add other devices to it. The security system will not set if
the hood, tailgate, or any door is not
f ully closed. If the system will not set,
check the Door and Tailgate Open
Monitor on the instrument panel
(see page ), to see if the doors
and tailgate are f ully closed. Since it
isnotpartofthemonitordisplay,
manually check the hood.64
Security System
Comf ort and Convenience Feat ures171
S SE
EC
CU UR RIITT Y
Y S
SYYSSTTE
EM
M L
LIIGGH HT
T
01/09/07 12:22:17 31S3V610_176
Page 209 of 372

Distribute cargo evenly on the
f loor of the cargo area, placing the
heaviest items on the bottom and
as far forward as possible. Tie
down items that could be thrown
about the vehicle during a crash or
sudden stop.If you use an accessory roof rack,
the roof rack weight limit may be
lower. Ref er to the inf ormation that
came with your roof rack.If you can carry any items on a
roof rack,besurethetotalweight
of the rack and the items on it
does not exceed 165 lb (75 kg).
Theseparationnetcanbeusedto
hold back sof t, lightweight items
stored in the cargo area. Heavy
items should be properly secured on
the f loor of the cargo area. The net
may not prevent heavy items f rom
being thrown f orward in a crash or a
sudden stop.
The cargo cover can be used to
cover the cargo area behind the third
row seats. When the third row seats
are folded down, the cargo cover can
be installed in a f orward position and
extended over the larger cargo area.
Do not install the cargo cover in the
f orward position if the third row
seats are not f olded down.
If you carry large items that
prevent you f rom closing the
tailgate, exhaust gas can enter the
passenger area. To avoid the
possibility of carbon monoxide
poisoning, f ollow the instructions
on page .
56
Carrying Cargo in the Cargo A rea
or on a Roof Rack
Optional Separation Net
Optional Cargo Cover
Carrying Cargo
Bef ore Driving205
01/09/07 12:27:52 31S3V610_210
Page 213 of 372

Youshoulddothefollowingchecks
and adjustments every day bef ore
you drive your vehicle.Make sure all windows, mirrors,
and outside lights are clean and
unobstructed. Remove f rost, snow,
or ice. Check the adjustment of the seat
(see page ).
Check the adjustment of the
inside and outside mirrors (see
page ).
Check the adjustment of the
steering wheel (see page ).
Fasten your seat belt. Check that
your passengers have f astened
their seat belts (see page ).Turn the ignition switch ON (II).
Check the indicator lights in the
instrument panel.
Start the engine (see page ).
Check the gauges and indicator
lights in the instrument panel (see
page ).
Check that any items you may be
carrying with you inside are stored
properly or f astened down
securely. Visually check the tires. If a tire
looks low, use a gauge to check its
pressure. Check that the hood and tailgate
arefullyclosed. Makesurethedoorsandtailgate are securely closed and locked.
3. 2.
1.
4. 5.
6.
7.
8.
9. 11.
12. 10.
15
92
104 78 61 210
Preparing to Drive
Driving209
01/09/07 12:28:24 31S3V610_214
Page 238 of 372

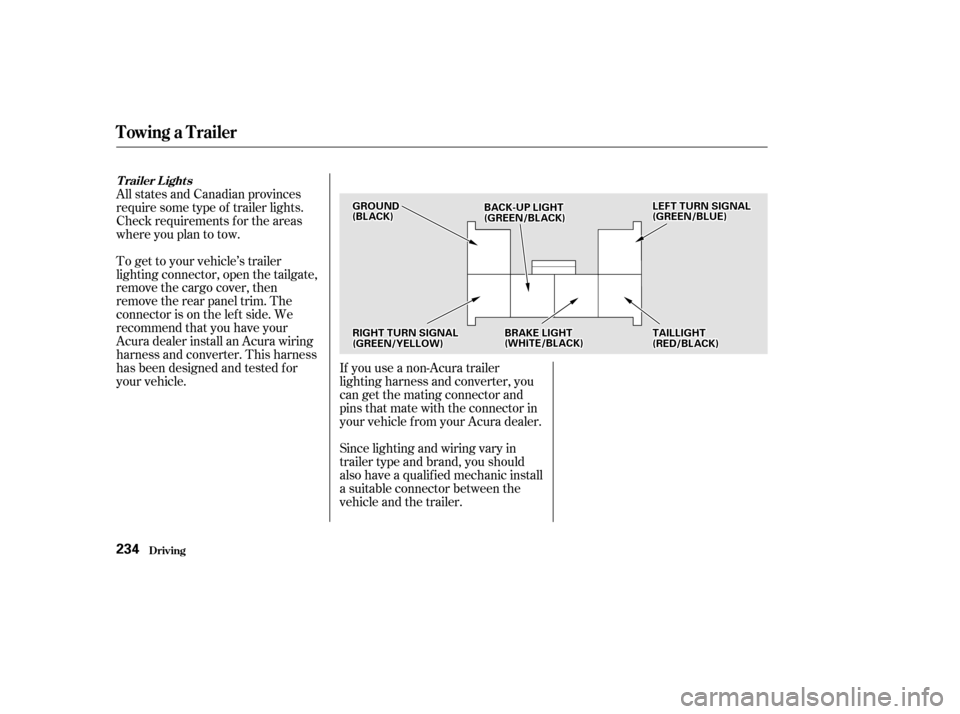
If you use a non-Acura trailer
lighting harness and converter, you
cangetthematingconnectorand
pins that mate with the connector in
your vehicle f rom your Acura dealer.
Since lighting and wiring vary in
trailer type and brand, you should
also have a qualif ied mechanic install
a suitable connector between the
vehicleandthetrailer.
All states and Canadian provinces
require some type of trailer lights.
Check requirements f or the areas
where you plan to tow.
To get to your vehicle’s trailer
lighting connector, open the tailgate,
remove the cargo cover, then
remove the rear panel trim. The
connector is on the lef t side. We
recommend that you have your
Acura dealer install an Acura wiring
harness and converter. This harness
has been designed and tested f or
your vehicle.
Driving
Towing a Trailer
T railer L ights
234
G GR
ROOU UNNDD
(
( B
BL LAA C
CKK)) B
BA
A C
CKK--U
UP P L
LIIGGH HT
T
(
( G
GR REEE
EN
N/ /B
BL LAA C
CKK)) L
LE
E F
FTT T
TU
UR RNN S
SIIGGN NAAL
L
(
( G
GR REEE
EN
N/ /B
BL LUUE E)
)
T
T A
A I
ILLL LIIGGH HT
T
(
( R
RE ED
D /
/B
BL LAA C
CKK))
B
BR
RAA K
KEE L
LIIGGH HT
T
(
( W
WH HI
ITT E
E/
/B
BL LAA C
CKK))
R
RI
IGGH HT
T T
TU
UR RNN S
SIIGGN NAAL
L
(
( G
GR REEE
EN
N/ /Y
YE EL
LLLOOW W) )
01/09/07 12:32:23 31S3V610_239
Page 302 of 372

Turn on the headlights to test the
new bulb. Insert the new bulb into the hole
and turn it one-quarter turn clock-
wise to lock it in place.
Put the light assembly into the
bumper. Tighten the mounting
bolt.Remove the socket by turning it
one-quarter turn counterclockwise.
Open the tailgate. Use a
screwdriver protected with a cloth
to pry open the two covers.
Determine which of the f our bulbs
is burned out: stop/taillight, turn
signal/hazard lights, side marker
light, or back-up light. Remove the two screws and
remove the rear light assembly
f rom the rear pillar. Remove the burned out bulb. To
remove the stop/taillight, back-up
or side marker light bulb, pull the
bulb straight out of its socket. To
remove the turn signal/hazard
light bulb, push it in and turn it
counterclockwise until it unlocks.
1.
2.
3.
4.
8. 6.
7.
5.
Replacing Rear Bulbs
Lights
Maint enance298
01/09/07 12:42:57 31S3V610_303