Clock Acura MDX 2007 Navigation Manual
[x] Cancel search | Manufacturer: ACURA, Model Year: 2007, Model line: MDX, Model: Acura MDX 2007Pages: 166, PDF Size: 4.21 MB
Page 3 of 166
2Navigation System
Table of Contents
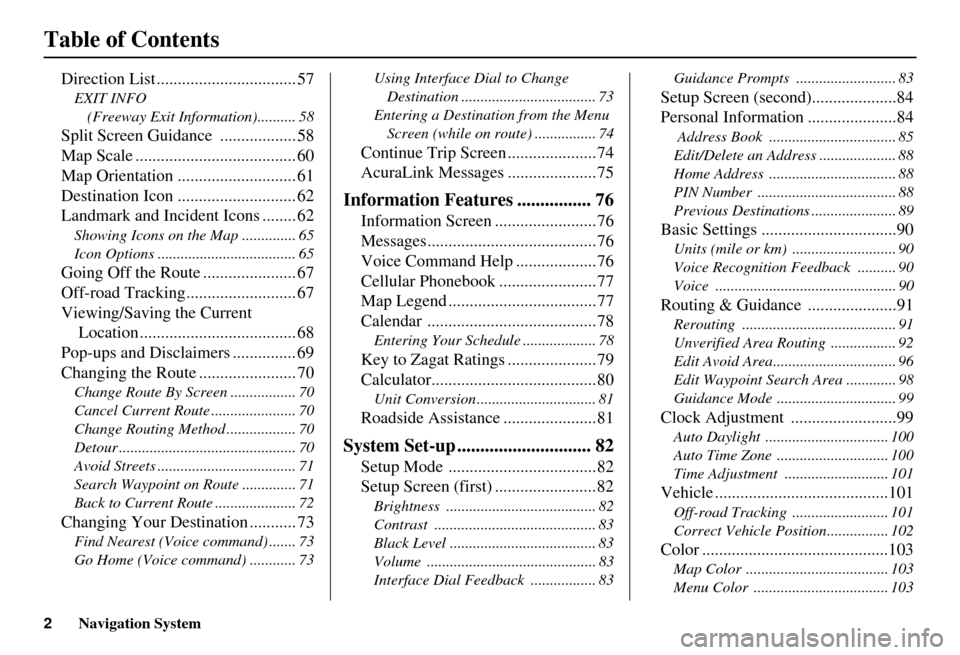
Direction List ................................. 57
EXIT INFO (Freeway Exit Information).......... 58
Split Screen Guidan ce .................. 58
Map Scale ...................................... 60
Map Orientation ............................ 61
Destination Icon ............................ 62
Landmark and Incident Icons ........ 62
Showing Icons on the M ap .............. 65
Icon Options .................................... 65
Going Off the Route ...................... 67
Off-road Tracking.......................... 67
Viewing/Saving the Current Location ..................................... 68
Pop-ups and Disclaimers ............... 69
Changing the Route ....................... 70
Change Route By Screen ................. 70
Cancel Current Route ...................... 70
Change Routing Method .................. 70
Detour .............................................. 70
Avoid Streets .................................... 71
Search Waypoint on Route .............. 71
Back to Current Route ..................... 72
Changing Your Destination ........... 73
Find Nearest (Voice command) ....... 73
Go Home (Voice command) ............ 73 Using Interface Dial to Change
Destination ................................... 73
Entering a Destination from the Menu Screen (while on route) ................ 74
Continue Trip Screen .....................74
AcuraLink Messages .....................75
Information Features ................ 76
Information Screen ........................76
Messages........................................76
Voice Command Help ...................76
Cellular Phonebook .......................77
Map Legend ...................................77
Calendar ........................................78
Entering Your Schedule ................... 78
Key to Zagat Ratings .....................79
Calculator.......................................80
Unit Conversion ............................... 81
Roadside Assistance ......................81
System Set-up ............................. 82
Setup Mode ...................................82
Setup Screen (first) ........................82
Brightness ....................................... 82
Contrast .......................................... 83
Black Level ...................................... 83
Volume ............................................ 83
Interface Dial Feedbac k ................. 83 Guidance Prompts ..............
............ 83
Setup Screen (second)....................84
Personal Information .....................84
Address Book ................................. 85
Edit/Delete an Address .................... 88
Home Address ................................. 88
PIN Number .................................... 88
Previous Destinations ...................... 89
Basic Settings ................................90
Units (mile or km) ........................... 90
Voice Recognition Feedback .......... 90
Voice ............................................... 90
Routing & Guidance .....................91
Rerouting ........................................ 91
Unverified Area Routing ................. 92
Edit Avoid Area................................ 96
Edit Waypoint Search Area ............. 98
Guidance Mode .......... ..................... 99
Clock Adjustment .........................99
Auto Daylight ................................ 100
Auto Time Zone ............................. 100
Time Adjustment ........................... 101
Vehicle .........................................101
Off-road Tracking ...... ................... 101
Correct Vehicle Position................ 102
Color ............................................103
Map Color ..................................... 103
Menu Color ................................... 103
Page 12 of 166
Navigation System11
Getting Started
(Display mode) button
Switches the display between Day
mode, Night mode, and OFF. See
page 104.
AUDIO button
Press to display the audio screen.
For more information on audio system
features, see the Audio section of the
Owner’s Manual. Interface Dial/ENTER
button
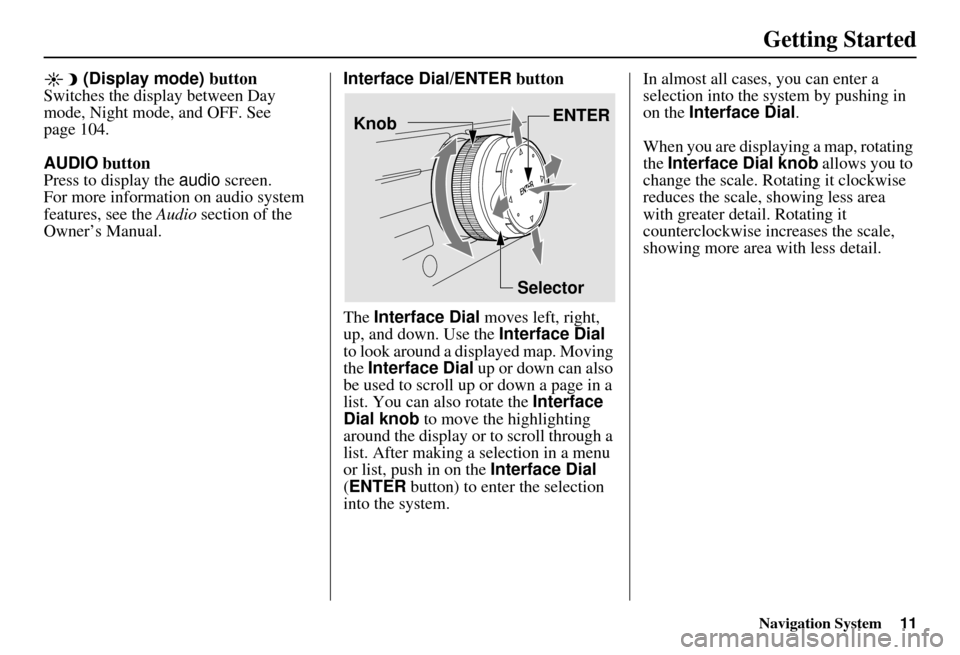
The Interface Dial moves left, right,
up, and down. Use the Interface Dial
to look around a displayed map. Moving
the Interface Dial up or down can also
be used to scroll up or down a page in a
list. You can also rotate the Interface
Dial knob to move the highlighting
around the display or to scroll through a
list. After making a selection in a menu
or list, push in on the Interface Dial
(ENTER button) to enter the selection
into the system. In almost all cases
, you can enter a
selection into the system by pushing in
on the Interface Dial .
When you are displaying a map, rotating
the Interface Dial knob allows you to
change the scale. Rotating it clockwise
reduces the scale, showing less area
with greater detail. Rotating it
counterclockwise increases the scale,
showing more area with less detail.
Selector ENTER
Knob
Page 13 of 166
12Navigation System
Getting Started
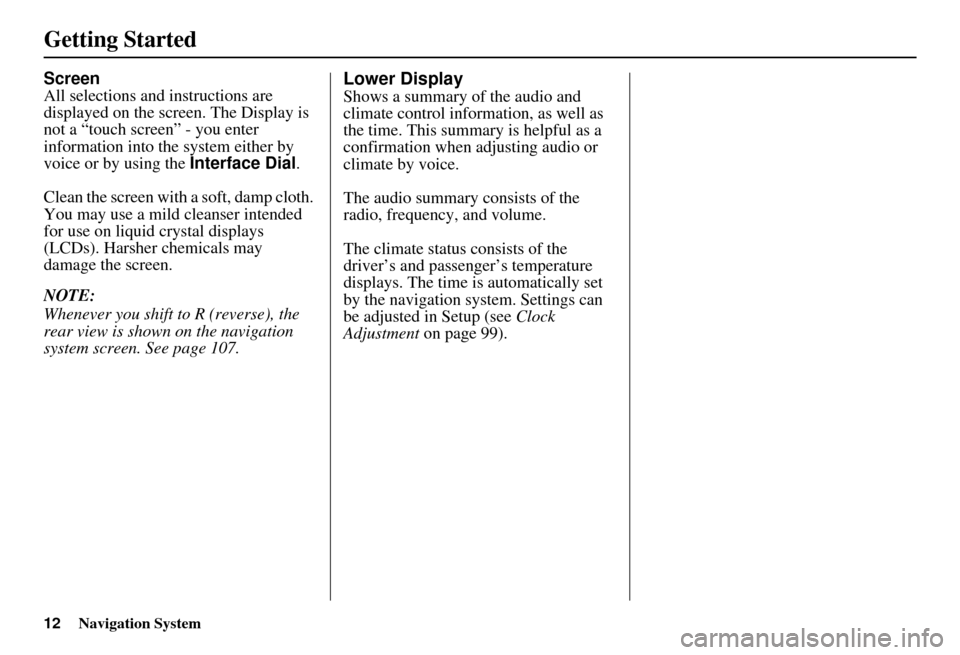
Screen
All selections and instructions are
displayed on the screen. The Display is
not a “touch screen” - you enter
information into the system either by
voice or by using the Interface Dial.
Clean the screen with a soft, damp cloth.
You may use a mild cleanser intended
for use on liquid crystal displays
(LCDs). Harsher chemicals may
damage the screen.
NOTE:
Whenever you shift to R (reverse), the
rear view is shown on the navigation
system screen. See page 107.Lower Display
Shows a summary of the audio and
climate control information, as well as
the time. This summary is helpful as a
confirmation when adjusting audio or
climate by voice.
The audio summary consists of the
radio, frequency, and volume.
The climate status consists of the
driver’s and passenger’s temperature
displays. The time is automatically set
by the navigation system. Settings can
be adjusted in Setup (see Clock
Adjustment on page 99).
Page 27 of 166
26Navigation System
Getting Started
System Function Diagram
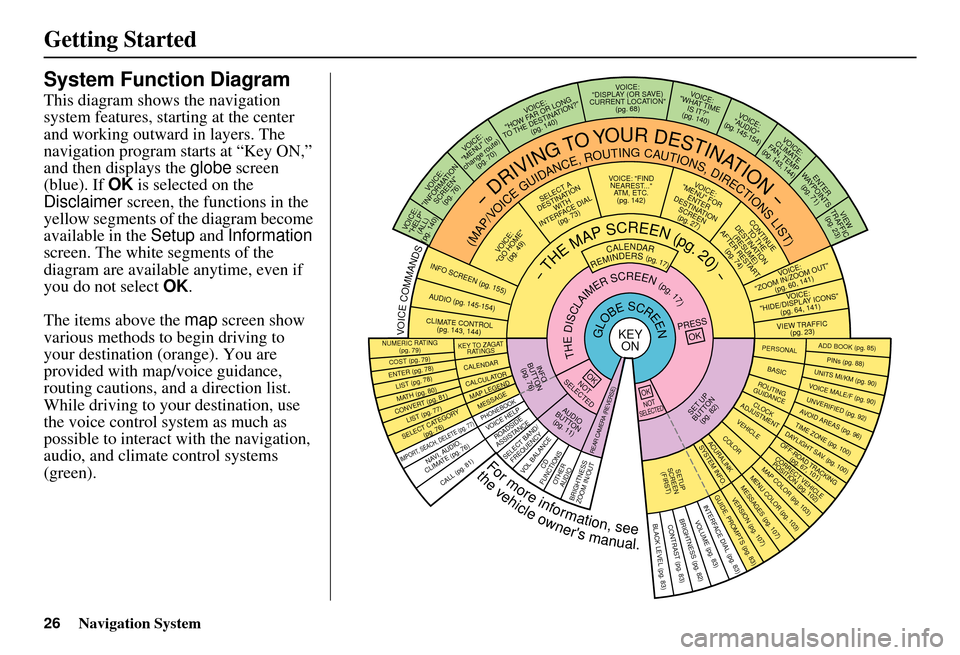
This diagram shows the navigation
system features, starting at the center
and working outward in layers. The
navigation program starts at “Key ON,”
and then displays the globe screen
(blue). If OK is selected on the
Disclaimer screen, the functions in the
yellow segments of the diagram become
available in the Setup and Information
screen. The white segments of the
diagram are available anytime, even if
you do not select OK.
The items above the map screen show
various methods to begin driving to
your destination (orange). You are
provided with map/voice guidance,
routing cautions, and a direction list.
While driving to your destination, use
the voice control system as much as
possible to interact with the navigation,
audio, and climat e control systems
(green).
REMINDERS(pg.17)CALENDAR
-THEMAPSCREEN(pg.20)-
(MAP/VOICEGUIDANCE,ROUTINGCAUTIONS,DIRECTIONSLIST)
-DRIVINGTOYOURDESTINATION-
VOI CE:
"HELP" (ALL)
(pg. 140)
VOICE:
"INFORMATION SCREEN"(pg. 76)
VOICE:
"MENU" (to
change route) (pg. 70)
VOICE:
"HOW FAR OR LONG
TO THE DESTINATION?" (pg. 140)
VOICE:
"DISPLAY (OR SAV E )
CURRENT LOCA TION"
(pg. 68)VOICE:
"WHAT TIME IS IT?"
(pg. 140)
VOICE:
"AUDIO"
(pg. 145-154)
VOI CE:
CLIMATE
FAN, TEMP
(pg. 143, 144)
ENTER
WAYPOINTS (pg. 71)
VIEW
TRAFFIC (pg. 23)
VOI CE:
"ZOOM IN/ZOOM OUT" (pg. 60, 141)
VOICE:
"HIDE/DISPLAY ICONS "
(pg. 64, 141)
VIEW TRAFFIC (pg. 23)
ADD BOOK (pg. 85)PINs (pg. 88)UNITS MI/KM (pg. 90)VOICE MALE/F (pg. 90)UNVERIFIED (pg. 92)AVO ID AREAS (pg. 96)TIME ZONE (pg. 100)DAYLIGHT SAV. (pg. 100)OFF-ROAD TRA CKING
(pg. 67, 10 1)CORRECT VEHICLE
POSITION (pg. 102)MAP COLOR (pg. 103)MENU COLOR (pg. 103)
GUIDE. PROMPTS (pg. 83)VERSION (pg. 107)MESSAGES (pg. 107)
BRIGHTNESS (pg. 82)VOLUME (pg. 83)INTERFACE DIAL (pg. 83)
CALL (pg. 81)
COST (pg. 79)
NUMERIC RAT I N G
(pg. 79)
ENTER (pg. 78)LIST (pg. 78 )MATH (pg. 80)CONVERT (pg. 81)LIST (pg. 77)
NAVI, AUDIO,
CLIMATE (pg. 7 6 )
SELECT CATEGORY (pg. 76)
IMPORT , SEACH, DELETE (pg. 77)
PRESS
OK
NOT
SELECTEDOK
NOTSELECTED
OK
ROADSIDE
ASSISTANCE
KEY T O ZAGAT
RATINGS
CALENDARCALCULA TORMAP LEGEND
PHONEBOOKMESSAGE
VOICE HELP
SELECT BAND/
FREQUENCYVOL BALANCECD
FUNCTIONSOTHER AUD IOBRIGHTNESS
ZOOM IN/OUT
SET UP
BUTTON (pg. 82)AUDIO
BUTTON (pg. 11)
INFO
BUTTON (pg. 76)
REAR CAMERA (REVERSE)
THEDISCLAIMERSCREEN(pg.17)
VOI CE: "FIND
NEARES T..."
AT M , ETC.
(pg. 142)
SELECT A
DESTINATION WITH
INTERFACE DIAL (pg. 73)
VOICE:
"GO HOME" (pg. 49)
VOICE:
"MENU" FOR ENTER
DESTINATION SCREEN(pg. 27)
CONTINUE TO THE
DESTINATION (RESUME)
AFTER RESTART (pg. 74)
GLOBESCREENKEYONPERSONAL
BASICROUTING
GUIDANCE
CLOCK
ADJUSTMENTVEHICLECOLORACU RALINKSYSTEM INFO .
SETUP
SCREEN (FIRS T)
VOICECOMMANDSINFO SCREEN (pg. 155)
AUDIO (pg. 145-154)
CLIMATE CONTR OL
(pg. 143, 144 )
Formoreinformation,see
thevehicleowner'smanual.
BLACK LEVEL (pg. 83)CONTRAST (pg. 83)
Page 100 of 166
Navigation System99
System Set-up
For “Places along the route,” the system
looks in front of yo u within a corridor
width specified by your values for “On
Freeways” or “On Surface Street.” The
system checks the upcoming area, based
on your input.
For “Places around the destination,” the
system searches outwards in a spiral
from the destination. In this case,
specific search values are not needed;
the matches are displayed in order of
distance from destination.
NOTE:
These settings do not affect the search
range used for the voice commands like,
“Find nearest gas station,” that are
also available wh en viewing the map
screen.Guidance Mode
Allows you to select the guidance
display mode: Single Screen or Split
Screen .
The factry default is Single Screen.
NOTE:
The Guidance Mode can also be
selected on the Icon Selection screen.
See Showing Icons on the Map on
page 65.
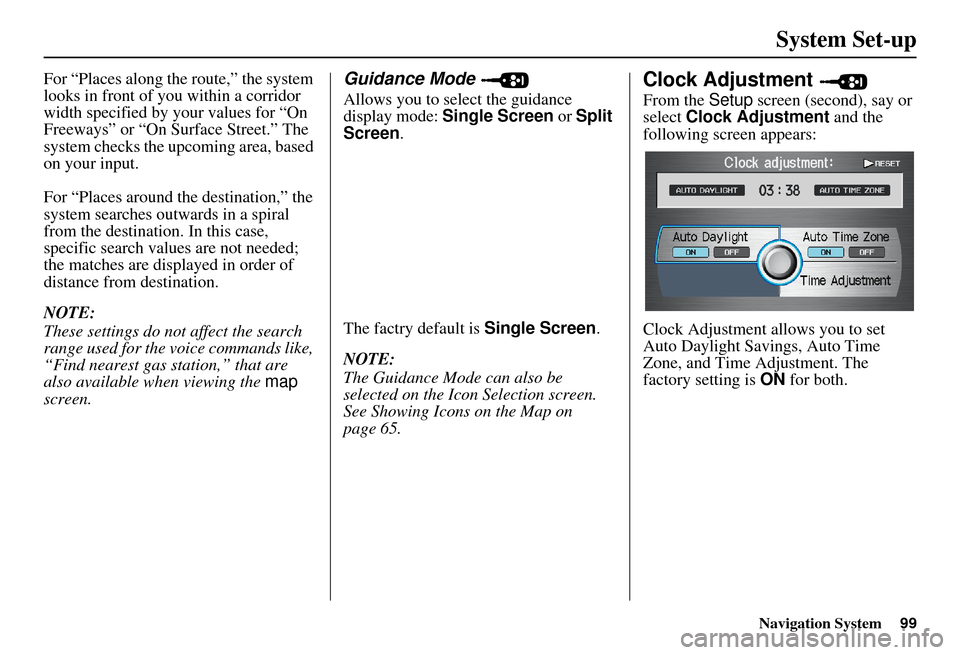
Clock Adjustment
From the Setup screen (second), say or
select Clock Adjustment and the
following screen appears:
Clock Adjustment allows you to set
Auto Daylight Savings, Auto Time
Zone, and Time Adjustment. The
factory setting is ON for both.
Page 101 of 166
100Navigation System
System Set-up
Auto Daylight
Sets automatic daylight saving time ON
or OFF . If you reside in a state or area
where daylight saving time is not used,
then you may want to turn this feature
off.
NOTE:
If you set Auto Daylight to ON, the Auto
Daylight function is activated even in an
area that does not adopt the Auto
Daylight system.
The federal government has mandated
that, starting in 2007, daylight savings
time will change in March & November
instead of the old schedule in April &
October. The new government daylight
savings time schedule is subject to
review and possible cancellation in
2008. At the time your navi DVD was
produced, the navi is programmed to
change its clock in April/October. The
dates that the navi switches between
standard and daylight savings time are
stored in the navi software, and is not
triggered by GPS satellite signals.
Therefore your navi clock will change
based on the old daylight savings time
schedule (April/October). To minimize
inconvenience caused by the new law,
we recommend the following:
1. The
Clock adjustment screen in the
Setup, set Auto Daylight to OFF.
2. When it is time to adjust the clock for daylight savings time, go to the Clock
adjustment screen in the Setup.
3. Select Time Adjustment and
simply adjust the navi time using the
Interface Dial by one hour.
Auto Time Zone
Sets automatic time zone selection by
GPS ON or OFF . If you are driving
across the country and passing through
time zones, then this feature will
automatically set the time to the time
zone you are traveling through.
However, if you live and work in two
different time zones, you may want to
turn this feature off.
NOTE:
When driving near a time zone
boundary, the displa yed time zone may
fluctuate between the two zone times.
Page 106 of 166
105Navigation System
System Set-up
I
Recommended Display mode Day/Night settings:
With the headlights on, select mid range for the dash illumination (see Own er’s manual for location of knob).
With the headlights off, select mid range for the dash illumination (see Owner’s manual for location of knob).
On the Setup “Color” adjustment screen, choose White for the map Day display, and black for the map Night display (see
page 103). Inappropriate adjustment of these colors can cause the Day/Night modes to appear inoperative.
llumination control Priority Operation Override conditions
( Display mode )
button (
see page 11) 1 Allows selection of
Day, Night or Off display
mode. This button has the highest priority and
overrides all other displa y control adjustments
listed below. When the car is restarted, the display mode
previously selected by th
is button is canceled,
and the display mode is determined by one of
the controls below.
Sunlight Sensor (Middle of
dash near the windshield).
(See owner's manual for
location) 2 If the sunlight sensor
detects daylight and the
headlights are turned on, the navi automatically
overrides (cancels) the Night display and
displays the Day display mode. If desired, use the
(
Display mode )
button to override this automatic choice.
Dash illumination adjustment
button (See Owner’s manual
for location) 3 When headlights are turned on, and you wish to
have the Day display mode, then adjust the
illumination to the full bright setting (beeps). When the headlights are turned
ON, adjust the
dash brightness down (counterclockwise) from
the maximum brightness position.
Headlights (On/Off) 4 When turned on, it changes the display to the Night display mode. The previous 3 controls
listed above can “cancel” this function. Use the
(
Display mode ) button, or
adjust the dash illuminati on to full bright to set
the display to your desired choice.
Map Day/Night screen color
choice (
see page 103 for the
Day and Night color choices) N/A The user can select the color of the screen that
will be displayed for the Day, and Night
display modes described above. For best contrast
, ensure that the Map “color”
is white for Day, and black for Night.
Page 109 of 166
108Navigation System
System Set-up
Rear View Camera Brightness
Adjustment
When in reverse, the Navi “hard”
buttons are locked out, except the
rotating portion of the Interface Dial
(knob). Rotate the knob clockwise to
make the camera image brighter, and
counterclockwise to darken the image.
This brightness adjustment is
independent of the screen brightness
adjustment in Setup.
NOTE:
The camera brightness cannot be adjusted by voice control.
Slight delays can occur when switching to the camera image, or
switching back to the map/menu
screen. This is normal.
Page 135 of 166
134Navigation System
Frequently Asked Questions
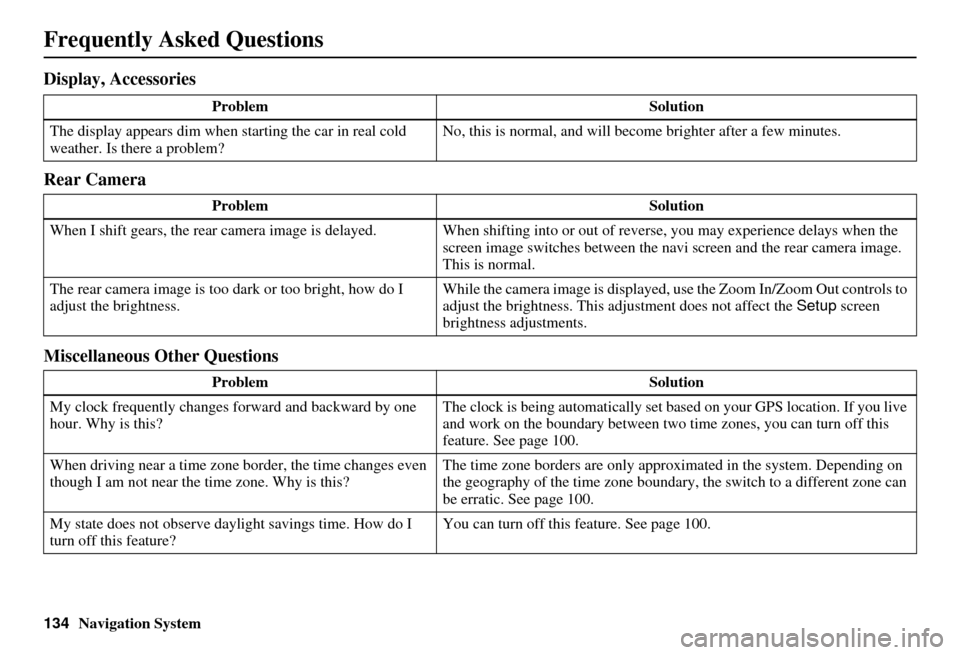
Display, Accessories
Rear Camera
Miscellaneous Other Questions
ProblemSolution
The display appears dim when starting the car in real cold
weather. Is there a problem? No, this is normal, and will beco
me brighter after a few minutes.
Problem Solution
When I shift gears, the rear camera image is delayed. When shifting into or out of reverse, you may experience delays when the
screen image switches between the navi screen and the rear camera image.
This is normal.
The rear camera image is too dark or too bright, how do I
adjust the brightness. While the camera image is displayed, use the Zoom In/Zoom Out controls to
adjust the brightness. This ad
justment does not affect the Setup screen
brightness adjustments.
Problem Solution
My clock frequently changes forward and backward by one
hour. Why is this? The clock is being automatically set based on your GPS location. If you live
and work on the boundary between two
time zones, you can turn off this
feature. See page 100.
When driving near a time zone border, the time changes even
though I am not near the time zone. Why is this? The time zone borders are only appr
oximated in the system. Depending on
the geography of the time zone boundary, the switch to a different zone can
be erratic. See page 100.
My state does not observe dayl ight savings time. How do I
turn off this feature? You can turn off this feature. See page 100.
Page 136 of 166
Navigation System135
Frequently Asked Questions
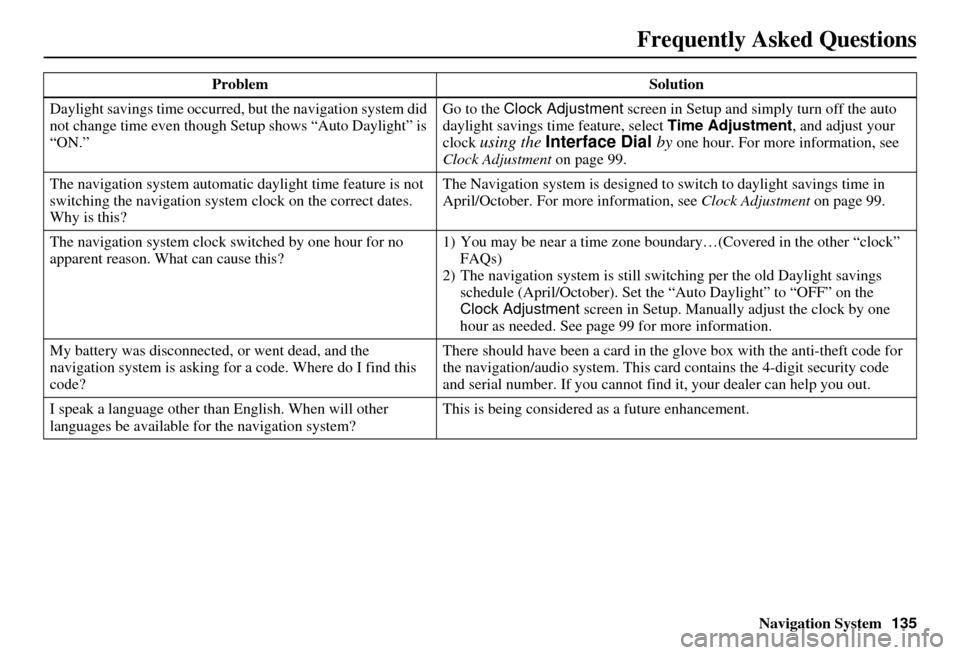
Daylight savings time occurred, but the navigation system did
not change time even though Setup shows “Auto Daylight” is
“ON.” Go to the Clock Adjustment
screen in Setup and simply turn off the auto
daylight savings time feature, select Time Adjustment , and adjust your
clock
using the Interface Dial by one hour. For more information, see
Clock Adjustment on page 99.
The navigation system automatic daylight time feature is not
switching the navigation system clock on the correct dates.
Why is this? The Navigation system is designed to
switch to daylight savings time in
April/October. For more information, see Clock Adjustment on page 99.
The navigation system clock switched by one hour for no
apparent reason. Wh at can cause this? 1) You may be near a ti
me zone boundary…(Covered in the other “clock”
FAQs)
2) The navigation system is still swit ching per the old Daylight savings
schedule (April/October). Set the “Auto Daylight” to “OFF” on the
Clock Adjustment screen in Setup. Manually adjust the clock by one
hour as needed. See page 99 for more information.
My battery was disconnected, or went dead, and the
navigation system is asking for a code. Where do I find this
code? There should have been a card in the
glove box with the anti-theft code for
the navigation/audio system. This card contains the 4-digit security code
and serial number. If you cannot find it, your de aler can help you out.
I speak a language other than English. When will other
languages be available fo r the navigation system? This is being considered
as a future enhancement.
Problem Solution