ad blue Acura MDX 2007 Navigation Manual
[x] Cancel search | Manufacturer: ACURA, Model Year: 2007, Model line: MDX, Model: Acura MDX 2007Pages: 166, PDF Size: 4.21 MB
Page 8 of 166
Navigation System7
Introduction
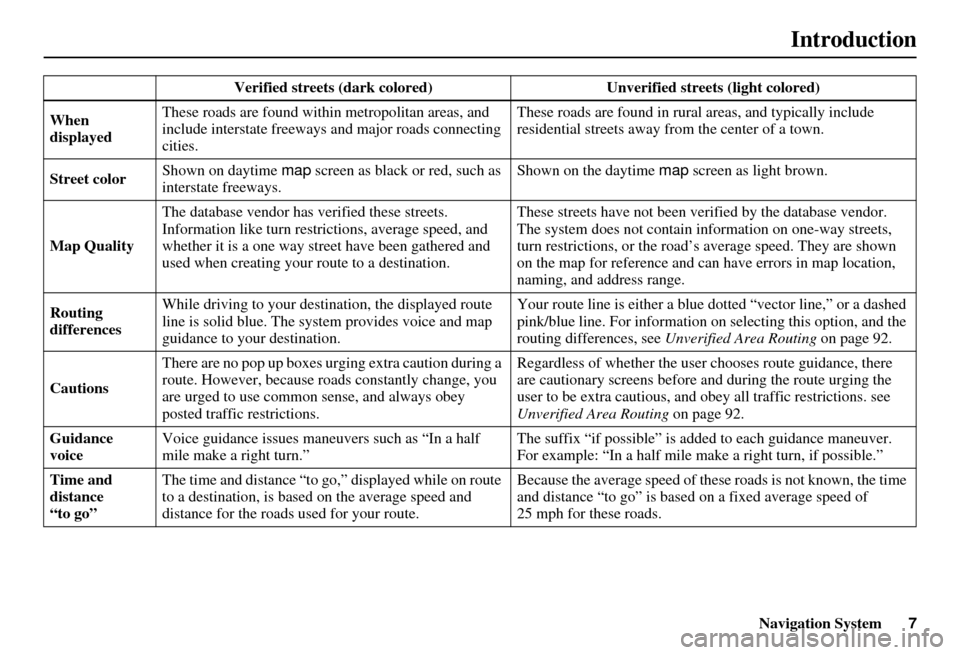
Verified streets (dark colored) Unverified streets (light colored)
When
displayed These roads are found within metropolitan areas, and
include interstate freeways
and major roads connecting
cities. These roads are found in rural
areas, and typically include
residential streets away fr om the center of a town.
Street color Shown on daytime
map screen as black or red, such as
interstate freeways. Shown on the daytime
map screen as light brown.
Map Quality The database vendor has
verified these streets.
Information like turn restri ctions, average speed, and
whether it is a one way street have been gathered and
used when creating your route to a destination. These streets have not
been verified by the database vendor.
The system does not contain in formation on one-way streets,
turn restrictions, or the road’s average speed. They are shown
on the map for reference and can have errors in map location,
naming, and address range.
Routing
differences While driving to your destin
ation, the displayed route
line is solid blue. The syst em provides voice and map
guidance to your destination. Your route line is either a blue
dotted “vector line,” or a dashed
pink/blue line. For information on selecting this option, and the
routing differences, see Unverified Area Routing on page 92.
Cautions There are no pop up boxes urging extra caution during a
route. However, because ro
ads constantly change, you
are urged to use common sense, and always obey
posted traffic restrictions. Regardless of whether the user
chooses route guidance, there
are cautionary screens before and during the route urging the
user to be extra cautious, and obey all traffic restrictions. see
Unverified Area Routing on page 92.
Guidance
voice Voice guidance issues maneuvers such as “In a half
mile make a right turn.” The suffix “if possible” is adde
d to each guidance maneuver.
For example: “In a half mile make a right turn, if possible.”
Time and
distance
“to go” The time and distance “to go,
” displayed while on route
to a destination, is based on the average speed and
distance for the roads used for your route. Because the average speed of thes
e roads is not known, the time
and distance “to go” is based on a fixed average speed of
25 mph for these roads.
Page 19 of 166
18Navigation System
Getting Started
If you press the CANCEL button, the
message will be displayed the next time
you start the vehicle.
NOTE:
The system will display the current
message and any older or previously
unread messages, with the newest
message listed first.HandsFreeLink™
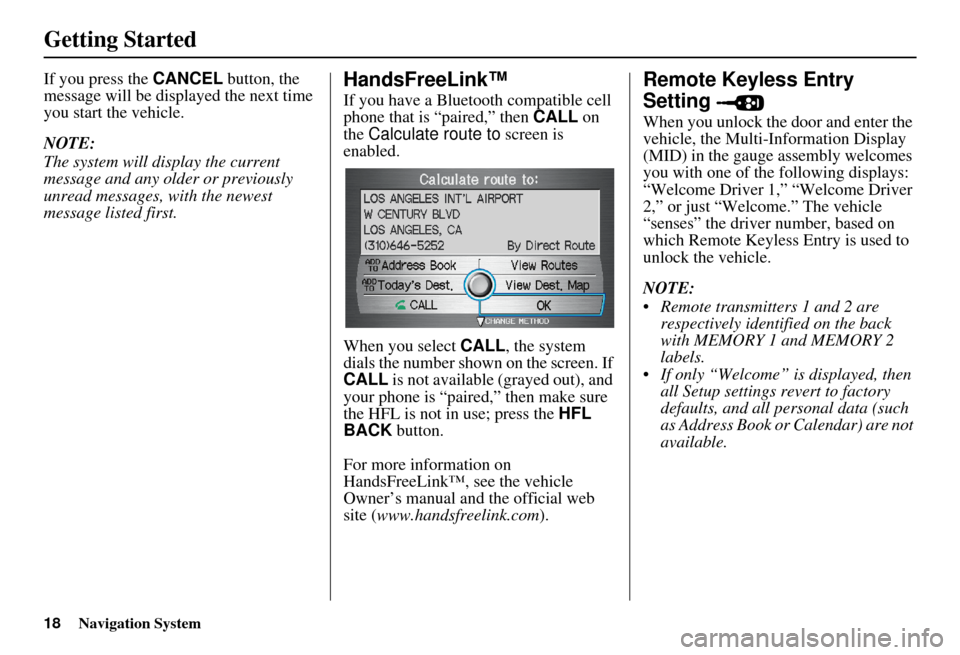
If you have a Bluetooth compatible cell
phone that is “paired,” then CALL on
the Calculate route to screen is
enabled.
When you select CALL, the system
dials the number shown on the screen. If
CALL is not available (grayed out), and
your phone is “paired,” then make sure
the HFL is not in use; press the HFL
BACK button.
For more information on
HandsFreeLink™, see the vehicle
Owner’s manual and the official web
site ( www.handsfreelink.com ).
Remote Keyless Entry
Setting
When you unlock the door and enter the
vehicle, the Multi-Information Display
(MID) in the gauge assembly welcomes
you with one of the following displays:
“Welcome Driver 1,” “Welcome Driver
2,” or just “Welcome.” The vehicle
“senses” the driver number, based on
which Remote Keyless Entry is used to
unlock the vehicle.
NOTE:
Remote transmitters 1 and 2 are respectively identified on the back
with MEMORY 1 and MEMORY 2
labels.
If only “Welcome” is displayed, then all Setup settings revert to factory
defaults, and all personal data (such
as Address Book or Calendar) are not
available.
Page 21 of 166
20Navigation System
Getting Started
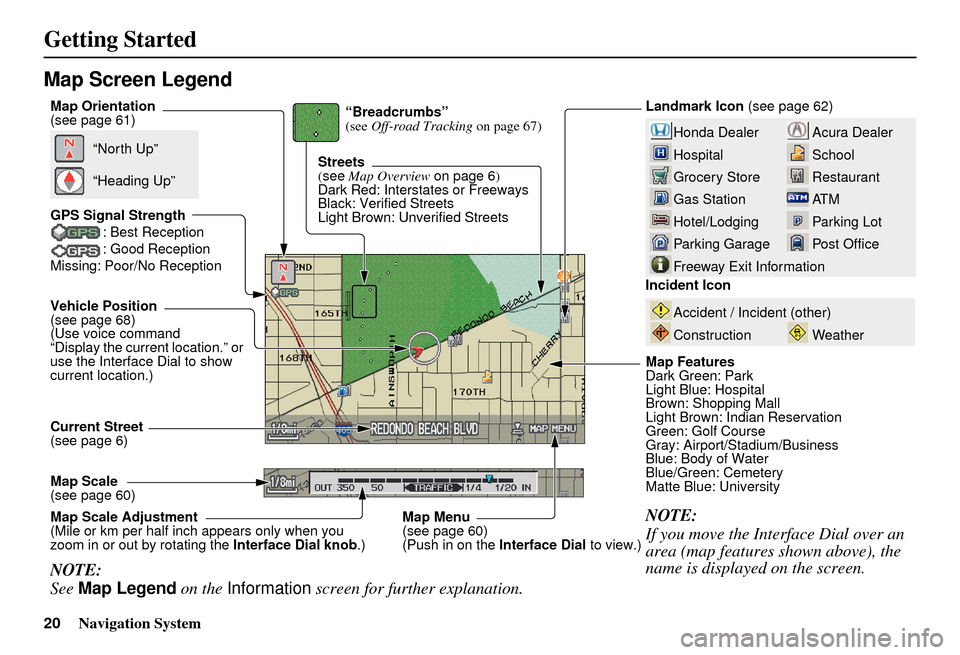
Map Screen Legend
Acura Dealer
School
Restaurant
AT M
Parking Lot
Post OfficeHonda Dealer
Hospital
Grocery Store
Gas Station
Hotel/Lodging
Parking Garage
Freeway Exit Information
Vehicle Position
(see page 68)
(Use voice command
“Display the current location.” or
use the Interface Dial to show
current location.)Landmark Icon
(see page 62)
Map Scale
(see page 60) Map Features
Dark Green: Park
Light Blue: Hospital
Brown: Shopping Mall
Light Brown: Indian Reservation
Green: Golf Course
Gray: Airport/Stadium/Business
Blue: Body of Water
Blue/Green: Cemetery
Matte Blue: University
NOTE:
If you move the Interface Dial over an
area (map features shown above), the
name is displayed on the screen.
Incident Icon
Weather
Accident / Incident (other)
Construction
Streets
(see
Map Overview on page 6)
Dark Red: Interstates or Freeways
Black: Verified Streets
Light Brown: Unverified Streets
Current Street
(see page 6)
NOTE:
See Map Legend on the Information screen for further explanation.
“Breadcrumbs”
(see Off-road Tracking on page 67)
GPS Signal Strength : Best Reception
: Good Reception
Missing: Poor/No Reception
“North Up”
“Heading Up”
Map Orientation
(see page 61)
Map Menu
(see page 60)
(Push in on the Interface Dial to view.)
Map Scale Adjustment
(Mile or km per half inch appears only when you
zoom in or out by rotating the
Interface Dial knob.)
Page 23 of 166
22Navigation System
Getting Started
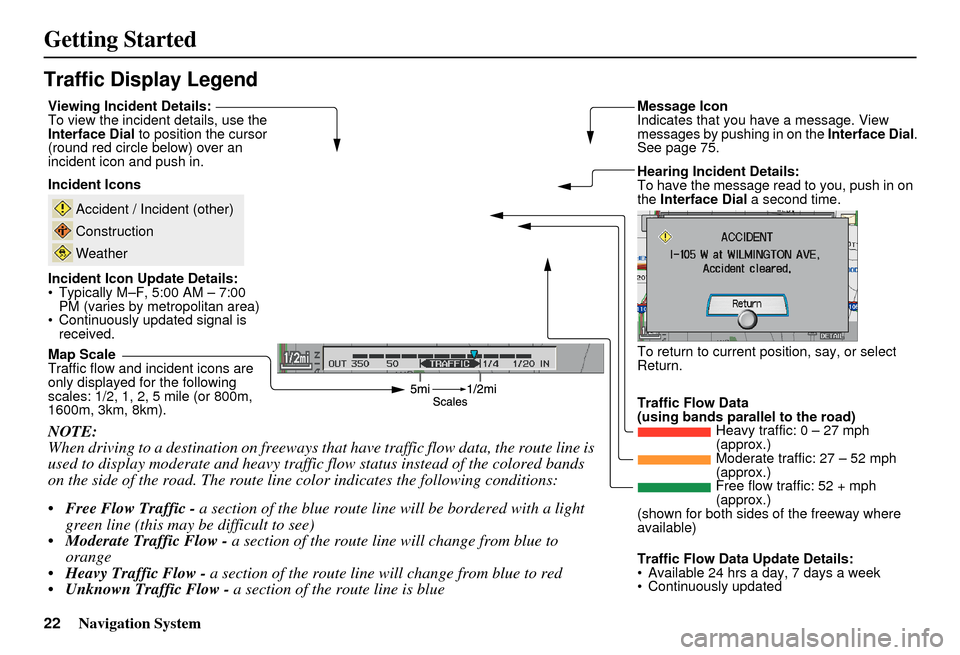
Traffic Display Legend
NOTE:
When driving to a destination on freeways that have traffic flow data, the route line is
used to display moderate and heavy traffic flow status instead of the colored bands
on the side of the road. The route line color indicates the following conditions:
Free Flow Traffic - a section of the blue route line will be bordered with a light
green line (this may be difficult to see)
Moderate Traffic Flow - a section of the route line will change from blue to
orange
Heavy Traffic Flow - a section of the route line will change from blue to red
Unknown Traffic Flow - a section of the route line is blue
Map Scale
Traffic flow and incident icons are
only displayed for the following
scales: 1/2, 1, 2, 5 mile (or 800m,
1600m, 3km, 8km). Incident Icons
Incident Icon Update Details:
Typically M–F, 5:00 AM – 7:00 PM (varies by metropolitan area)
Continuously updated signal is received.
Accident / Incident (other)
Construction
Weather
Traffic Flow Data
(using bands parallel to the road) Heavy traffic: 0 – 27 mph
(approx.)
Moderate traffic: 27 – 52 mph
(approx.)
Free flow traffic: 52 + mph
(approx.)
(shown for both sides of the freeway where
available)
Viewing Incident Details:
To view the incident
details, use the
Interface Dial to position the cursor
(round red circle below) over an
incident icon and push in. Hearing Incident Details:
To have the message read to you, push in on
the Interface Dial a second time.
To return to current position, say, or select
Return. Message Icon
Indicates that you have a message. View
messages by pushing in on the Interface Dial.
See page 75.
Traffic Flow Data Update Details:
Available 24 hrs a day, 7 days a week
Continuously updated
Page 24 of 166
Navigation System23
Getting Started
Real Time Traffic Display
The navigation screen can display up-
to-the-minute traffic information when
available including flow (traffic speed),
accidents, and construction on freeways
in more than 30 major metro areas. See
page 126 for a list of the current US
cities that offer traffic information.
The display of traffic flow and incidents
on your map screen is optional and can
be turned On/Off by selecting the
“Traffic” icon on the Icon bar (see
Showing Icons on the Map on page 65).The current metropolita
n areas that have
traffic coverage can be seen on
page 126. For more current metro
coverage inform ation, visit
www.acura.com/realtimetraffic. This
link offers additional information on
real-time information, including the
following:
The latest list of metro areas that have Nav-Traffic
Detailed coverage information for each metro area
An XM-Nav-Traffic demonstration
Frequently asked questions (FAQs)
Viewing Flow Data
Traffic flow data is displayed as colored
bands on either side of the freeway (see
Traffic Display Legend on page 22).
The different color bands represent the
average road speeds as determined by
“under-road sensors.”
While driving to your destination on a
road, that has traffic flow data, your
route line color is used to display the
traffic flow data. This means that when
the map scale is set to one of the traffic
scales (1/2 through 5 mile scale), your
blue route line may appear as alternating
orange, red or blue segments (see
Traffic Display Legend on page 22).
NOTE:
A blue route line segment on a freeway
can mean one of two things:
The under road sensors indicate free flow traffic.
The road has no sensors, and traffic conditions are unknown (they could
be congested).
Page 27 of 166
26Navigation System
Getting Started
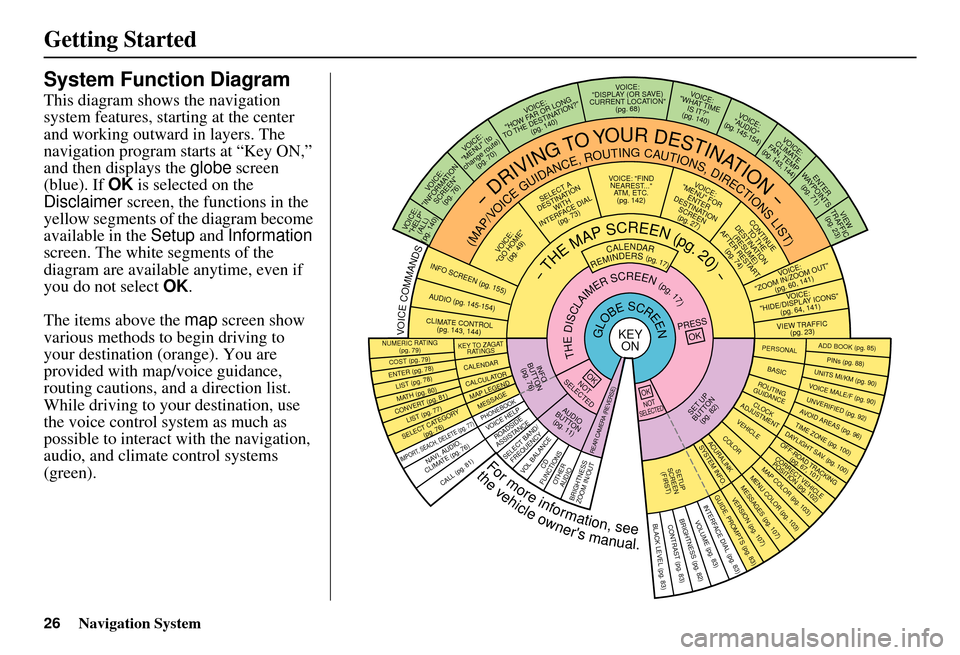
System Function Diagram
This diagram shows the navigation
system features, starting at the center
and working outward in layers. The
navigation program starts at “Key ON,”
and then displays the globe screen
(blue). If OK is selected on the
Disclaimer screen, the functions in the
yellow segments of the diagram become
available in the Setup and Information
screen. The white segments of the
diagram are available anytime, even if
you do not select OK.
The items above the map screen show
various methods to begin driving to
your destination (orange). You are
provided with map/voice guidance,
routing cautions, and a direction list.
While driving to your destination, use
the voice control system as much as
possible to interact with the navigation,
audio, and climat e control systems
(green).
REMINDERS(pg.17)CALENDAR
-THEMAPSCREEN(pg.20)-
(MAP/VOICEGUIDANCE,ROUTINGCAUTIONS,DIRECTIONSLIST)
-DRIVINGTOYOURDESTINATION-
VOI CE:
"HELP" (ALL)
(pg. 140)
VOICE:
"INFORMATION SCREEN"(pg. 76)
VOICE:
"MENU" (to
change route) (pg. 70)
VOICE:
"HOW FAR OR LONG
TO THE DESTINATION?" (pg. 140)
VOICE:
"DISPLAY (OR SAV E )
CURRENT LOCA TION"
(pg. 68)VOICE:
"WHAT TIME IS IT?"
(pg. 140)
VOICE:
"AUDIO"
(pg. 145-154)
VOI CE:
CLIMATE
FAN, TEMP
(pg. 143, 144)
ENTER
WAYPOINTS (pg. 71)
VIEW
TRAFFIC (pg. 23)
VOI CE:
"ZOOM IN/ZOOM OUT" (pg. 60, 141)
VOICE:
"HIDE/DISPLAY ICONS "
(pg. 64, 141)
VIEW TRAFFIC (pg. 23)
ADD BOOK (pg. 85)PINs (pg. 88)UNITS MI/KM (pg. 90)VOICE MALE/F (pg. 90)UNVERIFIED (pg. 92)AVO ID AREAS (pg. 96)TIME ZONE (pg. 100)DAYLIGHT SAV. (pg. 100)OFF-ROAD TRA CKING
(pg. 67, 10 1)CORRECT VEHICLE
POSITION (pg. 102)MAP COLOR (pg. 103)MENU COLOR (pg. 103)
GUIDE. PROMPTS (pg. 83)VERSION (pg. 107)MESSAGES (pg. 107)
BRIGHTNESS (pg. 82)VOLUME (pg. 83)INTERFACE DIAL (pg. 83)
CALL (pg. 81)
COST (pg. 79)
NUMERIC RAT I N G
(pg. 79)
ENTER (pg. 78)LIST (pg. 78 )MATH (pg. 80)CONVERT (pg. 81)LIST (pg. 77)
NAVI, AUDIO,
CLIMATE (pg. 7 6 )
SELECT CATEGORY (pg. 76)
IMPORT , SEACH, DELETE (pg. 77)
PRESS
OK
NOT
SELECTEDOK
NOTSELECTED
OK
ROADSIDE
ASSISTANCE
KEY T O ZAGAT
RATINGS
CALENDARCALCULA TORMAP LEGEND
PHONEBOOKMESSAGE
VOICE HELP
SELECT BAND/
FREQUENCYVOL BALANCECD
FUNCTIONSOTHER AUD IOBRIGHTNESS
ZOOM IN/OUT
SET UP
BUTTON (pg. 82)AUDIO
BUTTON (pg. 11)
INFO
BUTTON (pg. 76)
REAR CAMERA (REVERSE)
THEDISCLAIMERSCREEN(pg.17)
VOI CE: "FIND
NEARES T..."
AT M , ETC.
(pg. 142)
SELECT A
DESTINATION WITH
INTERFACE DIAL (pg. 73)
VOICE:
"GO HOME" (pg. 49)
VOICE:
"MENU" FOR ENTER
DESTINATION SCREEN(pg. 27)
CONTINUE TO THE
DESTINATION (RESUME)
AFTER RESTART (pg. 74)
GLOBESCREENKEYONPERSONAL
BASICROUTING
GUIDANCE
CLOCK
ADJUSTMENTVEHICLECOLORACU RALINKSYSTEM INFO .
SETUP
SCREEN (FIRS T)
VOICECOMMANDSINFO SCREEN (pg. 155)
AUDIO (pg. 145-154)
CLIMATE CONTR OL
(pg. 143, 144 )
Formoreinformation,see
thevehicleowner'smanual.
BLACK LEVEL (pg. 83)CONTRAST (pg. 83)
Page 53 of 166
52Navigation System
NOTE:
It may take several minutes (the system displays an hour glass while it
is calculating) to show all route
methods, and it is not unusual for the
different methods to pick the same
route. Voice commands cannot be
used while the system is calculating.
If the trip is greater than 100 miles, then “Minimize Toll Roads” and
“Minimize Freeways” may be grayed
out. This is normal.
Zoom IN/OUT to view route details or traffic conditions is not available
on this screen. After you choose a
“route method,” you can then zoom
in or out on the map screen to view
your route in detail. Say or select
SUMMARY to display the
distance and time to go for each route.
Based on the summary data, you can
change the routing method by rotating
the Interface Dial knob .
Once you confirm your selection, say
the number of the desired routing
method or push in on the Interface
Dial .
NOTE:
Distances and times show for each
method in the Summary are
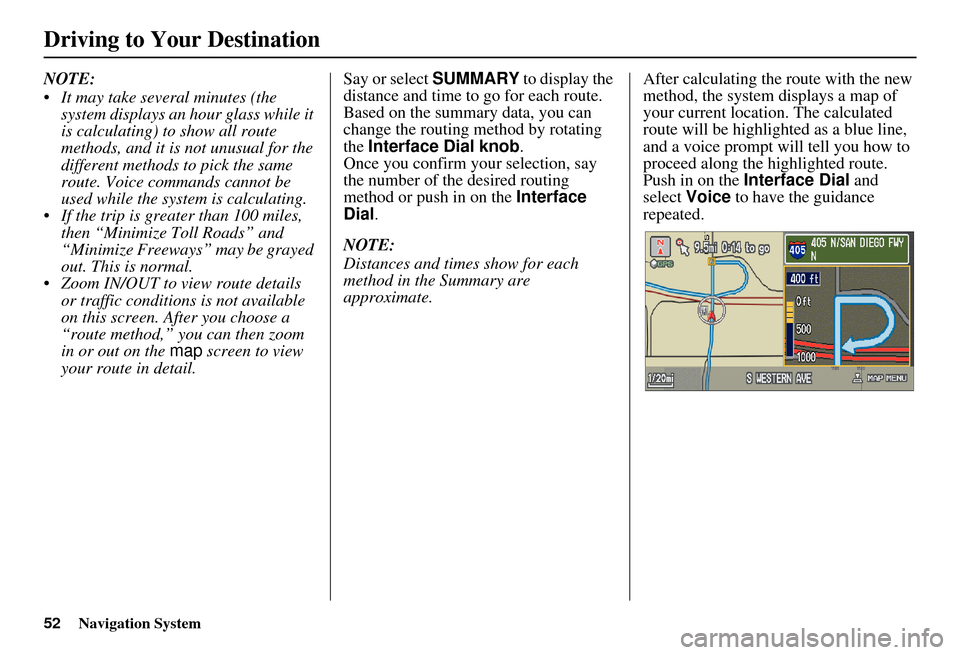
approximate. After calculating the route with the new
method, the system displays a map of
your current locatio
n. The calculated
route will be highlighted as a blue line,
and a voice prompt will tell you how to
proceed along the highlighted route.
Push in on the Interface Dial and
select Voice to have the guidance
repeated.
Driving to Your Destination
Page 54 of 166
Navigation System53
Driving to Your Destination
Viewing the Destination Map
Selecting View Dest. Map displays a
map of the destination vicinity. Press the
CANCEL or NAVI BACK button to
return. You can view the destination
map anytime while on route saying
“Display destination map.”
Map Screen
When you select OK on the Calculate
route to screen, the map screen
appears, showing your highlighted route
in real time.
Route Line
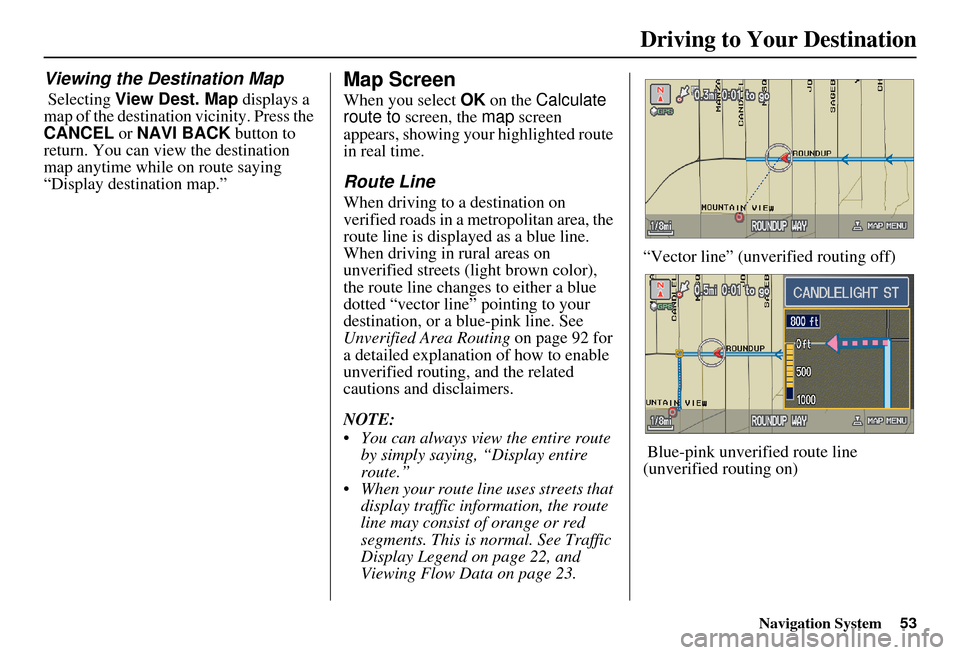
When driving to a destination on
verified roads in a metropolitan area, the
route line is displayed as a blue line.
When driving in rural areas on
unverified streets (light brown color),
the route line changes to either a blue
dotted “vector line” pointing to your
destination, or a blue-pink line. See
Unverified Area Routing on page 92 for
a detailed explanatio n of how to enable
unverified routing, and the related
cautions and disclaimers.
NOTE:
You can always view the entire route by simply saying, “Display entire
route.”
When your route line uses streets that display traffic information, the route
line may consist of orange or red
segments. This is normal. See Traffic
Display Legend on page 22, and
Viewing Flow Data on page 23. “Vector line” (unverified routing off)
Blue-pink unverified route line
(unverified routing on)
Page 55 of 166
54Navigation System
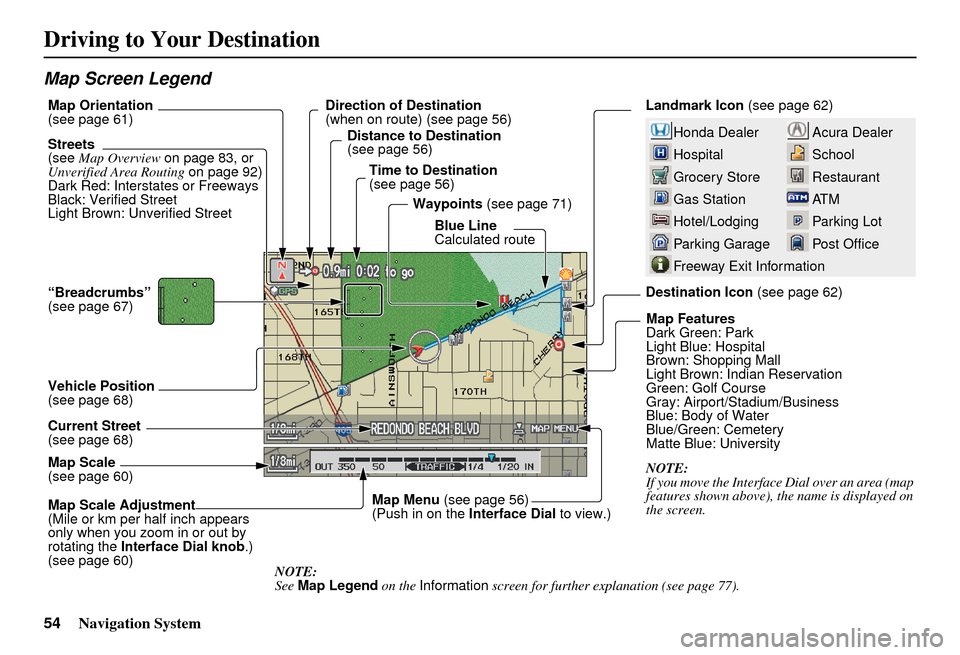
Map Screen Legend
Acura Dealer
School
Restaurant
AT M
Parking Lot
Post OfficeHonda Dealer
Hospital
Grocery Store
Gas Station
Hotel/Lodging
Parking Garage
Freeway Exit Information
Landmark Icon (see page 62)
Destination Icon (see page 62)
Map Features
Dark Green: Park
Light Blue: Hospital
Brown: Shopping Mall
Light Brown: Indian Reservation
Green: Golf Course
Gray: Airport/Stadium/Business
Blue: Body of Water
Blue/Green: Cemetery
Matte Blue: University
NOTE:
If you move the Interface Dial over an area (map
features shown above), the name is displayed on
the screen.
Map Scale Adjustment
(Mile or km per half inch appears
only when you zoom in or out by
rotating the
Interface Dial knob .)
(see page 60) NOTE:
See Map Legend on the Information screen for further explanation (see page 77).
Map Scale
(see page 60) Current Street
(see page 68) Vehicle Position
(see page 68) “Breadcrumbs”
(see page 67) Streets
(see
Map Overview on page 83, or
Unverified Area Routing on page 92)
Dark Red: Interstates or Freeways
Black: Verified Street
Light Brown: Unverified Street Direction of Destination
(when on route) (see page 56)
Map Orientation
(see page 61)
Distance to Destination
(see page 56)
Time to Destination
(see page 56) Waypoints (see page 71)
Blue Line
Calculated route
Map Menu (see page 56)
(Push in on the Interface Dial to view.)
Driving to Your Destination
Page 66 of 166
Navigation System65
Driving to Your Destination
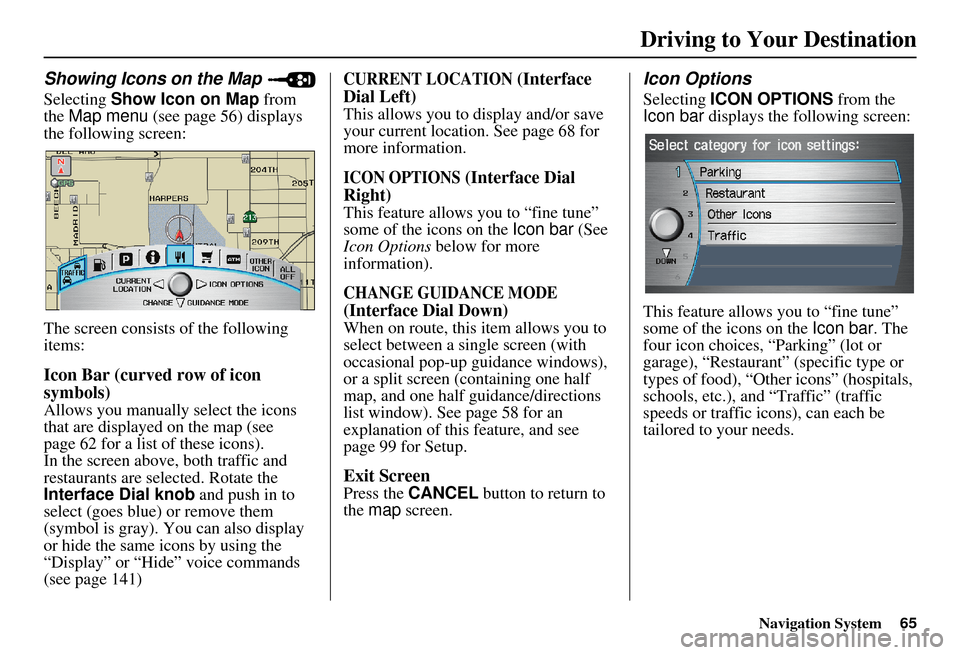
Showing Icons on the Map
Selecting Show Icon on Map from
the Map menu (see page 56) displays
the following screen:
The screen consists of the following
items:
Icon Bar (curved row of icon
symbols)
Allows you manually select the icons
that are displayed on the map (see
page 62 for a list of these icons).
In the screen above, both traffic and
restaurants are selected. Rotate the
Interface Dial knob and push in to
select (goes blue) or remove them
(symbol is gray). You can also display
or hide the same icons by using the
“Display” or “Hide” voice commands
(see page 141)
CURRENT LOCATION (Interface
Dial Left)
This allows you to display and/or save
your current location. See page 68 for
more information.
ICON OPTIONS (Interface Dial
Right)
This feature allows you to “fine tune”
some of the icons on the Icon bar (See
Icon Options below for more
information).
CHANGE GUIDANCE MODE
(Interface Dial Down)
When on route, this item allows you to
select between a single screen (with
occasional pop-up guidance windows),
or a split screen (containing one half
map, and one half guidance/directions
list window). See page 58 for an
explanation of this feature, and see
page 99 for Setup.
Exit Screen
Press the CANCEL button to return to
the map screen.
Icon Options
Selecting ICON OPTIONS from the
Icon bar displays the following screen:
This feature allows you to “fine tune”
some of the icons on the Icon bar. The
four icon choices, “Parking” (lot or
garage), “Restaurant” (specific type or
types of food), “Other icons” (hospitals,
schools, etc.), and “Traffic” (traffic
speeds or traffic icons), can each be
tailored to your needs.